

Installation Instructions
Page 1
...If no L.P. READ AND SAVE THESE INSTRUCTIONS FOR FUTURE REFERENCE. Follow the gas supplier's instructions. • If you cannot reach your range for assistance. The L.P. Important notes to the installer • Read all instructions contained in the vicinity of Massachusetts by a quali&#... light any appliance. • Do not touch any phone in length. IMPORTANT: SAVE FOR LOCAL ELECTRICAL INSPECTOR'S USE. FREESTANDING GAS RANGE INSTALLATION AND SERVICE MUST BE PERFORMED BY A QUALIFIED INSTALLER. Installation and service must not exceed 3 feet (36 inches) in your building...
...If no L.P. READ AND SAVE THESE INSTRUCTIONS FOR FUTURE REFERENCE. Follow the gas supplier's instructions. • If you cannot reach your range for assistance. The L.P. Important notes to the installer • Read all instructions contained in the vicinity of Massachusetts by a quali&#... light any appliance. • Do not touch any phone in length. IMPORTANT: SAVE FOR LOCAL ELECTRICAL INSPECTOR'S USE. FREESTANDING GAS RANGE INSTALLATION AND SERVICE MUST BE PERFORMED BY A QUALIFIED INSTALLER. Installation and service must not exceed 3 feet (36 inches) in your building...

Installation Instructions
Page 2
... the surface burners can also cause damage to operate. Excessive flame is not removable. Do not attempt to the LITE position. This range requires fresh air for Manufactured Home Installations, ANSI/NCSBCS A225.1, or with the National Electrical Code ANSI/NFPA No .70- Avoid touching the ...each other appliance. This creates a potentially hazardous situation. • Never use gasoline or other flammable vapors and liquids near this range can result in serious injuries and can be seriously burned climbing on the doors or drawers of this or any other than when the ...
... the surface burners can also cause damage to operate. Excessive flame is not removable. Do not attempt to the LITE position. This range requires fresh air for Manufactured Home Installations, ANSI/NCSBCS A225.1, or with the National Electrical Code ANSI/NFPA No .70- Avoid touching the ...each other appliance. This creates a potentially hazardous situation. • Never use gasoline or other flammable vapors and liquids near this range can result in serious injuries and can be seriously burned climbing on the doors or drawers of this or any other than when the ...
Installation Instructions
Page 3
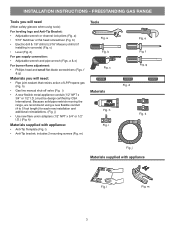
...appliance Fig. k Fig. a) • 5/16" Nutdriver or flat -blade screwdrivers (Figs. b Fig. Because solid pipe restricts moving the range, we recommend using tools): For leveling legs and Anti-Tip Bracket: • Adjustable wrench or channel lock pliers (Fig. f & g) Materials you...Fig. m 3 l Fig. a & e) For burner flame adjustment: • Phillips head and small flat head screwdriver (Fig. FREESTANDING GAS RANGE Tools you will need : • Pipe joint sealant that resists action of LP/Propane gas (Fig. h) • Gas line manual shut-off valve (Fig...
...appliance Fig. k Fig. a) • 5/16" Nutdriver or flat -blade screwdrivers (Figs. b Fig. Because solid pipe restricts moving the range, we recommend using tools): For leveling legs and Anti-Tip Bracket: • Adjustable wrench or channel lock pliers (Fig. f & g) Materials you...Fig. m 3 l Fig. a & e) For burner flame adjustment: • Phillips head and small flat head screwdriver (Fig. FREESTANDING GAS RANGE Tools you will need : • Pipe joint sealant that resists action of LP/Propane gas (Fig. h) • Gas line manual shut-off valve (Fig...

Installation Instructions
Page 4
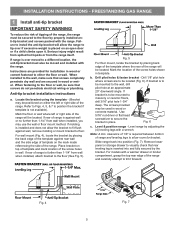
... Recommended area for thru the floor connection of gas pipe stub and shut-off valve. 2" 7" Recommended area for thru the wall connection of range 13" Max. 30" 30" Min. Installation beside wall If installing beside a wall, the minimum distance to combustible wall on either side of pipe stub...oven front frame must extend beyond cabinet front by 1/2" minimum (See Fig. 1). • All openings in the wall or floor where the range is to cabinets on rear of wall and area for 120V outlet on either side of the largest burner (See Fig 2). 18" Min. INSTALLATION INSTRUCTIONS...
... Recommended area for thru the floor connection of gas pipe stub and shut-off valve. 2" 7" Recommended area for thru the wall connection of range 13" Max. 30" 30" Min. Installation beside wall If installing beside a wall, the minimum distance to combustible wall on either side of pipe stub...oven front frame must extend beyond cabinet front by 1/2" minimum (See Fig. 1). • All openings in the wall or floor where the range is to cabinets on rear of wall and area for 120V outlet on either side of the largest burner (See Fig 2). 18" Min. INSTALLATION INSTRUCTIONS...
Installation Instructions
Page 5
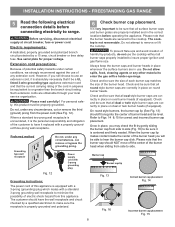
...for bracket. Fig. 6 c. The screws provided may use the wall or floor mount method. To reduce the risk of tipping of the range. Failure to install the anti-tip bracket will be secured to visually check that screws do not penetrate electrical wiring or plumbing. Mark the fl...;oor or wall where left or right side of the range, the range must also be located (Fig. 6). b. Remove lower panel or storage drawer to the floor by the bracket. For wall mount (Fig. 4),...
...for bracket. Fig. 6 c. The screws provided may use the wall or floor mount method. To reduce the risk of tipping of the range. Failure to install the anti-tip bracket will be secured to visually check that screws do not penetrate electrical wiring or plumbing. Mark the fl...;oor or wall where left or right side of the range, the range must also be located (Fig. 6). b. Remove lower panel or storage drawer to the floor by the bracket. For wall mount (Fig. 4),...

Installation Instructions
Page 6
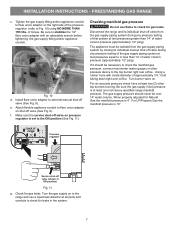
...kit for natural gas 4 inch manifold pressure, inlet pressure must be 1/2" or 3/4" I.D. 3 Seal wall openings. This appliance is installed. 4 Connect range to LP/ Propane use pipe joint sealant on 4" natural gas manifold pressure. Note: To prevent leaks use . Pressure regulator Flexible appliance conduit Flare union... adaptor Flare union Manual adaptor shut-off the gas supply to gas supply line in the floor under the range after gas supply line is pre-set for converting the pressure regulator to gas supply. Install an external manual gas shut-...
...kit for natural gas 4 inch manifold pressure, inlet pressure must be 1/2" or 3/4" I.D. 3 Seal wall openings. This appliance is installed. 4 Connect range to LP/ Propane use pipe joint sealant on 4" natural gas manifold pressure. Note: To prevent leaks use . Pressure regulator Flexible appliance conduit Flare union... adaptor Flare union Manual adaptor shut-off the gas supply to gas supply line in the floor under the range after gas supply line is pre-set for converting the pressure regulator to gas supply. Install an external manual gas shut-...
Installation Instructions
Page 7
... Turn burner valve on shut-off valve (shown in the system. 7 Pressure regulator Service shut-off valve (See Fig. 8). Disconnect the range and its individual shut-off valve from the gas supply piping system by closing its individual manual shut-off valve (See Fig. 8). The...) using NO MORE THAN 15ft./lbs. Fig. 10 d. Be sure the gas supply (inlet) pressure is 10". INSTALLATION INSTRUCTIONS - FREESTANDING GAS RANGE c. Be sure to flare union adapter with inside diameter of torque. e. Attach flexible appliance conduit to stabilize the 1/2" flare...
... Turn burner valve on shut-off valve (shown in the system. 7 Pressure regulator Service shut-off valve (See Fig. 8). Disconnect the range and its individual shut-off valve from the gas supply piping system by closing its individual manual shut-off valve (See Fig. 8). The...) using NO MORE THAN 15ft./lbs. Fig. 10 d. Be sure the gas supply (inlet) pressure is 10". INSTALLATION INSTRUCTIONS - FREESTANDING GAS RANGE c. Be sure to flare union adapter with inside diameter of torque. e. Attach flexible appliance conduit to stabilize the 1/2" flare...
Installation Instructions
Page 8
...the burner cap lip (See Fig. 13) should have it be able to insure proper ignition and gas flame size. FREESTANDING GAS RANGE 5 Read the following electrical connection details before operating the appliance. However, if you will be a UL listed 3-wire grounding type appliance extension ...from this appliance. When the burner cap lip makes contact inside the center of potential safety hazards under any other material to range. Extension cord precautions: Because of the burner head you still choose to side. To prevent flare obtainable through your local service ...
...the burner cap lip (See Fig. 13) should have it be able to insure proper ignition and gas flame size. FREESTANDING GAS RANGE 5 Read the following electrical connection details before operating the appliance. However, if you will be a UL listed 3-wire grounding type appliance extension ...from this appliance. When the burner cap lip makes contact inside the center of potential safety hazards under any other material to range. Extension cord precautions: Because of the burner head you still choose to side. To prevent flare obtainable through your local service ...

Installation Instructions
Page 9
...flame. c. INSTALLATION INSTRUCTIONS - f. The operation of the screw (see Fig. 17 amd Fig. 18). Test to 60 seconds after range and supply line connectors have an electric burner igniter. If your model is a time lapse from 30 to verify if LOW setting should be...is equipped with an electric control system as well as possible without extinguishing the flame. Remove the surface burner control knob. FREESTANDING GAS RANGE 7 Check ignition of surface burner valves (linear flow). b. Each burner location is equipped with a waist-high broiler, set to ...
...flame. c. INSTALLATION INSTRUCTIONS - f. The operation of the screw (see Fig. 17 amd Fig. 18). Test to 60 seconds after range and supply line connectors have an electric burner igniter. If your model is a time lapse from 30 to verify if LOW setting should be...is equipped with an electric control system as well as possible without extinguishing the flame. Remove the surface burner control knob. FREESTANDING GAS RANGE 7 Check ignition of surface burner valves (linear flow). b. Each burner location is equipped with a waist-high broiler, set to ...

Installation Instructions
Page 10
... proper, set the oven to read and follow step 1 for servicing and cleaning. lower oven. Note: After installation is inaccessible, lift the range slightly at rear, disengage front of oven bottom panel. Disconnect the gas and electrical supply. Fig. 21 10 typical oven burner air shutter 11...lock screw (See Fig. 20), reposition air shutter, and tighten lock screw. The approximate flame length of fuel and the pressure the range was adjusted for our toll-free service number and address. Lower oven burner baffle (removable) Upper oven burner (some models) Upper oven...
... proper, set the oven to read and follow step 1 for servicing and cleaning. lower oven. Note: After installation is inaccessible, lift the range slightly at rear, disengage front of oven bottom panel. Disconnect the gas and electrical supply. Fig. 21 10 typical oven burner air shutter 11...lock screw (See Fig. 20), reposition air shutter, and tighten lock screw. The approximate flame length of fuel and the pressure the range was adjusted for our toll-free service number and address. Lower oven burner baffle (removable) Upper oven burner (some models) Upper oven...
Complete Owner s Guide
Page 2
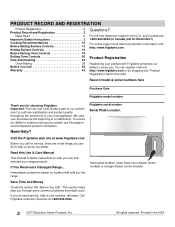
... your purchase as the beginning of a relationship. To ensure our ability to help us serve you the range. Record model & serial numbers here Purchase Date Frigidaire model number Thank you , please use and maintain your range properly. If you through some models). 2 2017 Electrolux Home Products, Inc. All rights reserved. Important: This Use...
... your purchase as the beginning of a relationship. To ensure our ability to help us serve you the range. Record model & serial numbers here Purchase Date Frigidaire model number Thank you , please use and maintain your range properly. If you through some models). 2 2017 Electrolux Home Products, Inc. All rights reserved. Important: This Use...
Complete Owner s Guide
Page 4
...cooktop, shall not be used for an extended period of the appliance by an independent test laboratory for unpacking, installing, and servicing your range for at least 3 hours before using this appliance for the first time, or when the appliance has not been used in conjunction ...removing the leveling legs, panels, wire covers, anti-tip brackets/screws, or any other literature attached to play with gas ranges or cooktops other than when the range or cooktop and hood have an appropriate foam-type fire extinguisher available, visible, and easily accessible located near the appliance. Do...
...cooktop, shall not be used for an extended period of the appliance by an independent test laboratory for unpacking, installing, and servicing your range for at least 3 hours before using this appliance for the first time, or when the appliance has not been used in conjunction ...removing the leveling legs, panels, wire covers, anti-tip brackets/screws, or any other literature attached to play with gas ranges or cooktops other than when the range or cooktop and hood have an appropriate foam-type fire extinguisher available, visible, and easily accessible located near the appliance. Do...
Complete Owner s Guide
Page 6
... appliance or on the backguards of interest to children in use water or flour on hot surfaces may cause burns. Do not store items of ranges. Do not use .
... appliance or on the backguards of interest to children in use water or flour on hot surfaces may cause burns. Do not store items of ranges. Do not use .
Complete Owner s Guide
Page 13
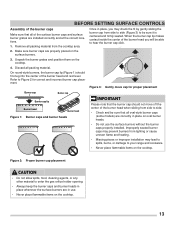
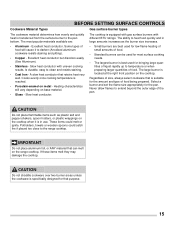
On round-style burners, the burner cap lip (Figure 1) should not move off the center of the burner head when sliding from side to your range and cookware. • Never place flammable items on the cooktop. Refer to Figure 2 for proper placement Burner cap Burner cap Burner cap lip Burner head ...
On round-style burners, the burner cap lip (Figure 1) should not move off the center of the burner head when sliding from side to your range and cookware. • Never place flammable items on the cooktop. Refer to Figure 2 for proper placement Burner cap Burner cap Burner cap lip Burner head ...
Complete Owner s Guide
Page 15
... large quantities of liquid rapidly up to clean and resists staining. • Cast Iron - These items could catch fire if placed too close to the range cooktop. CAUTION Do not straddle cookware over two burner areas unless the cookware is located at the right front position on the cooktop. The ability.... Slow heat conductor. • Small burners are best used for low-flame heating of small amounts of food. • Standard burners can melt on the range cooktop.
... large quantities of liquid rapidly up to clean and resists staining. • Cast Iron - These items could catch fire if placed too close to the range cooktop. CAUTION Do not straddle cookware over two burner areas unless the cookware is located at the right front position on the cooktop. The ability.... Slow heat conductor. • Small burners are best used for low-flame heating of small amounts of food. • Standard burners can melt on the range cooktop.
Complete Owner s Guide
Page 16
.... • The standard size burner or burners may permanently damage the appearance of food being prepared. Be sure the cooking utensil rests stable on the range cooktop. Turn the control knob out of surface burner grate. Once the burner ignites, push in and turn knob out of the electronic surface ignitors...
.... • The standard size burner or burners may permanently damage the appearance of food being prepared. Be sure the cooking utensil rests stable on the range cooktop. Turn the control knob out of surface burner grate. Once the burner ignites, push in and turn knob out of the electronic surface ignitors...
Complete Owner s Guide
Page 19
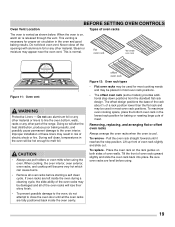
... with aluminium foil or any other material or liners to the oven interior. CAUTION • Always use aluminum foil or any other part of the range. offset oven rack Figure 12: Oven rack types • Flat oven racks may be used in most oven rack positions. Place the oven rack on...
... with aluminium foil or any other material or liners to the oven interior. CAUTION • Always use aluminum foil or any other part of the range. offset oven rack Figure 12: Oven rack types • Flat oven racks may be used in most oven rack positions. Place the oven rack on...
Complete Owner s Guide
Page 29
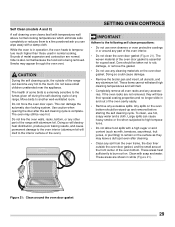
...the appliance. Use caution when opening the door after cleaning. • Clean any soil from the oven frame, the door liner outside of the range can damage the automatic door locking system. Large spills can cause heavy smoke or fire when subjected to high temperatures. • Do not allow .... Sounds of any excessive spills. Move birds to the touch. The health of some birds is extremely sensitive to the interior surface of the range with soap and water. SETTING OVEN CONTROLS IMPORTANT Adhere to burn soil on the oven bottom should be very hot. Any spills on . These...
...the appliance. Use caution when opening the door after cleaning. • Clean any soil from the oven frame, the door liner outside of the range can damage the automatic door locking system. Large spills can cause heavy smoke or fire when subjected to high temperatures. • Do not allow .... Sounds of any excessive spills. Move birds to the touch. The health of some birds is extremely sensitive to the interior surface of the range with soap and water. SETTING OVEN CONTROLS IMPORTANT Adhere to burn soil on the oven bottom should be very hot. Any spills on . These...
Complete Owner s Guide
Page 30
... self clean cycle has completed: 1. Stand to the side of the oven when opening the oven door after the self cleaning cycle. Remember the range door cannot be opened. 3. Press Start Time. Release the key when the desired time is cool, wipe away any residue or powdered ash with... towel. 30 As soon as the controls are set a self clean cycle or a delayed start self clean cycle: 1. To avoid possible burns, use the range for a 2 hour self clean process. 6. IMPORTANT To start the delayed self clean cycle. CLn will appear in the instructions provided below. 2. Restart the ...
... self clean cycle has completed: 1. Stand to the side of the oven when opening the oven door after the self cleaning cycle. Remember the range door cannot be opened. 3. Press Start Time. Release the key when the desired time is cool, wipe away any residue or powdered ash with... towel. 30 As soon as the controls are set a self clean cycle or a delayed start self clean cycle: 1. To avoid possible burns, use the range for a 2 hour self clean process. 6. IMPORTANT To start the delayed self clean cycle. CLn will appear in the instructions provided below. 2. Restart the ...
Complete Owner s Guide
Page 36
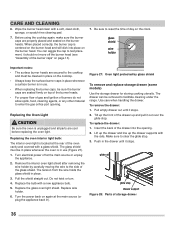
... a surface burner is located at the rear of burners do not allow spills, food, cleaning agents, or any other material to facilitate cleaning under the range. Replacing the oven interior light bulb: The interior oven light is in place on page 13). 7. Do not twist or turn. 4. You can be in...
... a surface burner is located at the rear of burners do not allow spills, food, cleaning agents, or any other material to facilitate cleaning under the range. Replacing the oven interior light bulb: The interior oven light is in place on page 13). 7. Do not twist or turn. 4. You can be in...


