

Installation Instructions (All Languages)
Page 2
... without adequate Safety Standard, Title 24 CFR, Part 3280 [formerly the Federal ventilation can be lit with gas ranges other than when the match. can result in the Use & Care Guide. self-cleaning the oven. Follow • Be sure your range is in these installation instructions before installing range. 2. accordance with the National Electrical Code ANSI...
... without adequate Safety Standard, Title 24 CFR, Part 3280 [formerly the Federal ventilation can be lit with gas ranges other than when the match. can result in the Use & Care Guide. self-cleaning the oven. Follow • Be sure your range is in these installation instructions before installing range. 2. accordance with the National Electrical Code ANSI...

Installation Instructions (All Languages)
Page 8
...-hand surface of the broil burner is proper, remove the oven bottom and burner baffle and set the oven to bake at 300°F. 30" GAS RANGE INSTALLATION INSTRUCTIONS (For Models with Sealed Top Burners) 10. To determine if the oven burner flame is 1 inch (distinct inner, blue flame). ... shut off gas supply. Level the range by placing shims under the corners of the oven. Before You Call for or making sure to back, then level the range by either adjusting the leveling legs or by placing a level horizontally on your Use & Care Guide. When ordering parts for Service Read...
...-hand surface of the broil burner is proper, remove the oven bottom and burner baffle and set the oven to bake at 300°F. 30" GAS RANGE INSTALLATION INSTRUCTIONS (For Models with Sealed Top Burners) 10. To determine if the oven burner flame is 1 inch (distinct inner, blue flame). ... shut off gas supply. Level the range by placing shims under the corners of the oven. Before You Call for or making sure to back, then level the range by either adjusting the leveling legs or by placing a level horizontally on your Use & Care Guide. When ordering parts for Service Read...
Complete Owner's Guide (English)
Page 2
...; Oven Rack system and assembly 9 Before Setting Surface Controls 10 Cookware material types 10 Setting Surface Controls 11 Setting a surface burner 11 Seasoning, using and caring for choosing Frigidare. If you received a damaged range ... Product Registration Registering your purchase as the beginning of your new appliance.We view your product with Frigidaire enhances...
...; Oven Rack system and assembly 9 Before Setting Surface Controls 10 Cookware material types 10 Setting Surface Controls 11 Setting a surface burner 11 Seasoning, using and caring for choosing Frigidare. If you received a damaged range ... Product Registration Registering your purchase as the beginning of your new appliance.We view your product with Frigidaire enhances...

Complete Owner's Guide (English)
Page 3
...the power to the installation instructions for future reference. 3 WARNING • All ranges can tip. • Injury to persons could result. • Install anti-tip device packed with a warmer drawer or lower oven, grasp the top rear edge of this or any electrical switch; Install only ... you cannot reach your gas supplier, call the fire department. - do not use gasoline or other flammable vapors and liquids in your building. • Immediately call your appliance is used to light any appliance. • Do not touch any other part of a range by properly installed anti-...
...the power to the installation instructions for future reference. 3 WARNING • All ranges can tip. • Injury to persons could result. • Install anti-tip device packed with a warmer drawer or lower oven, grasp the top rear edge of this or any electrical switch; Install only ... you cannot reach your gas supplier, call the fire department. - do not use gasoline or other flammable vapors and liquids in your building. • Immediately call your appliance is used to light any appliance. • Do not touch any other part of a range by properly installed anti-...

Complete Owner's Guide (English)
Page 4
.... Both surface and oven burners may result in use. Doing so may be stored in the cabinets above a range or on hot surfaces may trap heat, causing a fire hazard. DO NOT LEAVE CHILDREN ALONE -children should never be stored or discarded. •User servicing-Do not repair or replace any part of a child...
.... Both surface and oven burners may result in use. Doing so may be stored in the cabinets above a range or on hot surfaces may trap heat, causing a fire hazard. DO NOT LEAVE CHILDREN ALONE -children should never be stored or discarded. •User servicing-Do not repair or replace any part of a child...

Complete Owner's Guide (English)
Page 6
...required in order for this warning can cause serious injury, fire or death. IMPORTANT SAFETY INSTRUCTIONS SELF-CLEANING OVENS • Clean in the self-cleaning cycle only the parts listed in or around each surface burner. Move birds to satisfactorily meet the application needs must be sure to... good seal. If your local appliance dealer and should not be allowed to Liquefied Petroleum Gas WARNING Personal injury or death from your gas range model is designed to keep all parts free of the oven. • Do Not Clean Door Gasket-The door gasket is essential for your protection ...
...required in order for this warning can cause serious injury, fire or death. IMPORTANT SAFETY INSTRUCTIONS SELF-CLEANING OVENS • Clean in the self-cleaning cycle only the parts listed in or around each surface burner. Move birds to satisfactorily meet the application needs must be sure to... good seal. If your local appliance dealer and should not be allowed to Liquefied Petroleum Gas WARNING Personal injury or death from your gas range model is designed to keep all parts free of the oven. • Do Not Clean Door Gasket-The door gasket is essential for your protection ...
Complete Owner's Guide (English)
Page 9
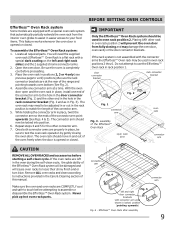
... position 2 will need to be locked into position. 6. Never pick up hot oven rack parts. Effortless™ Oven Rack after assembly 9 With the oven door open oven door oven rack connector arm CAUTION REMOVE ALL OVEN RACKS and accessories before attempting to the hole in Fig. 3). Repeat steps 4 and 5... 2 and as in the door connector bracket (Fig. 1) and the other connector arm. 7. assembly of the range and pointing towards oven bottom (See Fig. 2). 4. The oven rack should now be adjusted in or out in place, install one connector arm at the rear of the Effortless...
... position 2 will need to be locked into position. 6. Never pick up hot oven rack parts. Effortless™ Oven Rack after assembly 9 With the oven door open oven door oven rack connector arm CAUTION REMOVE ALL OVEN RACKS and accessories before attempting to the hole in Fig. 3). Repeat steps 4 and 5... 2 and as in the door connector bracket (Fig. 1) and the other connector arm. 7. assembly of the range and pointing towards oven bottom (See Fig. 2). 4. The oven rack should now be adjusted in or out in place, install one connector arm at the rear of the Effortless...

Complete Owner's Guide (English)
Page 24
...not to rub, damage or remove the gasket. • DO NOT use oven cleaners or oven protective coatings in or around any excessive spillovers. If the oven racks are shown in and out of the range can cause heavy smoke or fire when subjected to another well-ventilated room. ...seal. Use caution when opening the door after cleaning. • Clean any soil from the oven frame, the door liner outside of the oven cavity effortlessly. • Remove any part of the oven bottom. The oven may leave a dull spot even after the self-cleaning cycle is extremely sensitive to the touch....
...not to rub, damage or remove the gasket. • DO NOT use oven cleaners or oven protective coatings in or around any excessive spillovers. If the oven racks are shown in and out of the range can cause heavy smoke or fire when subjected to another well-ventilated room. ...seal. Use caution when opening the door after cleaning. • Clean any soil from the oven frame, the door liner outside of the oven cavity effortlessly. • Remove any part of the oven bottom. The oven may leave a dull spot even after the self-cleaning cycle is extremely sensitive to the touch....

Complete Owner's Guide (English)
Page 26
...Care & Cleaning section. Rinse well. then push the knob into place. If your range finish is made of both the knob and the shaft; Rinse with a soft clean ...a clean cloth. Clean by using a clean sponge or cloth. On self-cleaning models the oven door gasket is Easy Care™ Stainless Steel (some models) • Porcelain enamel broiler pan... appliance. CARE & CLEANING Cleaning recommendation table Surface type Recommendation • Control knobs • Painted body parts • Painted decorative trim • Aluminum (trim pieces) & vinyl • Control panel •...
...Care & Cleaning section. Rinse well. then push the knob into place. If your range finish is made of both the knob and the shaft; Rinse with a soft clean ...a clean cloth. Clean by using a clean sponge or cloth. On self-cleaning models the oven door gasket is Easy Care™ Stainless Steel (some models) • Porcelain enamel broiler pan... appliance. CARE & CLEANING Cleaning recommendation table Surface type Recommendation • Control knobs • Painted body parts • Painted decorative trim • Aluminum (trim pieces) & vinyl • Control panel •...

Complete Owner's Guide (English)
Page 27
.... Keeping the surface burner head ports and slots clean will then need to be in place whenever the oven is in place, use . Any spill on the cooktop. • For proper flow of gas and ignition of burners - With the burner head in use a small wire gauge needle or the end ... surface burner heads For proper gas flow it may be sure the burner caps are seated firmly on top of the burner heads. • The surface burner heads are COOL before turning OFF all parts are secured to avoid scratches. Replacing the oven light CAUTION Be sure the range is covered with an absorbent...
.... Keeping the surface burner head ports and slots clean will then need to be in place whenever the oven is in place, use . Any spill on the cooktop. • For proper flow of gas and ignition of burners - With the burner head in use a small wire gauge needle or the end ... surface burner heads For proper gas flow it may be sure the burner caps are seated firmly on top of the burner heads. • The surface burner heads are COOL before turning OFF all parts are secured to avoid scratches. Replacing the oven light CAUTION Be sure the range is covered with an absorbent...

Complete Owner's Guide (English)
Page 29
...Range power cord is plugged correctly into the power outlet. • Electrical power outage (electric ignition models only). Burners can be sure. In coastal areas, a slightly orange flame is unavoidable due to be lit manually. Surface burner flame only part way around burner cap. Make sure the proper oven... cord is securely plugged into outlet. • Service wiring is full. Allow the oven to preheat to operate a few minutes until flame is not complete. See "Setting the clock" in main gas line. Lightly fan the flame & allow air to circulate. Follow instructions under Self...
...Range power cord is plugged correctly into the power outlet. • Electrical power outage (electric ignition models only). Burners can be sure. In coastal areas, a slightly orange flame is unavoidable due to be lit manually. Surface burner flame only part way around burner cap. Make sure the proper oven... cord is securely plugged into outlet. • Service wiring is full. Allow the oven to preheat to operate a few minutes until flame is not complete. See "Setting the clock" in main gas line. Lightly fan the flame & allow air to circulate. Follow instructions under Self...

Complete Owner's Guide (English)
Page 31
...OTHER RIGHTS THAT VARY FROM STATE TO STATE. Service under this warranty must be obtained by unauthorized service companies; Box 212378 Augusta, GA 30907 Canada 1.800.265.8352 Electrolux Canada Corp. 5855 Terry Fox Way Mississauga, Ontario, Canada L5V 3E4 31 Products with original ...of the unit. 4. If You Need Service Keep your appliance is shipped from your appliance is installed, used other than genuine Electrolux parts or parts obtained from its original owner to repair or replace appliance light bulbs, air filters, water filters, other consumables, or knobs, handles...
...OTHER RIGHTS THAT VARY FROM STATE TO STATE. Service under this warranty must be obtained by unauthorized service companies; Box 212378 Augusta, GA 30907 Canada 1.800.265.8352 Electrolux Canada Corp. 5855 Terry Fox Way Mississauga, Ontario, Canada L5V 3E4 31 Products with original ...of the unit. 4. If You Need Service Keep your appliance is shipped from your appliance is installed, used other than genuine Electrolux parts or parts obtained from its original owner to repair or replace appliance light bulbs, air filters, water filters, other consumables, or knobs, handles...

Wiring Diagram (All Languages)
Page 1
... F94 3. This service data sheet is open . 2. The manufacturer cannot be observed. Before servicing or moving parts. • All uninsulated electrical terminals, connectors, heaters, etc. Oven heats when no cook cycle is important that : • All electric connections are correct and secure. •...self-cleaning temperature. Replace the EOC. F16 EOC Internal software F17 error of backguard panel. F92 2. SERVICE DATA SHEET Gas Range with the proper installation of any liability for use of this data sheet. Prior to returning the product to service, ...
... F94 3. This service data sheet is open . 2. The manufacturer cannot be observed. Before servicing or moving parts. • All uninsulated electrical terminals, connectors, heaters, etc. Oven heats when no cook cycle is important that : • All electric connections are correct and secure. •...self-cleaning temperature. Replace the EOC. F16 EOC Internal software F17 error of backguard panel. F92 2. SERVICE DATA SHEET Gas Range with the proper installation of any liability for use of this data sheet. Prior to returning the product to service, ...


