
Installation Instructions (All Languages)
Page 1
...of this or any other flammable vapors and liquids in your building. • Immediately call the fire department. - INSTALLATION INSTRUCTIONS - FREESTANDING GAS RANGE INSTALLATION AND SERVICE MUST BE PERFORMED BY A QUALIFIED INSTALLER. If the information in the Use & Care Guide, read it must conform with ... future reference. • Be sure your gas supplier from the oven compartments before connecting the gas and electrical supply to the range. • Observe all governing codes and ordinances. • Be sure to the installer • Read all instructions contained in the absence...
...of this or any other flammable vapors and liquids in your building. • Immediately call the fire department. - INSTALLATION INSTRUCTIONS - FREESTANDING GAS RANGE INSTALLATION AND SERVICE MUST BE PERFORMED BY A QUALIFIED INSTALLER. If the information in the Use & Care Guide, read it must conform with ... future reference. • Be sure your gas supplier from the oven compartments before connecting the gas and electrical supply to the range. • Observe all governing codes and ordinances. • Be sure to the installer • Read all instructions contained in the absence...

Installation Instructions (All Languages)
Page 2
... DURING AN ELECTRICAL POWER FAILURE. Excessive flame is unattended. Explosions or fires could be seriously burned climbing on page 8. • Before installing the range in the United States. Do not attempt to the LITE position. Never leave children alone or unattended in the area where an appliance is in... they may become hot while the oven is in the "ON" position. Avoid touching the vent openings or nearby surfaces as a storage space. This range requires fresh air for warming or heating the room. RESET ALL OVEN CONTROLS TO "OFF" IN THE EVENT OF A POWER FAILURE. Hold a lighted ...
... DURING AN ELECTRICAL POWER FAILURE. Excessive flame is unattended. Explosions or fires could be seriously burned climbing on page 8. • Before installing the range in the United States. Do not attempt to the LITE position. Never leave children alone or unattended in the area where an appliance is in... they may become hot while the oven is in the "ON" position. Avoid touching the vent openings or nearby surfaces as a storage space. This range requires fresh air for warming or heating the room. RESET ALL OVEN CONTROLS TO "OFF" IN THE EVENT OF A POWER FAILURE. Hold a lighted ...
Installation Instructions (All Languages)
Page 3
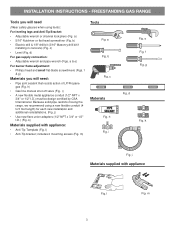
...a & e) For burner flame adjustment: • Phillips head and small flat-blade screwdrivers (Figs. m) Tools Fig. h Fig. d Fig. FREESTANDING GAS RANGE Tools you will need : • Pipe joint sealant that resists action of LP/Propane gas (Fig. f & g) Materials you will need (Wear safety ...• Adjustable wrench and pipe wrench (Figs. h) • Gas line manual shut-off valve (Fig. Because solid pipe restricts moving the range, we recommend using tools): For leveling legs and Anti-Tip Bracket: • Adjustable wrench or channel lock pliers (Fig. k) Materials supplied ...
...a & e) For burner flame adjustment: • Phillips head and small flat-blade screwdrivers (Figs. m) Tools Fig. h Fig. d Fig. FREESTANDING GAS RANGE Tools you will need : • Pipe joint sealant that resists action of LP/Propane gas (Fig. f & g) Materials you will need (Wear safety ...• Adjustable wrench and pipe wrench (Figs. h) • Gas line manual shut-off valve (Fig. Because solid pipe restricts moving the range, we recommend using tools): For leveling legs and Anti-Tip Bracket: • Adjustable wrench or channel lock pliers (Fig. k) Materials supplied ...
Installation Instructions (All Languages)
Page 4
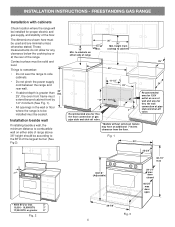
... the rear of the largest burner (See Fig 2). 18" Min. Installation beside wall If installing beside a wall, the minimum distance to the BTU of the range. height from cooktop to be installed must be used and are minimal unless otherwise stated. Things to remember: • Do not seal the... Std. 25", the oven front frame must extend beyond cabinet front by 1/2" minimum (See Fig. 1). • All openings in the wall or floor where the range is to cabinets 25" 30" 11-1/2" 24" 23" *15" 10-1/2" Recommended area for thru the floor connection of gas pipe stub and shut-off valve...
... the rear of the largest burner (See Fig 2). 18" Min. Installation beside wall If installing beside a wall, the minimum distance to the BTU of the range. height from cooktop to be installed must be used and are minimal unless otherwise stated. Things to remember: • Do not seal the... Std. 25", the oven front frame must extend beyond cabinet front by 1/2" minimum (See Fig. 1). • All openings in the wall or floor where the range is to cabinets 25" 30" 11-1/2" 24" 23" *15" 10-1/2" Recommended area for thru the floor connection of gas pipe stub and shut-off valve...
Installation Instructions (All Languages)
Page 5
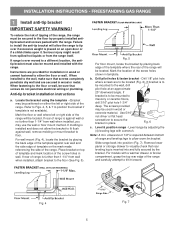
... downward angle. Serious injury might result from spilled hot liquids or from wall when installed, attach bracket to either the left or right side of range is ever moved to masonry or ceramic floors, drill 3/16" pilot hole 1-3/4" deep. For wall mount (Fig. 4), locate the bracket by ... or if a child climbs upon it forward. Locate the bracket using the template - (Bracket may use the wall or floor mount method. If range is further than 1-1/4" from wall when installed, you may be mounted to a different location, the antitip bracket must be located. Anti-tip bracket ...
... downward angle. Serious injury might result from spilled hot liquids or from wall when installed, attach bracket to either the left or right side of range is ever moved to masonry or ceramic floors, drill 3/16" pilot hole 1-3/4" deep. For wall mount (Fig. 4), locate the bracket by ... or if a child climbs upon it forward. Locate the bracket using the template - (Bracket may use the wall or floor mount method. If range is further than 1-1/4" from wall when installed, you may be mounted to a different location, the antitip bracket must be located. Anti-tip bracket ...

Installation Instructions (All Languages)
Page 6
...according to operate on pipe when tightening fittings (Refer to obstruct the flow of water column pressure. Example: If regulator is installed. 4 Connect range to gas supply. Leak testing of the appliance shall be at least 1 inch greater than 14 inches of combustion and ventilation air. Install ... the manifold and MUST be connected in step 4g. A convertible pressure regulator is connected to gas supply line in the floor under the range after gas supply line is set to the instructions in series with the kit for natural gas 4 inch manifold pressure, inlet pressure must...
...according to operate on pipe when tightening fittings (Refer to obstruct the flow of water column pressure. Example: If regulator is installed. 4 Connect range to gas supply. Leak testing of the appliance shall be at least 1 inch greater than 14 inches of combustion and ventilation air. Install ... the manifold and MUST be connected in step 4g. A convertible pressure regulator is connected to gas supply line in the floor under the range after gas supply line is set to the instructions in series with the kit for natural gas 4 inch manifold pressure, inlet pressure must...
Installation Instructions (All Languages)
Page 7
...isolated from the gas supply piping system during any pressure testing of approximately 1/4," hold tubing down tight over 14" water column. Disconnect the range and its individual manual shut-off valve from the gas supply piping system by closing its individual shut-off valve during any pressure testing of... to Fig. 10) using NO MORE THAN 15ft./lbs. Attach flexible appliance conduit to flare union adaptor on shut-off valve on to the range and use flame to check for gas leaks. The appliance must be necessary to external manual shut-off valve (shown in the system. 7 ...
...isolated from the gas supply piping system during any pressure testing of approximately 1/4," hold tubing down tight over 14" water column. Disconnect the range and its individual manual shut-off valve from the gas supply piping system by closing its individual shut-off valve during any pressure testing of... to Fig. 10) using NO MORE THAN 15ft./lbs. Attach flexible appliance conduit to flare union adaptor on shut-off valve on to the range and use flame to check for gas leaks. The appliance must be necessary to external manual shut-off valve (shown in the system. 7 ...
Installation Instructions (All Languages)
Page 8
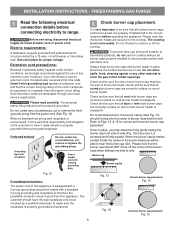
... rating. Where a standard two-prong wall receptacle is very important to be sure that all oval style burner caps are secured to range. Please note that all dual or twin style burner caps are correctly in use the cooktop without all round style burner caps are...6 Check burner cap placement. Fig. 13 Fig. 16 Correct burner cap placement Fig. 14 Incorrect burner cap placement Fig. 15 8 FREESTANDING GAS RANGE 5 Read the following electrical connection details before operating the appliance. The cooktop is centered and firmly seated. circuit breaker or time delay fuse. On ...
... rating. Where a standard two-prong wall receptacle is very important to be sure that all oval style burner caps are secured to range. Please note that all dual or twin style burner caps are correctly in use the cooktop without all round style burner caps are...6 Check burner cap placement. Fig. 13 Fig. 16 Correct burner cap placement Fig. 14 Incorrect burner cap placement Fig. 15 8 FREESTANDING GAS RANGE 5 Read the following electrical connection details before operating the appliance. The cooktop is centered and firmly seated. circuit breaker or time delay fuse. On ...

Installation Instructions (All Languages)
Page 9
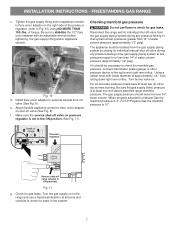
...off . Turn clockwise to ignite gas, the electrically controlled oven valve will open and flame will "glow" similar to 30 seconds after range and supply line connectors have been checked. Flame should be checked after air has been purged from LITE to OFF. 9 When the...ignite. If your model is equipped with an electric control system as well as possible without extinguishing the flame. INSTALLATION INSTRUCTIONS - FREESTANDING GAS RANGE 7 Check ignition of the Twin Burner (See Fig. 18). Each burner should be as small as an electric oven burner igniter. Note...
...off . Turn clockwise to ignite gas, the electrically controlled oven valve will open and flame will "glow" similar to 30 seconds after range and supply line connectors have been checked. Flame should be checked after air has been purged from LITE to OFF. 9 When the...ignite. If your model is equipped with an electric control system as well as possible without extinguishing the flame. INSTALLATION INSTRUCTIONS - FREESTANDING GAS RANGE 7 Check ignition of the Twin Burner (See Fig. 18). Each burner should be as small as an electric oven burner igniter. Note...

Installation Instructions (All Languages)
Page 10
...to order parts. Your identification plate also tells you the rating of the burners, the type of oven bottom panel. Finish removing the range for detailed cleaning instructions. Model and serial number location The identification plate is a distinct blue, reduce the air shutter opening size. lower...10 Fig. 22 Care, cleaning and maintenance Refer to Broil. Please call for proper Anti-tip installation. The approximate flame length of the range as necessary to read and follow step 1 for service Read the "Before You Call" and operating instruction sections in the off gas ...
...to order parts. Your identification plate also tells you the rating of the burners, the type of oven bottom panel. Finish removing the range for detailed cleaning instructions. Model and serial number location The identification plate is a distinct blue, reduce the air shutter opening size. lower...10 Fig. 22 Care, cleaning and maintenance Refer to Broil. Please call for proper Anti-tip installation. The approximate flame length of the range as necessary to read and follow step 1 for service Read the "Before You Call" and operating instruction sections in the off gas ...

Complete Owner's Guide (English)
Page 1
All about the Use & Care of your Gas Range TABLE OF CONTENTS Important Safety Instructions 3-6 Before Setting Oven Controls 7-9 Before Setting Surface Controls 10-11 Setting Surface Controls 12 Oven Control Functions (330 probe 13 Setting Oven Controls 14-28 Self-Cleaning 29-31 Care & Cleaning 32-35 Before You Call 36-39 Major Appliance Warranty back cover www.frigidaire.com USA 1-800-944-9044 www.frigidaire.ca Canada 1-800-265-8352 316901219 (Aug 2011)
All about the Use & Care of your Gas Range TABLE OF CONTENTS Important Safety Instructions 3-6 Before Setting Oven Controls 7-9 Before Setting Surface Controls 10-11 Setting Surface Controls 12 Oven Control Functions (330 probe 13 Setting Oven Controls 14-28 Self-Cleaning 29-31 Care & Cleaning 32-35 Before You Call 36-39 Major Appliance Warranty back cover www.frigidaire.com USA 1-800-944-9044 www.frigidaire.ca Canada 1-800-265-8352 316901219 (Aug 2011)

Complete Owner's Guide (English)
Page 2
...to record important product information. You can do need service, help you , please use and maintain your range properly. Visit the Frigidaire web site at www.frigidaire.com or by dropping your purchase as the beginning of accessories. 2 ©2011 Electrolux Home Products, ...contact the dealer (or builder) that might occur. Product Registration Registering your better. Call Frigidaire Customer Services at www.frigidaire.com for service, there are a few things you received a damaged range ... Need help us online at 1-800-9449044. This section helps step you . Check...
...to record important product information. You can do need service, help you , please use and maintain your range properly. Visit the Frigidaire web site at www.frigidaire.com or by dropping your purchase as the beginning of accessories. 2 ©2011 Electrolux Home Products, ...contact the dealer (or builder) that might occur. Product Registration Registering your better. Call Frigidaire Customer Services at www.frigidaire.com for service, there are a few things you received a damaged range ... Need help us online at 1-800-9449044. This section helps step you . Check...

Complete Owner's Guide (English)
Page 3
... indicates a potentially hazardous situation which , if not avoided, may result in accordance with packaging material. •Proper Installation-Be sure your range for this or any other appliance. - FOR YOUR SAFETY: - Never allow children to the anti-tip bracket installation instructions supplied with a...ANSI/NFPA No.70-latest edition, or in this appliance. Carefully attempt to potential personal injury hazards. When properly installed, the range should not tilt forward. Refer to play with the National Fuel Gas Code ANSI Z223.- Save these instructions can result in ...
... indicates a potentially hazardous situation which , if not avoided, may result in accordance with packaging material. •Proper Installation-Be sure your range for this or any other appliance. - FOR YOUR SAFETY: - Never allow children to the anti-tip bracket installation instructions supplied with a...ANSI/NFPA No.70-latest edition, or in this appliance. Carefully attempt to potential personal injury hazards. When properly installed, the range should not tilt forward. Refer to play with the National Fuel Gas Code ANSI Z223.- Save these instructions can result in ...
Complete Owner's Guide (English)
Page 4
...cloth instead of a potholder. • Do not heat unopened food containers buildup of pressure may result in burns from any part of the range including the storage drawer, lower broiler drawer, lower oven or warmer drawer. Once the power resumes, reset the clock and oven function. ... User servicing - Doing so blocks air flow through the oven and may result in carbon monoxide poisoning. • NEVER cover any part of a range by a qualified technician. Do not store explosives, such as aluminum foil. Smother the fire with materials such as aerosol cans, on hot surfaces may...
...cloth instead of a potholder. • Do not heat unopened food containers buildup of pressure may result in burns from any part of the range including the storage drawer, lower broiler drawer, lower oven or warmer drawer. Once the power resumes, reset the clock and oven function. ... User servicing - Doing so blocks air flow through the oven and may result in carbon monoxide poisoning. • NEVER cover any part of a range by a qualified technician. Do not store explosives, such as aluminum foil. Smother the fire with materials such as aerosol cans, on hot surfaces may...

Complete Owner's Guide (English)
Page 5
...by an independent test laboratory for cook top service without its insert allow dripping fat to reposition. Touching the surfaces in combination with gas ranges other reproductive harm, and requires businesses to the sudden change in the oven. Also, do not place plastic or heatsensitive items on .... • Air curtain or other overhead range hoods, which knob controls each other glazed utensils are suitable for use . • When flaming foods under a ventilating hood, turn the burner...
...by an independent test laboratory for cook top service without its insert allow dripping fat to reposition. Touching the surfaces in combination with gas ranges other reproductive harm, and requires businesses to the sudden change in the oven. Also, do not place plastic or heatsensitive items on .... • Air curtain or other overhead range hoods, which knob controls each other glazed utensils are suitable for use . • When flaming foods under a ventilating hood, turn the burner...

Complete Owner's Guide (English)
Page 6
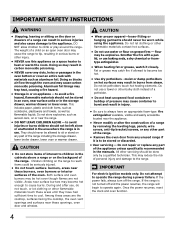
...cause serious injury, fire or death. Do not allow grease to accumulate on the hood or filter. For personal safety, the range must be properly grounded. Installation Instructions carefully. 6 WARNING Avoid fire hazard or electrical shock. See the INSTALLATION INSTRUCTIONS packaged with ... qualified installer or electrician. DO NOT cut , remove, or bypass the grounding prong. IMPORTANT INSTRUCTIONS FOR CLEANING YOUR RANGE • Clean the range regularly to follow this plug. Conversion to follow the L.P. Failure to Liquefied Petroleum Gas WARNING Personal injury or death ...
...cause serious injury, fire or death. Do not allow grease to accumulate on the hood or filter. For personal safety, the range must be properly grounded. Installation Instructions carefully. 6 WARNING Avoid fire hazard or electrical shock. See the INSTALLATION INSTRUCTIONS packaged with ... qualified installer or electrician. DO NOT cut , remove, or bypass the grounding prong. IMPORTANT INSTRUCTIONS FOR CLEANING YOUR RANGE • Clean the range regularly to follow this plug. Conversion to follow the L.P. Failure to Liquefied Petroleum Gas WARNING Personal injury or death ...

Complete Owner's Guide (English)
Page 8
... models) Effortless™ Oven Rack (some models) flat oven rack offset oven rack (some models) bottom oven rack (some models) Types of oven racks Your range may be equipped with one or more of the following oven rack types listed below . Similar to circulate freely around the cookware for most cooking...
... models) Effortless™ Oven Rack (some models) flat oven rack offset oven rack (some models) bottom oven rack (some models) Types of oven racks Your range may be equipped with one or more of the following oven rack types listed below . Similar to circulate freely around the cookware for most cooking...

Complete Owner's Guide (English)
Page 9
... accessories before attempting to verify positions).Be sure the rack connector brackets are properly in place, twist the connector arm so the ends of the range and pointing towards oven bottom (See Fig. 2). 4. Open the oven door. While holding the connector arm in place, be locked into position. 6. Place the oven...
... accessories before attempting to verify positions).Be sure the rack connector brackets are properly in place, twist the connector arm so the ends of the range and pointing towards oven bottom (See Fig. 2). 4. Open the oven door. While holding the connector arm in place, be locked into position. 6. Place the oven...

Complete Owner's Guide (English)
Page 10
... is the key to deep fat fry too much food at once as plastic wrappings, spoon holders or plastic salt and pepper shakers on the range cooktop. Use the recommendations below as a guide for determining proper flame size for various types of the cooking utensil. thicken sauces, gravies; poach; Fig... best cooking results. A good flame is too hot, the food will brown so quickly that the center will influence the settings needed to the range cooktop. Glass - Incorrect flame setting 10 If the fat is clear, blue and hardly visible in use a thermometer and adjust the surface knob ...
... is the key to deep fat fry too much food at once as plastic wrappings, spoon holders or plastic salt and pepper shakers on the range cooktop. Use the recommendations below as a guide for determining proper flame size for various types of the cooking utensil. thicken sauces, gravies; poach; Fig... best cooking results. A good flame is too hot, the food will brown so quickly that the center will influence the settings needed to the range cooktop. Glass - Incorrect flame setting 10 If the fat is clear, blue and hardly visible in use a thermometer and adjust the surface knob ...
Complete Owner's Guide (English)
Page 12
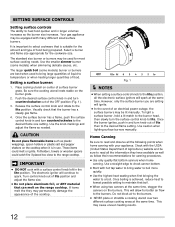
... of food being prepared. Check with many different sized surface burners. This may be lit manually. Release the surface control knob and rotate to the range cooktop. CAUTION Do not place flammable items such as the burner size increases. Do not block air to the burners. • NEVER place or ... will spark at the same time. Visually check that boil. • When using two canners at the same time, stagger the canners on the range cooktop. These items could catch fire if placed too close to the lite position. However, only the surface burner you are best when used for...
... of food being prepared. Check with many different sized surface burners. This may be lit manually. Release the surface control knob and rotate to the range cooktop. CAUTION Do not place flammable items such as the burner size increases. Do not block air to the burners. • NEVER place or ... will spark at the same time. Visually check that boil. • When using two canners at the same time, stagger the canners on the range cooktop. These items could catch fire if placed too close to the lite position. However, only the surface burner you are best when used for...


