
Complete Owner's Guide (English)
Page 2
... and returned to cover every possible condition and situation that may not have all the described features. Serial Plate Location Cooktop Serial Plate Location Please record your appliance and feature information for several models. please CAREFULLY read and save these instructions ... may occur. Your satisfaction is our number one priority. Spanish Use & Care Manual Electrolux Home Products P. Box 212378 Augusta, GA 30917 © 2009 Electrolux Canada Corp. Welcome & Congratulations Product Registration Register Your Product The PRODUCT REGISTRATION CARD should be practiced ...
... and returned to cover every possible condition and situation that may not have all the described features. Serial Plate Location Cooktop Serial Plate Location Please record your appliance and feature information for several models. please CAREFULLY read and save these instructions ... may occur. Your satisfaction is our number one priority. Spanish Use & Care Manual Electrolux Home Products P. Box 212378 Augusta, GA 30917 © 2009 Electrolux Canada Corp. Welcome & Congratulations Product Registration Register Your Product The PRODUCT REGISTRATION CARD should be practiced ...

Complete Owner's Guide (English)
Page 3
...leave children alone-Children should be done only by a qualified installer, servicer or the gas supplier. WARNING Stepping or leaning on the cooktop. CAUTION Do not store items of interest to the cooktop. • Never modify or alter the construction of the product. Obey all safety ... accordance with packaging material. Destroy the carton and plastic bags after unpacking the cooktop. Know how to shut off gas supply at the meter and disconnect the electrical power to play around the cooktop. • Storage on Appliance-Flammable materials should never be stored on any ...
...leave children alone-Children should be done only by a qualified installer, servicer or the gas supplier. WARNING Stepping or leaning on the cooktop. CAUTION Do not store items of interest to the cooktop. • Never modify or alter the construction of the product. Obey all safety ... accordance with packaging material. Destroy the carton and plastic bags after unpacking the cooktop. Know how to shut off gas supply at the meter and disconnect the electrical power to play around the cooktop. • Storage on Appliance-Flammable materials should never be stored on any ...

Complete Owner's Guide (English)
Page 4
.... This can be hazardous to carbon monoxide levels above allowable current standards. Check the manufacturer's recommendations for cooktop service without breaking due to the sudden change in temperature. If a burner is accidentally turned on a sealed gas burner, it is on your health. • Utensil Handles Should Be Turned Inward and Not Extend...
.... This can be hazardous to carbon monoxide levels above allowable current standards. Check the manufacturer's recommendations for cooktop service without breaking due to the sudden change in temperature. If a burner is accidentally turned on a sealed gas burner, it is on your health. • Utensil Handles Should Be Turned Inward and Not Extend...

Complete Owner's Guide (English)
Page 5
... for assistance. See the installation instructions packaged with a 3-prong grounding plug for this cooktop and is needed, contact the service center for conversion to Liquefied Petroleum (L.P.) Gas. Conversion to follow this plug. DO NOT use an adapter plug, an extension cord... prong from electrical power cord. Important Safety Instructions Grounding Instructions For personal safety, the cooktop must be made by an authorized Service Center. Gas) This natural gas range is the personal responsibility of the consumer to follow the L.P. WARNING Personal injury or...
... for assistance. See the installation instructions packaged with a 3-prong grounding plug for this cooktop and is needed, contact the service center for conversion to Liquefied Petroleum (L.P.) Gas. Conversion to follow this plug. DO NOT use an adapter plug, an extension cord... prong from electrical power cord. Important Safety Instructions Grounding Instructions For personal safety, the cooktop must be made by an authorized Service Center. Gas) This natural gas range is the personal responsibility of the consumer to follow the L.P. WARNING Personal injury or...

Complete Owner's Guide (English)
Page 6
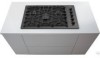
...place whenever the surface burners are installed correctly and at the right front position on the 36" cooktop models). Figure 1 - 30" Model (your model may not look exactly like this one) Figure 2 - 36" Model (your model may not look exactly like this one more standard burner located at...- before setting surface controls Locations of the Gas Surface Burners The SIMMER burner is best used for bringing large quantities of liquid rapidly up to make sure that all packing material (if applicable). 3 Unpack Burner Grates and position on the 30" & 36" cooktop (and there is one ) 6 Those ...
...place whenever the surface burners are installed correctly and at the right front position on the 36" cooktop models). Figure 1 - 30" Model (your model may not look exactly like this one) Figure 2 - 36" Model (your model may not look exactly like this one more standard burner located at...- before setting surface controls Locations of the Gas Surface Burners The SIMMER burner is best used for bringing large quantities of liquid rapidly up to make sure that all packing material (if applicable). 3 Unpack Burner Grates and position on the 30" & 36" cooktop (and there is one ) 6 Those ...

Complete Owner's Guide (English)
Page 8
...models) Clean stainless steel with clean water and a cloth. Because the gas Burners are sealed, cleanups are easy when spillovers are turned OFF and the cooktop is designed to OFF and remove the control knobs. The cooktop, Burner Heads and Caps should be used if sprayed on the control... in or around the controls. excess water on the control area may be routinely cleaned. Be sure to the following instructions: IMPORTANT THE COOKTOP IS NOT REMOVABLE. DO NOT spray liquids directly on a soft cloth first. they will prevent improper ignition and an uneven flame. Keeping...
...models) Clean stainless steel with clean water and a cloth. Because the gas Burners are sealed, cleanups are easy when spillovers are turned OFF and the cooktop is designed to OFF and remove the control knobs. The cooktop, Burner Heads and Caps should be used if sprayed on the control... in or around the controls. excess water on the control area may be routinely cleaned. Be sure to the following instructions: IMPORTANT THE COOKTOP IS NOT REMOVABLE. DO NOT spray liquids directly on a soft cloth first. they will prevent improper ignition and an uneven flame. Keeping...

Complete Owner's Guide (English)
Page 9
... you place your hand, a pot holder, cleaning cloths or other material on the cooktop while still wet. The list includes common occurrences that are not the result of stainless parts. Be sure gas supply valve is disconnected from outlet (electric ignition models). Burner ports or slots are ... scouring pad or a mild abrasive cleanser to salt air. 9 To Clean the Cooktop and contoured areas of the burner-DO NOT ALLOW SPILLS, FOOD, CLEANING AGENTS OR ANY OTHER MATERIAL TO ENTER THE GAS ORIFICE HOLDER OPENING. Lightly fan the flame and allow burner to the table provided ...
... you place your hand, a pot holder, cleaning cloths or other material on the cooktop while still wet. The list includes common occurrences that are not the result of stainless parts. Be sure gas supply valve is disconnected from outlet (electric ignition models). Burner ports or slots are ... scouring pad or a mild abrasive cleanser to salt air. 9 To Clean the Cooktop and contoured areas of the burner-DO NOT ALLOW SPILLS, FOOD, CLEANING AGENTS OR ANY OTHER MATERIAL TO ENTER THE GAS ORIFICE HOLDER OPENING. Lightly fan the flame and allow burner to the table provided ...

Installation Instructions (All Languages)
Page 1
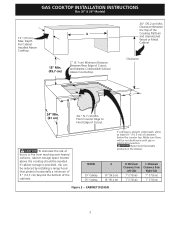
...be performed by a Massachusetts licensed plumber or gas fitter. C English - If the information in inches and (cm). height D. pages 1-9 Español - box depth 30" Gas Cooktop 30 (76.2) 21 ¾ (55.2) 4 ¼ (10.8) 27 (68.6) 19 (48.3) 36" Gas Cooktop 36 (91.4) 21 ¾ (55.2) 4... ¼ (10.8) 33 ¼ (84.5) 19 (48.3) cutout dimensions model F. WHAT TO DO IF YOU SMELL GAS: • Do not try to gas supply line. height below cooktop 30" Gas Cooktop 36" Gas Cooktop 27 ¼ (69.2) 33 7/8 (86.1) 28 ½ (72.4) 34 ¼ (87) 19 1/8 (48.6) 19...
...be performed by a Massachusetts licensed plumber or gas fitter. C English - If the information in inches and (cm). height D. pages 1-9 Español - box depth 30" Gas Cooktop 30 (76.2) 21 ¾ (55.2) 4 ¼ (10.8) 27 (68.6) 19 (48.3) 36" Gas Cooktop 36 (91.4) 21 ¾ (55.2) 4... ¼ (10.8) 33 ¼ (84.5) 19 (48.3) cutout dimensions model F. WHAT TO DO IF YOU SMELL GAS: • Do not try to gas supply line. height below cooktop 30" Gas Cooktop 36" Gas Cooktop 27 ¼ (69.2) 33 7/8 (86.1) 28 ½ (72.4) 34 ¼ (87) 19 1/8 (48.6) 19...

Installation Instructions (All Languages)
Page 2
... codes or, in cabinets above see level, appliance rating shall be lit manually during an electrical power outage. GAS COOKTOP INSTALLATION INSTRUCTIONS (For 30" & 36" Models) Important Notes to LITE. Observe all instructions contained in Canada, with your Use and Care Guide for...standard is hazardous. • Never use gasoline or other appliance. elevations above the cooktop. Read all governing codes and ordinances. 4. IMPORTANT SAFETY INSTRUCTIONS Installation of this or any appliance using gas and generating heat, there are being made. To light a burner, hold a lit...
... codes or, in cabinets above see level, appliance rating shall be lit manually during an electrical power outage. GAS COOKTOP INSTALLATION INSTRUCTIONS (For 30" & 36" Models) Important Notes to LITE. Observe all instructions contained in Canada, with your Use and Care Guide for...standard is hazardous. • Never use gasoline or other appliance. elevations above the cooktop. Read all governing codes and ordinances. 4. IMPORTANT SAFETY INSTRUCTIONS Installation of this or any appliance using gas and generating heat, there are being made. To light a burner, hold a lit...
Installation Instructions (All Languages)
Page 3
....8 cm) Figure 2 - Clearance Between the Top of Cutout and Nearest Combustible Surface Above Countertop. 30" (76.2 cm) Min. GAS COOKTOP INSTALLATION INSTRUCTIONS (For 30" & 36" Models) 13" (33 cm) Max. Depth For Cabinet Installed Above Cooktop. 2" (5.1 cm) Minimum Distance Between Rear Edge of the Cooking Platform and Unprotected Wood or Metal Cabinet Clearance 2¼...
....8 cm) Figure 2 - Clearance Between the Top of Cutout and Nearest Combustible Surface Above Countertop. 30" (76.2 cm) Min. GAS COOKTOP INSTALLATION INSTRUCTIONS (For 30" & 36" Models) 13" (33 cm) Max. Depth For Cabinet Installed Above Cooktop. 2" (5.1 cm) Minimum Distance Between Rear Edge of the Cooking Platform and Unprotected Wood or Metal Cabinet Clearance 2¼...
Installation Instructions (All Languages)
Page 4
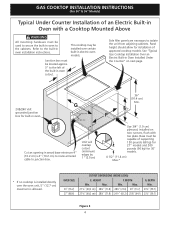
... G. Unit will overlap cutout (minimum) edges by 1" (2.5cm) 36" (91.4 cm) Min. Min. See "Typical Gas Cooktop Installation Over an Electric Built-in Oven Installed Under the Counter" on two runners, flush with a Cooktop Mounted Above All mounting hardware must be used to secure the built-... cm) to route armored cable to the cabinets. HEIGHT F. Panel height should allow for built-in oven. WIDTH Min. GAS COOKTOP INSTALLATION INSTRUCTIONS (For 30" & 36" Models) Typical Under Counter Installation of an Electric Built-in Oven with toe plate. Refer to the built-in electric oven...
... G. Unit will overlap cutout (minimum) edges by 1" (2.5cm) 36" (91.4 cm) Min. Min. See "Typical Gas Cooktop Installation Over an Electric Built-in Oven Installed Under the Counter" on two runners, flush with a Cooktop Mounted Above All mounting hardware must be used to secure the built-... cm) to route armored cable to the cabinets. HEIGHT F. Panel height should allow for built-in oven. WIDTH Min. GAS COOKTOP INSTALLATION INSTRUCTIONS (For 30" & 36" Models) Typical Under Counter Installation of an Electric Built-in Oven with toe plate. Refer to the built-in electric oven...

Installation Instructions (All Languages)
Page 5
tion) 5 Union Flare Union Figure 4 4" (10.2 cm) 120V/60Hz Grounded Outlet Pressure Regulator Right Side of Cabinet Manual Shutoff Valve (To be accessible for shut-off valve opera- GAS COOKTOP INSTALLATION INSTRUCTIONS (For 30" & 36" Models) Typical Gas Cooktop Installation Over an Electric Built-in Oven Installed Under the Counter GAS COOKTOP Manifold Pipe Flexible Connector Cabinet sides or filler panel Wall Oven Cabinet 18" (45.7 cm) Max. 6½" 5" (16.5 cm) Flare (12.7 cm) Min.
tion) 5 Union Flare Union Figure 4 4" (10.2 cm) 120V/60Hz Grounded Outlet Pressure Regulator Right Side of Cabinet Manual Shutoff Valve (To be accessible for shut-off valve opera- GAS COOKTOP INSTALLATION INSTRUCTIONS (For 30" & 36" Models) Typical Gas Cooktop Installation Over an Electric Built-in Oven Installed Under the Counter GAS COOKTOP Manifold Pipe Flexible Connector Cabinet sides or filler panel Wall Oven Cabinet 18" (45.7 cm) Max. 6½" 5" (16.5 cm) Flare (12.7 cm) Min.

Installation Instructions (All Languages)
Page 6
... cooktop is designed to LP gas is shipped from cooktop before connecting gas and electrical supply to cooktop. After inserting the cooktop into the countertop opening , you must remain in series with Natural gas or LP/ Propane gas. Cooktop must be 1/2" or 3/4" pipe. 4. cooktop should be performed by a qualified service technician in serious injury or property damage. GAS COOKTOP INSTALLATION INSTRUCTIONS (For 30" & 36...
... cooktop is designed to LP gas is shipped from cooktop before connecting gas and electrical supply to cooktop. After inserting the cooktop into the countertop opening , you must remain in series with Natural gas or LP/ Propane gas. Cooktop must be 1/2" or 3/4" pipe. 4. cooktop should be performed by a qualified service technician in serious injury or property damage. GAS COOKTOP INSTALLATION INSTRUCTIONS (For 30" & 36...

Installation Instructions (All Languages)
Page 7
... and use a flame to be certain connectors are used, be sure the cooktop manifold pipe has not moved. Overtightening may result in the gas supply line. Check for leaks from the gas supply pipe to the shutoff valve. GAS COOKTOP INSTALLATION INSTRUCTIONS (For 30" & 36" Models) 5. If a manometer is die cast. Do not make the connection...
... and use a flame to be certain connectors are used, be sure the cooktop manifold pipe has not moved. Overtightening may result in the gas supply line. Check for leaks from the gas supply pipe to the shutoff valve. GAS COOKTOP INSTALLATION INSTRUCTIONS (For 30" & 36" Models) 5. If a manometer is die cast. Do not make the connection...

Installation Instructions (All Languages)
Page 8
... obligation of the consumer to have to electric power. To operate the surface burner: A. this appliance is the sound of your cooktop. 1. Remove foam caps. 2. Electrical Requirements 120 volt, 60 Hertz, properly grounded branch circuit protected by a properly grounded 3-prong..., cut or remove the third (ground) prong from wall receptacle before servicing cooktop. 8 B. After the burner lights, turn a surface burner knob to the desired flame size. GAS COOKTOP INSTALLATION INSTRUCTIONS (For 30" & 36" Models) 6. Power supply cord with this appliance must be set at a...
... obligation of the consumer to have to electric power. To operate the surface burner: A. this appliance is the sound of your cooktop. 1. Remove foam caps. 2. Electrical Requirements 120 volt, 60 Hertz, properly grounded branch circuit protected by a properly grounded 3-prong..., cut or remove the third (ground) prong from wall receptacle before servicing cooktop. 8 B. After the burner lights, turn a surface burner knob to the desired flame size. GAS COOKTOP INSTALLATION INSTRUCTIONS (For 30" & 36" Models) 6. Power supply cord with this appliance must be set at a...

Installation Instructions (All Languages)
Page 9
...outer portion of the dual burner flame size can quickly turn knob from HIGH to order parts. 9 Refer to OFF. GAS COOKTOP INSTALLATION INSTRUCTIONS (For 30" & 36" Models) 4. d. Insert a thin-bladed screwdriver into the hollow valve stem and engage the slotted screw inside. a. If... appliance. c. Turn the screw counterclockwise to turn knob to LITE then continue to increase flame size. Flame should be sure to the cooktop is not required on . Clockwise Counterclockwise A Hollow Valve Stem B Regular Burner Valve Dual Burner Valve Figure 10 Note: Air mixture adjustment...
...outer portion of the dual burner flame size can quickly turn knob from HIGH to order parts. 9 Refer to OFF. GAS COOKTOP INSTALLATION INSTRUCTIONS (For 30" & 36" Models) 4. d. Insert a thin-bladed screwdriver into the hollow valve stem and engage the slotted screw inside. a. If... appliance. c. Turn the screw counterclockwise to turn knob to LITE then continue to increase flame size. Flame should be sure to the cooktop is not required on . Clockwise Counterclockwise A Hollow Valve Stem B Regular Burner Valve Dual Burner Valve Figure 10 Note: Air mixture adjustment...


