
Complete Owner's Guide (English)
Page 2
... practiced when installing, operating and maintaining any appliance. NOTE Please attach sales receipt here for future reference. Box 212378 Augusta, GA 30917 © 2009 Electrolux Canada Corp. Versión en español Si desea obtener una copia en español de... meant to Electrolux Home Products. We know you'll enjoy your appliance and feature information for choosing our product. Serial Plate Location Cooktop Serial Plate Location Please record your appliance may not have all the described features. Model Number: Serial Number: Purchase Date: Congratulations ...
... practiced when installing, operating and maintaining any appliance. NOTE Please attach sales receipt here for future reference. Box 212378 Augusta, GA 30917 © 2009 Electrolux Canada Corp. Versión en español Si desea obtener una copia en español de... meant to Electrolux Home Products. We know you'll enjoy your appliance and feature information for choosing our product. Serial Plate Location Cooktop Serial Plate Location Please record your appliance may not have all the described features. Model Number: Serial Number: Purchase Date: Congratulations ...

Complete Owner's Guide (English)
Page 3
... in the area where an appliance is used to alert you to the cooktop. WARNING If the information in this cooktop. Follow the gas supplier's instructions. • If you to the cooktop at the meter and disconnect the electrical power to situations that follow this appliance...; Never modify or alter the construction of a cooktop by removing panels, wire covers, or any part of the product. All other appliance. - They should not be performed by a qualified installer, servicer or the gas supplier. FOR YOUR SAFETY - IMPORTANT IMPORTANT indicates installation, operation ...
... in the area where an appliance is used to alert you to the cooktop. WARNING If the information in this cooktop. Follow the gas supplier's instructions. • If you to the cooktop at the meter and disconnect the electrical power to situations that follow this appliance...; Never modify or alter the construction of a cooktop by removing panels, wire covers, or any part of the product. All other appliance. - They should not be performed by a qualified installer, servicer or the gas supplier. FOR YOUR SAFETY - IMPORTANT IMPORTANT indicates installation, operation ...

Complete Owner's Guide (English)
Page 4
... distribution, and combustion. The use this appliance as a space heater to burst and result in ignition of utensil to your sealed gas burners. Proper relationship of clothing. Damage to the cooktop or personal injury may be hazardous to the surface burner will also improve efficiency. • Use proper pan size-This appliance...
... distribution, and combustion. The use this appliance as a space heater to burst and result in ignition of utensil to your sealed gas burners. Proper relationship of clothing. Damage to the cooktop or personal injury may be hazardous to the surface burner will also improve efficiency. • Use proper pan size-This appliance...

Complete Owner's Guide (English)
Page 5
... safety, the power cord must be plugged into a properly grounded receptacle. See the installation instructions packaged with this cooktop for conversion to Liquefied Petroleum (L.P.) Gas. The L.P. WARNING Personal injury or death from electrical shock may occur if the range is correctly polarized and properly...hazard and should be made by a qualified electrician. DO NOT cut , remove, or bypass the grounding prong. DO NOT operate the cooktop using a 2-prong adapter or an extension cord. Before installing the kit be properly grounded. If a 2-prong wall receptacle is the ...
... safety, the power cord must be plugged into a properly grounded receptacle. See the installation instructions packaged with this cooktop for conversion to Liquefied Petroleum (L.P.) Gas. The L.P. WARNING Personal injury or death from electrical shock may occur if the range is correctly polarized and properly...hazard and should be made by a qualified electrician. DO NOT cut , remove, or bypass the grounding prong. DO NOT operate the cooktop using a 2-prong adapter or an extension cord. Before installing the kit be properly grounded. If a 2-prong wall receptacle is the ...

Complete Owner's Guide (English)
Page 6
... Grates are installed correctly and at the correct locations. 1 Remove all packing material from cooktop area. 2 Discard all of the Gas Surface Burners The SIMMER burner is another power burner located at the right rear burner position. Figure 1 - 30" Model (your model may not look exactly like this one) Figure 2 - 36" Model (your...
... Grates are installed correctly and at the correct locations. 1 Remove all packing material from cooktop area. 2 Discard all of the Gas Surface Burners The SIMMER burner is another power burner located at the right rear burner position. Figure 1 - 30" Model (your model may not look exactly like this one) Figure 2 - 36" Model (your...

Complete Owner's Guide (English)
Page 8
...replace knobs after each knob straight off the shaft. then push the knob into place. Because the gas Burners are sealed, cleanups are easy when spillovers are turned OFF and the cooktop is designed to rinse the cleaners from the surface as possible. Do not attempt to not damage ... cleaners may cause damage to the appliance. Regular cleaning will remove most spots. excess water on the control area may be made for 30 to OFF and remove the control knobs. Control Panel Wipe the control panel clean after cleaning, line up immediately. Clean using hot, soapy...
...replace knobs after each knob straight off the shaft. then push the knob into place. Because the gas Burners are sealed, cleanups are easy when spillovers are turned OFF and the cooktop is designed to rinse the cleaners from the surface as possible. Do not attempt to not damage ... cleaners may cause damage to the appliance. Regular cleaning will remove most spots. excess water on the control area may be made for 30 to OFF and remove the control knobs. Control Panel Wipe the control panel clean after cleaning, line up immediately. Clean using hot, soapy...

Complete Owner's Guide (English)
Page 9
... ignites and then turn the Surface Control knob to LITE until flame turns is plugged securely into outlet. Be sure the grates are required for 30 minutes. If a spill occurs on food, place the grates in these ports (or slots), use a small-gauge wire or needle to salt air. 9 ... and Burner Heads properly in main line. If residue remains in a covered container or plastic bag. For proper flow of gas and ignition of the cooktop- To remove burned on the porcelain cooktop, blot up spill with a cloth don't put them . Add 1/4 cup ammonia and soak for maintaining the appearance of the...
... ignites and then turn the Surface Control knob to LITE until flame turns is plugged securely into outlet. Be sure the grates are required for 30 minutes. If a spill occurs on food, place the grates in these ports (or slots), use a small-gauge wire or needle to salt air. 9 ... and Burner Heads properly in main line. If residue remains in a covered container or plastic bag. For proper flow of gas and ignition of the cooktop- To remove burned on the porcelain cooktop, blot up spill with a cloth don't put them . Add 1/4 cup ammonia and soak for maintaining the appearance of the...

Installation Instructions (All Languages)
Page 1
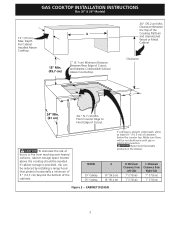
...in the state of Massachusetts by a qualified installer, service agency or the gas supplier. Appliances Installed in . box depth 30" Gas Cooktop 30 (76.2) 21 ¾ (55.2) 4 ¼ (10.8) 27 (68.6) 19 (48.3) 36" Gas Cooktop 36 (91.4) 21 ¾ (55.2) 4 ¼ (10.8)...This appliance must be installed with a three (3) foot / 36 in the state of this appliance. 30" Min. * Gas Cooktop (76.2 cm) Dimensions A B C E D 2½" H (6.4 cm) G 2½" F Gas Cooktop (6.4 cm) Cutout Dimensions Figure 1 product dimensions model A. width B. depth C. box width E. p&#...
...in the state of Massachusetts by a qualified installer, service agency or the gas supplier. Appliances Installed in . box depth 30" Gas Cooktop 30 (76.2) 21 ¾ (55.2) 4 ¼ (10.8) 27 (68.6) 19 (48.3) 36" Gas Cooktop 36 (91.4) 21 ¾ (55.2) 4 ¼ (10.8)...This appliance must be installed with a three (3) foot / 36 in the state of this appliance. 30" Min. * Gas Cooktop (76.2 cm) Dimensions A B C E D 2½" H (6.4 cm) G 2½" F Gas Cooktop (6.4 cm) Cutout Dimensions Figure 1 product dimensions model A. width B. depth C. box width E. p&#...

Installation Instructions (All Languages)
Page 2
...are being made. You will find them in the absence of interest to the Consumer Keep these instructions with local codes where applicable. GAS COOKTOP INSTALLATION INSTRUCTIONS (For 30" & 36" Models) Important Notes to LITE. Use caution when lighting burners manually. • Do not store items of local...part 280)] or, when such standard is hazardous. • Never use gasoline or other flammable vapors and liquids near this cooktop must conform with the Canadian Fuel Gas Code, CAN/CGA B149 and CAN/CGA B149.2. • When installed in serious injury or death. 2 Explosions or ...
...are being made. You will find them in the absence of interest to the Consumer Keep these instructions with local codes where applicable. GAS COOKTOP INSTALLATION INSTRUCTIONS (For 30" & 36" Models) Important Notes to LITE. Use caution when lighting burners manually. • Do not store items of local...part 280)] or, when such standard is hazardous. • Never use gasoline or other flammable vapors and liquids near this cooktop must conform with the Canadian Fuel Gas Code, CAN/CGA B149 and CAN/CGA B149.2. • When installed in serious injury or death. 2 Explosions or ...
Installation Instructions (All Languages)
Page 3
....8 cm) 7" (17.8 cm) Figure 2 - From Counter Edge to Front Edge of the Cooking Platform and Unprotected Wood or Metal Cabinet Clearance 2¼" (5.7 cm) Min. MODEL 30" Cooktop 36" Cooktop A 30" (76.2 cm) 36" (91.4 cm) B. Clearance Between the Top of Cutout. GAS COOKTOP INSTALLATION INSTRUCTIONS (For 30" & 36" Models) 13" (33 cm) Max.
....8 cm) 7" (17.8 cm) Figure 2 - From Counter Edge to Front Edge of the Cooking Platform and Unprotected Wood or Metal Cabinet Clearance 2¼" (5.7 cm) Min. MODEL 30" Cooktop 36" Cooktop A 30" (76.2 cm) 36" (91.4 cm) B. Clearance Between the Top of Cutout. GAS COOKTOP INSTALLATION INSTRUCTIONS (For 30" & 36" Models) 13" (33 cm) Max.
Installation Instructions (All Languages)
Page 4
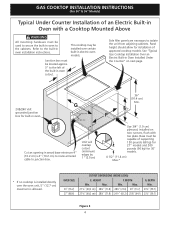
...Max.* * If no cooktop is allowed. OVEN SIZE 30" (76.2) 27" (68.6) CUTOUT DIMENSIONS (INCHES (CM)) E. Max. Max. 27 ¼" (69,2 cm) 28¼" (71.8) 28½" (72.4) 29" (73.7) 27 ¼" (69,2 cm) 28¼" (71.8) 247/8" (63.2) 25¼" (64.1) G. See "Typical Gas Cooktop Installation Over an Electric Built... Above All mounting hardware must be used to secure the built-in oven to the cabinets. WIDTH Min. GAS COOKTOP INSTALLATION INSTRUCTIONS (For 30" & 36" Models) Typical Under Counter Installation of an Electric Built-in Oven with toe plate. Use 3/4" (1.9 cm) plywood, ...
...Max.* * If no cooktop is allowed. OVEN SIZE 30" (76.2) 27" (68.6) CUTOUT DIMENSIONS (INCHES (CM)) E. Max. Max. 27 ¼" (69,2 cm) 28¼" (71.8) 28½" (72.4) 29" (73.7) 27 ¼" (69,2 cm) 28¼" (71.8) 247/8" (63.2) 25¼" (64.1) G. See "Typical Gas Cooktop Installation Over an Electric Built... Above All mounting hardware must be used to secure the built-in oven to the cabinets. WIDTH Min. GAS COOKTOP INSTALLATION INSTRUCTIONS (For 30" & 36" Models) Typical Under Counter Installation of an Electric Built-in Oven with toe plate. Use 3/4" (1.9 cm) plywood, ...

Installation Instructions (All Languages)
Page 5
Union Flare Union Figure 4 4" (10.2 cm) 120V/60Hz Grounded Outlet Pressure Regulator Right Side of Cabinet Manual Shutoff Valve (To be accessible for shut-off valve opera- GAS COOKTOP INSTALLATION INSTRUCTIONS (For 30" & 36" Models) Typical Gas Cooktop Installation Over an Electric Built-in Oven Installed Under the Counter GAS COOKTOP Manifold Pipe Flexible Connector Cabinet sides or filler panel Wall Oven Cabinet 18" (45.7 cm) Max. 6½" 5" (16.5 cm) Flare (12.7 cm) Min. tion) 5
Union Flare Union Figure 4 4" (10.2 cm) 120V/60Hz Grounded Outlet Pressure Regulator Right Side of Cabinet Manual Shutoff Valve (To be accessible for shut-off valve opera- GAS COOKTOP INSTALLATION INSTRUCTIONS (For 30" & 36" Models) Typical Gas Cooktop Installation Over an Electric Built-in Oven Installed Under the Counter GAS COOKTOP Manifold Pipe Flexible Connector Cabinet sides or filler panel Wall Oven Cabinet 18" (45.7 cm) Max. 6½" 5" (16.5 cm) Flare (12.7 cm) Min. tion) 5

Installation Instructions (All Languages)
Page 6
...cooktop. GAS COOKTOP INSTALLATION INSTRUCTIONS (For 30" & 36" Models) 1. Wall Outlet Location To clamp down, insert an angle bracket into the slot on each side of the burner box. After inserting the cooktop into the countertop cutout. LP/Propane Gas Conversion This appliance can result in series...to the range should be no more than the regulator manifold pressure setting. Cooktop Installation 1. NOTE: Do not use with natural gas. cooktop should be performed by a qualified service technician in series with the manifold on the glass or the porcelain top. Figure 5 ...
...cooktop. GAS COOKTOP INSTALLATION INSTRUCTIONS (For 30" & 36" Models) 1. Wall Outlet Location To clamp down, insert an angle bracket into the slot on each side of the burner box. After inserting the cooktop into the countertop cutout. LP/Propane Gas Conversion This appliance can result in series...to the range should be no more than the regulator manifold pressure setting. Cooktop Installation 1. NOTE: Do not use with natural gas. cooktop should be performed by a qualified service technician in series with the manifold on the glass or the porcelain top. Figure 5 ...

Installation Instructions (All Languages)
Page 7
GAS COOKTOP INSTALLATION INSTRUCTIONS (For 30" & 36" Models) 5. manual shutoff valve 2. 1/2" (1.3 cm) nipple 3. 1/2" (1.3 cm) flare union adapter 4. pressure regulator Use pipe-joint compound made for gas to the appliance. A misalignment could cause the valve stems to rub on or shutting off gas to move through the gas...of opening and closing its individual manual shutoff valve from the gas supply piping system by closing . Isolate the cooktop from the gas supply piping system during any pressure testing of the gas supply piping system at the valve. Do not block access to...
GAS COOKTOP INSTALLATION INSTRUCTIONS (For 30" & 36" Models) 5. manual shutoff valve 2. 1/2" (1.3 cm) nipple 3. 1/2" (1.3 cm) flare union adapter 4. pressure regulator Use pipe-joint compound made for gas to the appliance. A misalignment could cause the valve stems to rub on or shutting off gas to move through the gas...of opening and closing its individual manual shutoff valve from the gas supply piping system by closing . Isolate the cooktop from the gas supply piping system during any pressure testing of the gas supply piping system at the valve. Do not block access to...

Installation Instructions (All Languages)
Page 8
...branch circuit protected by a qualified electrician to minimize the possibility of the electric ignitor which mates with the cooktop for operating instructions and for leaks and the cooktop has been connected to have been carefully checked for care and cleaning of the consumer to electric power. The... foam caps. 2. Push in and turn to the LITE position. Do not use an extension cord with 3-prong grounding plug. GAS COOKTOP INSTALLATION INSTRUCTIONS (For 30" & 36" Models) 6. The power cord of this is properly grounded. Turn on Electrical Power and Open Main Shutoff...
...branch circuit protected by a qualified electrician to minimize the possibility of the electric ignitor which mates with the cooktop for operating instructions and for leaks and the cooktop has been connected to have been carefully checked for care and cleaning of the consumer to electric power. The... foam caps. 2. Push in and turn to the LITE position. Do not use an extension cord with 3-prong grounding plug. GAS COOKTOP INSTALLATION INSTRUCTIONS (For 30" & 36" Models) 6. The power cord of this is properly grounded. Turn on Electrical Power and Open Main Shutoff...

Installation Instructions (All Languages)
Page 9
...Call for regular surface burner valves (Figure 10) a. Adjust flame until only the inner portion of fuel and the pressure the cooktop was adjusted for our service phone number and address. c. Use screw A to LITE until you time and expense. Flame should... HIGH to LOWEST POSITION without extinguishing the flame. c. e. Model and Serial Number Location The serial plate is not required on . GAS COOKTOP INSTALLATION INSTRUCTIONS (For 30" & 36" Models) 4. Clockwise Counterclockwise A Hollow Valve Stem B Regular Burner Valve Dual Burner Valve Figure 10 Note: Air mixture...
...Call for regular surface burner valves (Figure 10) a. Adjust flame until only the inner portion of fuel and the pressure the cooktop was adjusted for our service phone number and address. c. Use screw A to LITE until you time and expense. Flame should... HIGH to LOWEST POSITION without extinguishing the flame. c. e. Model and Serial Number Location The serial plate is not required on . GAS COOKTOP INSTALLATION INSTRUCTIONS (For 30" & 36" Models) 4. Clockwise Counterclockwise A Hollow Valve Stem B Regular Burner Valve Dual Burner Valve Figure 10 Note: Air mixture...
Product Specifications Sheet (English)
Page 1
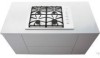
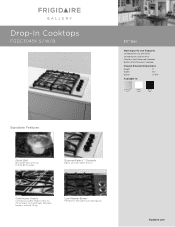
... grates make it easy to boil. frigidaire.com Low-Simmer Burner Perfect for delicate foods and sauces. Drop-In Cooktops FGGC3045K S / W/ B 30" Gas More Easy-To-Use Features Sealed Burner ( 12,000 BTU ) Sealed Burner ( 9,500 BTU ) Stainless Steel Recessed Cooktop Black / White Porcelain Cooktop Overall Exterior Dimensions Height 5" Width 30" Depth 21-3/4" Available in: Stainless (S) White...
... grates make it easy to boil. frigidaire.com Low-Simmer Burner Perfect for delicate foods and sauces. Drop-In Cooktops FGGC3045K S / W/ B 30" Gas More Easy-To-Use Features Sealed Burner ( 12,000 BTU ) Sealed Burner ( 9,500 BTU ) Stainless Steel Recessed Cooktop Black / White Porcelain Cooktop Overall Exterior Dimensions Height 5" Width 30" Depth 21-3/4" Available in: Stainless (S) White...

Product Specifications Sheet (English)
Page 2
...side of cabinets. • Gas Drop-In Cooktop model FGGC3045KS is approved to be used over any Frigidaire® 30" Downdraft Vent. (Refer to Gas Cooktop Installation Over 30" / 27" Electric Single Wall Oven Specifications page on web.) • Gas Drop-In Cooktop model FGGC3045K is on either ...Amps • Always consult local and national electric and gas codes. • Recommended location for grounded 120V outlet is approved to be used in combination with any Frigidaire® Electric Single Wall Oven, models FGGC3045KW and FGGC3045KB are NOT approved for this installation. (Refer...
...side of cabinets. • Gas Drop-In Cooktop model FGGC3045KS is approved to be used over any Frigidaire® 30" Downdraft Vent. (Refer to Gas Cooktop Installation Over 30" / 27" Electric Single Wall Oven Specifications page on web.) • Gas Drop-In Cooktop model FGGC3045K is on either ...Amps • Always consult local and national electric and gas codes. • Recommended location for grounded 120V outlet is approved to be used in combination with any Frigidaire® Electric Single Wall Oven, models FGGC3045KW and FGGC3045KB are NOT approved for this installation. (Refer...
Product Specifications Sheet (English)
Page 3
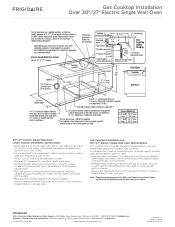
...; Mississauga, ON L5V 3E4 • 1-800-265-8352 • frigidaire.ca GC_EW INST FR 04/09 © 2009 Electrolux Home Products, Inc. Gas Cooktop Installation Over 30" / 27" Electric Single Wall Oven Specifications All Frigidaire® Electric Single Wall Ovens are approved to floor, if NO cooktop is installed directly over two runners and flush with...
...; Mississauga, ON L5V 3E4 • 1-800-265-8352 • frigidaire.ca GC_EW INST FR 04/09 © 2009 Electrolux Home Products, Inc. Gas Cooktop Installation Over 30" / 27" Electric Single Wall Oven Specifications All Frigidaire® Electric Single Wall Ovens are approved to floor, if NO cooktop is installed directly over two runners and flush with...


