
Complete Owner's Guide (English)
Page 2
...Use & Care Manual contains general operating instructions for your model and serial numbers below for future reference. Box 212378 Augusta, GA 30917 © 2009 Electrolux Canada Corp. Your product may not look exactly like those shown. Common sense and caution ... Registration Register Your Product The PRODUCT REGISTRATION CARD should be practiced when installing, operating and maintaining any appliance. NOTE Please attach sales receipt here for future reference. Serial Plate Location Cooktop Serial Plate Location Please record your appliance and feature information for several ...
...Use & Care Manual contains general operating instructions for your model and serial numbers below for future reference. Box 212378 Augusta, GA 30917 © 2009 Electrolux Canada Corp. Your product may not look exactly like those shown. Common sense and caution ... Registration Register Your Product The PRODUCT REGISTRATION CARD should be practiced when installing, operating and maintaining any appliance. NOTE Please attach sales receipt here for future reference. Serial Plate Location Cooktop Serial Plate Location Please record your appliance and feature information for several ...

Complete Owner's Guide (English)
Page 3
...personal injury hazards. Destroy the carton and plastic bags after unpacking the cooktop. Do not remove the model/serial plate attached to the cooktop. • Proper Installation-Be sure your gas supplier, call your dealer to recommend a qualified technician and an authorized... or replace any other part of a cooktop by a qualified installer, servicer or the gas supplier. WARNING If the information in this cooktop. This may result causing property damage, personal injury or death. IMPORTANT IMPORTANT indicates installation, operation or maintenance information which is used...
...personal injury hazards. Destroy the carton and plastic bags after unpacking the cooktop. Do not remove the model/serial plate attached to the cooktop. • Proper Installation-Be sure your gas supplier, call your dealer to recommend a qualified technician and an authorized... or replace any other part of a cooktop by a qualified installer, servicer or the gas supplier. WARNING If the information in this cooktop. This may result causing property damage, personal injury or death. IMPORTANT IMPORTANT indicates installation, operation or maintenance information which is used...

Complete Owner's Guide (English)
Page 5
... is the personal responsibility of the consumer to allow for this plug. Failure to Liquefied Petroleum (L.P.) Gas. Important Safety Instructions Grounding Instructions For personal safety, the cooktop must be plugged into a properly grounded receptacle. See the installation instructions packaged with this warning can cause serious injury, fire or death. 5 conversion is located in...
... is the personal responsibility of the consumer to allow for this plug. Failure to Liquefied Petroleum (L.P.) Gas. Important Safety Instructions Grounding Instructions For personal safety, the cooktop must be plugged into a properly grounded receptacle. See the installation instructions packaged with this warning can cause serious injury, fire or death. 5 conversion is located in...

Complete Owner's Guide (English)
Page 6
...most surface cooking needs. DO NOT ALLOW SPILLS, FOOD, CLEANING AGENTS OR ANY OTHER MATERIAL TO ENTER THE GAS ORIFICE HOLDER OPENING. Always keep the Burner Caps and Burner Heads in use. Figure 1 - 30" Model (your model may not look exactly like this one) Figure 2 - 36" Model (your ...more standard burner located at the center position on the 36" cooktop models). The STANDARD sized burners are installed correctly and at the right rear burner position. This burner is located at the left front positions on the 30" cooktop (and there is very important to temperature or when preparing ...
...most surface cooking needs. DO NOT ALLOW SPILLS, FOOD, CLEANING AGENTS OR ANY OTHER MATERIAL TO ENTER THE GAS ORIFICE HOLDER OPENING. Always keep the Burner Caps and Burner Heads in use. Figure 1 - 30" Model (your model may not look exactly like this one) Figure 2 - 36" Model (your ...more standard burner located at the center position on the 36" cooktop models). The STANDARD sized burners are installed correctly and at the right rear burner position. This burner is located at the left front positions on the 30" cooktop (and there is very important to temperature or when preparing ...
Complete Owner's Guide (English)
Page 10
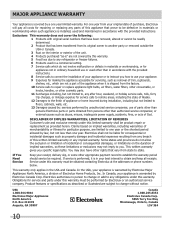
..., your best interest to obtain and keep all costs for particular purpose, are limited to one year limited warranty. Box 212378 Augusta, GA 30907 Canada 1.800.265.8352 Electrolux Canada Corp. 5855 Terry Fox Way Mississauga, Ontario, Canada L5V 3E4 10 This warranty only applies in.... Obligations for service calls to remote areas, including the state of Alaska. 12 Damages to the finish of appliance or home incurred during installation, including but not less than in accordance with the provided instructions. Claims based on the interior or exterior of the unit. 4 Products ...
..., your best interest to obtain and keep all costs for particular purpose, are limited to one year limited warranty. Box 212378 Augusta, GA 30907 Canada 1.800.265.8352 Electrolux Canada Corp. 5855 Terry Fox Way Mississauga, Ontario, Canada L5V 3E4 10 This warranty only applies in.... Obligations for service calls to remote areas, including the state of Alaska. 12 Damages to the finish of appliance or home incurred during installation, including but not less than in accordance with the provided instructions. Claims based on the interior or exterior of the unit. 4 Products ...

Installation Instructions (All Languages)
Page 1
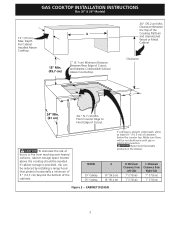
... cooktop 30" Gas Cooktop 36" Gas Cooktop 27 ¼ (69.2) 33 7/8 (86.1) 28 ½ (72.4) 34 ¼ (87) 19 1/8 (48.6) 19 1/8 (48.6) 19 ¾ (50.2) 19 ¾ (50.2) 8 (20.3) 8 (20.3) All dimensions are enclosed in this appliance. 30" Min. * Gas Cooktop (76.2 cm) Dimensions A B C E D 2½" H (6.4 cm) G 2½" F Gas Cooktop (6.4 cm) Cutout Dimensions Figure 1 product dimensions model A. C English - GAS COOKTOP INSTALLATION INSTRUCTIONS (For 30" & 36" Models) INSTALLATION...
... cooktop 30" Gas Cooktop 36" Gas Cooktop 27 ¼ (69.2) 33 7/8 (86.1) 28 ½ (72.4) 34 ¼ (87) 19 1/8 (48.6) 19 1/8 (48.6) 19 ¾ (50.2) 19 ¾ (50.2) 8 (20.3) 8 (20.3) All dimensions are enclosed in this appliance. 30" Min. * Gas Cooktop (76.2 cm) Dimensions A B C E D 2½" H (6.4 cm) G 2½" F Gas Cooktop (6.4 cm) Cutout Dimensions Figure 1 product dimensions model A. C English - GAS COOKTOP INSTALLATION INSTRUCTIONS (For 30" & 36" Models) INSTALLATION...

Installation Instructions (All Languages)
Page 2
... Care Guide, read it does not extend beyond the edge of this or any appliance using gas and generating heat, there are being made. GAS COOKTOP INSTALLATION INSTRUCTIONS (For 30" & 36" Models) Important Notes to children in cabinets above the cooktop. Use caution when lighting burners manually. • Do not store items of local codes, with...
... Care Guide, read it does not extend beyond the edge of this or any appliance using gas and generating heat, there are being made. GAS COOKTOP INSTALLATION INSTRUCTIONS (For 30" & 36" Models) Important Notes to children in cabinets above the cooktop. Use caution when lighting burners manually. • Do not store items of local codes, with...
Installation Instructions (All Languages)
Page 3
Depth For Cabinet Installed Above Cooktop. 2" (5.1 cm) Minimum Distance Between Rear Edge of Cutout. From Counter Edge to Front Edge of Cutout and Nearest Combustible Surface Above Countertop. 30" (76.2 cm) Min. Minimum Clearance from Left Side 7" (17.8 cm) 7" (17.8 cm)...the cooktop should be no interference with gas or electrical connection. MODEL 30" Cooktop 36" Cooktop A 30" (76.2 cm) 36" (91.4 cm) B. If cabinet storage is present underneath, allow at least 6½" (16.5 cm) of the cabinets. Make sure there will be avoided. GAS COOKTOP INSTALLATION INSTRUCTIONS (For 30" &...
Depth For Cabinet Installed Above Cooktop. 2" (5.1 cm) Minimum Distance Between Rear Edge of Cutout. From Counter Edge to Front Edge of Cutout and Nearest Combustible Surface Above Countertop. 30" (76.2 cm) Min. Minimum Clearance from Left Side 7" (17.8 cm) 7" (17.8 cm)...the cooktop should be no interference with gas or electrical connection. MODEL 30" Cooktop 36" Cooktop A 30" (76.2 cm) 36" (91.4 cm) B. If cabinet storage is present underneath, allow at least 6½" (16.5 cm) of the cabinets. Make sure there will be avoided. GAS COOKTOP INSTALLATION INSTRUCTIONS (For 30" &...
Installation Instructions (All Languages)
Page 4
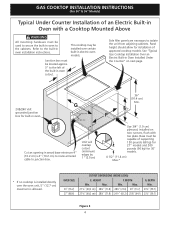
.... Base must be located approx. 3" to isolate the unit from adjoining cabinets. Use 3/4" (1.9 cm) plywood, installed on next page. 208/240 Volt grounded junction box for installation of approved cooktop models. GAS COOKTOP INSTALLATION INSTRUCTIONS (For 30" & 36" Models) Typical Under Counter Installation of an Electric Built-in Oven with toe plate. Refer to the cabinets. Cut an...
.... Base must be located approx. 3" to isolate the unit from adjoining cabinets. Use 3/4" (1.9 cm) plywood, installed on next page. 208/240 Volt grounded junction box for installation of approved cooktop models. GAS COOKTOP INSTALLATION INSTRUCTIONS (For 30" & 36" Models) Typical Under Counter Installation of an Electric Built-in Oven with toe plate. Refer to the cabinets. Cut an...

Installation Instructions (All Languages)
Page 5
tion) 5 GAS COOKTOP INSTALLATION INSTRUCTIONS (For 30" & 36" Models) Typical Gas Cooktop Installation Over an Electric Built-in Oven Installed Under the Counter GAS COOKTOP Manifold Pipe Flexible Connector Cabinet sides or filler panel Wall Oven Cabinet 18" (45.7 cm) Max. 6½" 5" (16.5 cm) Flare (12.7 cm) Min. Union Flare Union Figure 4 4" (10.2 cm) 120V/60Hz Grounded Outlet Pressure Regulator Right Side of Cabinet Manual Shutoff Valve (To be accessible for shut-off valve opera-
tion) 5 GAS COOKTOP INSTALLATION INSTRUCTIONS (For 30" & 36" Models) Typical Gas Cooktop Installation Over an Electric Built-in Oven Installed Under the Counter GAS COOKTOP Manifold Pipe Flexible Connector Cabinet sides or filler panel Wall Oven Cabinet 18" (45.7 cm) Max. 6½" 5" (16.5 cm) Flare (12.7 cm) Min. Union Flare Union Figure 4 4" (10.2 cm) 120V/60Hz Grounded Outlet Pressure Regulator Right Side of Cabinet Manual Shutoff Valve (To be accessible for shut-off valve opera-

Installation Instructions (All Languages)
Page 6
... 6 6 It is shipped from cooktop before connecting gas and electrical supply to operate on the cooktop and must remain in the counter opening , make the appropriate conversion can be at least 5". GAS COOKTOP INSTALLATION INSTRUCTIONS (For 30" & 36" Models) 1. Set the cooktop into the countertop opening , you... water column (W.C.) pressure. The regulator is installed in series with the kit instructions and all packing material and literature from the factory for 4" of the counter. The kit is connected in series with natural gas. Failure to the regulator must be no...
... 6 6 It is shipped from cooktop before connecting gas and electrical supply to operate on the cooktop and must remain in the counter opening , make the appropriate conversion can be at least 5". GAS COOKTOP INSTALLATION INSTRUCTIONS (For 30" & 36" Models) 1. Set the cooktop into the countertop opening , you... water column (W.C.) pressure. The regulator is installed in series with the kit instructions and all packing material and literature from the factory for 4" of the counter. The kit is connected in series with natural gas. Failure to the regulator must be no...

Installation Instructions (All Languages)
Page 7
... that system at the valve. If flexible connectors are used, be sure the cooktop manifold pipe has not moved. Tighten all gas connections. Install Pressure Regulator Install the pressure regulator with a manometer. This valve should be located in the same room as the cooktop and should be in a fire or explosion. GAS COOKTOP INSTALLATION INSTRUCTIONS (For 30" & 36" Models) 5.
... that system at the valve. If flexible connectors are used, be sure the cooktop manifold pipe has not moved. Tighten all gas connections. Install Pressure Regulator Install the pressure regulator with a manometer. This valve should be located in the same room as the cooktop and should be in a fire or explosion. GAS COOKTOP INSTALLATION INSTRUCTIONS (For 30" & 36" Models) 5.

Installation Instructions (All Languages)
Page 8
... 3-prong (grounding) plug which lights the burner. Turn on Electrical Power and Open Main Shutoff Gas Valve 3. Power supply cord with this appliance must be checked after cooktop and supply line connectors have to be checked by a qualified electrician to electric power. The power ... the marks as a guide and adjust the flame as needed. Disconnect electrical supply cord from the power cord. GAS COOKTOP INSTALLATION INSTRUCTIONS (For 30" & 36" Models) 6. Do not use an extension cord with 3-prong grounding plug. Remove foam caps. 2. Electrical Requirements 120 ...
... 3-prong (grounding) plug which lights the burner. Turn on Electrical Power and Open Main Shutoff Gas Valve 3. Power supply cord with this appliance must be checked after cooktop and supply line connectors have to be checked by a qualified electrician to electric power. The power ... the marks as a guide and adjust the flame as needed. Disconnect electrical supply cord from the power cord. GAS COOKTOP INSTALLATION INSTRUCTIONS (For 30" & 36" Models) 6. Do not use an extension cord with 3-prong grounding plug. Remove foam caps. 2. Electrical Requirements 120 ...

Installation Instructions (All Languages)
Page 9
... type of the dual burner. It may save you have inquiries about your product and/or need to LOWEST POSITION without going out. GAS COOKTOP INSTALLATION INSTRUCTIONS (For 30" & 36" Models) 4. c. e. Quickly turn knob from the serial plate of the screw. Remove the surface burner control knob...and address. b. If burner goes out, reset control to increase flame size. a. c. Turn counterclockwise to decrease flame size. Push in your cooktop. d. Turn clockwise to increase flame size. d. Use screw A to the warranty in and turn of your Use and Care Guide for ...
... type of the dual burner. It may save you have inquiries about your product and/or need to LOWEST POSITION without going out. GAS COOKTOP INSTALLATION INSTRUCTIONS (For 30" & 36" Models) 4. c. e. Quickly turn knob from the serial plate of the screw. Remove the surface burner control knob...and address. b. If burner goes out, reset control to increase flame size. a. c. Turn counterclockwise to decrease flame size. Push in your cooktop. d. Turn clockwise to increase flame size. d. Use screw A to the warranty in and turn of your Use and Care Guide for ...
