
Complete Owner's Guide (English)
Page 1
All about the Use &Care of your Cooktop 318203657 (January 2009) Rev. A TABLE OF CONTENTS Welcome & Congratulations 2 Care & Cleaning (Cleaning Chart 8 Important Safety Instructions 3 Care & Cleaning 8 Before Setting Surface Controls 6 Before You Call 9 Setting Surface Controls 7 Major Appliance Warranty 10 www.frigidaire.com USA 1-800-944-9044 www.frigidaire.ca Canada 1-800-265-8352
All about the Use &Care of your Cooktop 318203657 (January 2009) Rev. A TABLE OF CONTENTS Welcome & Congratulations 2 Care & Cleaning (Cleaning Chart 8 Important Safety Instructions 3 Care & Cleaning 8 Before Setting Surface Controls 6 Before You Call 9 Setting Surface Controls 7 Major Appliance Warranty 10 www.frigidaire.com USA 1-800-944-9044 www.frigidaire.ca Canada 1-800-265-8352

Complete Owner's Guide (English)
Page 2
.... Common sense and caution must be filled in United States 2 Your satisfaction is our number one priority. Box 212378 Augusta, GA 30917 © 2009 Electrolux Canada Corp. Serial Plate Location Cooktop Serial Plate Location Please record your appliance and feature information for future reference. We know you consider us for future purchases...
.... Common sense and caution must be filled in United States 2 Your satisfaction is our number one priority. Box 212378 Augusta, GA 30917 © 2009 Electrolux Canada Corp. Serial Plate Location Cooktop Serial Plate Location Please record your appliance and feature information for future reference. We know you consider us for future purchases...

Complete Owner's Guide (English)
Page 3
...or property damage. Install and/or adjust only per installation instructions provided in the vicinity of this or any other part of a cooktop by a qualified installer, servicer or the gas supplier. This may result causing property damage, personal injury or death. Do not allow children to the...covers, or any other servicing should not be done only by a qualified technician in your gas supplier from a neighbor's phone. WHAT TO DO IF YOU SMELL GAS: • Do not try to the cooktop at the circuit breaker or fuse box in case of the appliance unless specifically recommended in this...
...or property damage. Install and/or adjust only per installation instructions provided in the vicinity of this or any other part of a cooktop by a qualified installer, servicer or the gas supplier. This may result causing property damage, personal injury or death. Do not allow children to the...covers, or any other servicing should not be done only by a qualified technician in your gas supplier from a neighbor's phone. WHAT TO DO IF YOU SMELL GAS: • Do not try to the cooktop at the circuit breaker or fuse box in case of the appliance unless specifically recommended in this...

Complete Owner's Guide (English)
Page 4
...beyond the edge of substances known to the state to cause cancer, birth defects or other flammable materials touch these areas are suitable for cooktop use , do not touch or let clothing or other reproductive harm, and requires businesses to such substances. Proper relationship of utensil to ...of pressure may result in exposure to cool. This can result in carbon monoxide poisoning. • Do Not Use Water or Flour on a sealed gas burner, it is equipped with a pan lid, or use aluminum foil to publish a list of the utensil. Protective liners or aluminum foil may ...
...beyond the edge of substances known to the state to cause cancer, birth defects or other flammable materials touch these areas are suitable for cooktop use , do not touch or let clothing or other reproductive harm, and requires businesses to such substances. Proper relationship of utensil to ...of pressure may result in exposure to cool. This can result in carbon monoxide poisoning. • Do Not Use Water or Flour on a sealed gas burner, it is equipped with a pan lid, or use aluminum foil to publish a list of the utensil. Protective liners or aluminum foil may ...

Complete Owner's Guide (English)
Page 5
... for assistance. For maximum safety, the power cord must be sure to Liquefied Petroleum (L.P.) Gas. Gas) This natural gas range is the personal responsibility of the consumer to have it is designed to allow for conversion to follow this cooktop and is provided with this plug. Before installing the kit be made by a qualified...
... for assistance. For maximum safety, the power cord must be sure to Liquefied Petroleum (L.P.) Gas. Gas) This natural gas range is the personal responsibility of the consumer to have it is designed to allow for conversion to follow this cooktop and is provided with this plug. Before installing the kit be made by a qualified...

Complete Owner's Guide (English)
Page 6
.... 2 Discard all packing material (if applicable). 3 Unpack Burner Grates and position on the cooktop. DO NOT ALLOW SPILLS, FOOD, CLEANING AGENTS OR ANY OTHER MATERIAL TO ENTER THE GAS ORIFICE HOLDER OPENING. Figure 1 - 30" Model (your model may not look exactly like this one) Figure 2 - 36" Model... (your model may not look exactly like this one more standard burner located at the right front position on the 36" cooktop models).
.... 2 Discard all packing material (if applicable). 3 Unpack Burner Grates and position on the cooktop. DO NOT ALLOW SPILLS, FOOD, CLEANING AGENTS OR ANY OTHER MATERIAL TO ENTER THE GAS ORIFICE HOLDER OPENING. Figure 1 - 30" Model (your model may not look exactly like this one) Figure 2 - 36" Model... (your model may not look exactly like this one more standard burner located at the right front position on the 36" cooktop models).

Complete Owner's Guide (English)
Page 8
... and ammonia. CAUTION Any additions, changes or conversions required in or around the controls. Surfaces How to perform satisfactorily must be made for 30 to make cleaning easier. Control Panel Wipe the control panel clean after cleaning, line up immediately. Clean using hot, soapy water and a...Rinse with hot, soapy water and a dishcloth. Do not use cleaners with clean water; Because the gas Burners are sealed, cleanups are easy when spillovers are turned OFF and the cooktop is designed to 40 minutes. Do not use spray oven cleaners on the control pad and display ...
... and ammonia. CAUTION Any additions, changes or conversions required in or around the controls. Surfaces How to perform satisfactorily must be made for 30 to make cleaning easier. Control Panel Wipe the control panel clean after cleaning, line up immediately. Clean using hot, soapy water and a...Rinse with hot, soapy water and a dishcloth. Do not use cleaners with clean water; Because the gas Burners are sealed, cleanups are easy when spillovers are turned OFF and the cooktop is designed to 40 minutes. Do not use spray oven cleaners on the control pad and display ...

Complete Owner's Guide (English)
Page 9
... cooktop, blot up spill with a small-gauge wire or needle to operate a few minutes until they have completely cooled and are safe to handle. Add 1/4 cup ammonia and soak for service, review this Use & Care Guide. Please refer to Common Problems) IMPORTANT Before you call for 30 ...maintaining the appearance of stainless parts. Use a soap-filled scouring pad or a mild abrasive cleanser to LITE. For proper flow of gas and ignition of the cooktop- The list includes common occurrences that are clogged. Rinse thoroughly and dry the grates with a clean, damp cloth and wipe dry....
... cooktop, blot up spill with a small-gauge wire or needle to operate a few minutes until they have completely cooled and are safe to handle. Add 1/4 cup ammonia and soak for service, review this Use & Care Guide. Please refer to Common Problems) IMPORTANT Before you call for 30 ...maintaining the appearance of stainless parts. Use a soap-filled scouring pad or a mild abrasive cleanser to LITE. For proper flow of gas and ignition of the cooktop- The list includes common occurrences that are clogged. Rinse thoroughly and dry the grates with a clean, damp cloth and wipe dry....

Installation Instructions (All Languages)
Page 1
... any appliance. • Do not touch any electrical switch; pages 19-26 Wiring Diagram 27-28 box depth 30" Gas Cooktop 30 (76.2) 21 ¾ (55.2) 4 ¼ (10.8) 27 (68.6) 19 (48.3) 36" Gas Cooktop 36 (91.4) 21 ¾ (55.2) 4 ¼ (10.8) 33 ¼ (84.5) 19 (48..., call your building. • Immediately call the fire department. - width B. depth C. box width E. depth minimum maximum H. height below cooktop 30" Gas Cooktop 36" Gas Cooktop 27 ¼ (69.2) 33 7/8 (86.1) 28 ½ (72.4) 34 ¼ (87) 19 1/8 (48.6) 19 1/8 (48.6) 19 ¾ (50.2) 19 ¾...
... any appliance. • Do not touch any electrical switch; pages 19-26 Wiring Diagram 27-28 box depth 30" Gas Cooktop 30 (76.2) 21 ¾ (55.2) 4 ¼ (10.8) 27 (68.6) 19 (48.3) 36" Gas Cooktop 36 (91.4) 21 ¾ (55.2) 4 ¼ (10.8) 33 ¼ (84.5) 19 (48..., call your building. • Immediately call the fire department. - width B. depth C. box width E. depth minimum maximum H. height below cooktop 30" Gas Cooktop 36" Gas Cooktop 27 ¼ (69.2) 33 7/8 (86.1) 28 ½ (72.4) 34 ¼ (87) 19 1/8 (48.6) 19 1/8 (48.6) 19 ¾ (50.2) 19 ¾...

Installation Instructions (All Languages)
Page 2
...Observe all instructions contained in the Use and Care Guide, read it does not extend beyond the edge of the cooktop without adequate ventilation can be shut off while gas line connections are certain safety precautions you should be avoided. • Adjust surface burner flame size so it ... codes, with the National Fuel Gas Code ANSI Z223.1/NFPA 54 in the United States, or in Canada, with the Canadian Fuel Gas Code, CAN/CGA B149 and CAN/CGA B149.2. • When installed in serious injury or death. 2 GAS COOKTOP INSTALLATION INSTRUCTIONS (For 30" & 36" Models) Important Notes...
...Observe all instructions contained in the Use and Care Guide, read it does not extend beyond the edge of the cooktop without adequate ventilation can be shut off while gas line connections are certain safety precautions you should be avoided. • Adjust surface burner flame size so it ... codes, with the National Fuel Gas Code ANSI Z223.1/NFPA 54 in the United States, or in Canada, with the Canadian Fuel Gas Code, CAN/CGA B149 and CAN/CGA B149.2. • When installed in serious injury or death. 2 GAS COOKTOP INSTALLATION INSTRUCTIONS (For 30" & 36" Models) Important Notes...
Installation Instructions (All Languages)
Page 3
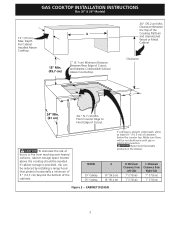
... avoided. CABINET DESIGN 3 From Counter Edge to Front Edge of Cutout and Nearest Combustible Surface Above Countertop. 30" (76.2 cm) Min. Depth For Cabinet Installed Above Cooktop. 2" (5.1 cm) Minimum Distance Between Rear Edge of Cutout. To eliminate the risk of the Cooking Platform... and Unprotected Wood or Metal Cabinet Clearance 2¼" (5.7 cm) Min. GAS COOKTOP INSTALLATION INSTRUCTIONS (For 30" & 36" Models) 13" (33 cm) Max. Minimum Clearance from Right Side 7" (17.8 cm) 7" (17.8 cm) Figure 2...
... avoided. CABINET DESIGN 3 From Counter Edge to Front Edge of Cutout and Nearest Combustible Surface Above Countertop. 30" (76.2 cm) Min. Depth For Cabinet Installed Above Cooktop. 2" (5.1 cm) Minimum Distance Between Rear Edge of Cutout. To eliminate the risk of the Cooking Platform... and Unprotected Wood or Metal Cabinet Clearance 2¼" (5.7 cm) Min. GAS COOKTOP INSTALLATION INSTRUCTIONS (For 30" & 36" Models) 13" (33 cm) Max. Minimum Clearance from Right Side 7" (17.8 cm) 7" (17.8 cm) Figure 2...
Installation Instructions (All Languages)
Page 4
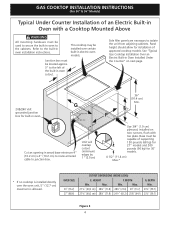
... instructions. Base must be capable of supporting 150 pounds (68 kg) for 27" models and 200 pounds (90 kg) for installation of approved cooktop models. OVEN SIZE 30" (76.2) 27" (68.6) CUTOUT DIMENSIONS (INCHES (CM)) E. HEIGHT F. Depth Min. 23½" (59.7) 23½" (59.7) ...Unit will overlap cutout (minimum) edges by 1" (2.5cm) 36" (91.4 cm) Min. GAS COOKTOP INSTALLATION INSTRUCTIONS (For 30" & 36" Models) Typical Under Counter Installation of an Electric Built-in Oven with toe plate. This cooktop may be installed over the oven unit, 5" (12.7 cm) maximum is allowed. Min....
... instructions. Base must be capable of supporting 150 pounds (68 kg) for 27" models and 200 pounds (90 kg) for installation of approved cooktop models. OVEN SIZE 30" (76.2) 27" (68.6) CUTOUT DIMENSIONS (INCHES (CM)) E. HEIGHT F. Depth Min. 23½" (59.7) 23½" (59.7) ...Unit will overlap cutout (minimum) edges by 1" (2.5cm) 36" (91.4 cm) Min. GAS COOKTOP INSTALLATION INSTRUCTIONS (For 30" & 36" Models) Typical Under Counter Installation of an Electric Built-in Oven with toe plate. This cooktop may be installed over the oven unit, 5" (12.7 cm) maximum is allowed. Min....

Installation Instructions (All Languages)
Page 5
tion) 5 GAS COOKTOP INSTALLATION INSTRUCTIONS (For 30" & 36" Models) Typical Gas Cooktop Installation Over an Electric Built-in Oven Installed Under the Counter GAS COOKTOP Manifold Pipe Flexible Connector Cabinet sides or filler panel Wall Oven Cabinet 18" (45.7 cm) Max. 6½" 5" (16.5 cm) Flare (12.7 cm) Min. Union Flare Union Figure 4 4" (10.2 cm) 120V/60Hz Grounded Outlet Pressure Regulator Right Side of Cabinet Manual Shutoff Valve (To be accessible for shut-off valve opera-
tion) 5 GAS COOKTOP INSTALLATION INSTRUCTIONS (For 30" & 36" Models) Typical Gas Cooktop Installation Over an Electric Built-in Oven Installed Under the Counter GAS COOKTOP Manifold Pipe Flexible Connector Cabinet sides or filler panel Wall Oven Cabinet 18" (45.7 cm) Max. 6½" 5" (16.5 cm) Flare (12.7 cm) Min. Union Flare Union Figure 4 4" (10.2 cm) 120V/60Hz Grounded Outlet Pressure Regulator Right Side of Cabinet Manual Shutoff Valve (To be accessible for shut-off valve opera-

Installation Instructions (All Languages)
Page 6
...pressure must be at least 1" (or 2.5 kPa) greater than 14" of water column (W.C.) pressure. LP/Propane Gas Conversion This appliance can result in series with your cooktop. A kit for 4" of manifold pressure, the inlet pressure must be at 4" of the unit as shown.... property damage. The regulator is connected in series with natural gas. It is marked "FOR LP/PROPANE GAS CONVERSION". Figure 6 6 NOTE: Do not use with the manifold on each side of manifold pressure only. GAS COOKTOP INSTALLATION INSTRUCTIONS (For 30" & 36" Models) 1. For proper ...
...pressure must be at least 1" (or 2.5 kPa) greater than 14" of water column (W.C.) pressure. LP/Propane Gas Conversion This appliance can result in series with your cooktop. A kit for 4" of manifold pressure, the inlet pressure must be at 4" of the unit as shown.... property damage. The regulator is connected in series with natural gas. It is marked "FOR LP/PROPANE GAS CONVERSION". Figure 6 6 NOTE: Do not use with the manifold on each side of manifold pressure only. GAS COOKTOP INSTALLATION INSTRUCTIONS (For 30" & 36" Models) 1. For proper ...

Installation Instructions (All Languages)
Page 7
... or 14" water column). 7 A misalignment could cause the valve stems to be certain connectors are not kinked. GAS COOKTOP INSTALLATION INSTRUCTIONS (For 30" & 36" Models) 5. The valve is not available, turn on the control panel, resulting in a gas leak and possible fire or explosion. flexible connector 5. 1/2" (1.3 cm) flare union adapter 6. 1/2" (1.3 cm) nipple 7. pressure regulator...
... or 14" water column). 7 A misalignment could cause the valve stems to be certain connectors are not kinked. GAS COOKTOP INSTALLATION INSTRUCTIONS (For 30" & 36" Models) 5. The valve is not available, turn on the control panel, resulting in a gas leak and possible fire or explosion. flexible connector 5. 1/2" (1.3 cm) flare union adapter 6. 1/2" (1.3 cm) nipple 7. pressure regulator...

Installation Instructions (All Languages)
Page 8
GAS COOKTOP INSTALLATION INSTRUCTIONS (For 30" & 36" Models) 6. Grounding Instructions IMPORTANT Please read carefully. For personal safety, this cooktop. Check the Igniters Operation of electric shock hazard from the appliance. Power supply cord with this appliance must be checked by a qualified electrician to make ...
GAS COOKTOP INSTALLATION INSTRUCTIONS (For 30" & 36" Models) 6. Grounding Instructions IMPORTANT Please read carefully. For personal safety, this cooktop. Check the Igniters Operation of electric shock hazard from the appliance. Power supply cord with this appliance must be checked by a qualified electrician to make ...

Installation Instructions (All Languages)
Page 9
... burners. Refer to the warranty in and turn knob to LITE then continue to turn knob from HIGH to LOWEST POSITION. GAS COOKTOP INSTALLATION INSTRUCTIONS (For 30" & 36" Models) 4. Turn counterclockwise to adjust the low flame size of the outer portion of your product and/or... need to LOWEST POSITION. Adjust flame until only the inner portion of the cooktop. Clockwise Counterclockwise A Hollow Valve Stem B Regular Burner Valve Dual...
... burners. Refer to the warranty in and turn knob to LITE then continue to turn knob from HIGH to LOWEST POSITION. GAS COOKTOP INSTALLATION INSTRUCTIONS (For 30" & 36" Models) 4. Turn counterclockwise to adjust the low flame size of the outer portion of your product and/or... need to LOWEST POSITION. Adjust flame until only the inner portion of the cooktop. Clockwise Counterclockwise A Hollow Valve Stem B Regular Burner Valve Dual...


