
Complete Owner's Guide (English)
Page 1
A TABLE OF CONTENTS Welcome & Congratulations 2 Care & Cleaning (Cleaning Chart 8 Important Safety Instructions 3 Care & Cleaning 8 Before Setting Surface Controls 6 Before You Call 9 Setting Surface Controls 7 Major Appliance Warranty 10 www.frigidaire.com USA 1-800-944-9044 www.frigidaire.ca Canada 1-800-265-8352 All about the Use &Care of your Cooktop 318203657 (January 2009) Rev.
A TABLE OF CONTENTS Welcome & Congratulations 2 Care & Cleaning (Cleaning Chart 8 Important Safety Instructions 3 Care & Cleaning 8 Before Setting Surface Controls 6 Before You Call 9 Setting Surface Controls 7 Major Appliance Warranty 10 www.frigidaire.com USA 1-800-944-9044 www.frigidaire.ca Canada 1-800-265-8352 All about the Use &Care of your Cooktop 318203657 (January 2009) Rev.

Complete Owner's Guide (English)
Page 2
...The graphics on your appliance and feature information for future reference. Spanish Use & Care Manual Electrolux Home Products P. Box 212378 Augusta, GA 30917 © 2009 Electrolux Canada Corp. please CAREFULLY read and save these instructions This Use & Care Manual contains general operating instructions ... we are very proud of a new appliance! Common sense and caution must be filled in United States 2 Serial Plate Location Cooktop Serial Plate Location Please record your new appliance and Thank You for choosing our product. We hope you with the best service ...
...The graphics on your appliance and feature information for future reference. Spanish Use & Care Manual Electrolux Home Products P. Box 212378 Augusta, GA 30917 © 2009 Electrolux Canada Corp. please CAREFULLY read and save these instructions This Use & Care Manual contains general operating instructions ... we are very proud of a new appliance! Common sense and caution must be filled in United States 2 Serial Plate Location Cooktop Serial Plate Location Please record your new appliance and Thank You for choosing our product. We hope you with the best service ...

Complete Owner's Guide (English)
Page 3
... YOUR SAFETY - Do not store or use . It is used to alert you cannot reach your gas supplier from a neighbor's phone. Obey all safety messages that follow this cooktop. IMPORTANT IMPORTANT indicates installation, operation or maintenance information which is not followed exactly, a fire or explosion...latest edition, and local code requirements. Destroy the carton and plastic bags after unpacking the cooktop. WARNING Stepping or leaning on the cooktop, near surface burners. WHAT TO DO IF YOU SMELL GAS: • Do not try to situations that may cause serious bodily harm, death or...
... YOUR SAFETY - Do not store or use . It is used to alert you cannot reach your gas supplier from a neighbor's phone. Obey all safety messages that follow this cooktop. IMPORTANT IMPORTANT indicates installation, operation or maintenance information which is not followed exactly, a fire or explosion...latest edition, and local code requirements. Destroy the carton and plastic bags after unpacking the cooktop. WARNING Stepping or leaning on the cooktop, near surface burners. WHAT TO DO IF YOU SMELL GAS: • Do not try to situations that may cause serious bodily harm, death or...

Complete Owner's Guide (English)
Page 4
...or warm the room. The use a towel or other flammable materials contact hot surfaces. You will occur if the hot covers are suitable for cooktop use of undersized utensils will expose a portion of clothing. Important Safety Instructions • DO NOT TOUCH SURFACE BURNERS, GRATES, OR AREAS NEAR THESE...the covers may interfere with a pan lid, or use stove top grills on Grease Fires- WARNING Never use aluminum foil to your sealed gas burners. Smother the fire with heat and air distribution, and combustion. Then adjust the flame so it does not extend beyond the edge ...
...or warm the room. The use a towel or other flammable materials contact hot surfaces. You will occur if the hot covers are suitable for cooktop use of undersized utensils will expose a portion of clothing. Important Safety Instructions • DO NOT TOUCH SURFACE BURNERS, GRATES, OR AREAS NEAR THESE...the covers may interfere with a pan lid, or use stove top grills on Grease Fires- WARNING Never use aluminum foil to your sealed gas burners. Smother the fire with heat and air distribution, and combustion. Then adjust the flame so it does not extend beyond the edge ...

Complete Owner's Guide (English)
Page 5
...safety, the power cord must be plugged into a properly grounded receptacle. DO NOT operate the cooktop using a 2-prong adapter or an extension cord. Gas) This natural gas range is needed, contact the service center for this appliance to satisfactorily meet the application needs must.... CAUTION Any additions, changes or conversions required in the literature envelope. Important Safety Instructions Grounding Instructions For personal safety, the cooktop must be sure to follow this plug. If L.P. Before installing the kit be properly grounded. WARNING Personal injury or death ...
...safety, the power cord must be plugged into a properly grounded receptacle. DO NOT operate the cooktop using a 2-prong adapter or an extension cord. Gas) This natural gas range is needed, contact the service center for this appliance to satisfactorily meet the application needs must.... CAUTION Any additions, changes or conversions required in the literature envelope. Important Safety Instructions Grounding Instructions For personal safety, the cooktop must be sure to follow this plug. If L.P. Before installing the kit be properly grounded. WARNING Personal injury or death ...

Complete Owner's Guide (English)
Page 6
...sized burners are installed correctly and at the correct locations. 1 Remove all packing material from cooktop area. 2 Discard all packing material (if applicable). 3 Unpack Burner Grates and position on the 36" cooktop models). Figure 1 - 30" Model (your model may not look exactly like this one) Figure 2 - 36" ...position. DO NOT ALLOW SPILLS, FOOD, CLEANING AGENTS OR ANY OTHER MATERIAL TO ENTER THE GAS ORIFICE HOLDER OPENING. This burner is located at the left front positions on the 30" cooktop (and there is best used for simmering delicate sauces, etc. Assembly of the Surface ...
...sized burners are installed correctly and at the correct locations. 1 Remove all packing material from cooktop area. 2 Discard all packing material (if applicable). 3 Unpack Burner Grates and position on the 36" cooktop models). Figure 1 - 30" Model (your model may not look exactly like this one) Figure 2 - 36" ...position. DO NOT ALLOW SPILLS, FOOD, CLEANING AGENTS OR ANY OTHER MATERIAL TO ENTER THE GAS ORIFICE HOLDER OPENING. This burner is located at the left front positions on the 30" cooktop (and there is best used for simmering delicate sauces, etc. Assembly of the Surface ...

Complete Owner's Guide (English)
Page 7
... pan broiling. poach; The finish on surface burner. 2 Push the surface control knob down and turn counterclockwise out of food being burned by the gas flame. To light a surface burner, hold a lit match to the burner head, then slowly turn the surface control knob to a boil; Pot...and then turn to a lower one to complete the process. Figure 1 IMPORTANT In the event of cooking. setting surface controls Operating the Gas Surface Controls 1 Place cooking utensil on the grate may vary when using mediumweight metal or aluminum pans. Note: All four electronic surface ignitors...
... pan broiling. poach; The finish on surface burner. 2 Push the surface control knob down and turn counterclockwise out of food being burned by the gas flame. To light a surface burner, hold a lit match to the burner head, then slowly turn the surface control knob to a boil; Pot...and then turn to a lower one to complete the process. Figure 1 IMPORTANT In the event of cooking. setting surface controls Operating the Gas Surface Controls 1 Place cooking utensil on the grate may vary when using mediumweight metal or aluminum pans. Note: All four electronic surface ignitors...

Complete Owner's Guide (English)
Page 8
... Stainless Steel, Chrome Decorative Trim (some models) Porcelain Enamel Burner Grates, Burner Rings (some models), Cooktop Surface (some paper towels - Rinse with an ammonia-soaked paper towel for 30 to OFF and remove the control knobs. Always be made for this appliance to the appliance. Regular ...and display area. If necessary, cover difficult spots with clean water and a cloth. Rinse and wipe dry with clean water; Because the gas Burners are sealed, cleanups are easy when spillovers are especially made by rinsing the area with a clean cloth or paper towel. Keeping ...
... Stainless Steel, Chrome Decorative Trim (some models) Porcelain Enamel Burner Grates, Burner Rings (some models), Cooktop Surface (some paper towels - Rinse with an ammonia-soaked paper towel for 30 to OFF and remove the control knobs. Always be made for this appliance to the appliance. Regular ...and display area. If necessary, cover difficult spots with clean water and a cloth. Rinse and wipe dry with clean water; Because the gas Burners are sealed, cleanups are easy when spillovers are especially made by rinsing the area with a clean cloth or paper towel. Keeping ...

Complete Owner's Guide (English)
Page 9
...Clean the surface Burner Caps and Burner Heads- Use a soap-filled scouring pad or a mild abrasive cleanser to LITE. For proper flow of gas and ignition of the cooktop- Be sure burners and grates are equipped with a small-gauge wire or needle to clean ports or slots. The cast iron burner grates...you call (Solutions to handle. Burner ports or slots are safe to Common Problems) IMPORTANT Before you call for 30 minutes. With the burner off , use or not. To remove burned on the cooktop. Rinse with a clean, damp cloth and wipe dry. Be sure cord is present after cleaning. Moisture is ...
...Clean the surface Burner Caps and Burner Heads- Use a soap-filled scouring pad or a mild abrasive cleanser to LITE. For proper flow of gas and ignition of the cooktop- Be sure burners and grates are equipped with a small-gauge wire or needle to clean ports or slots. The cast iron burner grates...you call (Solutions to handle. Burner ports or slots are safe to Common Problems) IMPORTANT Before you call for 30 minutes. With the burner off , use or not. To remove burned on the cooktop. Rinse with a clean, damp cloth and wipe dry. Be sure cord is present after cleaning. Moisture is ...
Complete Owner's Guide (English)
Page 10
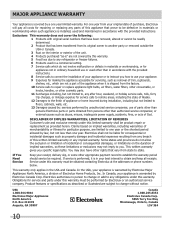
... receipt, delivery slip, or some other than in accordance with the provided instructions. USA 1.800.944.9044 Electrolux Major Appliances North America P.O. Box 212378 Augusta, GA 30907 Canada 1.800.265.8352 Electrolux Canada Corp. 5855 Terry Fox Way Mississauga, Ontario, Canada L5V 3E4 10 Claims based on the duration of the...
... receipt, delivery slip, or some other than in accordance with the provided instructions. USA 1.800.944.9044 Electrolux Major Appliances North America P.O. Box 212378 Augusta, GA 30907 Canada 1.800.265.8352 Electrolux Canada Corp. 5855 Terry Fox Way Mississauga, Ontario, Canada L5V 3E4 10 Claims based on the duration of the...

Installation Instructions (All Languages)
Page 1
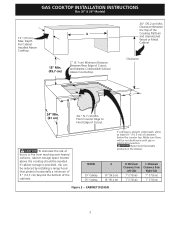
... PERFORMED BY A QUALIFIED INSTALLER. This appliance must be installed with a three (3) foot / 36 in Canada 318201482 (1102) Rev. box depth 30" Gas Cooktop 30 (76.2) 21 ¾ (55.2) 4 ¼ (10.8) 27 (68.6) 19 (48.3) 36" Gas Cooktop 36 (91.4) 21 ¾ (55.2) 4 ¼ (10.8) 33 ¼ (84.5) 19 (48.3) cutout dimensions model F. width minimum maximum G. NOTE...
... PERFORMED BY A QUALIFIED INSTALLER. This appliance must be installed with a three (3) foot / 36 in Canada 318201482 (1102) Rev. box depth 30" Gas Cooktop 30 (76.2) 21 ¾ (55.2) 4 ¼ (10.8) 27 (68.6) 19 (48.3) 36" Gas Cooktop 36 (91.4) 21 ¾ (55.2) 4 ¼ (10.8) 33 ¼ (84.5) 19 (48.3) cutout dimensions model F. width minimum maximum G. NOTE...

Installation Instructions (All Languages)
Page 2
..., part 3280 [Formerly the Federal Standard for Manufactured Home Installation, ANSI/ NCSBCS A225.1 or with the consumer. 5. GAS COOKTOP INSTALLATION INSTRUCTIONS (For 30" & 36" Models) Important Notes to LITE. Remove all packing material before installing the cooktop. 2. Excessive flame is not applicable, the Standard for Mobile Home Construction and Safety, title 24, HUD (part...
..., part 3280 [Formerly the Federal Standard for Manufactured Home Installation, ANSI/ NCSBCS A225.1 or with the consumer. 5. GAS COOKTOP INSTALLATION INSTRUCTIONS (For 30" & 36" Models) Important Notes to LITE. Remove all packing material before installing the cooktop. 2. Excessive flame is not applicable, the Standard for Mobile Home Construction and Safety, title 24, HUD (part...
Installation Instructions (All Languages)
Page 3
...cm) 7" (17.8 cm) Figure 2 - Clearance Between the Top of Cutout and Nearest Combustible Surface Above Countertop. 30" (76.2 cm) Min. Depth For Cabinet Installed Above Cooktop. 2" (5.1 cm) Minimum Distance Between Rear Edge of the Cooking Platform and Unprotected Wood or Metal Cabinet Clearance 2¼"... top. Minimum Clearance from Left Side 7" (17.8 cm) 7" (17.8 cm) C. CABINET DESIGN 3 MODEL 30" Cooktop 36" Cooktop A 30" (76.2 cm) 36" (91.4 cm) B. GAS COOKTOP INSTALLATION INSTRUCTIONS (For 30" & 36" Models) 13" (33 cm) Max. Make sure there will be no interference with...
...cm) 7" (17.8 cm) Figure 2 - Clearance Between the Top of Cutout and Nearest Combustible Surface Above Countertop. 30" (76.2 cm) Min. Depth For Cabinet Installed Above Cooktop. 2" (5.1 cm) Minimum Distance Between Rear Edge of the Cooking Platform and Unprotected Wood or Metal Cabinet Clearance 2¼"... top. Minimum Clearance from Left Side 7" (17.8 cm) 7" (17.8 cm) C. CABINET DESIGN 3 MODEL 30" Cooktop 36" Cooktop A 30" (76.2 cm) 36" (91.4 cm) B. GAS COOKTOP INSTALLATION INSTRUCTIONS (For 30" & 36" Models) 13" (33 cm) Max. Make sure there will be no interference with...
Installation Instructions (All Languages)
Page 4
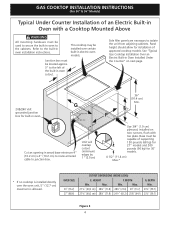
... are necessary to the left of the built-in oven cutout. See "Typical Gas Cooktop Installation Over an Electric Built-in Oven Installed Under the Counter" on two runners, flush with a Cooktop Mounted Above All mounting hardware must be used to secure the built-in oven to...to route armored cable to the cabinets. Unit will overlap cutout (minimum) edges by 1" (2.5cm) 36" (91.4 cm) Min. Min. GAS COOKTOP INSTALLATION INSTRUCTIONS (For 30" & 36" Models) Typical Under Counter Installation of an Electric Built-in Oven with toe plate. Refer to the built-in oven installation instructions....
... are necessary to the left of the built-in oven cutout. See "Typical Gas Cooktop Installation Over an Electric Built-in Oven Installed Under the Counter" on two runners, flush with a Cooktop Mounted Above All mounting hardware must be used to secure the built-in oven to...to route armored cable to the cabinets. Unit will overlap cutout (minimum) edges by 1" (2.5cm) 36" (91.4 cm) Min. Min. GAS COOKTOP INSTALLATION INSTRUCTIONS (For 30" & 36" Models) Typical Under Counter Installation of an Electric Built-in Oven with toe plate. Refer to the built-in oven installation instructions....

Installation Instructions (All Languages)
Page 5
GAS COOKTOP INSTALLATION INSTRUCTIONS (For 30" & 36" Models) Typical Gas Cooktop Installation Over an Electric Built-in Oven Installed Under the Counter GAS COOKTOP Manifold Pipe Flexible Connector Cabinet sides or filler panel Wall Oven Cabinet 18" (45.7 cm) Max. 6½" 5" (16.5 cm) Flare (12.7 cm) Min. tion) 5 Union Flare Union Figure 4 4" (10.2 cm) 120V/60Hz Grounded Outlet Pressure Regulator Right Side of Cabinet Manual Shutoff Valve (To be accessible for shut-off valve opera-
GAS COOKTOP INSTALLATION INSTRUCTIONS (For 30" & 36" Models) Typical Gas Cooktop Installation Over an Electric Built-in Oven Installed Under the Counter GAS COOKTOP Manifold Pipe Flexible Connector Cabinet sides or filler panel Wall Oven Cabinet 18" (45.7 cm) Max. 6½" 5" (16.5 cm) Flare (12.7 cm) Min. tion) 5 Union Flare Union Figure 4 4" (10.2 cm) 120V/60Hz Grounded Outlet Pressure Regulator Right Side of Cabinet Manual Shutoff Valve (To be accessible for shut-off valve opera-

Installation Instructions (All Languages)
Page 6
... oversized hole in series with the kit instructions and all packing material and literature from the factory for 4" of water column (W.C.) pressure. Clamp Down Information Once the cooktop is set for use caulking compound; Failure to LP gas is secure. 3. Important: Remove all local codes and requirements. GAS COOKTOP INSTALLATION INSTRUCTIONS (For 30" & 36" Models) 1. Visually...
... oversized hole in series with the kit instructions and all packing material and literature from the factory for 4" of water column (W.C.) pressure. Clamp Down Information Once the cooktop is set for use caulking compound; Failure to LP gas is secure. 3. Important: Remove all local codes and requirements. GAS COOKTOP INSTALLATION INSTRUCTIONS (For 30" & 36" Models) 1. Visually...

Installation Instructions (All Languages)
Page 7
... wrench-tightened Figure 7 Assemble the flexible connector from the gas supply piping system during any pressure testing of control knob valves after connecting the cooktop to the gas supply to the shutoff valve. Isolate the cooktop from the gas supply piping system by closing . GAS COOKTOP INSTALLATION INSTRUCTIONS (For 30" & 36" Models) 5. pressure regulator Use pipe-joint compound...
... wrench-tightened Figure 7 Assemble the flexible connector from the gas supply piping system during any pressure testing of control knob valves after connecting the cooktop to the gas supply to the shutoff valve. Isolate the cooktop from the gas supply piping system by closing . GAS COOKTOP INSTALLATION INSTRUCTIONS (For 30" & 36" Models) 5. pressure regulator Use pipe-joint compound...

Installation Instructions (All Languages)
Page 8
...replaced by a 15 amp circuit breaker or time delay fuse. Do not use an extension cord with 3-prong grounding plug. For personal safety, this cooktop. The controls do not have it is properly grounded. Use the marks as a guide and adjust the flame as needed. Disconnect electrical supply cord ... electric igniters should be properly grounded. Electrical Requirements 120 volt, 60 Hertz, properly grounded branch circuit protected by a properly grounded 3-prong wall receptacle. GAS COOKTOP INSTALLATION INSTRUCTIONS (For 30" & 36" Models) 6. Turn on Electrical Power and Open Main Shutoff...
...replaced by a 15 amp circuit breaker or time delay fuse. Do not use an extension cord with 3-prong grounding plug. For personal safety, this cooktop. The controls do not have it is properly grounded. Use the marks as a guide and adjust the flame as needed. Disconnect electrical supply cord ... electric igniters should be properly grounded. Electrical Requirements 120 volt, 60 Hertz, properly grounded branch circuit protected by a properly grounded 3-prong wall receptacle. GAS COOKTOP INSTALLATION INSTRUCTIONS (For 30" & 36" Models) 6. Turn on Electrical Power and Open Main Shutoff...

Installation Instructions (All Languages)
Page 9
... about your Use and Care Guide. Remove the surface burner control knob. d. When ordering parts for Service Checklist and operating instructions in this appliance. GAS COOKTOP INSTALLATION INSTRUCTIONS (For 30" & 36" Models) 4. Quickly turn knob from the serial plate of combustion and ventilation air to order parts. 9 c. When All Hookups are Complete Make...
... about your Use and Care Guide. Remove the surface burner control knob. d. When ordering parts for Service Checklist and operating instructions in this appliance. GAS COOKTOP INSTALLATION INSTRUCTIONS (For 30" & 36" Models) 4. Quickly turn knob from the serial plate of combustion and ventilation air to order parts. 9 c. When All Hookups are Complete Make...
