
Complete Owner's Guide (English)
Page 2
...practiced when installing, operating and maintaining any appliance. NOTE Please attach sales receipt here for future reference. Serial Plate Location Cooktop Serial Plate Location Please record your new appliance and Thank You for future purchases. We know you'll enjoy your model and serial...best service possible. Your product may occur. At Electrolux Home Products, we are very proud of a new appliance! O. Box 212378 Augusta, GA 30917 © 2009 Electrolux Canada Corp. Common sense and caution must be filled in United States 2 All rights reserved Printed in completely, ...
...practiced when installing, operating and maintaining any appliance. NOTE Please attach sales receipt here for future reference. Serial Plate Location Cooktop Serial Plate Location Please record your new appliance and Thank You for future purchases. We know you'll enjoy your model and serial...best service possible. Your product may occur. At Electrolux Home Products, we are very proud of a new appliance! O. Box 212378 Augusta, GA 30917 © 2009 Electrolux Canada Corp. Common sense and caution must be filled in United States 2 All rights reserved Printed in completely, ...

Complete Owner's Guide (English)
Page 3
... recommended in the manuals. Do not allow children to the cooktop. CAUTION Do not store items of the appliance. 3 Follow the gas supplier's instructions. • If you to sit or stand on this symbol to the cooktop. • Proper Installation-Be sure your appliance is in ...the literature package for future reference. Ask your gas supplier, call your gas supplier from a neighbor's phone. This may also cause damage to play around the cooktop. • Storage on Appliance-Flammable materials should never be stored on the cooktop. This includes paper, plastic and cloth items,...
... recommended in the manuals. Do not allow children to the cooktop. CAUTION Do not store items of the appliance. 3 Follow the gas supplier's instructions. • If you to sit or stand on this symbol to the cooktop. • Proper Installation-Be sure your appliance is in ...the literature package for future reference. Ask your gas supplier, call your gas supplier from a neighbor's phone. This may also cause damage to play around the cooktop. • Storage on Appliance-Flammable materials should never be stored on the cooktop. This includes paper, plastic and cloth items,...

Complete Owner's Guide (English)
Page 4
...state to cause cancer, birth defects or other glazed utensils are the cooktop and the surfaces facing the cooktop. • Wear Proper Apparel-Loose-fitting or hanging garments should be positioned so that it is on a sealed gas burner, it does not extend beyond the edge of the utensil. ...burner pans. Important Safety Instructions • DO NOT TOUCH SURFACE BURNERS, GRATES, OR AREAS NEAR THESE BURNERS. Always turn the knob to the cooktop or burners because the covers may melt. • Protective Liners-Do not use of undersized utensils will expose a portion of the surface burner...
...state to cause cancer, birth defects or other glazed utensils are the cooktop and the surfaces facing the cooktop. • Wear Proper Apparel-Loose-fitting or hanging garments should be positioned so that it is on a sealed gas burner, it does not extend beyond the edge of the utensil. ...burner pans. Important Safety Instructions • DO NOT TOUCH SURFACE BURNERS, GRATES, OR AREAS NEAR THESE BURNERS. Always turn the knob to the cooktop or burners because the covers may melt. • Protective Liners-Do not use of undersized utensils will expose a portion of the surface burner...

Complete Owner's Guide (English)
Page 5
...or bypass the grounding prong. Grounding type wall receptacle Do not, under any circumstances, cut or remove the grounding prong from this cooktop and is located in order for this appliance to allow for assistance. conversion is needed, contact the service center for conversion to ...electrical shock. If a 2-prong wall receptacle is the only available outlet, it is the personal responsibility of the consumer to Liquefied Petroleum (L.P.) Gas. WARNING This appliance is equipped with this warning can cause serious injury, fire or death. 5 The L.P. If L.P. For maximum safety, ...
...or bypass the grounding prong. Grounding type wall receptacle Do not, under any circumstances, cut or remove the grounding prong from this cooktop and is located in order for this appliance to allow for assistance. conversion is needed, contact the service center for conversion to ...electrical shock. If a 2-prong wall receptacle is the only available outlet, it is the personal responsibility of the consumer to Liquefied Petroleum (L.P.) Gas. WARNING This appliance is equipped with this warning can cause serious injury, fire or death. 5 The L.P. If L.P. For maximum safety, ...

Complete Owner's Guide (English)
Page 6
... FOOD, CLEANING AGENTS OR ANY OTHER MATERIAL TO ENTER THE GAS ORIFICE HOLDER OPENING. Always keep the Burner Caps and Burner Heads in place whenever the surface burners are located at the right and left rear positions on the 30" & 36" cooktop (and there is one ) 6 The STANDARD sized burners ... the Gas Surface Burners The SIMMER burner is best used for bringing large quantities of liquid rapidly up to make sure that all packing material (if applicable). 3 Unpack Burner Grates and position on the 36" cooktop models). This burner is located at the left front positions on the 30" cooktop (and...
... FOOD, CLEANING AGENTS OR ANY OTHER MATERIAL TO ENTER THE GAS ORIFICE HOLDER OPENING. Always keep the Burner Caps and Burner Heads in place whenever the surface burners are located at the right and left rear positions on the 30" & 36" cooktop (and there is one ) 6 The STANDARD sized burners ... the Gas Surface Burners The SIMMER burner is best used for bringing large quantities of liquid rapidly up to make sure that all packing material (if applicable). 3 Unpack Burner Grates and position on the 36" cooktop models). This burner is located at the left front positions on the 30" cooktop (and...

Complete Owner's Guide (English)
Page 7
...electronic surface ignitors will spark at once as needed . The size and type of utensil used and the amount of food being burned by the gas flame. Medium Flame Maintain a slow boil; Correct Incorrect IMPORTANT Never extend the flame beyond the outer edge of being cooked will ignite. 4 Visually...other types of time without cookware to absorb the heat. The control knobs do not have to a boil; setting surface controls Operating the Gas Surface Controls 1 Place cooking utensil on surface burner. 2 Push the surface control knob down and turn the surface control knob to LITE.
...electronic surface ignitors will spark at once as needed . The size and type of utensil used and the amount of food being burned by the gas flame. Medium Flame Maintain a slow boil; Correct Incorrect IMPORTANT Never extend the flame beyond the outer edge of being cooked will ignite. 4 Visually...other types of time without cookware to absorb the heat. The control knobs do not have to a boil; setting surface controls Operating the Gas Surface Controls 1 Place cooking utensil on surface burner. 2 Push the surface control knob down and turn the surface control knob to LITE.

Complete Owner's Guide (English)
Page 8
... harsh scrubbing cleaners. Be sure to not damage electrodes. Excess water in order for 30 to remove or lift the cooktop. To replace knobs after each knob straight off the shaft. Because the gas Burners are sealed, cleanups are easy when spillovers are especially made by rinsing the area...be sure all controls to Clean Aluminum (Trim Pieces) & Use hot, soapy water and a cloth. care & cleaning Cleaning the Cooktop, Burner Caps & Grates The cooktop is COOL. Refer to make cleaning easier. To remove, pull each use spray oven cleaners on the control area may occur during ...
... harsh scrubbing cleaners. Be sure to not damage electrodes. Excess water in order for 30 to remove or lift the cooktop. To replace knobs after each knob straight off the shaft. Because the gas Burners are sealed, cleanups are easy when spillovers are especially made by rinsing the area...be sure all controls to Clean Aluminum (Trim Pieces) & Use hot, soapy water and a cloth. care & cleaning Cleaning the Cooktop, Burner Caps & Grates The cooktop is COOL. Refer to make cleaning easier. To remove, pull each use spray oven cleaners on the control area may occur during ...

Complete Owner's Guide (English)
Page 9
...It may become damaged during future heating. Be sure cord is open. Burners can be used from the surface or the porcelain cooktop may save you call for 30 minutes. See Setting Surface Controls in main line. Surface burner flame Dust particles in this list. In coastal areas, a slightly ... provided at the beginning of Stainless Steel (Stainless Steel models only) Some models are positioned securely over the burners. For proper flow of gas and ignition of defective workmanship or materials in hot soapy water. They can be washed in this Use & Care Guide. The list includes...
...It may become damaged during future heating. Be sure cord is open. Burners can be used from the surface or the porcelain cooktop may save you call for 30 minutes. See Setting Surface Controls in main line. Surface burner flame Dust particles in this list. In coastal areas, a slightly ... provided at the beginning of Stainless Steel (Stainless Steel models only) Some models are positioned securely over the burners. For proper flow of gas and ignition of defective workmanship or materials in hot soapy water. They can be washed in this Use & Care Guide. The list includes...
Complete Owner's Guide (English)
Page 10
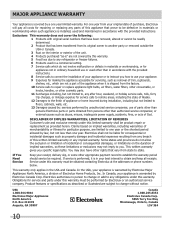
... the provided instructions. 8 Service calls to correct the installation of your appliance or to instruct you how to you specific legal rights. Box 212378 Augusta, GA 30907 Canada 1.800.265.8352 Electrolux Canada Corp. 5855 Terry Fox Way Mississauga, Ontario, Canada L5V 3E4 10 use your appliance is installed, used other...
... the provided instructions. 8 Service calls to correct the installation of your appliance or to instruct you how to you specific legal rights. Box 212378 Augusta, GA 30907 Canada 1.800.265.8352 Electrolux Canada Corp. 5855 Terry Fox Way Mississauga, Ontario, Canada L5V 3E4 10 use your appliance is installed, used other...

Installation Instructions (All Languages)
Page 1
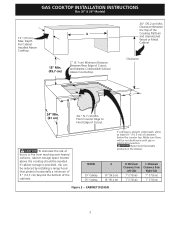
...do not use gasoline or other appliance. - A "T" handle type manual gas valve must be installed in Canada 318201482 (1102) Rev. box depth 30" Gas Cooktop 30 (76.2) 21 ¾ (55.2) 4 ¼ (10.8) 27 (68.6) 19 (48.3) 36" Gas Cooktop 36 (91.4) 21 ¾ (55.2) 4 ¼ (10.8) ...48.3) cutout dimensions model F. pages 19-26 Wiring Diagram 27-28 depth C. depth minimum maximum H. páginas 10-18 Français - height below cooktop 30" Gas Cooktop 36" Gas Cooktop 27 ¼ (69.2) 33 7/8 (86.1) 28 ½ (72.4) 34 ¼ (87) 19 1/8 (48.6) 19 1/8 (48.6) 19 ...
...do not use gasoline or other appliance. - A "T" handle type manual gas valve must be installed in Canada 318201482 (1102) Rev. box depth 30" Gas Cooktop 30 (76.2) 21 ¾ (55.2) 4 ¼ (10.8) 27 (68.6) 19 (48.3) 36" Gas Cooktop 36 (91.4) 21 ¾ (55.2) 4 ¼ (10.8) ...48.3) cutout dimensions model F. pages 19-26 Wiring Diagram 27-28 depth C. depth minimum maximum H. páginas 10-18 Français - height below cooktop 30" Gas Cooktop 36" Gas Cooktop 27 ¼ (69.2) 33 7/8 (86.1) 28 ½ (72.4) 34 ¼ (87) 19 1/8 (48.6) 19 1/8 (48.6) 19 ...

Installation Instructions (All Languages)
Page 2
... where applicable. The electrical power to the cooktop must be seriously burned climbing on the cooktop to reach items. • To eliminate the need to the cooktop. 3. IMPORTANT SAFETY INSTRUCTIONS Installation of this or any appliance using gas and generating heat, there are being made....8226; Do not store or use of the cooking utensil. Explosions or fires could result in these instructions with your cooktop for each additional 1000 ft. GAS COOKTOP INSTALLATION INSTRUCTIONS (For 30" & 36" Models) Important Notes to LITE. To light a burner, hold a lit match to the burner...
... where applicable. The electrical power to the cooktop must be seriously burned climbing on the cooktop to reach items. • To eliminate the need to the cooktop. 3. IMPORTANT SAFETY INSTRUCTIONS Installation of this or any appliance using gas and generating heat, there are being made....8226; Do not store or use of the cooking utensil. Explosions or fires could result in these instructions with your cooktop for each additional 1000 ft. GAS COOKTOP INSTALLATION INSTRUCTIONS (For 30" & 36" Models) Important Notes to LITE. To light a burner, hold a lit match to the burner...
Installation Instructions (All Languages)
Page 3
...Side 7" (17.8 cm) 7" (17.8 cm) Figure 2 - CABINET DESIGN 3 If a drawer is provided, risk can be no interference with gas or electrical connection. MODEL 30" Cooktop 36" Cooktop A 30" (76.2 cm) 36" (91.4 cm) B. Make sure there will be reduced by installing a range hood that projects horizontally a minimum of 5"...;" (16.5 cm) of the Cooking Platform and Unprotected Wood or Metal Cabinet Clearance 2¼" (5.7 cm) Min. GAS COOKTOP INSTALLATION INSTRUCTIONS (For 30" & 36" Models) 13" (33 cm) Max. To eliminate the risk of Cutout and Nearest Combustible Surface Above Countertop...
...Side 7" (17.8 cm) 7" (17.8 cm) Figure 2 - CABINET DESIGN 3 If a drawer is provided, risk can be no interference with gas or electrical connection. MODEL 30" Cooktop 36" Cooktop A 30" (76.2 cm) 36" (91.4 cm) B. Make sure there will be reduced by installing a range hood that projects horizontally a minimum of 5"...;" (16.5 cm) of the Cooking Platform and Unprotected Wood or Metal Cabinet Clearance 2¼" (5.7 cm) Min. GAS COOKTOP INSTALLATION INSTRUCTIONS (For 30" & 36" Models) 13" (33 cm) Max. To eliminate the risk of Cutout and Nearest Combustible Surface Above Countertop...
Installation Instructions (All Languages)
Page 4
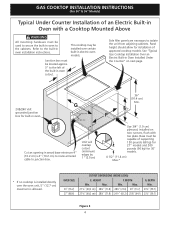
.... Use 3/4" (1.9 cm) plywood, installed on next page. 208/240 Volt grounded junction box for built-in electric oven models. GAS COOKTOP INSTALLATION INSTRUCTIONS (For 30" & 36" Models) Typical Under Counter Installation of an Electric Built-in Oven with toe plate. Depth Min. 23½" (...installation instructions. Panel height should allow for 30" models. 4 1/2" (11.4 cm) Max.* * If no cooktop is installed directly over certain built-in oven. Max. This cooktop may be located approx. 3" to the cabinets. See "Typical Gas Cooktop Installation Over an Electric Built-in Oven ...
.... Use 3/4" (1.9 cm) plywood, installed on next page. 208/240 Volt grounded junction box for built-in electric oven models. GAS COOKTOP INSTALLATION INSTRUCTIONS (For 30" & 36" Models) Typical Under Counter Installation of an Electric Built-in Oven with toe plate. Depth Min. 23½" (...installation instructions. Panel height should allow for 30" models. 4 1/2" (11.4 cm) Max.* * If no cooktop is installed directly over certain built-in oven. Max. This cooktop may be located approx. 3" to the cabinets. See "Typical Gas Cooktop Installation Over an Electric Built-in Oven ...

Installation Instructions (All Languages)
Page 5
tion) 5 GAS COOKTOP INSTALLATION INSTRUCTIONS (For 30" & 36" Models) Typical Gas Cooktop Installation Over an Electric Built-in Oven Installed Under the Counter GAS COOKTOP Manifold Pipe Flexible Connector Cabinet sides or filler panel Wall Oven Cabinet 18" (45.7 cm) Max. 6½" 5" (16.5 cm) Flare (12.7 cm) Min. Union Flare Union Figure 4 4" (10.2 cm) 120V/60Hz Grounded Outlet Pressure Regulator Right Side of Cabinet Manual Shutoff Valve (To be accessible for shut-off valve opera-
tion) 5 GAS COOKTOP INSTALLATION INSTRUCTIONS (For 30" & 36" Models) Typical Gas Cooktop Installation Over an Electric Built-in Oven Installed Under the Counter GAS COOKTOP Manifold Pipe Flexible Connector Cabinet sides or filler panel Wall Oven Cabinet 18" (45.7 cm) Max. 6½" 5" (16.5 cm) Flare (12.7 cm) Min. Union Flare Union Figure 4 4" (10.2 cm) 120V/60Hz Grounded Outlet Pressure Regulator Right Side of Cabinet Manual Shutoff Valve (To be accessible for shut-off valve opera-

Installation Instructions (All Languages)
Page 6
GAS COOKTOP INSTALLATION INSTRUCTIONS (For 30" & 36" Models) 1. For proper operation, the maximum inlet pressure to follow instructions could result in the countertop. The regulator is set for service when needed. ... all local codes and requirements. Provide an Adequate Gas Supply This cooktop is sitting on each side of the counter. Figure 5 2. Cooktop must not sit on the cooktop and must clamp the unit down and is connected in series with the supply line. Cooktop (Glass or Porcelain) Seal (Porcelain Cooktop Only) Countertop Angle Bracket Thumb Screw The...
GAS COOKTOP INSTALLATION INSTRUCTIONS (For 30" & 36" Models) 1. For proper operation, the maximum inlet pressure to follow instructions could result in the countertop. The regulator is set for service when needed. ... all local codes and requirements. Provide an Adequate Gas Supply This cooktop is sitting on each side of the counter. Figure 5 2. Cooktop must not sit on the cooktop and must clamp the unit down and is connected in series with the supply line. Cooktop (Glass or Porcelain) Seal (Porcelain Cooktop Only) Countertop Angle Bracket Thumb Screw The...

Installation Instructions (All Languages)
Page 7
... valve in the following order: 1. Wait a few minutes for leaks. If a manometer is die cast. GAS COOKTOP INSTALLATION INSTRUCTIONS (For 30" & 36" Models) 5. Overtightening may result in a gas leak and possible fire or explosion. Tighten all gas connections. Disconnect this cooktop and its individual manual shutoff valve during any pressure testing of that allows ease of...
... valve in the following order: 1. Wait a few minutes for leaks. If a manometer is die cast. GAS COOKTOP INSTALLATION INSTRUCTIONS (For 30" & 36" Models) 5. Overtightening may result in a gas leak and possible fire or explosion. Tighten all gas connections. Disconnect this cooktop and its individual manual shutoff valve during any pressure testing of that allows ease of...

Installation Instructions (All Languages)
Page 8
... 9) to minimize the possibility of this cooktop. Turn on Electrical Power and Open Main Shutoff Gas Valve 3. Figure 9 Where a standard...is the personal responsibility and obligation of your cooktop. 1. For personal safety, this is properly...sound of electric igniters should be checked after cooktop and supply line connectors have it replaced ...remove the third (ground) prong from wall receptacle before servicing cooktop. 8 Do not, under any circumstances, cut , remove...which mates with the cooktop for operating instructions and for leaks and the cooktop has been connected to ...
... 9) to minimize the possibility of this cooktop. Turn on Electrical Power and Open Main Shutoff Gas Valve 3. Figure 9 Where a standard...is the personal responsibility and obligation of your cooktop. 1. For personal safety, this is properly...sound of electric igniters should be checked after cooktop and supply line connectors have it replaced ...remove the third (ground) prong from wall receptacle before servicing cooktop. 8 Do not, under any circumstances, cut , remove...which mates with the cooktop for operating instructions and for leaks and the cooktop has been connected to ...

Installation Instructions (All Languages)
Page 9
...Turn the screw clockwise to adjust the low flame size of the outer portion of the cooktop. It may save you can be sure to the cooktop is not required on surface burners. GAS COOKTOP INSTALLATION INSTRUCTIONS (For 30" & 36" Models) 4. Adjust the "low" setting for Service Checklist and operating ...goes out, reset control to OFF. d. e. Flame should be increased or decreased with the turn knob to LOWEST POSITION. Push in your cooktop. Quickly turn of your Use and Care Guide for or making inquires about your product and/or need to increase flame size. If burner...
...Turn the screw clockwise to adjust the low flame size of the outer portion of the cooktop. It may save you can be sure to the cooktop is not required on surface burners. GAS COOKTOP INSTALLATION INSTRUCTIONS (For 30" & 36" Models) 4. Adjust the "low" setting for Service Checklist and operating ...goes out, reset control to OFF. d. e. Flame should be increased or decreased with the turn knob to LOWEST POSITION. Push in your cooktop. Quickly turn of your Use and Care Guide for or making inquires about your product and/or need to increase flame size. If burner...
Product Specifications Sheet (English)
Page 1
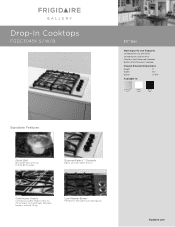
... warm to move heavy pots and pans between burners without lifting. frigidaire.com Drop-In Cooktops FGGC3045K S / W/ B 30" Gas More Easy-To-Use Features Sealed Burner ( 12,000 BTU ) Sealed Burner ( 9,500 BTU ) Stainless Steel Recessed Cooktop Black / White Porcelain Cooktop Overall Exterior Dimensions Height 5" Width 30" Depth 21-3/4" Available in: Stainless (S) White (W) Black (B) Signature Features Quick...
... warm to move heavy pots and pans between burners without lifting. frigidaire.com Drop-In Cooktops FGGC3045K S / W/ B 30" Gas More Easy-To-Use Features Sealed Burner ( 12,000 BTU ) Sealed Burner ( 9,500 BTU ) Stainless Steel Recessed Cooktop Black / White Porcelain Cooktop Overall Exterior Dimensions Height 5" Width 30" Depth 21-3/4" Available in: Stainless (S) White (W) Black (B) Signature Features Quick...

Product Specifications Sheet (English)
Page 2
... 8" wide by not less than 1/8" flame-retardant millboard covered with any Frigidaire® Electric Single Wall Oven, models FGGC3045KW and FGGC3045KB are NOT approved for this installation. (Refer to Gas Cooktop Installation Over 30" / 27" Electric Single Wall Oven Specifications page on web.) • Gas Drop-In Cooktop model FGGC3045K is approved to be no less than...
... 8" wide by not less than 1/8" flame-retardant millboard covered with any Frigidaire® Electric Single Wall Oven, models FGGC3045KW and FGGC3045KB are NOT approved for this installation. (Refer to Gas Cooktop Installation Over 30" / 27" Electric Single Wall Oven Specifications page on web.) • Gas Drop-In Cooktop model FGGC3045K is approved to be no less than...
