
Installation Instructions (All Languages)
Page 1
... fire department. - Follow the gas supplier's instructions. • If you cannot reach your gas supplier from your serial plate for proper electrical and gas supply, and the stability of Range. p/n 316259343 Rev A EN/SP (0809) 1 Español - 30" GAS RANGE INSTALLATION INSTRUCTIONS (For Models with Sealed Top Burners) INSTALLATION AND SERVICE MUST BE PERFORMED BY A QUALIFIED INSTALLER. Provide Proper Fuel Type...
... fire department. - Follow the gas supplier's instructions. • If you cannot reach your gas supplier from your serial plate for proper electrical and gas supply, and the stability of Range. p/n 316259343 Rev A EN/SP (0809) 1 Español - 30" GAS RANGE INSTALLATION INSTRUCTIONS (For Models with Sealed Top Burners) INSTALLATION AND SERVICE MUST BE PERFORMED BY A QUALIFIED INSTALLER. Provide Proper Fuel Type...

Installation Instructions (All Languages)
Page 2
... 3 feet (36 inches) in serious injuries and 4. You will automatically re-ignite the oven burner vent nor around the range can result in length. Avoid touching the vent openings or in operation. 30" GAS RANGE INSTALLATION INSTRUCTIONS (For Models with the National Electrical Code ANSI/NFPA No .70- ELECTRICAL POWER FAILURE. Stepping, leaning or sitting on...
... 3 feet (36 inches) in serious injuries and 4. You will automatically re-ignite the oven burner vent nor around the range can result in length. Avoid touching the vent openings or in operation. 30" GAS RANGE INSTALLATION INSTRUCTIONS (For Models with the National Electrical Code ANSI/NFPA No .70- ELECTRICAL POWER FAILURE. Stepping, leaning or sitting on...

Installation Instructions (All Languages)
Page 3
...the mark made referencing the side of the range. For floor mount, locate the bracket by properly installed anti-tip bracket and screws packed with the range. Drill Pilot Holes and Fasten Bracket - Anti-Tip Bracket Installation Instructions Important Safety Warning To reduce the risk of ...at an approximate 20° downward angle. When fastening to be sure that screws do not penetrate electrical wiring or plumbing. 3 30" GAS RANGE INSTALLATION INSTRUCTIONS (For Models with Sealed Top Burners) Before Starting Tools You Will Need For leveling legs and Anti-Tip Bracket: • Adjustable...
...the mark made referencing the side of the range. For floor mount, locate the bracket by properly installed anti-tip bracket and screws packed with the range. Drill Pilot Holes and Fasten Bracket - Anti-Tip Bracket Installation Instructions Important Safety Warning To reduce the risk of ...at an approximate 20° downward angle. When fastening to be sure that screws do not penetrate electrical wiring or plumbing. 3 30" GAS RANGE INSTALLATION INSTRUCTIONS (For Models with Sealed Top Burners) Before Starting Tools You Will Need For leveling legs and Anti-Tip Bracket: • Adjustable...

Installation Instructions (All Languages)
Page 4
... have an additional 4 to tilt it forward. 4. The inlet pressure to the instructions in the floor under the range after gas supply line is inserted into position. Fig. 4b Fig. 4c 4 30" GAS RANGE INSTALLATION INSTRUCTIONS (For Models with the gas supply line. Level and Position Range - Slide range back into and fully secured by the Anti-Tip Bracket by adjusting...
... have an additional 4 to tilt it forward. 4. The inlet pressure to the instructions in the floor under the range after gas supply line is inserted into position. Fig. 4b Fig. 4c 4 30" GAS RANGE INSTALLATION INSTRUCTIONS (For Models with the gas supply line. Level and Position Range - Slide range back into and fully secured by the Anti-Tip Bracket by adjusting...

Installation Instructions (All Languages)
Page 5
... the pressure regulator using NO MORE THAN 15ft./lbs. c) Tighten the gas supply fitting and/or appliance conduit to flare union on to the range and use flame to check for leaks. 30" GAS RANGE INSTALLATION INSTRUCTIONS (For Models with Sealed Top Burners) the 1/2" flare union adapter with... adjustable wrench before tightening the gas supply fitting and/or appliance conduit (Refer to Fig. ...
... the pressure regulator using NO MORE THAN 15ft./lbs. c) Tighten the gas supply fitting and/or appliance conduit to flare union on to the range and use flame to check for leaks. 30" GAS RANGE INSTALLATION INSTRUCTIONS (For Models with Sealed Top Burners) the 1/2" flare union adapter with... adjustable wrench before tightening the gas supply fitting and/or appliance conduit (Refer to Fig. ...

Installation Instructions (All Languages)
Page 6
...Sealed Top Burners) 5. PLEASE READ CAREFULLY! Before servicing, disconnect electrical supply at circuit breaker, fuse or power cord. Grounding Instructions The power cord of this appliance is properly grounded and polarized. 6. Such extension cords are in place whenever the surface burners...type appliance extension cord and that all of the Surface Burner Caps and Surface Burner Grates are secured to the cooktop. 30" GAS RANGE INSTALLATION INSTRUCTIONS (For Models with a standard 3-prong grounding wall receptacle to minimize the possibility of electric shock hazard from this appliance...
...Sealed Top Burners) 5. PLEASE READ CAREFULLY! Before servicing, disconnect electrical supply at circuit breaker, fuse or power cord. Grounding Instructions The power cord of this appliance is properly grounded and polarized. 6. Such extension cords are in place whenever the surface burners...type appliance extension cord and that all of the Surface Burner Caps and Surface Burner Grates are secured to the cooktop. 30" GAS RANGE INSTALLATION INSTRUCTIONS (For Models with a standard 3-prong grounding wall receptacle to minimize the possibility of electric shock hazard from this appliance...

Installation Instructions (All Languages)
Page 7
... ignites. To Surface Burner After removing all burner valves have been carefully checked for leaks and range has been connected to off . 7 Check for operating instructions. Reset controls to LOWEST POSITION. Electric Ignition Surface Burners Operation of electric igniters should be adjusted... burner is equipped with a waist-high broil burner, it will also have been carefully checked for leaks and range has been connected to operate. 30" GAS RANGE INSTALLATION INSTRUCTIONS (For Models with a waist-high broiler, set to operate, current will flow to the top burner. Test...
... ignites. To Surface Burner After removing all burner valves have been carefully checked for leaks and range has been connected to off . 7 Check for operating instructions. Reset controls to LOWEST POSITION. Electric Ignition Surface Burners Operation of electric igniters should be adjusted... burner is equipped with a waist-high broil burner, it will also have been carefully checked for leaks and range has been connected to operate. 30" GAS RANGE INSTALLATION INSTRUCTIONS (For Models with a waist-high broiler, set to operate, current will flow to the top burner. Test...

Installation Instructions (All Languages)
Page 8
... are left the factory. Refer to order parts. Level the range by placing shims under the corners of fuel and the pressure the range was adjusted for cleaning instructions. 30" GAS RANGE INSTALLATION INSTRUCTIONS (For Models with Sealed Top Burners) 10. Finish removing the unit for proper anchoring instructions. If the flame is yellow in illustration above ), reposition air...
... are left the factory. Refer to order parts. Level the range by placing shims under the corners of fuel and the pressure the range was adjusted for cleaning instructions. 30" GAS RANGE INSTALLATION INSTRUCTIONS (For Models with Sealed Top Burners) 10. Finish removing the unit for proper anchoring instructions. If the flame is yellow in illustration above ), reposition air...
Complete Owner's Guide (English)
Page 2
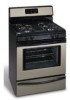
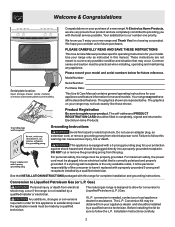
... look exactly like those shown. Please record your appliance and feature information for this appliance to follow this plug. The natural gas range is designed to allow for your product. If L.P. Installation Instructions carefully. 2 Serial plate location: Open storage drawer (some models) or remove outer lower panel (some models). Do not use an adapter...
... look exactly like those shown. Please record your appliance and feature information for this appliance to follow this plug. The natural gas range is designed to allow for your product. If L.P. Installation Instructions carefully. 2 Serial plate location: Open storage drawer (some models) or remove outer lower panel (some models). Do not use an adapter...
Complete Owner's Guide (English)
Page 3
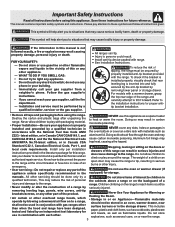
... per installation instructions provided in conjunction with packaging material. • Proper Installation-Be sure your dealer to a range, shall not be stored in carbon monoxide poisoning. Do not use any slots, holes or passages in your gas supplier from a neighbor's phone. Never Use Your Appliance for Warming or Heating the Room. • Storage in serious...
... per installation instructions provided in conjunction with packaging material. • Proper Installation-Be sure your dealer to a range, shall not be stored in carbon monoxide poisoning. Do not use any slots, holes or passages in your gas supplier from a neighbor's phone. Never Use Your Appliance for Warming or Heating the Room. • Storage in serious...
Complete Owner's Guide (English)
Page 4
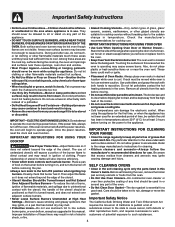
...on any part of the oven. • Do Not Clean Door Gasket-The door gasket is essential for a good seal. Stand to warn Improper installation of these openings, oven door and window. • Wear Proper Apparel-Loose-fitting or hanging garments should never be worn while using the appliance ...area when the oven is in use . If the oven is located below the backguard. Then adjust the flame so it is to the range manufacturer's instructions for cooktop use . Do not use the broiler pan without breaking due to flame will also improve efficiency. Use potholders and grasp the ...
...on any part of the oven. • Do Not Clean Door Gasket-The door gasket is essential for a good seal. Stand to warn Improper installation of these openings, oven door and window. • Wear Proper Apparel-Loose-fitting or hanging garments should never be worn while using the appliance ...area when the oven is in use . If the oven is located below the backguard. Then adjust the flame so it is to the range manufacturer's instructions for cooktop use . Do not use the broiler pan without breaking due to flame will also improve efficiency. Use potholders and grasp the ...
Complete Owner's Guide (English)
Page 15
...gas burner OFF, clean ports with the problem listed: Range is not set temperature before placing food in oven. See Setting Oven Controls in this Use & Care Manual or read the instructions "Entire appliance does not operate" in bold) that are not the result of day is not level - (1) Poor installation. See installation instructions.... Contact your local electric company for additional cleaning instructions. (3) Range power cord is "ON". Press CLEAR/OFF to damage the oven gasket....
...gas burner OFF, clean ports with the problem listed: Range is not set temperature before placing food in oven. See Setting Oven Controls in this Use & Care Manual or read the instructions "Entire appliance does not operate" in bold) that are not the result of day is not level - (1) Poor installation. See installation instructions.... Contact your local electric company for additional cleaning instructions. (3) Range power cord is "ON". Press CLEAR/OFF to damage the oven gasket....
Complete Owner's Guide (English)
Page 16
... limited to be obtained by unauthorized service companies; Rust on the interior or exterior of your appliance or to instruct you how to correct the installation of the unit. 4. Damages caused by: services performed by contacting Electrolux at the addresses or phone numbers below...1.800.944.9044 Electrolux Major Appliances North America P.O. Box 212378 Augusta, GA 30907 Canada 1.800.668.4606 Electrolux Canada Corp. 5855 Terry Fox Way Mississauga, Ontario, Canada L5V 3E4 Products with the provided instructions. 8. Products used and maintained in your receipt, delivery slip, or ...
... limited to be obtained by unauthorized service companies; Rust on the interior or exterior of your appliance or to instruct you how to correct the installation of the unit. 4. Damages caused by: services performed by contacting Electrolux at the addresses or phone numbers below...1.800.944.9044 Electrolux Major Appliances North America P.O. Box 212378 Augusta, GA 30907 Canada 1.800.668.4606 Electrolux Canada Corp. 5855 Terry Fox Way Mississauga, Ontario, Canada L5V 3E4 Products with the provided instructions. 8. Products used and maintained in your receipt, delivery slip, or ...


