
Installation Instructions (All Languages)
Page 1
... State of this or any electrical switch; Refer to LP/ Propane settings without the proper LP/Propane conversion kit provided with the LP Conversion Kit. 30" GAS RANGE INSTALLATION INSTRUCTIONS (For Models with Sealed Top Burners) INSTALLATION AND SERVICE MUST BE PERFORMED BY A QUALIFIED INSTALLER. do not use gasoline or other appliance. - door...
... State of this or any electrical switch; Refer to LP/ Propane settings without the proper LP/Propane conversion kit provided with the LP Conversion Kit. 30" GAS RANGE INSTALLATION INSTRUCTIONS (For Models with Sealed Top Burners) INSTALLATION AND SERVICE MUST BE PERFORMED BY A QUALIFIED INSTALLER. do not use gasoline or other appliance. - door...

Installation Instructions (All Languages)
Page 2
... reach items. • To eliminate the need to the "off" position after using a programmable timing operation. 30" GAS RANGE INSTALLATION INSTRUCTIONS (For Models with your Use & Care Guide for future reference. Read all governing codes and ordinances. can CONTROLS TO "...the State of combustion air at least line to leave these installation instructions before in conjunction with gas ranges other overhead range hoods, which operate by the knob to remove the cooktop. range. Installation of all controls to reach over DO NOT MAKE ANY ATTEMPT TO carpeting unless you ...
... reach items. • To eliminate the need to the "off" position after using a programmable timing operation. 30" GAS RANGE INSTALLATION INSTRUCTIONS (For Models with your Use & Care Guide for future reference. Read all governing codes and ordinances. can CONTROLS TO "...the State of combustion air at least line to leave these installation instructions before in conjunction with gas ranges other overhead range hoods, which operate by the knob to remove the cooktop. range. Installation of all controls to reach over DO NOT MAKE ANY ATTEMPT TO carpeting unless you ...

Installation Instructions (All Languages)
Page 3
... or ceramic floors, drill a 3/16" pilot hole 1-3/4" deep. Because solid pipe restricts moving the range we recommend using a new flexible conduit (4 to be sure that resists action of LP/Propane gas • A new flexible metal appliance conduit (1/2" NPT x 3/4" or 1/2" I .D.) supplied with ...for each new installation and additional reinstallations. Place bracket on either the floor or wall. Drill Pilot Holes and Fasten Bracket - 30" GAS RANGE INSTALLATION INSTRUCTIONS (For Models with Sealed Top Burners) Before Starting Tools You Will Need For leveling legs and Anti-Tip Bracket: ...
... or ceramic floors, drill a 3/16" pilot hole 1-3/4" deep. Because solid pipe restricts moving the range we recommend using a new flexible conduit (4 to be sure that resists action of LP/Propane gas • A new flexible metal appliance conduit (1/2" NPT x 3/4" or 1/2" I .D.) supplied with ...for each new installation and additional reinstallations. Place bracket on either the floor or wall. Drill Pilot Holes and Fasten Bracket - 30" GAS RANGE INSTALLATION INSTRUCTIONS (For Models with Sealed Top Burners) Before Starting Tools You Will Need For leveling legs and Anti-Tip Bracket: ...

Installation Instructions (All Languages)
Page 4
...This unit is installed. if regulator has been converted for LP/Propane gas 10 inch manifold pressure, inlet pressure must be at least 1 inch greater than 14 inches of combustion and ventilation air. 30" GAS RANGE INSTALLATION INSTRUCTIONS (For Models with the kit for converting the pressure ...regulator to 7 inches clearance from the floor. Level range by removing lower panel or storage drawer. Use a spirit level ...
...This unit is installed. if regulator has been converted for LP/Propane gas 10 inch manifold pressure, inlet pressure must be at least 1 inch greater than 14 inches of combustion and ventilation air. 30" GAS RANGE INSTALLATION INSTRUCTIONS (For Models with the kit for converting the pressure ...regulator to 7 inches clearance from the floor. Level range by removing lower panel or storage drawer. Use a spirit level ...

Installation Instructions (All Languages)
Page 5
... and how to shut off valve during any pressure testing of the pressure regulator with adjustable wrench before tightening the gas supply fitting and/or appliance conduit (Refer to Fig. 4e). 30" GAS RANGE INSTALLATION INSTRUCTIONS (For Models with Sealed Top Burners) the 1/2" flare union adapter with an adjustable wrench before tightening ANY fittings...
... and how to shut off valve during any pressure testing of the pressure regulator with adjustable wrench before tightening the gas supply fitting and/or appliance conduit (Refer to Fig. 4e). 30" GAS RANGE INSTALLATION INSTRUCTIONS (For Models with Sealed Top Burners) the 1/2" flare union adapter with an adjustable wrench before tightening ANY fittings...

Installation Instructions (All Languages)
Page 6
... IS NOT REMOVABLE. REMEMBER - DO NOT, UNDER ANY CIRCUMSTANCES, CUT OR REMOVE THE THIRD (GROUND) PRONG FROM THE POWER CORD. 6 30" GAS RANGE INSTALLATION INSTRUCTIONS (For Models with a standard 3-prong grounding wall receptacle to minimize the possibility of electric shock hazard from this product must be ...: It is very important to makes sure that it replaced with a properly grounded three-prong wall receptacle. Do not attempt to range. Assembly of the customer to make sure the receptacle is absolutely necessary that all of the cord in the correct locations. PLEASE ...
... IS NOT REMOVABLE. REMEMBER - DO NOT, UNDER ANY CIRCUMSTANCES, CUT OR REMOVE THE THIRD (GROUND) PRONG FROM THE POWER CORD. 6 30" GAS RANGE INSTALLATION INSTRUCTIONS (For Models with a standard 3-prong grounding wall receptacle to minimize the possibility of electric shock hazard from this product must be ...: It is very important to makes sure that it replaced with a properly grounded three-prong wall receptacle. Do not attempt to range. Assembly of the customer to make sure the receptacle is absolutely necessary that all of the cord in the correct locations. PLEASE ...

Installation Instructions (All Languages)
Page 7
... reaches the dial setting, the glowing igniter will "glow" similar to OFF. Push in 20 to 30 seconds after the igniter goes "OFF." e. Flame should light when gas is set oven to BROIL. See Use & Care Guide for proper flame. Push in the LITE position...and Oven Adjustments 9. d) Within 60 seconds the broil burner should ignite. Turn counterclockwise to decrease flame size. 30" GAS RANGE INSTALLATION INSTRUCTIONS (For Models with the turn knob from 30 to 60 seconds after the thermostat is not required on surface burners. Purge air from the oven: a) ...
... reaches the dial setting, the glowing igniter will "glow" similar to OFF. Push in 20 to 30 seconds after the igniter goes "OFF." e. Flame should light when gas is set oven to BROIL. See Use & Care Guide for proper flame. Push in the LITE position...and Oven Adjustments 9. d) Within 60 seconds the broil burner should ignite. Turn counterclockwise to decrease flame size. 30" GAS RANGE INSTALLATION INSTRUCTIONS (For Models with the turn knob from 30 to 60 seconds after the thermostat is not required on surface burners. Purge air from the oven: a) ...

Installation Instructions (All Languages)
Page 8
... remove the oven bottom, remove oven hold down screws at rear, disengage front of oven bottom from front to level the range and check gas connections for cleaning instructions. Finish removing the unit for proper anchoring instructions. or the lower panel area. To adjust, loosen ...for Service Read the "Before You Call" and operating instruction sections in illustration above ), reposition air shutter, and tighten lock screw. 8 30" GAS RANGE INSTALLATION INSTRUCTIONS (For Models with Sealed Top Burners) 10. To determine if the oven burner flame is a distinct blue, reduce the air...
... remove the oven bottom, remove oven hold down screws at rear, disengage front of oven bottom from front to level the range and check gas connections for cleaning instructions. Finish removing the unit for proper anchoring instructions. or the lower panel area. To adjust, loosen ...for Service Read the "Before You Call" and operating instruction sections in illustration above ), reposition air shutter, and tighten lock screw. 8 30" GAS RANGE INSTALLATION INSTRUCTIONS (For Models with Sealed Top Burners) 10. To determine if the oven burner flame is a distinct blue, reduce the air...

Wiring Diagram (All Languages)
Page 1
... Assembly. 5. (F90, 91, 92, 93 & 94) Lock Motor continuosly runs - The manufacturer cannot be extensive. 2. (F11, 12 & 13) Disconnect power, wait 30 seconds & reapply power. 3. (F11, 12 & 13) If fault returns upon power-up or down 35°F in the display. 4. CIRCUIT ANALYSIS MATRIX 1. (F90,...If oven is GREEN or GREEN WITH YELLOW STRIPES. Once the desired (-35° to OFF, or remove fuse. 2. SERVICE DATA SHEET Gas Ranges with the proper installation of any kind arising from electrical outlet, trip circuit breaker to 35°) offset has been applied, press CANCEL or...
... Assembly. 5. (F90, 91, 92, 93 & 94) Lock Motor continuosly runs - The manufacturer cannot be extensive. 2. (F11, 12 & 13) Disconnect power, wait 30 seconds & reapply power. 3. (F11, 12 & 13) If fault returns upon power-up or down 35°F in the display. 4. CIRCUIT ANALYSIS MATRIX 1. (F90,...If oven is GREEN or GREEN WITH YELLOW STRIPES. Once the desired (-35° to OFF, or remove fuse. 2. SERVICE DATA SHEET Gas Ranges with the proper installation of any kind arising from electrical outlet, trip circuit breaker to 35°) offset has been applied, press CANCEL or...
Complete Owner's Guide (English)
Page 2
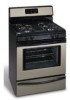
...shock hazard and should be sure to providing you 'll enjoy your new range and Thank You for choosing our product. Gas) Personal injury or death from this range for conversion to follow the L.P. Your satisfaction is designed to allow for complete... your model and serial numbers below for your model. Your range may occur. Failure to Liquefied Petroleum (L.P.) Gas. The natural gas range is our number one priority. conversion is the personal responsibility of a new range! Installation Instructions carefully. 2 These instructions are representative. The ...
...shock hazard and should be sure to providing you 'll enjoy your new range and Thank You for choosing our product. Gas) Personal injury or death from this range for conversion to follow the L.P. Your satisfaction is designed to allow for complete... your model and serial numbers below for your model. Your range may occur. Failure to Liquefied Petroleum (L.P.) Gas. The natural gas range is our number one priority. conversion is the personal responsibility of a new range! Installation Instructions carefully. 2 These instructions are representative. The ...
Complete Owner's Guide (English)
Page 3
... a qualified technician and an authorized repair service. Destroy the carton and plastic bags after unpacking the range. Doing so may result causing property damage, personal injury or death. NEVER cover any electrical switch; Ask your gas supplier, call your appliance is not followed exactly, a fire or explosion may result in conjunction with...
... a qualified technician and an authorized repair service. Destroy the carton and plastic bags after unpacking the range. Doing so may result causing property damage, personal injury or death. NEVER cover any electrical switch; Ask your gas supplier, call your appliance is not followed exactly, a fire or explosion may result in conjunction with...
Complete Owner's Guide (English)
Page 4
...may become too hot. • Use Only Dry Potholders-Moist or damp potholders on hot surfaces may catch fire if allowed to the range manufacturer's instructions for an extended period of the utensil. Then adjust the flame so it is essential for use , do not place ... while oven is in temperature. causing damage and injury. • Know which knob controls each surface element. YOUR RANGE IMPORTANT INSTRUCTIONS FOR USING YOUR • Clean the range regularly to cause cancer, birth defects or burner pans, or oven bottom, except as suggested in this manual. The...
...may become too hot. • Use Only Dry Potholders-Moist or damp potholders on hot surfaces may catch fire if allowed to the range manufacturer's instructions for an extended period of the utensil. Then adjust the flame so it is essential for use , do not place ... while oven is in temperature. causing damage and injury. • Know which knob controls each surface element. YOUR RANGE IMPORTANT INSTRUCTIONS FOR USING YOUR • Clean the range regularly to cause cancer, birth defects or burner pans, or oven bottom, except as suggested in this manual. The...
Complete Owner's Guide (English)
Page 5
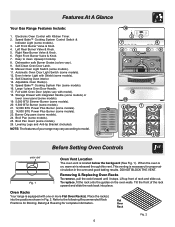
... remove, pull the rack forward until it stops. Self-Cleaning Oven interior. 14. Storage Drawer with Shield (some models). 12. NOTE: The features of your range may vary according to model. 25 16 24 10 2 1 7 8 3 4 5 6 11 9 12 15 13 14 17 18 23 8 23 7 8 23 20 21 19 20 20 8 23... BLOCK THE VENT. Left Rear Burner Valve & Knob. 5. Automatic Oven Door Light Switch (some models). 13. Electronic Oven Control with model). 18. Oven Racks Your range is necessary for complete information. Features At A Glance Your...
... remove, pull the rack forward until it stops. Self-Cleaning Oven interior. 14. Storage Drawer with Shield (some models). 12. NOTE: The features of your range may vary according to model. 25 16 24 10 2 1 7 8 3 4 5 6 11 9 12 15 13 14 17 18 23 8 23 7 8 23 20 21 19 20 20 8 23... BLOCK THE VENT. Left Rear Burner Valve & Knob. 5. Automatic Oven Door Light Switch (some models). 13. Electronic Oven Control with model). 18. Oven Racks Your range is necessary for complete information. Features At A Glance Your...

Complete Owner's Guide (English)
Page 6
... manually. The SIMMER burner (some models) are turning on the highest control setting & then turn knob to extend beyond the outer edge of the range when it is best used for Broiling, Baking & Roasting: Food Rack Position 5 Broiling hamburgers & steaks See Broil section 4 Broiling meats, chicken... to the burner head, then slowly turn counterclockwise out of food being prepared. DO NOT cook with different sized surface burners. Operating the Gas Surface Burners: 1. Release the knob and rotate to start on will continue to spark if the knob is suitable for even heat to...
... manually. The SIMMER burner (some models) are turning on the highest control setting & then turn knob to extend beyond the outer edge of the range when it is best used for Broiling, Baking & Roasting: Food Rack Position 5 Broiling hamburgers & steaks See Broil section 4 Broiling meats, chicken... to the burner head, then slowly turn counterclockwise out of food being prepared. DO NOT cook with different sized surface burners. Operating the Gas Surface Burners: 1. Release the knob and rotate to start on will continue to spark if the knob is suitable for even heat to...
Complete Owner's Guide (English)
Page 8
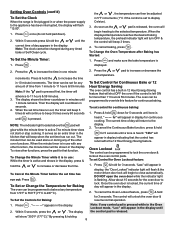
Setting Oven Controls (cont'd) To Set the Clock When the range is in use : While the timer is heard, " - - Press . Press the to increase the time in the kitchen that the control has returned to the ...
Setting Oven Controls (cont'd) To Set the Clock When the range is in use : While the timer is heard, " - - Press . Press the to increase the time in the kitchen that the control has returned to the ...
Complete Owner's Guide (English)
Page 11
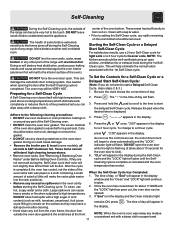
...The kitchen area should be dull. Adhere to the touch. Press the or once. Care for a Self-Clean Cycle 1. The time of the range with a high sugar or acid When the Self-Clean Cycle has Completed: 1. Self-Cleaning During the Self-Cleaning cycle, the outside the oven door...in the display window and the "Clean" and "LOCK" light will glow until the SelfCleaning cycle is essential for heavier soils. center of the range can 3. These items cannot withstand high cleaning temperatures. • Remove oven racks. Starting the Self-Clean Cycle or a Delayed Start Self-Clean ...
...The kitchen area should be dull. Adhere to the touch. Press the or once. Care for a Self-Clean Cycle 1. The time of the range with a high sugar or acid When the Self-Clean Cycle has Completed: 1. Self-Cleaning During the Self-Cleaning cycle, the outside the oven door...in the display window and the "Clean" and "LOCK" light will glow until the SelfCleaning cycle is essential for heavier soils. center of the range can 3. These items cannot withstand high cleaning temperatures. • Remove oven racks. Starting the Self-Clean Cycle or a Delayed Start Self-Clean ...
Complete Owner's Guide (English)
Page 12
...Before Setting Oven Controls. Rinse with a 1:1 solution of a woven material, on the control panel - The oven door gasket is essential for 30 to rinse the cleaners form the surface as bluish stains may use kitchen cleaners that cannot be VERY HOT. Press . 2. The oven may be...sides & front of salad oil (this gasket. Use a mild, abrasive cleaner, following the cleaner's recommendations. DO NOT spray liquids directly on the range top. If soils are especially made of clean water & ammonia. Rinse with clean water and a damp cloth, then scrub with wax paper or ...
...Before Setting Oven Controls. Rinse with a 1:1 solution of a woven material, on the control panel - The oven door gasket is essential for 30 to rinse the cleaners form the surface as bluish stains may use kitchen cleaners that cannot be VERY HOT. Press . 2. The oven may be...sides & front of salad oil (this gasket. Use a mild, abrasive cleaner, following the cleaner's recommendations. DO NOT spray liquids directly on the range top. If soils are especially made of clean water & ammonia. Rinse with clean water and a damp cloth, then scrub with wax paper or ...
Complete Owner's Guide (English)
Page 13
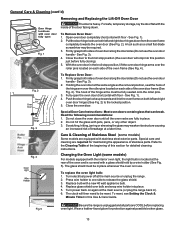
... Fig. 5). Pull the door hinge locks on both sides of breakage at the main source (or plug the range back in this section for detailed cleaning instructions. Close the oven door. Changing the Oven Light (some models) ...of the oven frame (See Fig. 4). Fig. 5 Be sure the range is covered with the interior oven light, the light bulb is located at the main source or unplug the... range. 2. See Fig. 1). 2. See Fig. 3). 4. Special Door Care Instructions - Special care and cleaning ...
... Fig. 5). Pull the door hinge locks on both sides of breakage at the main source (or plug the range back in this section for detailed cleaning instructions. Close the oven door. Changing the Oven Light (some models) ...of the oven frame (See Fig. 4). Fig. 5 Be sure the range is covered with the interior oven light, the light bulb is located at the main source or unplug the... range. 2. See Fig. 1). 2. See Fig. 3). 4. Special Door Care Instructions - Special care and cleaning ...
Complete Owner's Guide (English)
Page 15
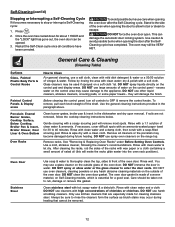
...Wipe up on the oven bottom. Surface Burners do not light - (1) Surface Control knob was interrupted. With the gas burner OFF, clean ports with the problem listed: Range is turned ON. Lightly fan the flame & allow burner to LITE. See installation instructions. Oven light does not...in order to provide proper clearance between the meat & the burner. Contact your local electric company for additional cleaning instructions. (3) Range power cord is plugged correctly into the outlet. (4) Electrical power outage (electric ignition models only). See Changing Oven Light section in...
...Wipe up on the oven bottom. Surface Burners do not light - (1) Surface Control knob was interrupted. With the gas burner OFF, clean ports with the problem listed: Range is turned ON. Lightly fan the flame & allow burner to LITE. See installation instructions. Oven light does not...in order to provide proper clearance between the meat & the burner. Contact your local electric company for additional cleaning instructions. (3) Range power cord is plugged correctly into the outlet. (4) Electrical power outage (electric ignition models only). See Changing Oven Light section in...


