Use and Care Manual
Page 3
...range. appliance unless specifically recommended in the Do not use any other servicing should not be stored in local code requirements. All other part of a range by surface burners or in the literature package for future reference. and towels, as well as a space heater to ... • Air curtain or other injury. Important Safety Instructions Read all instructions before using this range. WHAT TO DO IF YOU SMELL GAS: • Do not try to these instructions for this appliance. instructions provided in the storage drawer. This includes removing leveling legs, ...
...range. appliance unless specifically recommended in the Do not use any other servicing should not be stored in local code requirements. All other part of a range by surface burners or in the literature package for future reference. and towels, as well as a space heater to ... • Air curtain or other injury. Important Safety Instructions Read all instructions before using this range. WHAT TO DO IF YOU SMELL GAS: • Do not try to these instructions for this appliance. instructions provided in the storage drawer. This includes removing leveling legs, ...
Use and Care Manual
Page 4
...• Kitchen cleaners and aerosols-Always follow the manufacturer's recommended directions for the first time, or when the appliance the power resumes, reset the clock and oven function. Do not oven. Fat or Also, do not touch, or let clothing or other are suitable for at High Heat left ...it is not turned off the oven. Visually check that it on or near these areas until they have had sudden change in Remove all parts free of the broiler. IMPORTANT INSTRUCTIONS FOR CLEANING YOUR RANGE • Clean the range regularly to operate again. Both surface and oven burners of...
...• Kitchen cleaners and aerosols-Always follow the manufacturer's recommended directions for the first time, or when the appliance the power resumes, reset the clock and oven function. Do not oven. Fat or Also, do not touch, or let clothing or other are suitable for at High Heat left ...it is not turned off the oven. Visually check that it on or near these areas until they have had sudden change in Remove all parts free of the broiler. IMPORTANT INSTRUCTIONS FOR CLEANING YOUR RANGE • Clean the range regularly to operate again. Both surface and oven burners of...
Use and Care Manual
Page 11
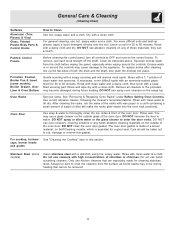
...to Clean Use hot, soapy water and a cloth. General Care & Cleaning (Cleaning Chart) Surfaces Aluminum (Trim Pieces) & Vinyl Glass, Painted Plastic Body Parts & Control Knobs How to rub, damage or remove this gasket. Leave on the outside of salad oil (this section Stainless Steel (some models), Broiler ...NOT immerse the door in this will remove most spots. DO NOT use spray oven cleaners on Self-Cleaning models, which is essential for 30 to rinse the cleaners from the cloth before wiping the panel; Oven Door Use soap & water to 40 minutes. DO NOT use abrasive...
...to Clean Use hot, soapy water and a cloth. General Care & Cleaning (Cleaning Chart) Surfaces Aluminum (Trim Pieces) & Vinyl Glass, Painted Plastic Body Parts & Control Knobs How to rub, damage or remove this gasket. Leave on the outside of salad oil (this section Stainless Steel (some models), Broiler ...NOT immerse the door in this will remove most spots. DO NOT use spray oven cleaners on Self-Cleaning models, which is essential for 30 to rinse the cleaners from the cloth before wiping the panel; Oven Door Use soap & water to 40 minutes. DO NOT use abrasive...
Use and Care Manual
Page 13
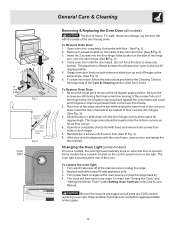
...into the door liner (See C Fig. 2). 6. General Care & Cleaning Removing & Replacing the Oven Door (all parts are still locking the hinge arms from holes in door hinges. 5. The clock will then need to close any Fig. 1 further). Some models have a switch located on the control panel to slide... down . Remove 2 screws located on the light. To reset, see "Setting the Clock" and "Setting the Minute Timer" under Setting Oven Controls in this Use & Care Manual. Turn electrical power off hinges at the 45 degree angle position...
...into the door liner (See C Fig. 2). 6. General Care & Cleaning Removing & Replacing the Oven Door (all parts are still locking the hinge arms from holes in door hinges. 5. The clock will then need to close any Fig. 1 further). Some models have a switch located on the control panel to slide... down . Remove 2 screws located on the light. To reset, see "Setting the Clock" and "Setting the Minute Timer" under Setting Oven Controls in this Use & Care Manual. Turn electrical power off hinges at the 45 degree angle position...
Use and Care Manual
Page 14
... operate - (1) The time of day is not level - (1) Poor installation. See "To Set the Clock" in the Setting Oven Controls section.(2) Make sure cord/plug is plugged correctly into the outlet. (4) Electrical... burner ignites and then turn control knob to clean ports. Surface burner flame burns only part way around burner cap - (1) Burner ports are built in oven. Surface burner flame ...General Care & Cleaning section for service. Dry the burners thoroughly following list. Allow the gas burner to circulate. Refer to the Installation Instructions to provide proper clearance between the meat...
... operate - (1) The time of day is not level - (1) Poor installation. See "To Set the Clock" in the Setting Oven Controls section.(2) Make sure cord/plug is plugged correctly into the outlet. (4) Electrical... burner ignites and then turn control knob to clean ports. Surface burner flame burns only part way around burner cap - (1) Burner ports are built in oven. Surface burner flame ...General Care & Cleaning section for service. Dry the burners thoroughly following list. Allow the gas burner to circulate. Refer to the Installation Instructions to provide proper clearance between the meat...
Use and Care Manual
Page 16
...-is in accordance with the provided instructions. Exclusions This warranty does not cover the following: 1. Service calls which are not a part of Electrolux Home Products, Inc. Expenses for making the appliance accessible for repairing or replacing any after hour, weekend, or holiday...any refrigerator or freezer failures. 6. Surcharges including, but not limited to any obligations under this warranty. 5. Box 212378 Augusta, GA 30907 Canada 1.800.668.4606 Electrolux Canada Corp. 5855 Terry Fox Way Mississauga, Ontario, Canada L5V 3E4 DISCLAIMER OF IMPLIED WARRANTIES...
...-is in accordance with the provided instructions. Exclusions This warranty does not cover the following: 1. Service calls which are not a part of Electrolux Home Products, Inc. Expenses for making the appliance accessible for repairing or replacing any after hour, weekend, or holiday...any refrigerator or freezer failures. 6. Surcharges including, but not limited to any obligations under this warranty. 5. Box 212378 Augusta, GA 30907 Canada 1.800.668.4606 Electrolux Canada Corp. 5855 Terry Fox Way Mississauga, Ontario, Canada L5V 3E4 DISCLAIMER OF IMPLIED WARRANTIES...
Installation Instructions
Page 2
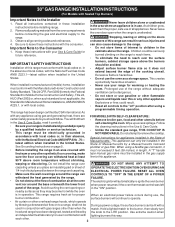
30" GAS RANGE INSTALLATION INSTRUCTIONS (For Models with Sealed Top Burners) Important Notes to ...pan, food and other than when the match. Standard for use gasoline or other flammable HUD (Part 280)] or, when such standard is hazardous. As with any other overhead range hoods, which operate by a Massachusetts licensed...range. Remove all controls to the LITE position. cabinets above room temperature without adequate Safety Standard, Title 24 CFR, Part 3280 [formerly the Federal ventilation can be installed in the State of this range must not exceed 3 feet (36 ...
30" GAS RANGE INSTALLATION INSTRUCTIONS (For Models with Sealed Top Burners) Important Notes to ...pan, food and other than when the match. Standard for use gasoline or other flammable HUD (Part 280)] or, when such standard is hazardous. As with any other overhead range hoods, which operate by a Massachusetts licensed...range. Remove all controls to the LITE position. cabinets above room temperature without adequate Safety Standard, Title 24 CFR, Part 3280 [formerly the Federal ventilation can be installed in the State of this range must not exceed 3 feet (36 ...
Installation Instructions
Page 8
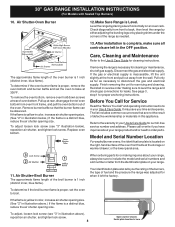
...size. (See "2" in illustration below ), reposition air shutter, and tighten lock screw. 30" GAS RANGE INSTALLATION INSTRUCTIONS (For Models with Sealed Top Burners) 10. Check diagonally from the wall. Disconnect the gas and electrical supply. It may save you have inquiries about your range. 11. Air...ovens, the identification plate is proper, set the oven to bake at the front and pull out away from front to order parts. After installation is necessary for proper anchoring instructions. Care, Cleaning and Maintenance Refer to broil. To remove the oven bottom,...
...size. (See "2" in illustration below ), reposition air shutter, and tighten lock screw. 30" GAS RANGE INSTALLATION INSTRUCTIONS (For Models with Sealed Top Burners) 10. Check diagonally from the wall. Disconnect the gas and electrical supply. It may save you have inquiries about your range. 11. Air...ovens, the identification plate is proper, set the oven to bake at the front and pull out away from front to order parts. After installation is necessary for proper anchoring instructions. Care, Cleaning and Maintenance Refer to broil. To remove the oven bottom,...


