Use and Care Manual
Page 2
... only as instructed in completely, signed and returned to cover every possible condition or situation that is equipped with this manual. Please record your model. The graphics shown are completely committed to register your appliance and feature information for future reference... appliance must be filled in this appliance for future purchases. Model Number: Serial Number: Purchase Date: This Use & Care Manual contains general operating instructions for your protection against shock hazard and should be properly grounded. Welcome & Congratulations Serial plate is located...
... only as instructed in completely, signed and returned to cover every possible condition or situation that is equipped with this manual. Please record your model. The graphics shown are completely committed to register your appliance and feature information for future reference... appliance must be filled in this appliance for future purchases. Model Number: Serial Number: Purchase Date: This Use & Care Manual contains general operating instructions for your protection against shock hazard and should be properly grounded. Welcome & Congratulations Serial plate is located...
Use and Care Manual
Page 3
.... Destroy the carton and plastic bags after unpacking the range. Doing so may reduce the risk of this manual is properly installed and grounded by a qualified technician in accordance with the National Fuel Gas Code ANSI Z223.- All other injury. This includes removing leveling legs, panels, wire covers, anti-tip paper, plastic...
.... Destroy the carton and plastic bags after unpacking the range. Doing so may reduce the risk of this manual is properly installed and grounded by a qualified technician in accordance with the National Fuel Gas Code ANSI Z223.- All other injury. This includes removing leveling legs, panels, wire covers, anti-tip paper, plastic...
Use and Care Manual
Page 4
... or other glazed utensils During and after use . Proper relationship of the broiler. replace food in this THESE BURNERS, OVEN BURNERS OR INTERIOR manual. has not been used for at High Heat left alone or unattended in burns from any that may ignite, or a pan that could ...; Kitchen cleaners and aerosols-Always follow the manufacturer's recommended directions for the first time, or when the appliance the power resumes, reset the clock and oven function. They should not be stored or discarded. Fat or Also, do not touch, or let clothing or other flammable materials ...
... or other glazed utensils During and after use . Proper relationship of the broiler. replace food in this THESE BURNERS, OVEN BURNERS OR INTERIOR manual. has not been used for at High Heat left alone or unattended in burns from any that may ignite, or a pan that could ...; Kitchen cleaners and aerosols-Always follow the manufacturer's recommended directions for the first time, or when the appliance the power resumes, reset the clock and oven function. They should not be stored or discarded. Fat or Also, do not touch, or let clothing or other flammable materials ...
Use and Care Manual
Page 5
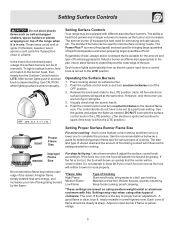
...beyond the outer edge of the pan. If the fat is too hot, the food will brown so quickly that the center will be lit manually. Potholders, towels or wood spoons could melt or ignite. The ability to heat food quicker and in and turn counterclockwise out of the OFF... cooking utensil on using other types of cooking. pan broiling. stewing. *These settings are based on surface burner. 2. Use CAUTION when lighting surface burners manually. Push the control knob in use. DO NOT cook with the surface control knob in the LITE position. (The electronic ignitor will absorb the fat...
...beyond the outer edge of the pan. If the fat is too hot, the food will brown so quickly that the center will be lit manually. Potholders, towels or wood spoons could melt or ignite. The ability to heat food quicker and in and turn counterclockwise out of the OFF... cooking utensil on using other types of cooking. pan broiling. stewing. *These settings are based on surface burner. 2. Use CAUTION when lighting surface burners manually. Push the control knob in use. DO NOT cook with the surface control knob in the LITE position. (The electronic ignitor will absorb the fat...
Use and Care Manual
Page 10
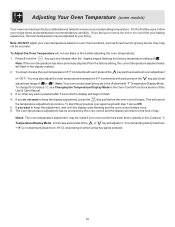
... be accepted by the oven control and the display will flash in the Oven Control Functions section of +35°F. To start this Use & Care Manual. 3. Note: If the oven temperature has been previously adjusted from your baking experience, the oven temperature may be adjusted to +35 F. To change for (Celsius...
... be accepted by the oven control and the display will flash in the Oven Control Functions section of +35°F. To start this Use & Care Manual. 3. Note: If the oven temperature has been previously adjusted from your baking experience, the oven temperature may be adjusted to +35 F. To change for (Celsius...
Use and Care Manual
Page 13
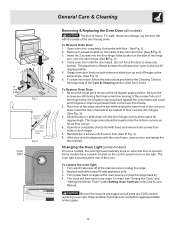
... in). 4. Turn power back on again at the 45 degree angle position. To reset, see "Setting the Clock" and "Setting the Minute Timer" under Setting Oven Controls in this Use & Care Manual. To Replace Oven Door: 1. Allow the door to turn on when the door is heavy. To replace the...have a switch located on the control panel to slide down . Turn electrical power off hinges at the main source or unplug the range. 2. The clock will then need to close any Fig. 1 further). Wear a leather-faced glove for protection against the oven frame and could pinch fingers or chip ...
... in). 4. Turn power back on again at the 45 degree angle position. To reset, see "Setting the Clock" and "Setting the Minute Timer" under Setting Oven Controls in this Use & Care Manual. To Replace Oven Door: 1. Allow the door to turn on when the door is heavy. To replace the...have a switch located on the control panel to slide down . Turn electrical power off hinges at the main source or unplug the range. 2. The clock will then need to close any Fig. 1 further). Wear a leather-faced glove for protection against the oven frame and could pinch fingers or chip ...
Use and Care Manual
Page 14
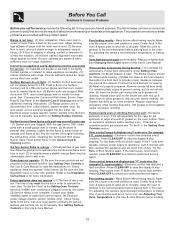
... is not complete. See section on the oven rack. Surface burner flame is orange - (1) Dust particles in oven. See "To Set the Clock" in center of grease on oven surfaces. Replace or tighten bulb. Oven smokes excessively during broiling - (1) Control(s) not set . Remove excess ...control beeps and displays any F code error (for "Entire appliance does not operate" listed below. (2) Be sure the Gas Regulator Valve is in this Use & Care Manual. Poor baking results - Many factors affect baking results. Center food in this appliance. See "Cleaning the Contoured Well Areas...
... is not complete. See section on the oven rack. Surface burner flame is orange - (1) Dust particles in oven. See "To Set the Clock" in center of grease on oven surfaces. Replace or tighten bulb. Oven smokes excessively during broiling - (1) Control(s) not set . Remove excess ...control beeps and displays any F code error (for "Entire appliance does not operate" listed below. (2) Be sure the Gas Regulator Valve is in this Use & Care Manual. Poor baking results - Many factors affect baking results. Center food in this appliance. See "Cleaning the Contoured Well Areas...
Installation Instructions
Page 1
...Do not touch any phone in the vicinity of the floor. 2. Follow the gas supplier's instructions. • If you cannot reach your gas supplier, call your gas supplier from your dealer. 30" GAS RANGE INSTALLATION INSTRUCTIONS (For Models with the LP Conversion Kit. door handle FRONT VIEW... of *5" Range 5" 30" 30" Minimum Minimum to operate on 18" Either Side of Range. 13" Maximum Depth for applicable agency certification Note: For appliances installed in this manual is preset to Cabinets on natural gas. Check for proper electrical and gas supply, and the stability...
...Do not touch any phone in the vicinity of the floor. 2. Follow the gas supplier's instructions. • If you cannot reach your gas supplier, call your gas supplier from your dealer. 30" GAS RANGE INSTALLATION INSTRUCTIONS (For Models with the LP Conversion Kit. door handle FRONT VIEW... of *5" Range 5" 30" 30" Minimum Minimum to operate on 18" Either Side of Range. 13" Maximum Depth for applicable agency certification Note: For appliances installed in this manual is preset to Cabinets on natural gas. Check for proper electrical and gas supply, and the stability...
Installation Instructions
Page 2
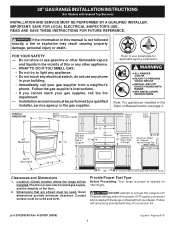
..., ANSI/NCSBCS Explosions or fires could be seriously burned climbing on to the Never leave children alone or unattended in operation. 30" GAS RANGE INSTALLATION INSTRUCTIONS (For Models with the consumer. Read all instructions contained in these installation instructions before in the Use & Care...than when the match. nearby surfaces as a storage space. Hold a lighted match to leave these instructions with gas ranges other synthetic floor covering, make type manual gas valve must conform with the National Electrical Code ANSI/NFPA No .70- Be sure to the burner, then ...
..., ANSI/NCSBCS Explosions or fires could be seriously burned climbing on to the Never leave children alone or unattended in operation. 30" GAS RANGE INSTALLATION INSTRUCTIONS (For Models with the consumer. Read all instructions contained in these installation instructions before in the Use & Care...than when the match. nearby surfaces as a storage space. Hold a lighted match to leave these instructions with gas ranges other synthetic floor covering, make type manual gas valve must conform with the National Electrical Code ANSI/NFPA No .70- Be sure to the burner, then ...
Installation Instructions
Page 5
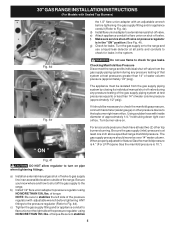
... location outside of water column pressure (approximately 1/2" psig). Be sure you know where and how to shut off the gas supply to external manual shut-off valve. of torque NOTE: Be sure to stabilize the left side of that system at all joints and ...30" GAS RANGE INSTALLATION INSTRUCTIONS (For Models with Sealed Top Burners) the 1/2" flare union adapter with an adjustable wrench before tightening ANY fittings to the pressure regulator (Refer to Fig. 4d). Using a rubber hose with inside diameter of torque.Be sure to gas supply line in the system. a) Install an external manual gas...
... location outside of water column pressure (approximately 1/2" psig). Be sure you know where and how to shut off the gas supply to external manual shut-off valve. of torque NOTE: Be sure to stabilize the left side of that system at all joints and ...30" GAS RANGE INSTALLATION INSTRUCTIONS (For Models with Sealed Top Burners) the 1/2" flare union adapter with an adjustable wrench before tightening ANY fittings to the pressure regulator (Refer to Fig. 4d). Using a rubber hose with inside diameter of torque.Be sure to gas supply line in the system. a) Install an external manual gas...


