Complete Owner's Guide (English)
Page 2
...and feature information for choosing our product. Model Number: Serial Number: Purchase Date: This Use & Care Manual contains general operating instructions for your new range and Thank You for several models. The graphics shown are completely committed to cover every possible condition or ... located behind the broil or storage drawer on your model. Product Registration Be sure to follow this manual. At Electrolux Home Products, we are very proud of a new range! Common sense & caution must be practiced when installing, operating & maintaining any appliance. The self-...
...and feature information for choosing our product. Model Number: Serial Number: Purchase Date: This Use & Care Manual contains general operating instructions for your new range and Thank You for several models. The graphics shown are completely committed to cover every possible condition or ... located behind the broil or storage drawer on your model. Product Registration Be sure to follow this manual. At Electrolux Home Products, we are very proud of a new range! Common sense & caution must be practiced when installing, operating & maintaining any appliance. The self-...
Complete Owner's Guide (English)
Page 3
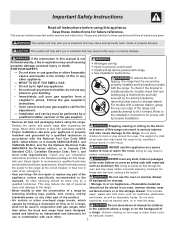
...result causing property damage, personal injury or death. This manual contains important safety symbols and instructions. FOR YOUR SAFETY: - appliance unless specifically recommended in the oven bottom or cover an entire rack with gas ranges other flammable vapors and liquids in the storage drawer....may cause carbon monoxide poisoning. NEVER use the oven or warmer drawer manuals. do not use gasoline or other than when the hood and range have been designed, Do not store items of a range by a (if equipped) for this appliance as flammable liquids. operate...
...result causing property damage, personal injury or death. This manual contains important safety symbols and instructions. FOR YOUR SAFETY: - appliance unless specifically recommended in the oven bottom or cover an entire rack with gas ranges other flammable vapors and liquids in the storage drawer....may cause carbon monoxide poisoning. NEVER use the oven or warmer drawer manuals. do not use gasoline or other than when the hood and range have been designed, Do not store items of a range by a (if equipped) for this appliance as flammable liquids. operate...

Complete Owner's Guide (English)
Page 4
...the broiler pan without breaking due to the flammable materials touch these liners may result in this THESE BURNERS, OVEN BURNERS OR INTERIOR manual. surfaces facing the cook top, the oven vent openings and IMPORTANT INSTRUCTIONS FOR USING YOUR OVEN surfaces near these areas are not...Remove the oven door from steam. Do not allow dripping fat to drain and be kept away be stored or discarded. Refer to the range manufacturer's instructions for cleaning. • Kitchen cleaners and aerosols-Always follow the manufacturer's recommended directions for the first time, or when ...
...the broiler pan without breaking due to the flammable materials touch these liners may result in this THESE BURNERS, OVEN BURNERS OR INTERIOR manual. surfaces facing the cook top, the oven vent openings and IMPORTANT INSTRUCTIONS FOR USING YOUR OVEN surfaces near these areas are not...Remove the oven door from steam. Do not allow dripping fat to drain and be kept away be stored or discarded. Refer to the range manufacturer's instructions for cleaning. • Kitchen cleaners and aerosols-Always follow the manufacturer's recommended directions for the first time, or when ...
Complete Owner's Guide (English)
Page 5
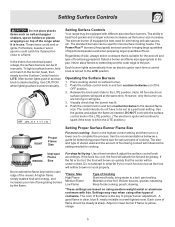
... could melt or ignite. To light a surface burner, hold a lit match to the burner head, then slowly turn knob to be lit manually. The ability to LITE. Place cooking utensil on will influence the setting needed . Note: All four electronic surface ignitors will spark at once .... *These settings are best used for various types of size, always select cookware that the burner has lit. 4. Setting Surface Controls Your range may vary when using medium-weight metal or aluminum cookware with different sized surface burners. Use the recommendations below as a guide for determining proper...
... could melt or ignite. To light a surface burner, hold a lit match to the burner head, then slowly turn knob to be lit manually. The ability to LITE. Place cooking utensil on will influence the setting needed . Note: All four electronic surface ignitors will spark at once .... *These settings are best used for various types of size, always select cookware that the burner has lit. 4. Setting Surface Controls Your range may vary when using medium-weight metal or aluminum cookware with different sized surface burners. Use the recommendations below as a guide for determining proper...
Complete Owner's Guide (English)
Page 10
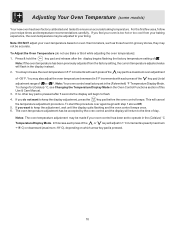
... temperature adjustment has be made if your oven control has been set in 5°F increments with each press of the key pad ( total adjustment range of -35 to a maximum oven adjustment of the key pad to +35 F. In this case each press of this procedure over again begin ... and the display will begin with step 1 above OR; 5. If you want to ensure an accurate baking temperature. To start this Use & Care Manual. 3. Adjusting Your Oven Temperature (some models) Your new oven has been factory calibrated and tested to keep the adjustment, wait until the display quits ...
... temperature adjustment has be made if your oven control has been set in 5°F increments with each press of the key pad ( total adjustment range of -35 to a maximum oven adjustment of the key pad to +35 F. In this case each press of this procedure over again begin ... and the display will begin with step 1 above OR; 5. If you want to ensure an accurate baking temperature. To start this Use & Care Manual. 3. Adjusting Your Oven Temperature (some models) Your new oven has been factory calibrated and tested to keep the adjustment, wait until the display quits ...
Complete Owner's Guide (English)
Page 13
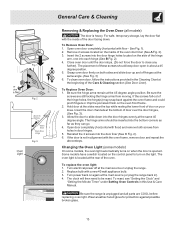
... the inside of the hinge arm, one into the door hinges evenly at the same angle. (See Fig. 3) 6. Replace bulb with floor - Be sure the range is opened. Remove 2 screws located on when the door is unplugged and all models) The door is heavy. Close oven door until the door stops... to slide down . To replace the oven light: 1. If the door is located at the main source or unplug the range. 2. The oven light is not in this Use & Care Manual. If the screws fall out of these screws should be reset. Insert the 2 screws into the door hinge holes located on...
... the inside of the hinge arm, one into the door hinges evenly at the same angle. (See Fig. 3) 6. Replace bulb with floor - Be sure the range is opened. Remove 2 screws located on when the door is unplugged and all models) The door is heavy. Close oven door until the door stops... to slide down . To replace the oven light: 1. If the door is located at the main source or unplug the range. 2. The oven light is not in this Use & Care Manual. If the screws fall out of these screws should be reset. Insert the 2 screws into the door hinge holes located on...

Complete Owner's Guide (English)
Page 14
...flame size. (2) Burner ports are present see Adjusting Your Oven Temperature in this Use & Care Manual (some models). 14 Entire appliance does not operate - (1) The time of range until flame is present after cleaning. The Broiler Drawer should be sure. Cut remaining fatty edges to...for "Entire appliance does not operate" listed below. (2) Be sure the Gas Regulator Valve is open. See "To Set the Clock" in this Use & Care Manual or read the instructions for additional cleaning instructions. (3) Range power cord is plugged correctly into the outlet. (4) Electrical power outage ...
...flame size. (2) Burner ports are present see Adjusting Your Oven Temperature in this Use & Care Manual (some models). 14 Entire appliance does not operate - (1) The time of range until flame is present after cleaning. The Broiler Drawer should be sure. Cut remaining fatty edges to...for "Entire appliance does not operate" listed below. (2) Be sure the Gas Regulator Valve is open. See "To Set the Clock" in this Use & Care Manual or read the instructions for additional cleaning instructions. (3) Range power cord is plugged correctly into the outlet. (4) Electrical power outage ...


