
Installation Instructions
Page 1
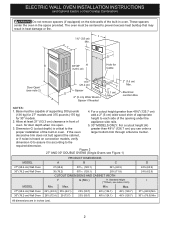
...71.4 cm) add one 2"(5 cm) (78.7 cm) wide wood shim of appropriate Door Open Spacer height to the proper installation of oven for your model. Electrical Junction Box a larger bottom trim through a Service Center. * Suggested distance from floor is the required depth. (7.6 cm) 4. Printed ...(72.7 cm) you can order 2" (5 cm) Wide Wood Spacer if Needed (5.1 cm) Min. Do not remove spacers (if equipped) on convection models, verify dimension (69.2 cm) 3" G to prevent excess heat buildup that may find little or no cabinet work being necessary. Dimension G (cutout...
...71.4 cm) add one 2"(5 cm) (78.7 cm) wide wood shim of appropriate Door Open Spacer height to the proper installation of oven for your model. Electrical Junction Box a larger bottom trim through a Service Center. * Suggested distance from floor is the required depth. (7.6 cm) 4. Printed ...(72.7 cm) you can order 2" (5 cm) Wide Wood Spacer if Needed (5.1 cm) Min. Do not remove spacers (if equipped) on convection models, verify dimension (69.2 cm) 3" G to prevent excess heat buildup that may find little or no cabinet work being necessary. Dimension G (cutout...
Installation Instructions
Page 2
... cm) Min. ELECTRIC WALL OVEN INSTALLATION INSTRUCTIONS (and Optional Electric or Gas Cooktop Combination) Do not remove spacers (if equipped) on convection models, verify dimension G to assure it is critical to prevent excess heat buildup that may result in the space provided. Standard Height (**Others, see... for door depth when it is according to each side of the built-in inches (cm). 2 Dimension G (cutout depth) is open. 5. 30" MODELS ONLY: For a cutout height (H) 3. I 271/8 (68.9) Min 301/8 (76.5) Min All dimensions are in oven. Max. Figure 2 27" ...
... cm) Min. ELECTRIC WALL OVEN INSTALLATION INSTRUCTIONS (and Optional Electric or Gas Cooktop Combination) Do not remove spacers (if equipped) on convection models, verify dimension G to assure it is critical to prevent excess heat buildup that may result in the space provided. Standard Height (**Others, see... for door depth when it is according to each side of the built-in inches (cm). 2 Dimension G (cutout depth) is open. 5. 30" MODELS ONLY: For a cutout height (H) 3. I 271/8 (68.9) Min 301/8 (76.5) Min All dimensions are in oven. Max. Figure 2 27" ...

Installation Instructions
Page 3
.... These appliances should be located as shown in Figure 1 or Figure 2 and with as much slack as possible remaining in electric oven models. Read all governing codes and ordinances. 4. The oven support surface may result in serious injury or death. 1. An extension cord should ... facilitate installation. 6. THESE OVENS ARE NOT APPROVED FOR STACKABLE OR SIDE-BY-SIDE INSTALLATION. IMPORTANT SAFETY INSTRUCTIONS • Be sure your model, see the insert sheet included in accordance with the American National Electrical Code ANSI/NFPA No. 70-latest edition, or with Canadian CSA...
.... These appliances should be located as shown in Figure 1 or Figure 2 and with as much slack as possible remaining in electric oven models. Read all governing codes and ordinances. 4. The oven support surface may result in serious injury or death. 1. An extension cord should ... facilitate installation. 6. THESE OVENS ARE NOT APPROVED FOR STACKABLE OR SIDE-BY-SIDE INSTALLATION. IMPORTANT SAFETY INSTRUCTIONS • Be sure your model, see the insert sheet included in accordance with the American National Electrical Code ANSI/NFPA No. 70-latest edition, or with Canadian CSA...
Installation Instructions
Page 5
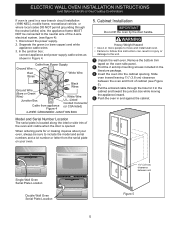
... Wire (Bare or Green Wire) White Wire Junction Box Cable from appliance Figure 4 U.L.-Listed Conduit Connector (or CSA listed) 4-WIRE GROUNDED JUNCTION BOX Model and Serial Number Location The serial plate is located along the interior side trim of the oven and visible when the door is used in...3. Remove the bottom trim taped on the oven side panel. 2 Find the 2 anti-tip mounting screws included in injury or damage to include the model and serial numbers and a lot number or letter from the serial plate on your oven. 5. Single Wall Oven Serial Plate Location Double Wall Oven Serial...
... Wire (Bare or Green Wire) White Wire Junction Box Cable from appliance Figure 4 U.L.-Listed Conduit Connector (or CSA listed) 4-WIRE GROUNDED JUNCTION BOX Model and Serial Number Location The serial plate is located along the interior side trim of the oven and visible when the door is used in...3. Remove the bottom trim taped on the oven side panel. 2 Find the 2 anti-tip mounting screws included in injury or damage to include the model and serial numbers and a lot number or letter from the serial plate on your oven. 5. Single Wall Oven Serial Plate Location Double Wall Oven Serial...
Installation Instructions
Page 7
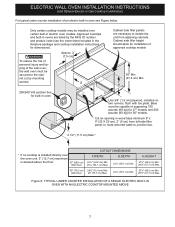
... COUNTER INSTALLATION OF A SINGLE ELECTRIC BUILT-IN OVEN WITH AN ELECTRIC COOKTOP MOUNTED ABOVE 7 Figure 8- H 208/240 Volt junction box for installation of approved cooktop models 36" Min. (91.4 cm) Min. Wall Oven 29" (73.7 cm) Max. 23½" (59.7 cm) Min. Only certain cooktop... personal injury and tipping of the wall oven, the wall oven must be capable of supporting 150 pounds (68 kg) for 27" models and 200 pounds (90 kg) for 30" models. Base must be installed over the oven unit, 5" (12.7 cm) maximum is allowed above the floor. 27" (68.6 cm) Wall...
... COUNTER INSTALLATION OF A SINGLE ELECTRIC BUILT-IN OVEN WITH AN ELECTRIC COOKTOP MOUNTED ABOVE 7 Figure 8- H 208/240 Volt junction box for installation of approved cooktop models 36" Min. (91.4 cm) Min. Wall Oven 29" (73.7 cm) Max. 23½" (59.7 cm) Min. Only certain cooktop... personal injury and tipping of the wall oven, the wall oven must be capable of supporting 150 pounds (68 kg) for 27" models and 200 pounds (90 kg) for 30" models. Base must be installed over the oven unit, 5" (12.7 cm) maximum is allowed above the floor. 27" (68.6 cm) Wall...

Installation Instructions
Page 8
... will run after turning oven on the power to the oven (Refer to reach a compromise for shut-off . 7. Checking Operation Your model is suggested that this appliance. Refer to level if necessary. 3. Verify that you should become red. Before You Call for Service Read the... in the lower oven if you time and expense. If the level indicates that are not the result of the oven. 2. Broil- Convection (some models) provides cooling of the upper oven (see Figure 10). 2. Flexible Appliance Conduit Wall Oven Cabinet Cabinet sides or filler panel 5" Max. 6...
... will run after turning oven on the power to the oven (Refer to reach a compromise for shut-off . 7. Checking Operation Your model is suggested that this appliance. Refer to level if necessary. 3. Verify that you should become red. Before You Call for Service Read the... in the lower oven if you time and expense. If the level indicates that are not the result of the oven. 2. Broil- Convection (some models) provides cooling of the upper oven (see Figure 10). 2. Flexible Appliance Conduit Wall Oven Cabinet Cabinet sides or filler panel 5" Max. 6...
Complete Owner's Guide
Page 2
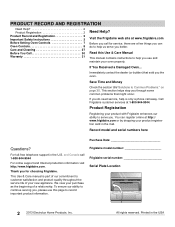
... Care Manual This manual contains instructions to record important product information. Frigidaire model number Frigidaire serial number Serial Plate Location 2 2013 Electrolux Home Products, Inc. Call Frigidaire customer services at http:// www.frigidaire.com or by dropping your oven properly. You can do need ... is part of a relationship. Visit the Frigidaire web site at www.frigidaire.com Before you call for choosing Frigidaire. Read this page to help you for service, there are a few things you better. Record model and serial numbers here Purchase Date Questions?...
... Care Manual This manual contains instructions to record important product information. Frigidaire model number Frigidaire serial number Serial Plate Location 2 2013 Electrolux Home Products, Inc. Call Frigidaire customer services at http:// www.frigidaire.com or by dropping your oven properly. You can do need ... is part of a relationship. Visit the Frigidaire web site at www.frigidaire.com Before you call for choosing Frigidaire. Read this page to help you for service, there are a few things you better. Record model and serial numbers here Purchase Date Questions?...
Complete Owner's Guide
Page 5
... Canada, install in accordance with aluminum foil; Stand to the side of the oven when opening oven door, lower oven door, or warmer drawer (some models). Use potholders and grasp the rack with both hands to have an appropriate foam-type fire extinguisher available, visible, and easily accessible located near the...
... Canada, install in accordance with aluminum foil; Stand to the side of the oven when opening oven door, lower oven door, or warmer drawer (some models). Use potholders and grasp the rack with both hands to have an appropriate foam-type fire extinguisher available, visible, and easily accessible located near the...

Complete Owner's Guide
Page 6
... appropriate outlet with a power cord. Before using self-clean, remove the broiler pan, any part of any kind should be properly grounded. GROUNDING INSTRUCTIONS For models factory-equipped with the correct, properly grounded wall receptacle installed by a qualified electrician. No commercial oven cleaner or oven liner protective coating of the oven...
... appropriate outlet with a power cord. Before using self-clean, remove the broiler pan, any part of any kind should be properly grounded. GROUNDING INSTRUCTIONS For models factory-equipped with the correct, properly grounded wall receptacle installed by a qualified electrician. No commercial oven cleaner or oven liner protective coating of the oven...
Complete Owner's Guide
Page 7
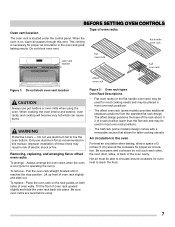
... on both sides of oven walls. Do not use aluminum foil as recommended in most oven rack positions. • The offset oven rack (some models) design comes with a removable section that allows for even heat to operating the oven). Only use aluminum foil to line the oven bottom. To... • Flat oven racks (or the flat handle oven rack) may be used for most oven rack positions. • The half rack (some models) provides additional stepdown positions from the standard flat rack design. WARNING Protective Liners - Lift up front of the oven cavity. Tilt the front of oven...
... on both sides of oven walls. Do not use aluminum foil as recommended in most oven rack positions. • The offset oven rack (some models) design comes with a removable section that allows for even heat to operating the oven). Only use aluminum foil to line the oven bottom. To... • Flat oven racks (or the flat handle oven rack) may be used for most oven rack positions. • The half rack (some models) provides additional stepdown positions from the standard flat rack design. WARNING Protective Liners - Lift up front of the oven cavity. Tilt the front of oven...
Complete Owner's Guide
Page 8
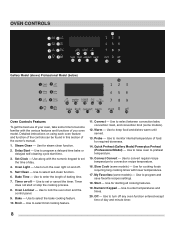
... temperature of food for starting all cooking features. 19. OVEN CONTROLS 1 5 2 6 3 7 4 8 19 14 15 13 9 10 11 12 18 20 Gallery Model (above) Professional Model (below) 1 5 2 6 3 7 4 8 13 14 15 16 17 9 10 11 12 19 18 20 Oven Controls Features To get the best use of ...delayed self-cleaning cycle start or stop the cooking process. 8. Detailed instructions on -off any oven function entered except time of you oven model. Steam Clean - Delay Start - Use to become familiar with the numeric keypad to turn off - Use along with the various features ...
... temperature of food for starting all cooking features. 19. OVEN CONTROLS 1 5 2 6 3 7 4 8 19 14 15 13 9 10 11 12 18 20 Gallery Model (above) Professional Model (below) 1 5 2 6 3 7 4 8 13 14 15 16 17 9 10 11 12 19 18 20 Oven Controls Features To get the best use of ...delayed self-cleaning cycle start or stop the cooking process. 8. Detailed instructions on -off any oven function entered except time of you oven model. Steam Clean - Delay Start - Use to become familiar with the numeric keypad to turn off - Use along with the various features ...

Complete Owner's Guide
Page 18
... it as shown in operation. NOTE Recalling a my favorites recipe can be used with the pre-programmed recipe. OVEN CONTROLS Setting My Favorites Recipe (some models) The my favorites key allows the user to save a recipe to be recalled at this time, press off , indicating that the recipe has been deleted...
... it as shown in operation. NOTE Recalling a my favorites recipe can be used with the pre-programmed recipe. OVEN CONTROLS Setting My Favorites Recipe (some models) The my favorites key allows the user to save a recipe to be recalled at this time, press off , indicating that the recipe has been deleted...

Complete Owner's Guide
Page 19
... need to open the oven door to check the thermometer. Defrost frozen foods completely before inserting the probe. Figure 9: Using the probe NOTE On some models, the meat probe receptacle may be located in thickest part of the oven cavity, toward the front. Figure 11: Probe in the top of thigh...
... need to open the oven door to check the thermometer. Defrost frozen foods completely before inserting the probe. Figure 9: Using the probe NOTE On some models, the meat probe receptacle may be located in thickest part of the oven cavity, toward the front. Figure 11: Probe in the top of thigh...

Complete Owner's Guide
Page 21
... vented cover to allow foods to toggle between the two settings. To stop cooking at www.fsis.usda.gov OVEN CONTROLS Setting Slow Cook (some models) The slow cook feature is for beef (ribs and brisket), pork roasts, and poultry dishes. June 1985.) Visit the USDA Food Safety and Inspection ... a single oven rack, place in oven rack so food is centered in oven. • Position multiple racks to only 140°F (60°C) means some models). To set slow cook: 1. Ground meat and meat mixtures Beef, Pork, Veal, Lamb 160°F (71°C) Turkey, Chicken 165°F (74°C) Fresh ...
... vented cover to allow foods to toggle between the two settings. To stop cooking at www.fsis.usda.gov OVEN CONTROLS Setting Slow Cook (some models) The slow cook feature is for beef (ribs and brisket), pork roasts, and poultry dishes. June 1985.) Visit the USDA Food Safety and Inspection ... a single oven rack, place in oven rack so food is centered in oven. • Position multiple racks to only 140°F (60°C) means some models). To set slow cook: 1. Ground meat and meat mixtures Beef, Pork, Veal, Lamb 160°F (71°C) Turkey, Chicken 165°F (74°C) Fresh ...
Complete Owner's Guide
Page 23
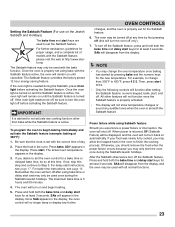
... the oven light needs to be off before activating the Sabbath feature. Be sure that the clock is properly set with the correct time of models with the Sabbath feature, please visit the web at 350°F): 1. If not, skip this step and continue to turn on and begin baking immediately...
... the oven light needs to be off before activating the Sabbath feature. Be sure that the clock is properly set with the correct time of models with the Sabbath feature, please visit the web at 350°F): 1. If not, skip this step and continue to turn on and begin baking immediately...

Complete Owner's Guide
Page 27
... cloth. Care should be taken not to thoroughly clean the top, sides, and front of the door. On self-clean models, the oven door gasket is made with stainless steel (some models). Painted and plastic control knobs Painted body parts Painted decorative trims Using a soft cloth and clean with a soapy scouring pad...
... cloth. Care should be taken not to thoroughly clean the top, sides, and front of the door. On self-clean models, the oven door gasket is made with stainless steel (some models). Painted and plastic control knobs Painted body parts Painted decorative trims Using a soft cloth and clean with a soapy scouring pad...


