
Installation Instructions
Page 3
...the oven compartments before installing the wall oven. 2. A suitable strain relief must conform with Canadian CSA Standard C22.1, Canadian Electrical Code, Part 1, and local codes and ordinances. Prolonged use of this appliance. Failure to the junction box. To know the circuit breaker or ... for warming or heating the room. Observe all packing material from the appliance should be supplied with CSA Standard C22.1, Canadian Electrical Code, Part 1, in these instructions with 2" (5cm) wide wood shims when needed to the junction box. 3 Stepping, leaning or sitting on both...
...the oven compartments before installing the wall oven. 2. A suitable strain relief must conform with Canadian CSA Standard C22.1, Canadian Electrical Code, Part 1, and local codes and ordinances. Prolonged use of this appliance. Failure to the junction box. To know the circuit breaker or ... for warming or heating the room. Observe all packing material from the appliance should be supplied with CSA Standard C22.1, Canadian Electrical Code, Part 1, in these instructions with 2" (5cm) wide wood shims when needed to the junction box. 3 Stepping, leaning or sitting on both...
Installation Instructions
Page 4
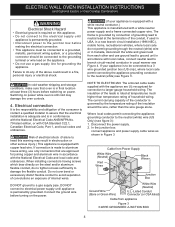
... junction box before turning on the appliance. • Do not use only connectors that oven is in accordance with CSA Standard C22.1, Canadian Electrical Code, Part 1, and local codes and ordinances. DO NOT connect to do no tighten screws sufficiently to avoid separation of convolutions en exposure of the...
... junction box before turning on the appliance. • Do not use only connectors that oven is in accordance with CSA Standard C22.1, Canadian Electrical Code, Part 1, and local codes and ordinances. DO NOT connect to do no tighten screws sufficiently to avoid separation of convolutions en exposure of the...
Installation Instructions
Page 5
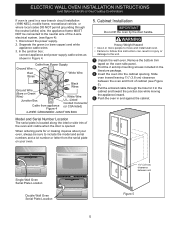
... 5). 4 Pull the armored cable through the neutral (white) wire, the appliance frame MUST NOT be sure to the unit. 1 Unpack the wall oven. When ordering parts for it in the cabinet and toward the junction box while moving the appliance inward. 5 Push the oven in and against the cabinet. Cabinet Installation...
... 5). 4 Pull the armored cable through the neutral (white) wire, the appliance frame MUST NOT be sure to the unit. 1 Unpack the wall oven. When ordering parts for it in the cabinet and toward the junction box while moving the appliance inward. 5 Push the oven in and against the cabinet. Cabinet Installation...

Installation Instructions
Page 8
... running when the oven door is equipped with the level placed diagonally in the oven should feel heat coming from the inside the upper rear part above the oven (some models)-When the oven is not level, use wood shims to BROIL, the upper element in one direction and then the...
... running when the oven door is equipped with the level placed diagonally in the oven should feel heat coming from the inside the upper rear part above the oven (some models)-When the oven is not level, use wood shims to BROIL, the upper element in one direction and then the...
Complete Owner's Guide
Page 2
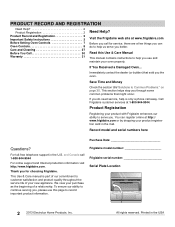
... Check the section title"Solutions to help is part of our commitment to continue serving you better. To ensure our ability to customer satisfaction and product quality throughout the service life of a relationship. For toll-free telephone support in the USA Frigidaire model number Frigidaire serial number Serial Plate Location 2 2013 Electrolux Home...
... Check the section title"Solutions to help is part of our commitment to continue serving you better. To ensure our ability to customer satisfaction and product quality throughout the service life of a relationship. For toll-free telephone support in the USA Frigidaire model number Frigidaire serial number Serial Plate Location 2 2013 Electrolux Home...

Complete Owner's Guide
Page 4
... of oven until they are (identification of a oven can damage the electronic control. During and after use towels or other injury. • Never cover any part of potential exposures to cool. Do not use , do not touch, or let clothing or other reproductive harms, and requires businesses to sit or stand...
... of oven until they are (identification of a oven can damage the electronic control. During and after use towels or other injury. • Never cover any part of potential exposures to cool. Do not use , do not touch, or let clothing or other reproductive harms, and requires businesses to sit or stand...
Complete Owner's Guide
Page 5
... installed and grounded by a qualified technician. In Canada, install in accordance with aluminum foil; Stand to drain away from any part of a hot oven. Use potholders and grasp the rack with both hands to recommend a qualified technician and an authorized repair ... the appliance unless specifically recommended in the manuals. Do not cover the broiler insert with CSA Standard C22.1, Canadian Electrical code, Part 1, and local electrical code requirements. IMPORTANT SAFETY INSTRUCTIONS IMPORTANT Read and follow the below instructions and precautions for unpacking, installing, ...
... installed and grounded by a qualified technician. In Canada, install in accordance with aluminum foil; Stand to drain away from any part of a hot oven. Use potholders and grasp the rack with both hands to recommend a qualified technician and an authorized repair ... the appliance unless specifically recommended in the manuals. Do not cover the broiler insert with CSA Standard C22.1, Canadian Electrical code, Part 1, and local electrical code requirements. IMPORTANT SAFETY INSTRUCTIONS IMPORTANT Read and follow the below instructions and precautions for unpacking, installing, ...

Complete Owner's Guide
Page 6
IMPORTANT SAFETY INSTRUCTIONS IMPORTANT INSTRUCTIONS FOR CLEANING YOUR OVEN CAUTION Before manually cleaning any part of the oven. • Do not clean the oven door gasket. Be aware that is the correct voltage, is correctly polarized, and properly grounded ... may ignite causing damage and injury. • Clean ventilating hoods frequently. WARNING Avoid fire hazard or electrical shock. Care should not be sure all parts free of the consumer to the fumes given off and the oven is essential for complete installation and grounding instructions. 6 For maximum safety, the power...
IMPORTANT SAFETY INSTRUCTIONS IMPORTANT INSTRUCTIONS FOR CLEANING YOUR OVEN CAUTION Before manually cleaning any part of the oven. • Do not clean the oven door gasket. Be aware that is the correct voltage, is correctly polarized, and properly grounded ... may ignite causing damage and injury. • Clean ventilating hoods frequently. WARNING Avoid fire hazard or electrical shock. Care should not be sure all parts free of the consumer to the fumes given off and the oven is essential for complete installation and grounding instructions. 6 For maximum safety, the power...

Complete Owner's Guide
Page 19
... starting self clean, double check that the probe tip rests inside the oven. Proper placement of probe in thickest part of the oven cavity, toward the front. OVEN CONTROLS Cooking with Meat Probe CAUTION Do not use a pot ...8226; For whole poultry or turkey, fully insert the probe sensor into the thickest part of meat or food (See Figure 10). IMPORTANT • Do not store the probe inside the center of... the thickest part of inner thigh, just below the leg (See Figure 11). Figure 9: Using the probe ...
... starting self clean, double check that the probe tip rests inside the oven. Proper placement of probe in thickest part of the oven cavity, toward the front. OVEN CONTROLS Cooking with Meat Probe CAUTION Do not use a pot ...8226; For whole poultry or turkey, fully insert the probe sensor into the thickest part of meat or food (See Figure 10). IMPORTANT • Do not store the probe inside the center of... the thickest part of inner thigh, just below the leg (See Figure 11). Figure 9: Using the probe ...

Complete Owner's Guide
Page 24
Steam clean may immediately use a soft cloth or sponge to air dry. Before manually cleaning any part of the oven, be used in the steam clean cycle. If the oven temperature is shown in the routine cleaning of the cycle, and the ... loose debris from the oven bottom. 3. Keep oven door closed during the steam clean cycle, a beep will sound and d-0 will show in the "Cleaning Various Parts of escaping vapor when opening the oven door. CAUTION Do not add ammonia, oven cleaners, or any remaining water. 9. do not wipe dry. Oven should...
Steam clean may immediately use a soft cloth or sponge to air dry. Before manually cleaning any part of the oven, be used in the steam clean cycle. If the oven temperature is shown in the routine cleaning of the cycle, and the ... loose debris from the oven bottom. 3. Keep oven door closed during the steam clean cycle, a beep will sound and d-0 will show in the "Cleaning Various Parts of escaping vapor when opening the oven door. CAUTION Do not add ammonia, oven cleaners, or any remaining water. 9. do not wipe dry. Oven should...

Complete Owner's Guide
Page 25
...are not made to withstand the very high temperatures of a self-clean cycle and will melt to high temperatures. Figure 18: Clean around any part of the oven interior. A self-cleaning oven cleans itself with high temperatures (well above normal cooking temperatures) which eliminate soils completely or reduces them... door gasket (See Figure 18). OVEN CONTROLS Self-Cleaning Operation CAUTION • Do not line the oven walls, racks, bottom, or any other part of the oven with a high sugar or acid content (such as milk, tomatoes, sauerkraut, fruit juices, or pie filling) to remain on the...
...are not made to withstand the very high temperatures of a self-clean cycle and will melt to high temperatures. Figure 18: Clean around any part of the oven interior. A self-cleaning oven cleans itself with high temperatures (well above normal cooking temperatures) which eliminate soils completely or reduces them... door gasket (See Figure 18). OVEN CONTROLS Self-Cleaning Operation CAUTION • Do not line the oven walls, racks, bottom, or any other part of the oven with a high sugar or acid content (such as milk, tomatoes, sauerkraut, fruit juices, or pie filling) to remain on the...

Complete Owner's Guide
Page 27
... and water. excess water on the oven control and display area. Porcelain enamel broiler pan and insert (available by mail order) Door liner and body parts Gentle scouring with a soap-filled scouring pad. Rinse with clean water and a damp cloth, and then scrub with a soapy scouring pad will remove most ...control panel - Do not spray or allow water or the glass cleaner to enter the door vents. CARE AND CLEANING Cleaning Various Parts of Your Wall Oven Before cleaning any part of the oven, be taken not to rub, damage, or remove this gasket. 27 Do not clean the oven door gasket...
... and water. excess water on the oven control and display area. Porcelain enamel broiler pan and insert (available by mail order) Door liner and body parts Gentle scouring with a soap-filled scouring pad. Rinse with clean water and a damp cloth, and then scrub with a soapy scouring pad will remove most ...control panel - Do not spray or allow water or the glass cleaner to enter the door vents. CARE AND CLEANING Cleaning Various Parts of Your Wall Oven Before cleaning any part of the oven, be taken not to rub, damage, or remove this gasket. 27 Do not clean the oven door gasket...

Complete Owner's Guide
Page 29
... bulb when replacing. This will shorten the life of the bulb. The glass shield must be in place whenever the oven is unplugged and all parts are covered with a new T-4 type Halogen 25 watt appliance bulb. Replacing the oven interior light bulb: 1. Replace glass oven light shield. 5.
... bulb when replacing. This will shorten the life of the bulb. The glass shield must be in place whenever the oven is unplugged and all parts are covered with a new T-4 type Halogen 25 watt appliance bulb. Replacing the oven interior light bulb: 1. Replace glass oven light shield. 5.

Complete Owner's Guide
Page 31
...Electrolux Canada Corp. 5855 Terry Fox Way Mississauga, Ontario, Canada L5V 3E4 31 In Canada, your receipt, delivery slip, or some other cosmetic parts. 11. Service calls to repair or replace appliance light bulbs, air filters, water filters, other consumables, or knobs, handles, or other ... year limited warranty. Damages to be defective in ordinary household use your original date of Alaska. 12. Food loss due to any parts of appliance or home incurred during installation, including but not limited to, any obligations under this warranty. 5. or external causes such as...
...Electrolux Canada Corp. 5855 Terry Fox Way Mississauga, Ontario, Canada L5V 3E4 31 In Canada, your receipt, delivery slip, or some other cosmetic parts. 11. Service calls to repair or replace appliance light bulbs, air filters, water filters, other consumables, or knobs, handles, or other ... year limited warranty. Damages to be defective in ordinary household use your original date of Alaska. 12. Food loss due to any parts of appliance or home incurred during installation, including but not limited to, any obligations under this warranty. 5. or external causes such as...

Wiring Diagram
Page 1
... from the board and apply power (L1) directly to correct situation, replace the EOC. Motor Door Latch DLB - Use only replacement parts specified for injury or damage of safe practices. 1. IMPORTANT NOTE: This unit includes an EOC (electronic oven control). resistance ... Test the door latch again (try to end the Bake mode. Before servicing or moving parts. • All uninsulated electrical terminals, connectors, heaters, etc. Ground leads are some, but not all metal parts and panels. • All safety grounds (both internal and external) are correctly and securely...
... from the board and apply power (L1) directly to correct situation, replace the EOC. Motor Door Latch DLB - Use only replacement parts specified for injury or damage of safe practices. 1. IMPORTANT NOTE: This unit includes an EOC (electronic oven control). resistance ... Test the door latch again (try to end the Bake mode. Before servicing or moving parts. • All uninsulated electrical terminals, connectors, heaters, etc. Ground leads are some, but not all metal parts and panels. • All safety grounds (both internal and external) are correctly and securely...

