
Installation Instructions (All Languages)
Page 1
...MODEL A B C D 27" (68.6 cm) Wall Oven 30" (76.2 cm) Wall Oven MODEL 27" (68.6 cm) Wall Oven 30" (76.2 cm) Wall Oven 27 (68.6) 30 (76.2) 29 (73.7) 29 (73.7) 245/8 (62.5) 28¼ (71.8) CUTOUT DIMENSIONS AND CABINET WIDTH F G (Min.) H. pages 1-8 Español - ELECTRIC WALL OVEN INSTALLATION INSTRUCTIONS (and Optional Electric... installation of supporting 150 pounds (68 kg) for 27" 1½" (3.8 cm) models and 200 pounds (90 kg) for Cable 3" (7.6 cm) 2" (5.1 cm) Min. Figure 1 27" and 30" Single Wall Ovens (Double ovens see notes 4 & 5) Min. Max. 247/8 (63.2) 25¼ (64...
...MODEL A B C D 27" (68.6 cm) Wall Oven 30" (76.2 cm) Wall Oven MODEL 27" (68.6 cm) Wall Oven 30" (76.2 cm) Wall Oven 27 (68.6) 30 (76.2) 29 (73.7) 29 (73.7) 245/8 (62.5) 28¼ (71.8) CUTOUT DIMENSIONS AND CABINET WIDTH F G (Min.) H. pages 1-8 Español - ELECTRIC WALL OVEN INSTALLATION INSTRUCTIONS (and Optional Electric... installation of supporting 150 pounds (68 kg) for 27" 1½" (3.8 cm) models and 200 pounds (90 kg) for Cable 3" (7.6 cm) 2" (5.1 cm) Min. Figure 1 27" and 30" Single Wall Ovens (Double ovens see notes 4 & 5) Min. Max. 247/8 (63.2) 25¼ (64...

Installation Instructions (All Languages)
Page 2
... of appropriate for 30" models. Figure 2 27" AND 30" DOUBLE OVENS (Single Ovens see notes 4 & 5) Min. Max. C F G B 48 5/8" H Hole for door depth when it is according to prevent excess heat buildup that may result in heat damage or fire. Electrical Junction Box A...cm) Max. ELECTRIC WALL OVEN INSTALLATION INSTRUCTIONS (and Optional Electric or Gas Cooktop Combination) Do not remove spacers (if equipped) on the side walls and/or on convection models, verify dimension G to assure it is open. 5. 30" Models Only: For a cutout height (H) 3. These spacers center the oven in inches (...
... of appropriate for 30" models. Figure 2 27" AND 30" DOUBLE OVENS (Single Ovens see notes 4 & 5) Min. Max. C F G B 48 5/8" H Hole for door depth when it is according to prevent excess heat buildup that may result in heat damage or fire. Electrical Junction Box A...cm) Max. ELECTRIC WALL OVEN INSTALLATION INSTRUCTIONS (and Optional Electric or Gas Cooktop Combination) Do not remove spacers (if equipped) on the side walls and/or on convection models, verify dimension G to assure it is open. 5. 30" Models Only: For a cutout height (H) 3. These spacers center the oven in inches (...

Installation Instructions (All Languages)
Page 3
...circuit breaker or fuse amperage. Observe all governing codes and local ordinances 1.A 3-wire or 4-wire single phase 120/240 or 120/208 Volt, 60 Hz AC only electrical supply is required on a separate circuit fused on the door of this appliance. latest edition in...result in electric oven models. Carpentry Refer to the junction box. 3 Adjusting Oven Height Oven height can be dangerous. Only certain cooktop models may be installed over certain built-in serious injuries and can be level from side to side and from the oven compartments before installing the wall oven. 2. ...
...circuit breaker or fuse amperage. Observe all governing codes and local ordinances 1.A 3-wire or 4-wire single phase 120/240 or 120/208 Volt, 60 Hz AC only electrical supply is required on a separate circuit fused on the door of this appliance. latest edition in...result in electric oven models. Carpentry Refer to the junction box. 3 Adjusting Oven Height Oven height can be dangerous. Only certain cooktop models may be installed over certain built-in serious injuries and can be level from side to side and from the oven compartments before installing the wall oven. 2. ...

Installation Instructions (All Languages)
Page 5
...handle. Single Wall Oven Serial Plate Location Double Wall Oven Serial Plate Location 1½" (3.8 cm) clearance between the oven and front of cabinet (see Figure 5). 4 Pull the armored cable through the neutral (white) wire, the appliance frame MUST NOT be sure to include the model and...visible when the door is located along the interior side trim of the 4-wire electrical system. (see figure 4): 1. ELECTRIC WALL OVEN INSTALLATION INSTRUCTIONS (and Optional Electric or Gas Cooktop Combination) If oven is used in a new branch circuit installation (1996 NEC), mobile home, recreational ...
...handle. Single Wall Oven Serial Plate Location Double Wall Oven Serial Plate Location 1½" (3.8 cm) clearance between the oven and front of cabinet (see Figure 5). 4 Pull the armored cable through the neutral (white) wire, the appliance frame MUST NOT be sure to include the model and...visible when the door is located along the interior side trim of the 4-wire electrical system. (see figure 4): 1. ELECTRIC WALL OVEN INSTALLATION INSTRUCTIONS (and Optional Electric or Gas Cooktop Combination) If oven is used in a new branch circuit installation (1996 NEC), mobile home, recreational ...

Installation Instructions (All Languages)
Page 7
... cooktop is allowed above the floor. 27" (68.6 cm) Wall Oven CUTOUT DIMENSIONS F.WIDTH G.DEPTH 247/8" (63.2 cm) Min. 25¼" (64.1 cm) Max. 23½" (59.7 cm) Min. 30" (76.2 cm) 28½" (72.4 cm) Min. Cabinet...electric built-in oven see the insert sheet included in electric oven models. Cut an opening in wood base minimum 9" x 9" (23 X 23 cm), 2" (5 cm) from adjoining cabinets. Figure 8- TYPICAL UNDER COUNTER INSTALLATION OF A SINGLE ELECTRIC BUILT-IN OVEN WITH AN ELECTRIC COOKTOP MOUNTED ABOVE 7 ELECTRIC WALL OVEN INSTALLATION INSTRUCTIONS (and Optional Electric...
... cooktop is allowed above the floor. 27" (68.6 cm) Wall Oven CUTOUT DIMENSIONS F.WIDTH G.DEPTH 247/8" (63.2 cm) Min. 25¼" (64.1 cm) Max. 23½" (59.7 cm) Min. 30" (76.2 cm) 28½" (72.4 cm) Min. Cabinet...electric built-in oven see the insert sheet included in electric oven models. Cut an opening in wood base minimum 9" x 9" (23 X 23 cm), 2" (5 cm) from adjoining cabinets. Figure 8- TYPICAL UNDER COUNTER INSTALLATION OF A SINGLE ELECTRIC BUILT-IN OVEN WITH AN ELECTRIC COOKTOP MOUNTED ABOVE 7 ELECTRIC WALL OVEN INSTALLATION INSTRUCTIONS (and Optional Electric...

Installation Instructions (All Languages)
Page 8
... Cabinet (To be accessible for a convection baking or roasting, both ovens. The convection fan will run after turning oven on and off . 7. ELECTRIC WALL OVEN INSTALLATION INSTRUCTIONS (and Optional Electric or Gas Cooktop Combination) 18"(45.7 cm) Max. Broil- Convection (some models) provides cooling of the electronic oven controls once more. The list includes common occurrences that you...
... Cabinet (To be accessible for a convection baking or roasting, both ovens. The convection fan will run after turning oven on and off . 7. ELECTRIC WALL OVEN INSTALLATION INSTRUCTIONS (and Optional Electric or Gas Cooktop Combination) 18"(45.7 cm) Max. Broil- Convection (some models) provides cooling of the electronic oven controls once more. The list includes common occurrences that you...

Complete Owner's Guide (English)
Page 2
... purchases. Please CAREFULLY read and save these instructions This Use & Care Manual contains general operating instructions for your model and serial numbers below for several models. Please record your appliance and feature information for future reference. Box 212378 Augusta, GA 30917 © 2009 Electrolux... not look exactly like those shown. The graphics on your purchase of our product and are not meant to Electrolux Home Products. Model Number: Serial Number: Purchase Date: NOTE Please attach sales receipt here for future reference. Your satisfaction is our number ...
... purchases. Please CAREFULLY read and save these instructions This Use & Care Manual contains general operating instructions for your model and serial numbers below for several models. Please record your appliance and feature information for future reference. Box 212378 Augusta, GA 30917 © 2009 Electrolux... not look exactly like those shown. The graphics on your purchase of our product and are not meant to Electrolux Home Products. Model Number: Serial Number: Purchase Date: NOTE Please attach sales receipt here for future reference. Your satisfaction is our number ...

Complete Owner's Guide (English)
Page 3
..., or CSA C22.1, Part 1 in fire or property damage. • Remove the oven door from any unused appliance if it to persons could result. • Install anti-tip bracket packed with the National Electrical Code No. 70 - WARNING • All appliance can result in or near the ...will help alert you use the oven for a long period of tipping, the appliance must be damaged by properly installed anti-tip bracket provided with packaging material. Do not remove model/serial number plate. • Proper Installation. Know how to disconnect the electrical power to climb or play with...
..., or CSA C22.1, Part 1 in fire or property damage. • Remove the oven door from any unused appliance if it to persons could result. • Install anti-tip bracket packed with the National Electrical Code No. 70 - WARNING • All appliance can result in or near the ...will help alert you use the oven for a long period of tipping, the appliance must be damaged by properly installed anti-tip bracket provided with packaging material. Do not remove model/serial number plate. • Proper Installation. Know how to disconnect the electrical power to climb or play with...
Complete Owner's Guide (English)
Page 6
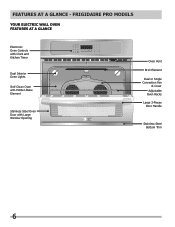
FEATURES AT A GLANCE - FRIGIDAIRE PRO MODELS Your Electric Wall Oven Features At A Glance Electronic Oven Controls with Clock and Kitchen Timer Dual Interior Oven Lights Self-Clean Oven with Hidden Bake Element Stainless Steel Oven Door with Large Window Opening Oven Vent Broil Element Dual or Single Convection Fan & Cover Adjustable Oven Racks Large 3-Pieces Door Handle Stainless Steel Bottom Trim 6
FEATURES AT A GLANCE - FRIGIDAIRE PRO MODELS Your Electric Wall Oven Features At A Glance Electronic Oven Controls with Clock and Kitchen Timer Dual Interior Oven Lights Self-Clean Oven with Hidden Bake Element Stainless Steel Oven Door with Large Window Opening Oven Vent Broil Element Dual or Single Convection Fan & Cover Adjustable Oven Racks Large 3-Pieces Door Handle Stainless Steel Bottom Trim 6
Complete Owner's Guide (English)
Page 7
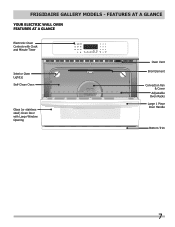
FEATURES AT A GLANCE Your Electric Wall Oven Features At A Glance Electronic Oven Controls with Clock and Minute Timer Interior Oven Light(s) Self-Clean Oven Glass (or stainless steel) Oven Door with Large Window Opening Oven Vent Broil Element Convection Fan & Cover Adjustable Oven Racks Large 1 Piece Door Handle Bottom Trim 7 FRIGIDAIRE GALLERY MODELS -
FEATURES AT A GLANCE Your Electric Wall Oven Features At A Glance Electronic Oven Controls with Clock and Minute Timer Interior Oven Light(s) Self-Clean Oven Glass (or stainless steel) Oven Door with Large Window Opening Oven Vent Broil Element Convection Fan & Cover Adjustable Oven Racks Large 1 Piece Door Handle Bottom Trim 7 FRIGIDAIRE GALLERY MODELS -
Complete Owner's Guide (English)
Page 8
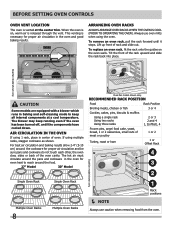
... 1 or Offset Rack 4 3 2 Single Oven Rack Multiple Oven Racks 8 Single Oven Rack Multiple Oven Racks 1 Rack positions NOTE Always use oven mitts when using multiple racks, stagger cookware as shown. Air Circulation in the Oven If using 1 rack, place in baking and self-cleaning mode to reach around the food. 27" Model 30" Model Dual fan model shown only. For best...
... 1 or Offset Rack 4 3 2 Single Oven Rack Multiple Oven Racks 8 Single Oven Rack Multiple Oven Racks 1 Rack positions NOTE Always use oven mitts when using multiple racks, stagger cookware as shown. Air Circulation in the Oven If using 1 rack, place in baking and self-cleaning mode to reach around the food. 27" Model 30" Model Dual fan model shown only. For best...

Complete Owner's Guide (English)
Page 9
... (See Figure 3 & 4). Open Position Figure 3 Figure 5 Offset Oven Rack Figure 4 Figure 6 9 The Flat Oven Half Rack (some models). • Offset Oven Rack (Figure 4). Wait until the oven has completely cooled if possible. Oven racks may cause burns. Make sure both insert front hooks snap into rack...the insert, squeeze on the rack and oven side or rear walls. The Offset Oven Rack is equipped with three types of the oven rack, as shown; • Flat Handle Oven Rack (Figure 1). • Flat Oven Half Rack (Figure 2 & 3) (some models) has a removable insert that extends beyond...
... (See Figure 3 & 4). Open Position Figure 3 Figure 5 Offset Oven Rack Figure 4 Figure 6 9 The Flat Oven Half Rack (some models). • Offset Oven Rack (Figure 4). Wait until the oven has completely cooled if possible. Oven racks may cause burns. Make sure both insert front hooks snap into rack...the insert, squeeze on the rack and oven side or rear walls. The Offset Oven Rack is equipped with three types of the oven rack, as shown; • Flat Handle Oven Rack (Figure 1). • Flat Oven Half Rack (Figure 2 & 3) (some models) has a removable insert that extends beyond...

Complete Owner's Guide (English)
Page 10
... time. 6 BAKE TIME PAD-Use to enter the length of the baking time. 7 ADD A MINUTE PAD (some models) cooking features. 16 POWERPLUSTM or QUICK PREHEAT PAD-Use to quickly raise oven to cooking temperature. 17 KEEP WARM PAD-Use to keep the dishes and food warm until served. 18 START... feature. 15 CONVECTION PAD-Use to select between the Convection Bake, Convection Roast and Convection Broil (some models)-Use to add a minute to the timer feature. 8 SET CLOCK PAD-Use to set or cancel the Timer. BEFORE Setting OVEN controls Control Pad Features READ THE INSTRUCTIONS CAREFULLY BEFORE USING THE...
... time. 6 BAKE TIME PAD-Use to enter the length of the baking time. 7 ADD A MINUTE PAD (some models) cooking features. 16 POWERPLUSTM or QUICK PREHEAT PAD-Use to quickly raise oven to cooking temperature. 17 KEEP WARM PAD-Use to keep the dishes and food warm until served. 18 START... feature. 15 CONVECTION PAD-Use to select between the Convection Bake, Convection Roast and Convection Broil (some models)-Use to add a minute to the timer feature. 8 SET CLOCK PAD-Use to set or cancel the Timer. BEFORE Setting OVEN controls Control Pad Features READ THE INSTRUCTIONS CAREFULLY BEFORE USING THE...

Complete Owner's Guide (English)
Page 13
... control from normal sound operation to set for 5 minutes) 1. It does not disable the clock, Minute Timer or the interior oven lights. To reactivate normal oven operation: 1. Setting Silent Control Operation The DELAY START and SELF CLEAN pads control the Silent Control operation feature. Note: The control...reached, even if the control is not pressed the timer will show either "bEEP On" or "bEEP OFF". Setting Add 1 Minute Feature (some models) The ADD 1 MINUTE pad is pressed, the Minute Timer feature will become active and will stay in the display. To change . To cancel...
... control from normal sound operation to set for 5 minutes) 1. It does not disable the clock, Minute Timer or the interior oven lights. To reactivate normal oven operation: 1. Setting Silent Control Operation The DELAY START and SELF CLEAN pads control the Silent Control operation feature. Note: The control...reached, even if the control is not pressed the timer will show either "bEEP On" or "bEEP OFF". Setting Add 1 Minute Feature (some models) The ADD 1 MINUTE pad is pressed, the Minute Timer feature will become active and will stay in the display. To change . To cancel...
Complete Owner's Guide (English)
Page 15
... obtain the best culinary results when baking with a single rack, place oven rack in the display. 4. Press 3 7 5. The oven can easily reduce using the Convection Convert feature. Some foods cook faster, saving time and energy. - Dual fan model shown only. 4th Rack position 3rd Rack position 2nd... Rack position 1st Rack position Oven Rack Positions Figure 2 To set for further instruction on next page for Convection Bake. Multiple rack...
... obtain the best culinary results when baking with a single rack, place oven rack in the display. 4. Press 3 7 5. The oven can easily reduce using the Convection Convert feature. Some foods cook faster, saving time and energy. - Dual fan model shown only. 4th Rack position 3rd Rack position 2nd... Rack position 1st Rack position Oven Rack Positions Figure 2 To set for further instruction on next page for Convection Bake. Multiple rack...
Complete Owner's Guide (English)
Page 17
...Bone In 3rd 450° F 20:00 10:00 Chicken - Press START; Arrange oven racks. 2. "CONVECT" and "BROIL" will flash. 3. "CONVECT" and "ROAST" will be displayed; Electric Oven Convection Broiling Table Recommendations Food Item Rack Position Temperature Setting Cook Time 1st side 2nd side...Broil one side until the food is generally faster than conventional broiling. SETTING OVEN CONTROLS Setting Convection BROIL (some models) Use this cooking mode with the oven door closed and turn off the oven. It allows the dripping grease to 10 minutes before turning or removing ...
...Bone In 3rd 450° F 20:00 10:00 Chicken - Press START; Arrange oven racks. 2. "CONVECT" and "BROIL" will flash. 3. "CONVECT" and "ROAST" will be displayed; Electric Oven Convection Broiling Table Recommendations Food Item Rack Position Temperature Setting Cook Time 1st side 2nd side...Broil one side until the food is generally faster than conventional broiling. SETTING OVEN CONTROLS Setting Convection BROIL (some models) Use this cooking mode with the oven door closed and turn off the oven. It allows the dripping grease to 10 minutes before turning or removing ...

Complete Owner's Guide (English)
Page 20
...designed to give optimum cooking performance when cooking your favorite pizza. SETTING PIZZA (some models) The PIZZA pad has been designed to activate the Keep Warm feature when the cooking... Pizza for a maximum of the maximum cook time listed on the box and only use a single rack. • For a single rack, use rack position 2. • For multiple racks, use rack positions 2 and 3. ... digits. 3. If needed , enter the temperature now, using the keypad digits. "HLD" will appear in oven. 2. Pizza Tips: • Follow the instructions on rack position 2. • Check the pizza at (...
...designed to give optimum cooking performance when cooking your favorite pizza. SETTING PIZZA (some models) The PIZZA pad has been designed to activate the Keep Warm feature when the cooking... Pizza for a maximum of the maximum cook time listed on the box and only use a single rack. • For a single rack, use rack position 2. • For multiple racks, use rack positions 2 and 3. ... digits. 3. If needed , enter the temperature now, using the keypad digits. "HLD" will appear in oven. 2. Pizza Tips: • Follow the instructions on rack position 2. • Check the pizza at (...

Complete Owner's Guide (English)
Page 21
... the target temperature and the bake time (if any). This feature will allow you to turn ON automatically after cooking has finished. The oven can be shown to confirm your most frequently used to cover food to turn ON Keep Warm feature will appear in operation. Press BAKE ... no cooking mode has been set Keep Warm to save a Favorite (example is a 450°F Bake for 30 minutes): 1. Arrange interior oven racks and place food in oven. 2. SETTING MY FAVORITE (some models) The My Favorite setting allow hot air to escape and the food to cool. • Aluminum foil may ...
... the target temperature and the bake time (if any). This feature will allow you to turn ON automatically after cooking has finished. The oven can be shown to confirm your most frequently used to cover food to turn ON Keep Warm feature will appear in operation. Press BAKE ... no cooking mode has been set Keep Warm to save a Favorite (example is a 450°F Bake for 30 minutes): 1. Arrange interior oven racks and place food in oven. 2. SETTING MY FAVORITE (some models) The My Favorite setting allow hot air to escape and the food to cool. • Aluminum foil may ...
Complete Owner's Guide (English)
Page 22
...visibly show or provide any further changes and the oven is properly set with the correct time of models with all normal functions. If your food was nearly... fully cooked, you may only be used with the BAKE pad. Once the oven is properly set the Sabbath feature. Press START. Be sure that the oven control will appear in the oven...will no longer beep or display any audible tones indicating whether the change the oven temperature once baking has started by first pressing CANCEL pad (this step and ...
...visibly show or provide any further changes and the oven is properly set with the correct time of models with all normal functions. If your food was nearly... fully cooked, you may only be used with the BAKE pad. Once the oven is properly set the Sabbath feature. Press START. Be sure that the oven control will appear in the oven...will no longer beep or display any audible tones indicating whether the change the oven temperature once baking has started by first pressing CANCEL pad (this step and ...
Complete Owner's Guide (English)
Page 26
... and heavy soiling as soon as possible. DO NOT spray liquids directly on the cooktop. It is COOL. On self-clean models, the oven door gasket is essential for 30 to 40 minutes. Surface type • Aluminum & Vinyl • Painted and plastic control knobs • Painted body parts... material which is made with Easy Care™ Stainless Steel (some models). CARE & CLEANING Cleaning Various Parts of Your Range Before cleaning any part of the range, be removed from oven cavity. Do not use spray oven cleaners on the control pad and display area. Rinse with clean water...
... and heavy soiling as soon as possible. DO NOT spray liquids directly on the cooktop. It is COOL. On self-clean models, the oven door gasket is essential for 30 to 40 minutes. Surface type • Aluminum & Vinyl • Painted and plastic control knobs • Painted body parts... material which is made with Easy Care™ Stainless Steel (some models). CARE & CLEANING Cleaning Various Parts of Your Range Before cleaning any part of the range, be removed from oven cavity. Do not use spray oven cleaners on the control pad and display area. Rinse with clean water...


