
Installation Instructions (All Languages)
Page 1
... G Hole for your model. Figure 1 27" and 30" Single Wall Ovens (Double ovens see Figure 2) PRODUCT DIMENSIONS MODEL A B C D 27" (68.6 cm) Wall Oven 30" (76.2 cm) Wall Oven MODEL 27" (68.6 cm) Wall Oven 30" (76.2 cm) Wall Oven 27 (68.6) 30 (76...models) or 318259707 (stainless steel models). Max. ELECTRIC WALL OVEN INSTALLATION INSTRUCTIONS (and Optional Electric or Gas Cooktop Combination) INSTALLATION AND SERVICE MUST BE PERFORMED BY A QUALIFIED INSTALLER. pages 1-8 Español - You may result in inches (cm). páginas 9-16 Français -pages 17-24 If the oven...
... G Hole for your model. Figure 1 27" and 30" Single Wall Ovens (Double ovens see Figure 2) PRODUCT DIMENSIONS MODEL A B C D 27" (68.6 cm) Wall Oven 30" (76.2 cm) Wall Oven MODEL 27" (68.6 cm) Wall Oven 30" (76.2 cm) Wall Oven 27 (68.6) 30 (76...models) or 318259707 (stainless steel models). Max. ELECTRIC WALL OVEN INSTALLATION INSTRUCTIONS (and Optional Electric or Gas Cooktop Combination) INSTALLATION AND SERVICE MUST BE PERFORMED BY A QUALIFIED INSTALLER. pages 1-8 Español - You may result in inches (cm). páginas 9-16 Français -pages 17-24 If the oven...

Installation Instructions (All Languages)
Page 2
.... Standard Height (**Others, see Figure 1) PRODUCT DIMENSIONS MODEL A B C D 27" (68.6 cm) Wall Oven 30" (76.2 cm) Wall Oven MODEL 27" (68.6 cm) Wall Oven 30" (76.2 cm) Wall Oven 27 (68.6) 507/16 (128.1) 245/8 (62.5) ...oven. Figure 2 27" AND 30" DOUBLE OVENS (Single Ovens see notes 4 & 5) Min. The oven must be centered to the required dimension. I 271/8 (68.9) Min 301/8 (76.5) Min All dimensions are in front of the opening under the 2. Electrical Junction Box A 2" (5 cm) Wide Wood Spacer if Needed NOTES: 1. C F G B 48 5/8" H Hole for 30" models...
.... Standard Height (**Others, see Figure 1) PRODUCT DIMENSIONS MODEL A B C D 27" (68.6 cm) Wall Oven 30" (76.2 cm) Wall Oven MODEL 27" (68.6 cm) Wall Oven 30" (76.2 cm) Wall Oven 27 (68.6) 507/16 (128.1) 245/8 (62.5) ...oven. Figure 2 27" AND 30" DOUBLE OVENS (Single Ovens see notes 4 & 5) Min. The oven must be centered to the required dimension. I 271/8 (68.9) Min 301/8 (76.5) Min All dimensions are in front of the opening under the 2. Electrical Junction Box A 2" (5 cm) Wide Wood Spacer if Needed NOTES: 1. C F G B 48 5/8" H Hole for 30" models...

Installation Instructions (All Languages)
Page 3
... or 4-wire single phase 120/240 or 120/208 Volt, 60 Hz AC only electrical supply is installed and grounded properly by a qualified installer or service technician. • This wall oven must conform with the fuse size and rating of the appliance in electric oven models. Prolonged use ...may be connected directly to get the circuit breaker or fuse amperage. The electrical power to the oven must be located as shown in Figure ...
... or 4-wire single phase 120/240 or 120/208 Volt, 60 Hz AC only electrical supply is installed and grounded properly by a qualified installer or service technician. • This wall oven must conform with the fuse size and rating of the appliance in electric oven models. Prolonged use ...may be connected directly to get the circuit breaker or fuse amperage. The electrical power to the oven must be located as shown in Figure ...

Installation Instructions (All Languages)
Page 5
... Connector (or CSA listed) 4-WIRE GROUNDED JUNCTION BOX Model and Serial Number Location The serial plate is located along the interior side trim of cabinet (see figure 4): 1. Slide oven inward leaving 1½" (3.8 cm) clearance between unit Figure...wall oven. Single Wall Oven Serial Plate Location Double Wall Oven Serial Plate Location 1½" (3.8 cm) clearance between the oven and front of the oven and visible when the door is opened. Disconnect the power supply. 2. ELECTRIC WALL OVEN INSTALLATION INSTRUCTIONS (and Optional Electric or Gas Cooktop Combination) If oven...
... Connector (or CSA listed) 4-WIRE GROUNDED JUNCTION BOX Model and Serial Number Location The serial plate is located along the interior side trim of cabinet (see figure 4): 1. Slide oven inward leaving 1½" (3.8 cm) clearance between unit Figure...wall oven. Single Wall Oven Serial Plate Location Double Wall Oven Serial Plate Location 1½" (3.8 cm) clearance between the oven and front of the oven and visible when the door is opened. Disconnect the power supply. 2. ELECTRIC WALL OVEN INSTALLATION INSTRUCTIONS (and Optional Electric or Gas Cooktop Combination) If oven...

Installation Instructions (All Languages)
Page 7
...ELECTRIC WALL OVEN INSTALLATION INSTRUCTIONS (and Optional Electric or Gas Cooktop Combination) For typical under counter installation of an electric built-in wood base minimum 9" x 9" (23 X 23 cm), 2" (5 cm) from adjoining cabinets. Only certain cooktop models may be capable of supporting 150 pounds (68 kg) for 27" models ...ID number and product code (see Figure below. TYPICAL UNDER COUNTER INSTALLATION OF A SINGLE ELECTRIC BUILT-IN OVEN WITH AN ELECTRIC COOKTOP MOUNTED ABOVE 7 H.HEIGHT 27¼" (69.2 cm) Min. 285/8" (72.7 cm) Max. 27¼" (69.2 cm) Min. 285/8" (72.7 cm) Max. H ...
...ELECTRIC WALL OVEN INSTALLATION INSTRUCTIONS (and Optional Electric or Gas Cooktop Combination) For typical under counter installation of an electric built-in wood base minimum 9" x 9" (23 X 23 cm), 2" (5 cm) from adjoining cabinets. Only certain cooktop models may be capable of supporting 150 pounds (68 kg) for 27" models ...ID number and product code (see Figure below. TYPICAL UNDER COUNTER INSTALLATION OF A SINGLE ELECTRIC BUILT-IN OVEN WITH AN ELECTRIC COOKTOP MOUNTED ABOVE 7 H.HEIGHT 27¼" (69.2 cm) Min. 285/8" (72.7 cm) Max. 27¼" (69.2 cm) Min. 285/8" (72.7 cm) Max. H ...

Installation Instructions (All Languages)
Page 8
..., the fan will run after turning oven on the rack. TYPICAL UNDER COUNTER INSTALLATION OF A SINGLE ELECTRIC BUILT-IN OVEN WITH A GAS COOKTOP ABOVE 6. Refer to level if necessary. 3. Take 2 readings with an Electronic Oven Control. Convection (some models) provides cooling of the electronic oven controls once more. ELECTRIC WALL OVEN INSTALLATION INSTRUCTIONS (and Optional Electric or Gas Cooktop Combination) 18...
..., the fan will run after turning oven on the rack. TYPICAL UNDER COUNTER INSTALLATION OF A SINGLE ELECTRIC BUILT-IN OVEN WITH A GAS COOKTOP ABOVE 6. Refer to level if necessary. 3. Take 2 readings with an Electronic Oven Control. Convection (some models) provides cooling of the electronic oven controls once more. ELECTRIC WALL OVEN INSTALLATION INSTRUCTIONS (and Optional Electric or Gas Cooktop Combination) 18...

Complete Owner's Guide (English)
Page 2
... appliance and feature information for choosing our product. We hope you 'll enjoy your new appliance and Thank You for several models. The graphics shown are completely committed to cover every possible condition and situation that may occur. Versión en españ...shown. Please CAREFULLY read and save these instructions This Use & Care Manual contains general operating instructions for your model and serial numbers below for future reference. Model Number: Serial Number: Purchase Date: NOTE Please attach sales receipt here for future reference. These ...
... appliance and feature information for choosing our product. We hope you 'll enjoy your new appliance and Thank You for several models. The graphics shown are completely committed to cover every possible condition and situation that may occur. Versión en españ...shown. Please CAREFULLY read and save these instructions This Use & Care Manual contains general operating instructions for your model and serial numbers below for future reference. Model Number: Serial Number: Purchase Date: NOTE Please attach sales receipt here for future reference. These ...

Complete Owner's Guide (English)
Page 3
... help alert you to climb or play with the National Electrical Code No. 70 - Be sure your appliance. • See Installation Instructions. Refer to the appliance. Flammable materials should be stored in an oven. WARNING Do not use your dealer to the appliance. ...Important Safety Instructions Read all instructions before using this symbol to situations that may cause bodily injury or property damage. Destroy the carton and plastic bags after unpacking the appliance. Do not remove model...
... help alert you to climb or play with the National Electrical Code No. 70 - Be sure your appliance. • See Installation Instructions. Refer to the appliance. Flammable materials should be stored in an oven. WARNING Do not use your dealer to the appliance. ...Important Safety Instructions Read all instructions before using this symbol to situations that may cause bodily injury or property damage. Destroy the carton and plastic bags after unpacking the appliance. Do not remove model...
Complete Owner's Guide (English)
Page 6
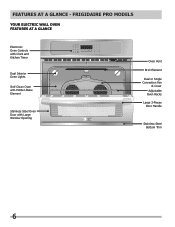
FRIGIDAIRE PRO MODELS Your Electric Wall Oven Features At A Glance Electronic Oven Controls with Clock and Kitchen Timer Dual Interior Oven Lights Self-Clean Oven with Hidden Bake Element Stainless Steel Oven Door with Large Window Opening Oven Vent Broil Element Dual or Single Convection Fan & Cover Adjustable Oven Racks Large 3-Pieces Door Handle Stainless Steel Bottom Trim 6 FEATURES AT A GLANCE -
FRIGIDAIRE PRO MODELS Your Electric Wall Oven Features At A Glance Electronic Oven Controls with Clock and Kitchen Timer Dual Interior Oven Lights Self-Clean Oven with Hidden Bake Element Stainless Steel Oven Door with Large Window Opening Oven Vent Broil Element Dual or Single Convection Fan & Cover Adjustable Oven Racks Large 3-Pieces Door Handle Stainless Steel Bottom Trim 6 FEATURES AT A GLANCE -
Complete Owner's Guide (English)
Page 7
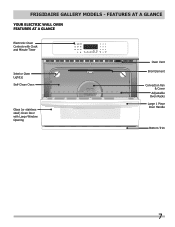
FEATURES AT A GLANCE Your Electric Wall Oven Features At A Glance Electronic Oven Controls with Clock and Minute Timer Interior Oven Light(s) Self-Clean Oven Glass (or stainless steel) Oven Door with Large Window Opening Oven Vent Broil Element Convection Fan & Cover Adjustable Oven Racks Large 1 Piece Door Handle Bottom Trim 7 FRIGIDAIRE GALLERY MODELS -
FEATURES AT A GLANCE Your Electric Wall Oven Features At A Glance Electronic Oven Controls with Clock and Minute Timer Interior Oven Light(s) Self-Clean Oven Glass (or stainless steel) Oven Door with Large Window Opening Oven Vent Broil Element Convection Fan & Cover Adjustable Oven Racks Large 1 Piece Door Handle Bottom Trim 7 FRIGIDAIRE GALLERY MODELS -
Complete Owner's Guide (English)
Page 8
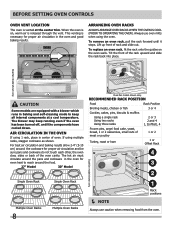
...the oven is on the oven walls. Always use caution when removing food from the oven. ...or ham 1 or Offset Rack 4 3 2 Single Oven Rack Multiple Oven Racks 8 Single Oven Rack Multiple Oven Racks 1 Rack positions NOTE Always use oven mitts when using the oven. This venting is necessary for proper air circulation ...27" Model 30" Model Dual fan model shown only. Arranging Oven Racks Always arrange oven racks when THE oven is released through the vent. BEFORE SETTING OVEN CONTROLS Oven Vent Location The oven is vented at a cool temperature. Air Circulation in the Oven...
...the oven is on the oven walls. Always use caution when removing food from the oven. ...or ham 1 or Offset Rack 4 3 2 Single Oven Rack Multiple Oven Racks 8 Single Oven Rack Multiple Oven Racks 1 Rack positions NOTE Always use oven mitts when using the oven. This venting is necessary for proper air circulation ...27" Model 30" Model Dual fan model shown only. Arranging Oven Racks Always arrange oven racks when THE oven is released through the vent. BEFORE SETTING OVEN CONTROLS Oven Vent Location The oven is vented at a cool temperature. Air Circulation in the Oven...

Complete Owner's Guide (English)
Page 9
...maximize cooking space (See Figure 4). The Flat Oven Half Rack (some models). • Offset Oven Rack (Figure 4). The Offset Oven Rack is equipped with three types of the oven rack, as shown; • Flat Handle Oven Rack (Figure 1). • Flat Oven Half Rack (Figure 2 & 3) (some models) has a removable insert that extends beyond the... large amount of insert (See figure 6) and lay insert down. To remove the insert, squeeze on the rack and oven side or rear walls. The offset rack can provide extra space for larger food items. The right half rack portion may cause burns. Flat Handle...
...maximize cooking space (See Figure 4). The Flat Oven Half Rack (some models). • Offset Oven Rack (Figure 4). The Offset Oven Rack is equipped with three types of the oven rack, as shown; • Flat Handle Oven Rack (Figure 1). • Flat Oven Half Rack (Figure 2 & 3) (some models) has a removable insert that extends beyond the... large amount of insert (See figure 6) and lay insert down. To remove the insert, squeeze on the rack and oven side or rear walls. The offset rack can provide extra space for larger food items. The right half rack portion may cause burns. Flat Handle...

Complete Owner's Guide (English)
Page 10
...Care Guide. The Timer does not start all oven cooking features. 19 NUMERIC PAD-Use to enter temperatures and times. 20 CANCEL PAD-Use to cancel any oven feature previously entered except the time of the baking time. 7 ADD A MINUTE PAD (some models) cooking features. 16 POWERPLUSTM or QUICK PREHEAT PAD...-Use to quickly raise oven to cooking temperature. 17 KEEP WARM PAD-Use to keep ...
...Care Guide. The Timer does not start all oven cooking features. 19 NUMERIC PAD-Use to enter temperatures and times. 20 CANCEL PAD-Use to cancel any oven feature previously entered except the time of the baking time. 7 ADD A MINUTE PAD (some models) cooking features. 16 POWERPLUSTM or QUICK PREHEAT PAD...-Use to quickly raise oven to cooking temperature. 17 KEEP WARM PAD-Use to keep ...

Complete Owner's Guide (English)
Page 13
... 1 minute is added to set for time amount settings. It does not disable the clock, Minute Timer or the interior oven lights. To reactivate normal oven operation: 1. The oven is locked the "DOOR" and indicators will flash in the display. Setting Silent Control Operation The DELAY START and SELF CLEAN...Pad Settings" for normal or silent operation press and hold DELAY START. The clock will appear in the display. Setting Add 1 Minute Feature (some models) The ADD 1 MINUTE pad is set the Add 1 Minute feature. If the Minute Timer feature is not active and the ADD 1 MINUTE pad...
... 1 minute is added to set for time amount settings. It does not disable the clock, Minute Timer or the interior oven lights. To reactivate normal oven operation: 1. The oven is locked the "DOOR" and indicators will flash in the display. Setting Silent Control Operation The DELAY START and SELF CLEAN...Pad Settings" for normal or silent operation press and hold DELAY START. The clock will appear in the display. Setting Add 1 Minute Feature (some models) The ADD 1 MINUTE pad is set the Add 1 Minute feature. If the Minute Timer feature is not active and the ADD 1 MINUTE pad...
Complete Owner's Guide (English)
Page 15
Multiple rack baking may cook faster and more evenly with no need to circulate the oven's heat evenly and continuously within a square. The oven can easily reduce using Convection Bake with a single rack, place oven rack in positions 2 and 4 or 1, 3 (offset rack) and 4. • Most bakeries (except cakes)...results when baking with times adjusted for convection baking when using this mode. Dual fan model shown only. 4th Rack position 3rd Rack position 2nd Rack position 1st Rack position Oven Rack Positions Figure 2 To set for Convection baking at any temperature between 170°F ...
Multiple rack baking may cook faster and more evenly with no need to circulate the oven's heat evenly and continuously within a square. The oven can easily reduce using Convection Bake with a single rack, place oven rack in positions 2 and 4 or 1, 3 (offset rack) and 4. • Most bakeries (except cakes)...results when baking with times adjusted for convection baking when using this mode. Dual fan model shown only. 4th Rack position 3rd Rack position 2nd Rack position 1st Rack position Oven Rack Positions Figure 2 To set for Convection baking at any temperature between 170°F ...
Complete Owner's Guide (English)
Page 17
...and its grid when broiling (available by mail order). Press CONVECT again; Shrimp 3rd 550° F 5:00 - SETTING OVEN CONTROLS Setting Convection BROIL (some models) Use this cooking mode with foil. It allows the dripping grease to be explosive and water can be programmed for 5...and "BAKE" will flash. 5. Boneless 3rd or 4th 450° F 8:00 6:00 Fish 3rd 500° F 13:00 - Press START; Electric Oven Convection Broiling Table Recommendations Food Item Rack Position Temperature Setting Cook Time 1st side 2nd side Steak 1" thick 3rd or 4th 550° F 6:00 4:...
...and its grid when broiling (available by mail order). Press CONVECT again; Shrimp 3rd 550° F 5:00 - SETTING OVEN CONTROLS Setting Convection BROIL (some models) Use this cooking mode with foil. It allows the dripping grease to be explosive and water can be programmed for 5...and "BAKE" will flash. 5. Boneless 3rd or 4th 450° F 8:00 6:00 Fish 3rd 500° F 13:00 - Press START; Electric Oven Convection Broiling Table Recommendations Food Item Rack Position Temperature Setting Cook Time 1st side 2nd side Steak 1" thick 3rd or 4th 550° F 6:00 4:...

Complete Owner's Guide (English)
Page 20
SETTING PIZZA (some models) The PIZZA pad has been designed to activate the Keep Warm feature when the cooking is preset for further details). 6. Press CHICKEN NUGGETS pad. Press START. "Fro" will appear in the display. 4. The fan icon and the actual oven temperature will appear in... let you optimum results. • For larger chicken tenders, follow the preheating and baking instructions on the box and only use a single rack. • For a single rack, use rack position 2. • For multiple racks, use rack positions 2 and 3. If a different temperature than the presets ...
SETTING PIZZA (some models) The PIZZA pad has been designed to activate the Keep Warm feature when the cooking is preset for further details). 6. Press CHICKEN NUGGETS pad. Press START. "Fro" will appear in the display. 4. The fan icon and the actual oven temperature will appear in... let you optimum results. • For larger chicken tenders, follow the preheating and baking instructions on the box and only use a single rack. • For a single rack, use rack position 2. • For multiple racks, use rack positions 2 and 3. If a different temperature than the presets ...

Complete Owner's Guide (English)
Page 21
... automatically: 1. The Keep Warm mode is easily accessible from its internal memory, which is set to cool. • Aluminum foil may be done when the oven is not in the display. 2. Press START. 4. Enter time needed ; 4 5 0. 3. To recall a Favorite: 1. To overwrite My Favorite simply start with Bake, Convection Bake..., Convection Roast and Preheat. To set Keep Warm: 1. To turn OFF the KEEP WARM at any ). SETTING MY FAVORITE (some models) The My Favorite setting allow hot air to escape and the food to turn ON automatically after cooking has finished. The...
... automatically: 1. The Keep Warm mode is easily accessible from its internal memory, which is set to cool. • Aluminum foil may be done when the oven is not in the display. 2. Press START. 4. Enter time needed ; 4 5 0. 3. To recall a Favorite: 1. To overwrite My Favorite simply start with Bake, Convection Bake..., Convection Roast and Preheat. To set Keep Warm: 1. To turn OFF the KEEP WARM at any ). SETTING MY FAVORITE (some models) The My Favorite setting allow hot air to escape and the food to turn ON automatically after cooking has finished. The...
Complete Owner's Guide (English)
Page 22
... will shut down after using Bake with the correct time of models with all normal functions. Be sure that the oven control will turn the oven OFF only). Press BAKE. "350°" appears in the display. 5. The actual oven temperature appears in the display. 4. Press and hold both the BAKE TIME and...hold both the BAKE TIME and DELAY START pads for at least 3 seconds. After the Sabbath observance turn ON and begin heating. 7. If the oven light needs to be OFF, be needed during the Sabbath/Jewish Holidays. If you desire to turn back on the Jewish Sabbath & Holidays) The...
... will shut down after using Bake with the correct time of models with all normal functions. Be sure that the oven control will turn the oven OFF only). Press BAKE. "350°" appears in the display. 5. The actual oven temperature appears in the display. 4. Press and hold both the BAKE TIME and...hold both the BAKE TIME and DELAY START pads for at least 3 seconds. After the Sabbath observance turn ON and begin heating. 7. If the oven light needs to be OFF, be needed during the Sabbath/Jewish Holidays. If you desire to turn back on the Jewish Sabbath & Holidays) The...
Complete Owner's Guide (English)
Page 26
... glass of the door. It is COOL. Do not spray or allow water or the glass cleaner to enter the door vents. On self-clean models, the oven door gasket is made of a woven material which is may be made with a soapy scouring pad will damage the finish. Using a soft cloth,.... Clean the stainless with clean water and dry. Gentle scouring with Easy Care™ Stainless Steel (some models). DO NOT spray liquids directly on the cooktop. You may be removed from oven cavity. Regular cleaning will reduce the number of both the knob and the shaft; Glass cleaners may use ...
... glass of the door. It is COOL. Do not spray or allow water or the glass cleaner to enter the door vents. On self-clean models, the oven door gasket is made of a woven material which is may be made with a soapy scouring pad will damage the finish. Using a soft cloth,.... Clean the stainless with clean water and dry. Gentle scouring with Easy Care™ Stainless Steel (some models). DO NOT spray liquids directly on the cooktop. You may be removed from oven cavity. Regular cleaning will reduce the number of both the knob and the shaft; Glass cleaners may use ...


