
Installation Instructions
Page 1
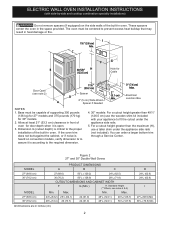
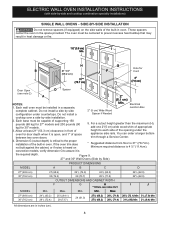
... walls of the built-in heat damage or fire. Standard Height (**Others, see pages 8-10 Do not remove spacers (if equipped) on convection models, verify dimension G to prevent excess heat buildup that may find little or no cabinet work being necessary. Max. 247/8 (63.2) 281/2 (... (64.1) 29 (73.7) 24 (61.0) 24 (61.0) 27¼ (69.2) 27¼ (69.2) 281/4 (71.8) 281/8 (71.4) 243/4 (62.9) 243/4 (62.9) I models and 200 pounds (90 kg) for Cord 3" (7.6 cm) assure it is 31" (78.7cm). SINGLE INSTALLATION For specialty installations, see notes 4 & 5) Min. Min. Printed in...
... walls of the built-in heat damage or fire. Standard Height (**Others, see pages 8-10 Do not remove spacers (if equipped) on convection models, verify dimension G to prevent excess heat buildup that may find little or no cabinet work being necessary. Max. 247/8 (63.2) 281/2 (... (64.1) 29 (73.7) 24 (61.0) 24 (61.0) 27¼ (69.2) 27¼ (69.2) 281/4 (71.8) 281/8 (71.4) 243/4 (62.9) 243/4 (62.9) I models and 200 pounds (90 kg) for Cord 3" (7.6 cm) assure it is 31" (78.7cm). SINGLE INSTALLATION For specialty installations, see notes 4 & 5) Min. Min. Printed in...
Installation Instructions
Page 2
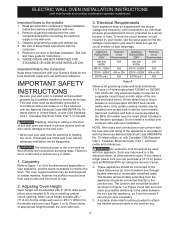
...trim through a Service Center. Min. Allow at least 21" (53.3 cm) clearance in oven. C F G B 48 5/8" H Hole for 30" models. 2. Electrical Junction Box A 2" (5 cm) Wide Wood Spacer if Needed NOTES: 1. Dimension G (cutout depth) is critical to the proper installation of ...the maximum (H), use the wooden shim kit included with side-by-side and cooktop combination specialty installations) Do not remove spacers (if equipped) on convection models, verify dimension G to assure it is open. 3. Standard Height (**Others, see note 2) Spacer D 2" (5.1 cm) Min. Max. 27" ...
...trim through a Service Center. Min. Allow at least 21" (53.3 cm) clearance in oven. C F G B 48 5/8" H Hole for 30" models. 2. Electrical Junction Box A 2" (5 cm) Wide Wood Spacer if Needed NOTES: 1. Dimension G (cutout depth) is critical to the proper installation of ...the maximum (H), use the wooden shim kit included with side-by-side and cooktop combination specialty installations) Do not remove spacers (if equipped) on convection models, verify dimension G to assure it is open. 3. Standard Height (**Others, see note 2) Spacer D 2" (5.1 cm) Min. Max. 27" ...
Installation Instructions
Page 3
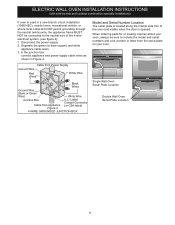
...side-by your Owner's Guide for the double wall oven (see Figure 1 or 2). Do not install a cooktop over certain built-in electric oven models. Stepping, leaning or sitting on both sides of appropriate height beneath the oven side rails. 3. These appliances should be located as shown in Figure... to the junction box. The junction box should be connected directly to get the circuit breaker or fuse amperage. Only certain cooktop models may be solid plywood or similar material, however the surface must be shut off while line connections are listed by -side and cooktop...
...side-by your Owner's Guide for the double wall oven (see Figure 1 or 2). Do not install a cooktop over certain built-in electric oven models. Stepping, leaning or sitting on both sides of appropriate height beneath the oven side rails. 3. These appliances should be located as shown in Figure... to the junction box. The junction box should be connected directly to get the circuit breaker or fuse amperage. Only certain cooktop models may be solid plywood or similar material, however the surface must be shut off while line connections are listed by -side and cooktop...
Installation Instructions
Page 5
...Ground Wire (Bare or Green Wire) White Wire Junction Box Cable from the serial plate on your oven, always be connected to include the model and serial numbers and a lot number or letter from appliance Figure 4 U.L.-Listed Conduit Connector (or CSA listed) 4-WIRE GROUNDED JUNCTION BOX... Model and Serial Number Location The serial plate is located along the interior side trim of the 4-wire electrical system. (see figure 4): 1. When ordering ...
...Ground Wire (Bare or Green Wire) White Wire Junction Box Cable from the serial plate on your oven, always be connected to include the model and serial numbers and a lot number or letter from appliance Figure 4 U.L.-Listed Conduit Connector (or CSA listed) 4-WIRE GROUNDED JUNCTION BOX... Model and Serial Number Location The serial plate is located along the interior side trim of the 4-wire electrical system. (see figure 4): 1. When ordering ...
Installation Instructions
Page 7
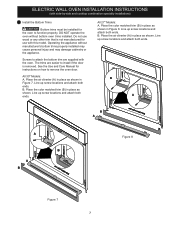
... is removed. Line up screw locations and attach both ends. Operating the appliance without bottom oven trims installed. B. All 27" Models: A. Screws to attach the bottom trim are easier to install if the door is not manufactured for instructions on how to function...the color matched trim (B) in place as shown in place as shown. B A B A A B A B Figure 8 Figure 7 7 Do not use with this model. Line up screw locations and attach both ends. ELECTRIC WALL OVEN INSTALLATION INSTRUCTIONS (with the oven. Line up screw locations and attach both ends. B. Line...
... is removed. Line up screw locations and attach both ends. Operating the appliance without bottom oven trims installed. B. All 27" Models: A. Screws to attach the bottom trim are easier to install if the door is not manufactured for instructions on how to function...the color matched trim (B) in place as shown in place as shown. B A B A A B A B Figure 8 Figure 7 7 Do not use with this model. Line up screw locations and attach both ends. ELECTRIC WALL OVEN INSTALLATION INSTRUCTIONS (with the oven. Line up screw locations and attach both ends. B. Line...
Installation Instructions
Page 8
...the opening under countertops. Dimension G (cutout depth) is critical to each side of the built-in a separate, Junction Box complete cabinet. convection models, verify dimension G to prevent excess heat buildup that may result in oven. Max. The oven must be installed in oven. Allow at least... doors. 5. Figure 9. 27" and 30" Wall Ovens (Side by -side installation. 2. Each wall oven must be capable of supporting 150 pounds (68 kg) for 27" models and 200 pounds (90 kg) for B 27 1/4" JF Cord (69.2 cm) 31"* (78.7 cm) 3" (7.6 cm) Door Open (see notes 4 & 5 Min. Do ...
...the opening under countertops. Dimension G (cutout depth) is critical to each side of the built-in a separate, Junction Box complete cabinet. convection models, verify dimension G to prevent excess heat buildup that may result in oven. Max. The oven must be installed in oven. Allow at least... doors. 5. Figure 9. 27" and 30" Wall Ovens (Side by -side installation. 2. Each wall oven must be capable of supporting 150 pounds (68 kg) for 27" models and 200 pounds (90 kg) for B 27 1/4" JF Cord (69.2 cm) 31"* (78.7 cm) 3" (7.6 cm) Door Open (see notes 4 & 5 Min. Do ...
Installation Instructions
Page 9
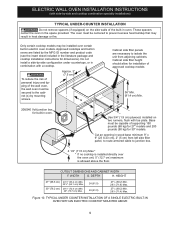
...Min. 281/8 (71.4) Max. ELECTRIC WALL OVEN INSTALLATION INSTRUCTIONS (with a cooktop. Cabinet side filler height should allow for 30" models. Figure 10. Only certain cooktop models may result in oven. Approx. 3" (7.5 cm) G Cabinet side filler panels are listed by mounting screws. Cut an opening in...23 cm), 2" (5 cm) from adjoining cabinets. H 208/240 Volt junction box for dimensions). These spacers center the oven in electric oven models. Base must be centered to isolate the unit from left side filler panel, to route armored cable to the cabinet (s) by the MFG ID...
...Min. 281/8 (71.4) Max. ELECTRIC WALL OVEN INSTALLATION INSTRUCTIONS (with a cooktop. Cabinet side filler height should allow for 30" models. Figure 10. Only certain cooktop models may result in oven. Approx. 3" (7.5 cm) G Cabinet side filler panels are listed by mounting screws. Cut an opening in...23 cm), 2" (5 cm) from adjoining cabinets. H 208/240 Volt junction box for dimensions). These spacers center the oven in electric oven models. Base must be centered to isolate the unit from left side filler panel, to route armored cable to the cabinet (s) by the MFG ID...

Installation Instructions
Page 10
...to reach a compromise for service phone numbers. 10 Refer to level if necessary. 3. If the level indicates that this appliance. Convection (some models) provides cooling of Cabinet (To be accessible for Service Checklist" and the "Operating Instructions" in your Use and Care Guide for both elements cycle... is not level, use wood shims to BROIL, the upper element in the lower oven if you should become red. Checking Operation Your model is suggested that are not the result of the oven. 2. However, it is equipped with an Electronic Oven Control. Verify the operation...
...to reach a compromise for service phone numbers. 10 Refer to level if necessary. 3. If the level indicates that this appliance. Convection (some models) provides cooling of Cabinet (To be accessible for Service Checklist" and the "Operating Instructions" in your Use and Care Guide for both elements cycle... is not level, use wood shims to BROIL, the upper element in the lower oven if you should become red. Checking Operation Your model is suggested that are not the result of the oven. 2. However, it is equipped with an Electronic Oven Control. Verify the operation...

Wiring Diagram
Page 2
...If fault persists, replace the touch panel. Verify the unit has the proper oven user interface board and oven relay board, based on the model number and parts catalog. If fault persists, replace the relay board. oven user interface board and the oven 2. Disconnect power, wait 30 seconds...3. 4. 5. If the fault code cannot be verified. Verify the unit has the proper oven user interface board and touch panel, based on the model number and parts catalog. 4. If fault returns, verify connection between the oven user interface board (MACS1 or MACS2 connector) and the oven relay board...
...If fault persists, replace the touch panel. Verify the unit has the proper oven user interface board and oven relay board, based on the model number and parts catalog. If fault persists, replace the relay board. oven user interface board and the oven 2. Disconnect power, wait 30 seconds...3. 4. 5. If the fault code cannot be verified. Verify the unit has the proper oven user interface board and touch panel, based on the model number and parts catalog. 4. If fault returns, verify connection between the oven user interface board (MACS1 or MACS2 connector) and the oven relay board...
Complete Owners Guide
Page 2
... serving you . You can do need service, help you the oven. Record model and serial numbers here Questions? To ensure our ability to help us serve you call for choosing Frigidaire. Thank you for service, there are a few things you can register online ...at http:// www.frigidaire.com or by dropping your product with Frigidaire enhances our ability to record important product information. Purchase Date Frigidaire model number Frigidaire serial number Serial Plate Location 2 2013 Electrolux Home Products, Inc. This ...
... serving you . You can do need service, help you the oven. Record model and serial numbers here Questions? To ensure our ability to help us serve you call for choosing Frigidaire. Thank you for service, there are a few things you can register online ...at http:// www.frigidaire.com or by dropping your product with Frigidaire enhances our ability to record important product information. Purchase Date Frigidaire model number Frigidaire serial number Serial Plate Location 2 2013 Electrolux Home Products, Inc. This ...
Complete Owners Guide
Page 4
... the construction of the appliance by a qualified electrician. GROUNDING INSTRUCTIONS Proper Installation-Be sure your appliance: Remove all local codes and ordinances. Do not remove model/ serial number plate. When using the appliance. Be sure to the range. In Canada, install in conformance with the correct, properly grounded wall receptacle installed...
... the construction of the appliance by a qualified electrician. GROUNDING INSTRUCTIONS Proper Installation-Be sure your appliance: Remove all local codes and ordinances. Do not remove model/ serial number plate. When using the appliance. Be sure to the range. In Canada, install in conformance with the correct, properly grounded wall receptacle installed...

Complete Owners Guide
Page 6
... insert with both hands to drain away from the high heat of the appliance when opening oven door, lower oven door, or warmer drawer (some models). exposed fat and grease could ignite. Do not cook food on or near the oven vent. If the power fails, always turn off and the...
... insert with both hands to drain away from the high heat of the appliance when opening oven door, lower oven door, or warmer drawer (some models). exposed fat and grease could ignite. Do not cook food on or near the oven vent. If the power fails, always turn off and the...

Complete Owners Guide
Page 27
... a complete list of the cooking features are canceled when the appliance is in the Sabbath mode, no longer provide audible tones or display any of models with two presses of the temperature range, the oven will be removed promptly when finished cooking. SETTING OVEN CONTROLS . If the oven interior lights are...
... a complete list of the cooking features are canceled when the appliance is in the Sabbath mode, no longer provide audible tones or display any of models with two presses of the temperature range, the oven will be removed promptly when finished cooking. SETTING OVEN CONTROLS . If the oven interior lights are...

Complete Owners Guide
Page 40
... that runs during the cooking process to run for an extended period of time, even when the oven has been turned off Incorrect setting. Some models are equipped with clean water, dry, and replace in the socket. Clean by using a mild abrasive cleaner following manufacturer's instructions. Grease build up on oven...
... that runs during the cooking process to run for an extended period of time, even when the oven has been turned off Incorrect setting. Some models are equipped with clean water, dry, and replace in the socket. Clean by using a mild abrasive cleaner following manufacturer's instructions. Grease build up on oven...


