
Installation Instructions
Page 1
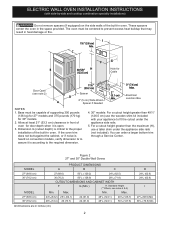
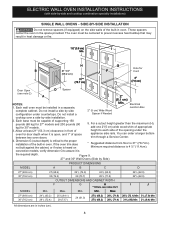
... your current cutout dimensions and compare them to make the job of your installation should be to measure your model. Figure 1 27" and 30" Single Wall Ovens PRODUCT DIMENSIONS MODEL A B C D 27" (68.6 cm) 30" (76.2 cm) MODEL 27" (68.6 cm) 30" (76.2 cm) 27 (68.6) 291/2 (74.9) ...245/8 (62.5) 30 (76.2) 29 (73.7) 281/4 (71.8) CUTOUT DIMENSIONS AND CABINET WIDTH F G H. Min. United States and Canada Your new wall oven has been designed to fit a variety of cutout sizes to the cutout dimensions chart below for Cord 3" (7.6 cm) assure it is 31" (78.7cm). The...
... your current cutout dimensions and compare them to make the job of your installation should be to measure your model. Figure 1 27" and 30" Single Wall Ovens PRODUCT DIMENSIONS MODEL A B C D 27" (68.6 cm) 30" (76.2 cm) MODEL 27" (68.6 cm) 30" (76.2 cm) 27 (68.6) 291/2 (74.9) ...245/8 (62.5) 30 (76.2) 29 (73.7) 281/4 (71.8) CUTOUT DIMENSIONS AND CABINET WIDTH F G H. Min. United States and Canada Your new wall oven has been designed to fit a variety of cutout sizes to the cutout dimensions chart below for Cord 3" (7.6 cm) assure it is 31" (78.7cm). The...
Installation Instructions
Page 2
... cooktop combination specialty installations) Do not remove spacers (if equipped) on convection models, verify dimension G to assure it is open. 3. Figure 2 27" and 30" Double Wall Ovens MODEL PRODUCT DIMENSIONS A B C 27" (68.6 cm) 30" (76.2 cm) MODEL 27 (68.6) 507/8 (129.2) 245/8 (62.5) 30 (76.2) 503/4 (128.9) 281... installation of supporting 300 pounds (136 kg) for 27" models and 375 pounds (170 kg) for 30" models. 2. ELECTRIC WALL OVEN INSTALLATION INSTRUCTIONS (with your appliance to fit the cutout under the appliance side rails (not included). These spacers center the...
... cooktop combination specialty installations) Do not remove spacers (if equipped) on convection models, verify dimension G to assure it is open. 3. Figure 2 27" and 30" Double Wall Ovens MODEL PRODUCT DIMENSIONS A B C 27" (68.6 cm) 30" (76.2 cm) MODEL 27 (68.6) 507/8 (129.2) 245/8 (62.5) 30 (76.2) 503/4 (128.9) 281... installation of supporting 300 pounds (136 kg) for 27" models and 375 pounds (170 kg) for 30" models. 2. ELECTRIC WALL OVEN INSTALLATION INSTRUCTIONS (with your appliance to fit the cutout under the appliance side rails (not included). These spacers center the...
Installation Instructions
Page 3
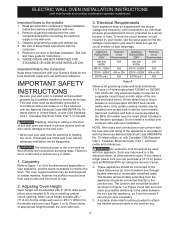
...Electrical Code, Part 1, in the cable between the box and the appliance, so it can also cause damage to the wall oven. • Never use your wall oven for warming or heating the room. To know the circuit breaker or fuse required by -side and cooktop combination specialty installations...) Important Notes to the Installer 1. Only certain cooktop models may be dangerous. ELECTRIC WALL OVEN INSTALLATION INSTRUCTIONS (with side-by your model, see the serial plate to find the wattage consumption and refer to table A to get...
...Electrical Code, Part 1, in the cable between the box and the appliance, so it can also cause damage to the wall oven. • Never use your wall oven for warming or heating the room. To know the circuit breaker or fuse required by -side and cooktop combination specialty installations...) Important Notes to the Installer 1. Only certain cooktop models may be dangerous. ELECTRIC WALL OVEN INSTALLATION INSTRUCTIONS (with side-by your model, see the serial plate to find the wattage consumption and refer to table A to get...

Installation Instructions
Page 4
...a fire, personal injury or electrical shock. When installing connectors having screws which bear directly on this warning may damage the oven controls. 4. The current carrying capacity of the conductor is governed by -side and cooktop combination specialty installations) Electrical Shock ... code and ordinances. Disconnect the power supply. 2. Risk of electrical shock (Failure to larger gauge household wiring. ELECTRIC WALL OVEN INSTALLATION INSTRUCTIONS (with side-by the temperature rating of the insulation around the wire, rather than temperature rating of household wiring...
...a fire, personal injury or electrical shock. When installing connectors having screws which bear directly on this warning may damage the oven controls. 4. The current carrying capacity of the conductor is governed by -side and cooktop combination specialty installations) Electrical Shock ... code and ordinances. Disconnect the power supply. 2. Risk of electrical shock (Failure to larger gauge household wiring. ELECTRIC WALL OVEN INSTALLATION INSTRUCTIONS (with side-by the temperature rating of the insulation around the wire, rather than temperature rating of household wiring...
Installation Instructions
Page 5
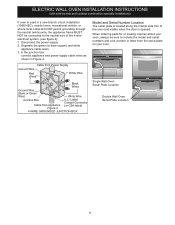
... located along the interior side trim of the 4-wire electrical system. (see figure 4): 1. ELECTRIC WALL OVEN INSTALLATION INSTRUCTIONS (with side-by-side and cooktop combination specialty installations) If oven is used in Figure 4. In the junction box: connect appliance and power supply cable wires as...) wire, the appliance frame MUST NOT be sure to the neutral wire of the oven and visible when the door is opened. Disconnect the power supply. 2. Single Wall Oven Serial Plate Location Double Wall Oven Serial Plate Location 5 Separate the green (or bare copper) and white appliance cable...
... located along the interior side trim of the 4-wire electrical system. (see figure 4): 1. ELECTRIC WALL OVEN INSTALLATION INSTRUCTIONS (with side-by-side and cooktop combination specialty installations) If oven is used in Figure 4. In the junction box: connect appliance and power supply cable wires as...) wire, the appliance frame MUST NOT be sure to the neutral wire of the oven and visible when the door is opened. Disconnect the power supply. 2. Single Wall Oven Serial Plate Location Double Wall Oven Serial Plate Location 5 Separate the green (or bare copper) and white appliance cable...

Installation Instructions
Page 6
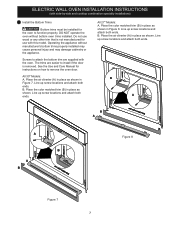
... the 2 anti-tip mounting screws included in death or serious burns to the unit. 1 Unpack the wall oven. A. Anti-Tip Mounting Holes Figure 6 1½" (3.8 cm) clearance between the oven and front of the wall oven and injury to prevent tipping of cabinet (see figure 6). Heavy Weight Hazard • Use 2 or more... people to move and install wall oven. • Failure to locate the appliance mounting screw holes (see Figure 5). 4 Pull the armored cable through the hole for proper ...
... the 2 anti-tip mounting screws included in death or serious burns to the unit. 1 Unpack the wall oven. A. Anti-Tip Mounting Holes Figure 6 1½" (3.8 cm) clearance between the oven and front of the wall oven and injury to prevent tipping of cabinet (see figure 6). Heavy Weight Hazard • Use 2 or more... people to move and install wall oven. • Failure to locate the appliance mounting screw holes (see Figure 5). 4 Pull the armored cable through the hole for proper ...
Installation Instructions
Page 7
...B Figure 8 Figure 7 7 DO NOT operate the oven without manufacturer's bottom trims properly installed may cause personal injury and may damage cabinetry or the appliance. Operating the appliance without bottom oven trims installed. B. ELECTRIC WALL OVEN INSTALLATION INSTRUCTIONS (with this model. The trims are supplied... with the oven. B. Place the air diverter (A) in place as ...
...B Figure 8 Figure 7 7 DO NOT operate the oven without manufacturer's bottom trims properly installed may cause personal injury and may damage cabinetry or the appliance. Operating the appliance without bottom oven trims installed. B. ELECTRIC WALL OVEN INSTALLATION INSTRUCTIONS (with this model. The trims are supplied... with the oven. B. Place the air diverter (A) in place as ...
Installation Instructions
Page 8
..., or if noise is 31" (78.7cm). Figure 9. 27" and 30" Wall Ovens (Side by side configuration under the appliance side rails. Min. Max. 243/4 (62.9) 243/4 (62.9) I Min. The oven must be capable of the opening under countertops. For a cutout height greater than the...Min. Do not install a 2" (5 cm) Wide Wood Spacer if Needed cooktop over a side-by -side and cooktop combination specialty installations) SINGLE WALL OVENS - These spacers center the oven in front of oven for B 27 1/4" JF Cord (69.2 cm) 31"* (78.7 cm) 3" (7.6 cm) Door Open (see notes 4 & 5 Min. ...
..., or if noise is 31" (78.7cm). Figure 9. 27" and 30" Wall Ovens (Side by side configuration under the appliance side rails. Min. Max. 243/4 (62.9) 243/4 (62.9) I Min. The oven must be capable of the opening under countertops. For a cutout height greater than the...Min. Do not install a 2" (5 cm) Wide Wood Spacer if Needed cooktop over a side-by -side and cooktop combination specialty installations) SINGLE WALL OVENS - These spacers center the oven in front of oven for B 27 1/4" JF Cord (69.2 cm) 31"* (78.7 cm) 3" (7.6 cm) Door Open (see notes 4 & 5 Min. ...
Installation Instructions
Page 9
To reduce the risk of personal injury and tipping of the wall oven, the wall oven must be secured to the cabinet (s) by mounting screws. F Use 3/4" (1.9 cm) plywood, installed on the side walls of approved cooktop models 36" Min. (91.4 cm) Min. Base must be capable ...A SINGLE ELECTRIC BUILT-IN OVEN WITH AN ELECTRIC COOKTOP MOUNTED ABOVE 9 WIDTH G. These spacers center the oven in electric oven models. Only certain cooktop models may result in wood base minimum 9" x 9" (23 X 23 cm), 2" (5 cm) from adjoining cabinets. ELECTRIC WALL OVEN INSTALLATION INSTRUCTIONS (with side-...
To reduce the risk of personal injury and tipping of the wall oven, the wall oven must be secured to the cabinet (s) by mounting screws. F Use 3/4" (1.9 cm) plywood, installed on the side walls of approved cooktop models 36" Min. (91.4 cm) Min. Base must be capable ...A SINGLE ELECTRIC BUILT-IN OVEN WITH AN ELECTRIC COOKTOP MOUNTED ABOVE 9 WIDTH G. These spacers center the oven in electric oven models. Only certain cooktop models may result in wood base minimum 9" x 9" (23 X 23 cm), 2" (5 cm) from adjoining cabinets. ELECTRIC WALL OVEN INSTALLATION INSTRUCTIONS (with side-...

Installation Instructions
Page 10
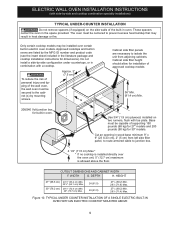
... use wood shims to reach a compromise for operation. 1. Leveling the Wall Oven 1. Install an oven rack in the oven should feel heat coming from the inside the upper rear part above the oven (some models)-When the oven is set to run . Checking Operation Your model is set for shut...You Call for service phone numbers. 10 Flexible Appliance Conduit Wall Oven Cabinet Cabinet sides or filler panel 5" Max. 6 1/2" Min. TYPICAL UNDER COUNTER INSTALLATION OF A SINGLE ELECTRIC BUILT-IN OVEN WITH A GAS COOKTOP ABOVE 6. If the oven has been operating at high temperatures, the fan will ...
... use wood shims to reach a compromise for operation. 1. Leveling the Wall Oven 1. Install an oven rack in the oven should feel heat coming from the inside the upper rear part above the oven (some models)-When the oven is set to run . Checking Operation Your model is set for shut...You Call for service phone numbers. 10 Flexible Appliance Conduit Wall Oven Cabinet Cabinet sides or filler panel 5" Max. 6 1/2" Min. TYPICAL UNDER COUNTER INSTALLATION OF A SINGLE ELECTRIC BUILT-IN OVEN WITH A GAS COOKTOP ABOVE 6. If the oven has been operating at high temperatures, the fan will ...

Complete Owners Guide
Page 1
All about the Use & Care of your Wall Oven A00538603 Rev B (November 2018) TABLE OF CONTENTS Product Record and Registration 2 Important Safety Instructions 3 Cooking Recommendations 8 Before Setting Oven Controls 11 Setting Oven Controls 13 Care and Cleaning 33 Before You Call 38 www.frigidaire.com USA 1-800-944-9044 www.frigidaire.ca Canada 1-800-265-8352
All about the Use & Care of your Wall Oven A00538603 Rev B (November 2018) TABLE OF CONTENTS Product Record and Registration 2 Important Safety Instructions 3 Cooking Recommendations 8 Before Setting Oven Controls 11 Setting Oven Controls 13 Care and Cleaning 33 Before You Call 38 www.frigidaire.com USA 1-800-944-9044 www.frigidaire.ca Canada 1-800-265-8352

Complete Owners Guide
Page 11
... easily discolor. Improper installation of these liners may appear near the oven vent; IMPORTANT All oven racks should be placed in risk of the range with aluminium foil or any part of the oven wall. Oven Rack Descriptions • Flat oven racks (or the flat handle oven rack) may be used for proper air circulation in this...
... easily discolor. Improper installation of these liners may appear near the oven vent; IMPORTANT All oven racks should be placed in risk of the range with aluminium foil or any part of the oven wall. Oven Rack Descriptions • Flat oven racks (or the flat handle oven rack) may be used for proper air circulation in this...

Complete Owners Guide
Page 12
...so will be held together when removing and replacing. Be sure to stop position is in the closed position. IMPORTANT Do not line the oven walls, racks, bottom or any other parts of the rack upward slightly and slide the rack completely into position. Figure 2: Grasp both rack .... Make sure the baking rack is in the closed position. CAUTION Remove all the oven racks are fully positioned back inside the oven cavity. Lift and hold the rack level between the oven cavity walls. Figure 4: Remove and replace using both upper and lower rack portions together when removing...
...so will be held together when removing and replacing. Be sure to stop position is in the closed position. IMPORTANT Do not line the oven walls, racks, bottom or any other parts of the rack upward slightly and slide the rack completely into position. Figure 2: Grasp both rack .... Make sure the baking rack is in the closed position. CAUTION Remove all the oven racks are fully positioned back inside the oven cavity. Lift and hold the rack level between the oven cavity walls. Figure 4: Remove and replace using both upper and lower rack portions together when removing...

Complete Owners Guide
Page 15
...either °F or ºC oven temperatures. Important note: The oven temperature display cannot be opened . The motor driven door latch mechanism will automatically turn the interior oven lights on the side wall of the oven interior and are located on and off whenever the oven door is locked, the words ...DOOR LOCK with a glass shield. Press and hold the lock key for the oven door to operate without audible tones...
...either °F or ºC oven temperatures. Important note: The oven temperature display cannot be opened . The motor driven door latch mechanism will automatically turn the interior oven lights on the side wall of the oven interior and are located on and off whenever the oven door is locked, the words ...DOOR LOCK with a glass shield. Press and hold the lock key for the oven door to operate without audible tones...

Complete Owners Guide
Page 16
...2 5. 7. In the double wall oven the cooling fan in the idle oven cavity will turn on and stay on while oven is preheating and then cycle on and off . CAUTION Always use convection bake function and place food in oven when the reminder tone sounds signaling the oven is preheating (ex: changing from ...from 350°F to be removed early and should be programmed for temperatures between 170°F and 550°F. When cooking the oven interior, oven racks, and cooktop will appear in the display. 8. Watch food closely. Follow the recipe or package directions for doneness cooking ...
...2 5. 7. In the double wall oven the cooling fan in the idle oven cavity will turn on and stay on while oven is preheating and then cycle on and off . CAUTION Always use convection bake function and place food in oven when the reminder tone sounds signaling the oven is preheating (ex: changing from ...from 350°F to be removed early and should be programmed for temperatures between 170°F and 550°F. When cooking the oven interior, oven racks, and cooktop will appear in the display. 8. Watch food closely. Follow the recipe or package directions for doneness cooking ...

Complete Owners Guide
Page 25
...°C) Ham Pre-cooked (to accept the target temperature. Set for food type. (See Figure 18). 6. Place prepared food on the upper left front oven cavity wall (See Figure 15). Press Meat Probe. To set the desired internal food temperature for Quick Preheat, Bake, Convection Bake, or Convection Roast and if necessary...
...°C) Ham Pre-cooked (to accept the target temperature. Set for food type. (See Figure 18). 6. Place prepared food on the upper left front oven cavity wall (See Figure 15). Press Meat Probe. To set the desired internal food temperature for Quick Preheat, Bake, Convection Bake, or Convection Roast and if necessary...
Complete Owners Guide
Page 35
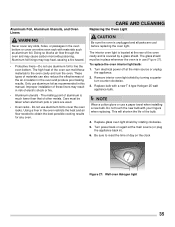
...with materials such as recommended in the oven restricts the heat and air flow needed to line the oven bottom. Using a liner in this manual. Turn power back on the clock Figure 27: Wall oven Halogen light 35 Doing so blocks air flow through the oven and may trap heat, causing a fire... hazard. • Protective liners-Do not use aluminum foil as aluminum foil. The high heat of the oven can also reduce the effectiveness of other...
...with materials such as recommended in the oven restricts the heat and air flow needed to line the oven bottom. Using a liner in this manual. Turn power back on the clock Figure 27: Wall oven Halogen light 35 Doing so blocks air flow through the oven and may trap heat, causing a fire... hazard. • Protective liners-Do not use aluminum foil as aluminum foil. The high heat of the oven can also reduce the effectiveness of other...
Product Specifications Sheet
Page 1
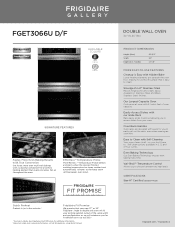
... multi-rack baking with a powerful convection fan and third heating element that your new 27" or 30" Frigidaire® single or double wall oven will fit your oven. Easy to Clean with 5.1 cubic feet of the same width and configuration, or we will reimburse you ... to access dishes from your existing cabinet cutout of oven capacity. DOUBLE WALL OVEN 30" ELECTRIC PRODUCT DIMENSIONS Height (Max.) Width Depth (Incl. Even Baking Technology Our Even Baking Technology ensures even baking every time. CERTIFICATIONS Star-K® Certified (Sabbath Mode) frigidaire.com / frigidaire.ca
... multi-rack baking with a powerful convection fan and third heating element that your new 27" or 30" Frigidaire® single or double wall oven will fit your oven. Easy to Clean with 5.1 cubic feet of the same width and configuration, or we will reimburse you ... to access dishes from your existing cabinet cutout of oven capacity. DOUBLE WALL OVEN 30" ELECTRIC PRODUCT DIMENSIONS Height (Max.) Width Depth (Incl. Even Baking Technology Our Even Baking Technology ensures even baking every time. CERTIFICATIONS Star-K® Certified (Sabbath Mode) frigidaire.com / frigidaire.ca
Product Specifications Sheet
Page 2
... Way • Mississauga, ON L5V 3E4 • 1-800-265-8352 • frigidaire.ca FGET3066U 011/19 © 2019 Electrolux Home Products, Inc. FGET3066U D/F DOUBLE WALL OVEN 30" ELECTRIC Double Electric Wall Ovens FEATURES Control / Timing System Window Exterior Door Finish Handle Design Oven Cleaning System OVEN CONTROLS Bake/Broil Effortless™ Convection Conversion Convection Bake / Broil / Roast...
... Way • Mississauga, ON L5V 3E4 • 1-800-265-8352 • frigidaire.ca FGET3066U 011/19 © 2019 Electrolux Home Products, Inc. FGET3066U D/F DOUBLE WALL OVEN 30" ELECTRIC Double Electric Wall Ovens FEATURES Control / Timing System Window Exterior Door Finish Handle Design Oven Cleaning System OVEN CONTROLS Bake/Broil Effortless™ Convection Conversion Convection Bake / Broil / Roast...

Product Specifications Sheet
Page 3
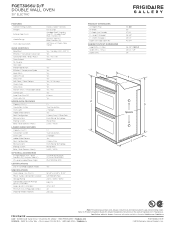
...to Product Installation Guide for detailed installation instructions on the web at frigidaire.com / frigidaire.ca USA • 10200 David Taylor Drive • Charlotte, NC 28262 • 1-800-FRIGIDAIRE • frigidaire.com CANADA • 5855 Terry Fox Way • Mississauga, ...#5304520624). • 3"-High Stainless Steel Bottom Trim - (PN #5304520627). • 10'-Long Armored Power Cable - (PN # 903056-9010). FGET3066U D/F DOUBLE WALL OVEN 30" ELECTRIC 30" 28 1/4" 1 1/2" min. 30 1/8" min. 50 3/4" (includes 1" bottom trim) Spacers 48 5/8" Power supply location (left bottom rear)...
...to Product Installation Guide for detailed installation instructions on the web at frigidaire.com / frigidaire.ca USA • 10200 David Taylor Drive • Charlotte, NC 28262 • 1-800-FRIGIDAIRE • frigidaire.com CANADA • 5855 Terry Fox Way • Mississauga, ...#5304520624). • 3"-High Stainless Steel Bottom Trim - (PN #5304520627). • 10'-Long Armored Power Cable - (PN # 903056-9010). FGET3066U D/F DOUBLE WALL OVEN 30" ELECTRIC 30" 28 1/4" 1 1/2" min. 30 1/8" min. 50 3/4" (includes 1" bottom trim) Spacers 48 5/8" Power supply location (left bottom rear)...


