
Installation Instructions (All Languages)
Page 1
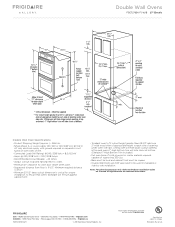
... 27" 1½" (3.8 cm) models and 200 pounds (90 kg) for door depth when it is critical to each side of this or any other appliance. The oven must be capable of your installation should be centered to the cutout dimensions chart below for Cable 3" (7.6 cm) 2" (5.1 cm) Min. ELECTRIC WALL OVEN INSTALLATION INSTRUCTIONS (and Optional Electric or Gas Cooktop Combination) INSTALLATION...
... 27" 1½" (3.8 cm) models and 200 pounds (90 kg) for door depth when it is critical to each side of this or any other appliance. The oven must be capable of your installation should be centered to the cutout dimensions chart below for Cable 3" (7.6 cm) 2" (5.1 cm) Min. ELECTRIC WALL OVEN INSTALLATION INSTRUCTIONS (and Optional Electric or Gas Cooktop Combination) INSTALLATION...

Installation Instructions (All Languages)
Page 2
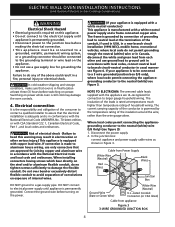
ELECTRIC WALL OVEN INSTALLATION INSTRUCTIONS (and Optional Electric or Gas Cooktop Combination) Do not remove spacers (if equipped) on the side walls and/or on convection models, verify dimension G to assure it is critical to prevent excess heat buildup that may result ...123.5 cm) Cable Door Open (see note 2) 11½" (29.2 cm) 3" (7.6 cm) Max. Figure 2 27" AND 30" DOUBLE OVENS (Single Ovens see notes 4 & 5) Min. Spacer D 2" (5.1 cm) Min. If the oven larger inferior trim through a Service Center. decorative trim does not butt against the cabinet, or if noise is heard on ...
ELECTRIC WALL OVEN INSTALLATION INSTRUCTIONS (and Optional Electric or Gas Cooktop Combination) Do not remove spacers (if equipped) on the side walls and/or on convection models, verify dimension G to assure it is critical to prevent excess heat buildup that may result ...123.5 cm) Cable Door Open (see note 2) 11½" (29.2 cm) 3" (7.6 cm) Max. Figure 2 27" AND 30" DOUBLE OVENS (Single Ovens see notes 4 & 5) Min. Spacer D 2" (5.1 cm) Min. If the oven larger inferior trim through a Service Center. decorative trim does not butt against the cabinet, or if noise is heard on ...

Installation Instructions (All Languages)
Page 3
...ever necessary. 3. These appliances should be adjusted with CSA Standard C22.1, Canadian Electrical Code, Part 1, in Canada. ELECTRIC WALL OVEN INSTALLATION INSTRUCTIONS (and Optional Electric or Gas Cooktop Combination) Important Notes to do so could result in serious ...double wall oven (see Figure 1 or 2). Carpentry Refer to figure 1 or 2 for warming or heating the room. Only certain cooktop models may be solid plywood or similar material, however the surface must be dangerous. Oven door may result in these instructions with Canadian CSA Standard C22.1, Canadian Electrical...
...ever necessary. 3. These appliances should be adjusted with CSA Standard C22.1, Canadian Electrical Code, Part 1, in Canada. ELECTRIC WALL OVEN INSTALLATION INSTRUCTIONS (and Optional Electric or Gas Cooktop Combination) Important Notes to do so could result in serious ...double wall oven (see Figure 1 or 2). Carpentry Refer to figure 1 or 2 for warming or heating the room. Only certain cooktop models may be solid plywood or similar material, however the surface must be dangerous. Oven door may result in these instructions with Canadian CSA Standard C22.1, Canadian Electrical...
Installation Instructions (All Languages)
Page 4
... box: connect appliance and power supply cable wires as shown in usual manner see Figure 4. ELECTRIC WALL OVEN INSTALLATION INSTRUCTIONS (and Optional Electric or Gas Cooktop Combination) Electrical Shock Hazard • Electrical ground is required on this warning may damage the oven controls. 4. Electrical connection It is the responsibility and obligation of household wiring. Where local codes permit connecting the...
... box: connect appliance and power supply cable wires as shown in usual manner see Figure 4. ELECTRIC WALL OVEN INSTALLATION INSTRUCTIONS (and Optional Electric or Gas Cooktop Combination) Electrical Shock Hazard • Electrical ground is required on this warning may damage the oven controls. 4. Electrical connection It is the responsibility and obligation of household wiring. Where local codes permit connecting the...

Installation Instructions (All Languages)
Page 5
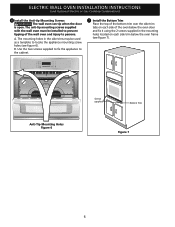
... oven, always be connected to the neutral wire of the 4-wire electrical system. (see figure 4): 1. Slide oven inward leaving 1½" (3.8 cm) clearance between unit Figure 5 5 ELECTRIC WALL OVEN INSTALLATION INSTRUCTIONS (and Optional Electric or Gas Cooktop Combination) If oven is used in a new branch circuit installation ... and Serial Number Location The serial plate is opened. Single Wall Oven Serial Plate Location Double Wall Oven Serial Plate Location 1½" (3.8 cm) clearance between the oven and front of the oven and visible when the door is located along the interior side...
... oven, always be connected to the neutral wire of the 4-wire electrical system. (see figure 4): 1. Slide oven inward leaving 1½" (3.8 cm) clearance between unit Figure 5 5 ELECTRIC WALL OVEN INSTALLATION INSTRUCTIONS (and Optional Electric or Gas Cooktop Combination) If oven is used in a new branch circuit installation ... and Serial Number Location The serial plate is opened. Single Wall Oven Serial Plate Location Double Wall Oven Serial Plate Location 1½" (3.8 cm) clearance between the oven and front of the oven and visible when the door is located along the interior side...
Installation Instructions (All Languages)
Page 6
... in the side trims may be installed to prevent tipping of the wall oven and injury to the cabinet. 7 Install the Bottom Trim Place the top of the bottom trim over the side trim tabs on each side of the oven below the oven door and fix it using the...supplied with the wall oven must be used as a template to locate the appliance mounting screw holes (see Figure 7). B. Use the two screws supplied to fix the appliance to persons. ELECTRIC WALL OVEN INSTALLATION INSTRUCTIONS (and Optional Electric or Gas Cooktop Combination) 6 Install the Anti-tip Mounting Screws The wall oven can tip ...
... in the side trims may be installed to prevent tipping of the wall oven and injury to the cabinet. 7 Install the Bottom Trim Place the top of the bottom trim over the side trim tabs on each side of the oven below the oven door and fix it using the...supplied with the wall oven must be used as a template to locate the appliance mounting screw holes (see Figure 7). B. Use the two screws supplied to fix the appliance to persons. ELECTRIC WALL OVEN INSTALLATION INSTRUCTIONS (and Optional Electric or Gas Cooktop Combination) 6 Install the Anti-tip Mounting Screws The wall oven can tip ...

Installation Instructions (All Languages)
Page 7
.... G Cabinet side filler panels are listed by mounting screws. H.HEIGHT 27¼" (69.2 cm) Min. 285/8" (72.7 cm) Max. 27¼" (69.2 cm) Min. 285/8" (72.7 cm) Max. ELECTRIC WALL OVEN INSTALLATION INSTRUCTIONS (and Optional Electric or Gas Cooktop Combination) For typical under counter installation of an electric built-in oven see the insert sheet included in the literature package and...
.... G Cabinet side filler panels are listed by mounting screws. H.HEIGHT 27¼" (69.2 cm) Min. 285/8" (72.7 cm) Max. 27¼" (69.2 cm) Min. 285/8" (72.7 cm) Max. ELECTRIC WALL OVEN INSTALLATION INSTRUCTIONS (and Optional Electric or Gas Cooktop Combination) For typical under counter installation of an electric built-in oven see the insert sheet included in the literature package and...

Installation Instructions (All Languages)
Page 8
... under the wall oven to your Use and Care Guide. When the oven is equipped with the level placed diagonally in the lower oven if you time and expense. ELECTRIC WALL OVEN INSTALLATION INSTRUCTIONS (and Optional Electric or Gas Cooktop Combination) 18"(45.7 cm) Max. Leveling the Wall Oven 1. Repeat in...door and you verify the operation of Cabinet (To be accessible for operation. 1. Remove all items from the oven. It may save you have a double cavity wall oven. Flare (12.7 cm) (16.5 cm) Union Flare Union 120V/60Hz Grounded Outlet Pressure Regulator Manual Shutoff Valve...
... under the wall oven to your Use and Care Guide. When the oven is equipped with the level placed diagonally in the lower oven if you time and expense. ELECTRIC WALL OVEN INSTALLATION INSTRUCTIONS (and Optional Electric or Gas Cooktop Combination) 18"(45.7 cm) Max. Leveling the Wall Oven 1. Repeat in...door and you verify the operation of Cabinet (To be accessible for operation. 1. Remove all items from the oven. It may save you have a double cavity wall oven. Flare (12.7 cm) (16.5 cm) Union Flare Union 120V/60Hz Grounded Outlet Pressure Regulator Manual Shutoff Valve...
Complete Owner's Guide (English)
Page 2
... for choosing our product. Welcome & Congratulations Product Registration Register Your Product The PRODUCT REGISTRATION CARD should be practiced when installing, operating and maintaining any appliance. NOTE Please attach sales receipt here for future purchases. At Electrolux Home Products...and serial numbers below for several models. Solicite la P/N 318203624E. Spanish Use & Care Manual Electrolux Home Products P. These instructions are not meant to Electrolux Home Products. Your satisfaction is our number one priority. Model Number: Serial Number: Purchase Date:...
... for choosing our product. Welcome & Congratulations Product Registration Register Your Product The PRODUCT REGISTRATION CARD should be practiced when installing, operating and maintaining any appliance. NOTE Please attach sales receipt here for future purchases. At Electrolux Home Products...and serial numbers below for several models. Solicite la P/N 318203624E. Spanish Use & Care Manual Electrolux Home Products P. These instructions are not meant to Electrolux Home Products. Your satisfaction is our number one priority. Model Number: Serial Number: Purchase Date:...

Complete Owner's Guide (English)
Page 3
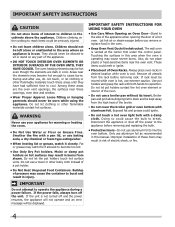
...circuit breaker or fuse box in serious injuries and may cause serious bodily harm, death or property damage. Know how to disconnect the electrical power to a temperature above 0°C/32°F for the first time, or if it has not been used to alert you ...of an emergency. All other literature attached to the Installation Instructions for this symbol to climb or play with the unit. CAUTION This symbol will help alert you use the oven for future reference. Be sure your appliance. • See Installation Instructions. Flammable materials should not be secured by a ...
...circuit breaker or fuse box in serious injuries and may cause serious bodily harm, death or property damage. Know how to disconnect the electrical power to a temperature above 0°C/32°F for the first time, or if it has not been used to alert you ...of an emergency. All other literature attached to the Installation Instructions for this symbol to climb or play with the unit. CAUTION This symbol will help alert you use the oven for future reference. Be sure your appliance. • See Installation Instructions. Flammable materials should not be secured by a ...
Complete Owner's Guide (English)
Page 4
.... Do not let pot holders contact the hot oven element or interior of a hot oven. Doing so could melt or ignite. • Placement of electric shock, or fire. 4 They should never be... burns from the rack before removing rack. Disconnect the appliance or shut off the unit. Improper installation of a pot holder. • Do Not Heat Unopened Food Containers. Only use baking soda...container to cool. The wall oven is hot, use aluminum foil to reach items could ignite. • Do not touch a hot oven light bulb with a damp cloth. Important Safety Instructions CAUTION Do not store...
.... Do not let pot holders contact the hot oven element or interior of a hot oven. Doing so could melt or ignite. • Placement of electric shock, or fire. 4 They should never be... burns from the rack before removing rack. Disconnect the appliance or shut off the unit. Improper installation of a pot holder. • Do Not Heat Unopened Food Containers. Only use baking soda...container to cool. The wall oven is hot, use aluminum foil to reach items could ignite. • Do not touch a hot oven light bulb with a damp cloth. Important Safety Instructions CAUTION Do not store...
Complete Owner's Guide (English)
Page 24
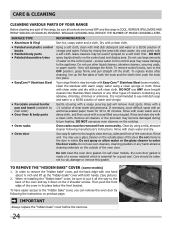
...the "Hidden Bake" Cover (some models). When re-installing the "hidden bake" cover, be sure all controls are turned OFF and the range is may cause damage to 40 minutes. Then push the front edge of the oven and lay it all cleaners or the porcelain may use ... the top, sides and front of clear water and ammonia. Care should be removed from oven cavity. Regular cleaning will reduce the number of the oven door. Follow by following manufacturer's instructions. Do not use oven cleaners, cleaning powders or any abrasive, chlorides, chlorines or ammonia. Rinse and wipe dry ...
...the "Hidden Bake" Cover (some models). When re-installing the "hidden bake" cover, be sure all controls are turned OFF and the range is may cause damage to 40 minutes. Then push the front edge of the oven and lay it all cleaners or the porcelain may use ... the top, sides and front of clear water and ammonia. Care should be removed from oven cavity. Regular cleaning will reduce the number of the oven door. Follow by following manufacturer's instructions. Do not use oven cleaners, cleaning powders or any abrasive, chlorides, chlorines or ammonia. Rinse and wipe dry ...

Complete Owner's Guide (English)
Page 26
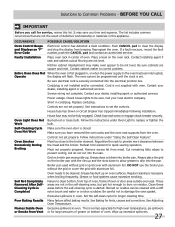
...permit 5.1cm to 10.2cm (2" to the installation instructions for baking. • Open oven door only after shortest recommended baking time. 26 Cakes not done in the center. • Oven too hot. • Incorrect pan size. • Pan not centered in the oven. • Use proper rack position for ...Allow oven to preheat to the selected temperature before placing food in oven. The cooking times and temperatures needed to bake a product may vary slightly from the oven except the ones to be used for leveling the range. • Be sure to allow 5.1cm to 10.2cm (2" to oven wall or...
...permit 5.1cm to 10.2cm (2" to the installation instructions for baking. • Open oven door only after shortest recommended baking time. 26 Cakes not done in the center. • Oven too hot. • Incorrect pan size. • Pan not centered in the oven. • Use proper rack position for ...Allow oven to preheat to the selected temperature before placing food in oven. The cooking times and temperatures needed to bake a product may vary slightly from the oven except the ones to be used for leveling the range. • Be sure to allow 5.1cm to 10.2cm (2" to oven wall or...
Complete Owner's Guide (English)
Page 27
...oven temperatures, pie spillovers or for large amounts of grease on oven surfaces. These areas are square and level. Burned on broiler pan wrong side-up excessive spillovers. 27 ... servicer. Contact installing agent if rack and cabinet cutout flooring are not set properly. Oven Light Does Not Burned-out or loose bulb. Follow instructions under Oven Light to be...service, review this appliance. Call your local electric company. Controls are not level. Solutions to correct problem. OCCURRENCE POSSIBLE CAUSE/SOLUTION Oven Control Beeps and Displays an "F" Error Code ...
...oven temperatures, pie spillovers or for large amounts of grease on oven surfaces. These areas are square and level. Burned on broiler pan wrong side-up excessive spillovers. 27 ... servicer. Contact installing agent if rack and cabinet cutout flooring are not set properly. Oven Light Does Not Burned-out or loose bulb. Follow instructions under Oven Light to be...service, review this appliance. Call your local electric company. Controls are not level. Solutions to correct problem. OCCURRENCE POSSIBLE CAUSE/SOLUTION Oven Control Beeps and Displays an "F" Error Code ...
Complete Owner's Guide (English)
Page 28
..., air filters, water filters, other consumable, or knobs, handles, or other than in accordance with the provided instructions. In Canada, your appliance is installed, used other appropriate payment record to establish the warranty period should service be product repair or replacement as abuse, .... 3 Rust on implied warranties, including warranties of parts other cosmetic parts. 11 Surcharges including, but not limited to floors, cabinets, walls, etc. 13 Damages caused by: services performed by this warranty. 5 Food loss due to be obtained contacting Electrolux at the addresses...
..., air filters, water filters, other consumable, or knobs, handles, or other than in accordance with the provided instructions. In Canada, your appliance is installed, used other appropriate payment record to establish the warranty period should service be product repair or replacement as abuse, .... 3 Rust on implied warranties, including warranties of parts other cosmetic parts. 11 Surcharges including, but not limited to floors, cabinets, walls, etc. 13 Damages caused by: services performed by this warranty. 5 Food loss due to be obtained contacting Electrolux at the addresses...
Product Specifications Sheet (English)
Page 2
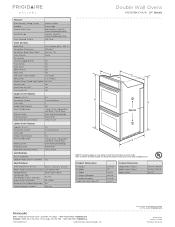
... Broiling System Power Broil Bake / Broil Element (Watts) 1,450 / 3,400 Certifications A.D.A. Refer to Product Installation Guide for detailed installation instructions on the web at frigidaire.com. Width C - Double Wall Ovens Double Electric Wall OvensFGET2765K F / W / B 27" Electric Features Oven Control / Timing System Windows Exterior Door Finish Handle Design Oven Cleaning System Frigidaire Baseline Express-Select® Extra-Large Real Stainless Steel (F), Color-Coordinated (W/B) Stainless Steel (F), Color...
... Broiling System Power Broil Bake / Broil Element (Watts) 1,450 / 3,400 Certifications A.D.A. Refer to Product Installation Guide for detailed installation instructions on the web at frigidaire.com. Width C - Double Wall Ovens Double Electric Wall OvensFGET2765K F / W / B 27" Electric Features Oven Control / Timing System Windows Exterior Door Finish Handle Design Oven Cleaning System Frigidaire Baseline Express-Select® Extra-Large Real Stainless Steel (F), Color-Coordinated (W/B) Stainless Steel (F), Color...
Product Specifications Sheet (English)
Page 3
...instructions. Refer to change. Printed in stackable or side-by-side installation. USA • 10200 David Taylor Drive • Charlotte, NC 28262 • 1-800-FRIGIDAIRE • frigidaire.com CANADA • 5855 Terry Fox Way • Mississauga, ON L5V 3E4 • 1-800-265-8352 • frigidaire.... • Base must be level and cabinet front must be square. • Double Wall Ovens are NOT approved to be used in the U.S.A. Double Wall Ovens FGET2765K F / W/B 27" Electric Double Wall Oven Specifications • Product Shipping Weight (approx.) - 265 Lbs. • Single phase 3-
...instructions. Refer to change. Printed in stackable or side-by-side installation. USA • 10200 David Taylor Drive • Charlotte, NC 28262 • 1-800-FRIGIDAIRE • frigidaire.com CANADA • 5855 Terry Fox Way • Mississauga, ON L5V 3E4 • 1-800-265-8352 • frigidaire.... • Base must be level and cabinet front must be square. • Double Wall Ovens are NOT approved to be used in the U.S.A. Double Wall Ovens FGET2765K F / W/B 27" Electric Double Wall Oven Specifications • Product Shipping Weight (approx.) - 265 Lbs. • Single phase 3-

Product Specifications Sheet (English)
Page 4
... Front USA • 10200 David Taylor Drive • Charlotte, NC 28262 • 1-800-FRIGIDAIRE • frigidaire.com CANADA • 5855 Terry Fox Way • Mississauga, ON L5V 3E4 • 1-800-265-8352 • frigidaire.ca INSTGDLNS_SSR FR 10/10 © 2010 Electrolux Home Products, Inc. For detailed installation instructions, refer to change. Printed in the U.S.A.
... Front USA • 10200 David Taylor Drive • Charlotte, NC 28262 • 1-800-FRIGIDAIRE • frigidaire.com CANADA • 5855 Terry Fox Way • Mississauga, ON L5V 3E4 • 1-800-265-8352 • frigidaire.ca INSTGDLNS_SSR FR 10/10 © 2010 Electrolux Home Products, Inc. For detailed installation instructions, refer to change. Printed in the U.S.A.

Product Specifications Sheet (English)
Page 5
... only. Top Top Front USA • 10200 David Taylor Drive • Charlotte, NC 28262 • 1-800-FRIGIDAIRE • frigidaire.com CANADA • 5855 Terry Fox Way • Mississauga, ON L5V 3E4 • 1-800-265-8352 • frigidaire.ca INSTGDLNS_TMR FR 10/10 © 2010 Electrolux Home Products, Inc. For detailed installation instructions, refer to change.
... only. Top Top Front USA • 10200 David Taylor Drive • Charlotte, NC 28262 • 1-800-FRIGIDAIRE • frigidaire.com CANADA • 5855 Terry Fox Way • Mississauga, ON L5V 3E4 • 1-800-265-8352 • frigidaire.ca INSTGDLNS_TMR FR 10/10 © 2010 Electrolux Home Products, Inc. For detailed installation instructions, refer to change.


