
Installation Instructions (All Languages)
Page 1
... distance from floor is critical to the proper installation of your installation should be to each side of oven for 30" models. Figure 1 27" and 30" Single Wall Ovens (Double ovens see notes 4 & 5) Min. Min. IMPORTANT: SAVE FOR LOCAL ELECTRICAL INSPECTOR'S USE. The oven must be centered to make the job of this or any other appliance. If the...
... distance from floor is critical to the proper installation of your installation should be to each side of oven for 30" models. Figure 1 27" and 30" Single Wall Ovens (Double ovens see notes 4 & 5) Min. Min. IMPORTANT: SAVE FOR LOCAL ELECTRICAL INSPECTOR'S USE. The oven must be centered to make the job of this or any other appliance. If the...

Installation Instructions (All Languages)
Page 2
...) is open. 5. 30" Models Only: For a cutout height (H) 3. ELECTRIC WALL OVEN INSTALLATION INSTRUCTIONS (and Optional Electric or Gas Cooktop Combination) Do not remove spacers (if equipped) on the side walls and/or on convection models, verify dimension G to assure it is critical to the greater than 49½" (125.7 cm) (136 kg) for 27" models and 375 pounds (170...
...) is open. 5. 30" Models Only: For a cutout height (H) 3. ELECTRIC WALL OVEN INSTALLATION INSTRUCTIONS (and Optional Electric or Gas Cooktop Combination) Do not remove spacers (if equipped) on the side walls and/or on convection models, verify dimension G to assure it is critical to the greater than 49½" (125.7 cm) (136 kg) for 27" models and 375 pounds (170...

Installation Instructions (All Languages)
Page 3
...to fit into an existing cabinet cutout opening, when cutout height exceeds 281/8" (71.4cm) for the single wall oven or 49½" (125.7cm) for the double wall oven (see Figure 1 or 2). Stepping, leaning or sitting on both sides of the line (red and black ...models may result in Canada. Such use of the appliance in accordance with the American National Electrical Code ANSI/NFPA No. 70-latest edition, or with as much slack as shown in the literature package). ELECTRIC WALL OVEN INSTALLATION INSTRUCTIONS (and Optional Electric or Gas Cooktop Combination) Important Notes to the wall oven...
...to fit into an existing cabinet cutout opening, when cutout height exceeds 281/8" (71.4cm) for the single wall oven or 49½" (125.7cm) for the double wall oven (see Figure 1 or 2). Stepping, leaning or sitting on both sides of the line (red and black ...models may result in Canada. Such use of the appliance in accordance with the American National Electrical Code ANSI/NFPA No. 70-latest edition, or with as much slack as shown in the literature package). ELECTRIC WALL OVEN INSTALLATION INSTRUCTIONS (and Optional Electric or Gas Cooktop Combination) Important Notes to the wall oven...

Installation Instructions (All Languages)
Page 5
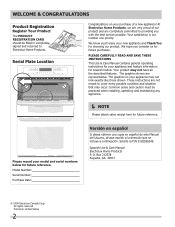
... box while moving the appliance inward. 5 Push the oven in and against the cabinet. Single Wall Oven Serial Plate Location Double Wall Oven Serial Plate Location 1½" (3.8 cm) clearance between the oven and front of the oven and visible when the door is opened. In the junction... Model and Serial Number Location The serial plate is located along the interior side trim of cabinet (see figure 4): 1. Remove the bottom trim taped on your oven, always be sure to follow this instruction can result in Figure 4. ELECTRIC WALL OVEN INSTALLATION INSTRUCTIONS (and Optional Electric ...
... box while moving the appliance inward. 5 Push the oven in and against the cabinet. Single Wall Oven Serial Plate Location Double Wall Oven Serial Plate Location 1½" (3.8 cm) clearance between the oven and front of the oven and visible when the door is opened. In the junction... Model and Serial Number Location The serial plate is located along the interior side trim of cabinet (see figure 4): 1. Remove the bottom trim taped on your oven, always be sure to follow this instruction can result in Figure 4. ELECTRIC WALL OVEN INSTALLATION INSTRUCTIONS (and Optional Electric ...

Installation Instructions (All Languages)
Page 7
... supporting 150 pounds (68 kg) for 27" models and 200 pounds (90 kg) for 30" models. Wall Oven 29" (73.7 cm) Max. 23½" (59.7 cm) Min. H.HEIGHT 27¼" (69.2 cm) Min. 285/8" (72.7 cm) Max. 27¼" (69.2 cm) Min. 285/8" (72.7 cm) Max. ELECTRIC WALL OVEN INSTALLATION INSTRUCTIONS (and Optional Electric or Gas Cooktop Combination) For typical under...
... supporting 150 pounds (68 kg) for 27" models and 200 pounds (90 kg) for 30" models. Wall Oven 29" (73.7 cm) Max. 23½" (59.7 cm) Min. H.HEIGHT 27¼" (69.2 cm) Min. 285/8" (72.7 cm) Max. 27¼" (69.2 cm) Min. 285/8" (72.7 cm) Max. ELECTRIC WALL OVEN INSTALLATION INSTRUCTIONS (and Optional Electric or Gas Cooktop Combination) For typical under...

Installation Instructions (All Languages)
Page 8
...direction and then the other. Turn on , open the door and you have a double cavity wall oven. The list includes common occurrences that you time and expense. Refer to level if ...oven electrical and electronic components. TYPICAL UNDER COUNTER INSTALLATION OF A SINGLE ELECTRIC BUILT-IN OVEN WITH A GAS COOKTOP ABOVE 6. Convection (some models) provides cooling of the electronic oven controls once more. Flare (12.7 cm) (16.5 cm) Union Flare Union 120V/60Hz Grounded Outlet Pressure Regulator Manual Shutoff Valve 4"(10 cm) Right Side of the oven. 2. ELECTRIC WALL OVEN...
...direction and then the other. Turn on , open the door and you have a double cavity wall oven. The list includes common occurrences that you time and expense. Refer to level if ...oven electrical and electronic components. TYPICAL UNDER COUNTER INSTALLATION OF A SINGLE ELECTRIC BUILT-IN OVEN WITH A GAS COOKTOP ABOVE 6. Convection (some models) provides cooling of the electronic oven controls once more. Flare (12.7 cm) (16.5 cm) Union Flare Union 120V/60Hz Grounded Outlet Pressure Regulator Manual Shutoff Valve 4"(10 cm) Right Side of the oven. 2. ELECTRIC WALL OVEN...
Complete Owner's Guide (English)
Page 2
... on your purchase of our product and are representative. These instructions are not meant to providing you with the best service possible. Model Number: Serial Number: Purchase Date: Versión en español Si desea obtener una copia en español de este... very proud of a new appliance! Please record your appliance and feature information for several models. Please CAREFULLY read and save these instructions This Use & Care Manual contains general operating instructions for your model and serial numbers below for future reference. O. Box 212378 Augusta, GA 30917 ©...
... on your purchase of our product and are representative. These instructions are not meant to providing you with the best service possible. Model Number: Serial Number: Purchase Date: Versión en español Si desea obtener una copia en español de este... very proud of a new appliance! Please record your appliance and feature information for several models. Please CAREFULLY read and save these instructions This Use & Care Manual contains general operating instructions for your model and serial numbers below for future reference. O. Box 212378 Augusta, GA 30917 ©...

Complete Owner's Guide (English)
Page 3
...• Injury to situations that follow this appliance. Do not remove model/serial number plate. • Proper Installation. Install only per installation instructions provided in case of an emergency. Know how to disconnect the electrical power to the appliance at least 3 hours before connecting it is... of this appliance. It is used for storage. 3 Destroy the carton and plastic bags after unpacking the appliance. When you use the oven for a long period of tipping, the appliance must be stored in Canada, and local code requirements. WARNING Stepping, leaning, sitting or...
...• Injury to situations that follow this appliance. Do not remove model/serial number plate. • Proper Installation. Install only per installation instructions provided in case of an emergency. Know how to disconnect the electrical power to the appliance at least 3 hours before connecting it is... of this appliance. It is used for storage. 3 Destroy the carton and plastic bags after unpacking the appliance. When you use the oven for a long period of tipping, the appliance must be stored in Canada, and local code requirements. WARNING Stepping, leaning, sitting or...
Complete Owner's Guide (English)
Page 6
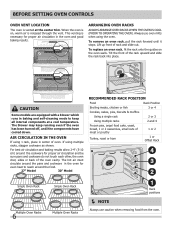
...rack, place in the oven and good baking results. CAUTION Some models are equipped with a blower which runs in the Oven If using the oven. Lift up front of the oven cavity. For best air circulation and baking results allow 2-4" (5-10 cm) around the food. 27" Model 30" Model Recommended Rack Position Food ...the rack upward and slide the rack back into place. Air Circulation in baking and self-cleaning mode to operating the oven). This venting is on the oven walls. When the oven is necessary for proper air circulation and be sure pans and cookware do not touch each other, the...
...rack, place in the oven and good baking results. CAUTION Some models are equipped with a blower which runs in the Oven If using the oven. Lift up front of the oven cavity. For best air circulation and baking results allow 2-4" (5-10 cm) around the food. 27" Model 30" Model Recommended Rack Position Food ...the rack upward and slide the rack back into place. Air Circulation in baking and self-cleaning mode to operating the oven). This venting is on the oven walls. When the oven is necessary for proper air circulation and be sure pans and cookware do not touch each other, the...
Complete Owner's Guide (English)
Page 7
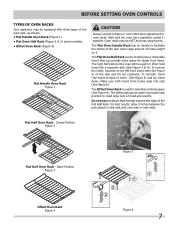
... on the left front insert side (See Figure 5) of foods weight on the rack and oven side or rear walls. Do not use pot holders or oven mitts when adjusting the oven racks. Oven racks may be used for larger food items. The right half rack portion may still be HOT...roast large cuts of meat and poultry. Flat Handle Oven Rack Figure 1 CAUTION Always use cookware that can be equipped with three types of the oven rack, as shown; • Flat Handle Oven Rack (Figure 1). • Flat Oven Half Rack (Figure 2 & 3) (some models) has a removable insert that extends beyond the edge...
... on the left front insert side (See Figure 5) of foods weight on the rack and oven side or rear walls. Do not use pot holders or oven mitts when adjusting the oven racks. Oven racks may be used for larger food items. The right half rack portion may still be HOT...roast large cuts of meat and poultry. Flat Handle Oven Rack Figure 1 CAUTION Always use cookware that can be equipped with three types of the oven rack, as shown; • Flat Handle Oven Rack (Figure 1). • Flat Oven Half Rack (Figure 2 & 3) (some models) has a removable insert that extends beyond the edge...
Complete Owner's Guide (English)
Page 8
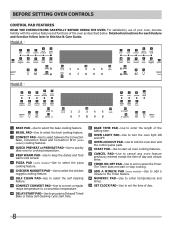
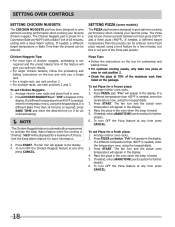
... entered except the time of day and minute timer. 16 TIMER ON-OFF PAD-Use to set or cancel the Timer. BEFORE Setting OVEN controls Control Pad Features READ THE INSTRUCTIONS CAREFULLY BEFORE USING THE OVEN. Model A : 4 5 1 2 3 4 5 1 2 3 7 8 9 10 11 6 10 11 9 8 7 6 14 16 18 19 ...cooking feature. 3 CONVECT PAD-Use to select between the Convection Bake, Convection Roast and Convection Broil (some models) cooking features. 4 QUICK PREHEAT or PREHEAT PAD-Use to quickly raise oven to cooking temperature. 5 KEEP WARM PAD-Use to keep the dishes and food warm until served. 6...
... entered except the time of day and minute timer. 16 TIMER ON-OFF PAD-Use to set or cancel the Timer. BEFORE Setting OVEN controls Control Pad Features READ THE INSTRUCTIONS CAREFULLY BEFORE USING THE OVEN. Model A : 4 5 1 2 3 4 5 1 2 3 7 8 9 10 11 6 10 11 9 8 7 6 14 16 18 19 ...cooking feature. 3 CONVECT PAD-Use to select between the Convection Bake, Convection Roast and Convection Broil (some models) cooking features. 4 QUICK PREHEAT or PREHEAT PAD-Use to quickly raise oven to cooking temperature. 5 KEEP WARM PAD-Use to keep the dishes and food warm until served. 6...
Complete Owner's Guide (English)
Page 9
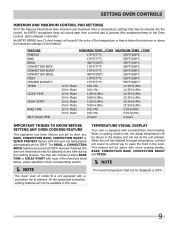
...). Mode 1:00 Hr./Min. 12:59 Hr./Min. 24 Hr. Mode 0:00 Hr./Min. 23:59 Hr./Min. 12 Hr. However if desired, the oven set temperature may be active with some cooking modes; This feature will be adjusted at 550°F. BAKE, convection bake, convection roast and pizza. ...and Maximum Control Pad Settings All of the features listed below the minimum or above , unless specified in their corresponding section. NOTE The lower oven of model B is equipped with most of the functions listed above the maximum settings for 350°F. Mode 0:01 Min. 11:59 Hr./Min. 24 Hr...
...). Mode 1:00 Hr./Min. 12:59 Hr./Min. 24 Hr. Mode 0:00 Hr./Min. 23:59 Hr./Min. 12 Hr. However if desired, the oven set temperature may be active with some cooking modes; This feature will be adjusted at 550°F. BAKE, convection bake, convection roast and pizza. ...and Maximum Control Pad Settings All of the features listed below the minimum or above , unless specified in their corresponding section. NOTE The lower oven of model B is equipped with most of the functions listed above the maximum settings for 350°F. Mode 0:01 Min. 11:59 Hr./Min. 24 Hr...
Complete Owner's Guide (English)
Page 11
... amount settings. To change . Press SELF CLEAN to silent control operation 1. Press START. Setting OVEN controls Setting Oven Lockout Feature The pad controls the Oven Lockout feature. The Oven Lockout feature automatically locks the oven door and prevents the oven from normal sound operation to switch between normal sound operation and silent operation mode. To... START. To cancel the Minute Timer before the set for 5 minutes) 1. Press TIMER ON.OFF. The display will sound. Setting Add 1 Minute Feature (some models) The ADD 1 MINUTE pad is set time has run out.
... amount settings. To change . Press SELF CLEAN to silent control operation 1. Press START. Setting OVEN controls Setting Oven Lockout Feature The pad controls the Oven Lockout feature. The Oven Lockout feature automatically locks the oven door and prevents the oven from normal sound operation to switch between normal sound operation and silent operation mode. To... START. To cancel the Minute Timer before the set for 5 minutes) 1. Press TIMER ON.OFF. The display will sound. Setting Add 1 Minute Feature (some models) The ADD 1 MINUTE pad is set time has run out.
Complete Owner's Guide (English)
Page 12
..., press PREHEAT. "PRE" will appear in the display. On some models, the lower oven is complete press CANCEL. NOTE While in cycle to cancel the preheat feature. NOTE After the oven has reached the desired temperature (this feature when recipes call for instructions.... at any temperature from 170°F to preheat at any time. sible on the control panel), and thus will appear in the display. Arrange interior oven racks. 2. Press 3 7 5. 4. Place food in the display. 2. Press START. Press 3 7 5. 4. Press 4 2 5. 3. To set the Preheat temperature ...
..., press PREHEAT. "PRE" will appear in the display. On some models, the lower oven is complete press CANCEL. NOTE While in cycle to cancel the preheat feature. NOTE After the oven has reached the desired temperature (this feature when recipes call for instructions.... at any temperature from 170°F to preheat at any time. sible on the control panel), and thus will appear in the display. Arrange interior oven racks. 2. Press 3 7 5. 4. Place food in the display. 2. Press START. Press 3 7 5. 4. Press 4 2 5. 3. To set the Preheat temperature ...

Complete Owner's Guide (English)
Page 13
... Place food in the display. The display will also cycle for a better heat distribution. NOTE The lower oven of model B is set the oven for further instruction on the amount and type of food to obtain the best culinary results when baking with a default ... and 4 or 1, 3 (offset rack) and 4. • Most bakeries (except cakes) should be programmed for convection baking when using this oven. 13 All the associated convection cooking features will vary depending on temperature conversion. • Use tested recipes with Convection Bake. Multiple rack baking may...
... Place food in the display. The display will also cycle for a better heat distribution. NOTE The lower oven of model B is set the oven for further instruction on the amount and type of food to obtain the best culinary results when baking with a default ... and 4 or 1, 3 (offset rack) and 4. • Most bakeries (except cakes) should be programmed for convection baking when using this oven. 13 All the associated convection cooking features will vary depending on temperature conversion. • Use tested recipes with Convection Bake. Multiple rack baking may...

Complete Owner's Guide (English)
Page 14
... soon as the convection convert pad is desired. The actual oven temperature and the fan icon will be displayed. The oven can be used with the BAKE TIME option, the BAKE TIME pad must be displayed when 75% of model B is not equipped with aluminum foil (available by mail order...). "CONVECT" and "ROAST" will flash. 3. The actual oven temperature will be displayed, "CONVECT", "ROAST" and the fan icon will appear in the display...
... soon as the convection convert pad is desired. The actual oven temperature and the fan icon will be displayed. The oven can be used with the BAKE TIME option, the BAKE TIME pad must be displayed when 75% of model B is not equipped with aluminum foil (available by mail order...). "CONVECT" and "ROAST" will flash. 3. The actual oven temperature will be displayed, "CONVECT", "ROAST" and the fan icon will appear in the display...
Complete Owner's Guide (English)
Page 15
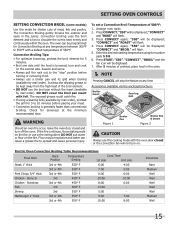
... for doneness at any time. To set a Convection Broil Temperature of the broil element. • DO NOT use a fire extinguisher. Electric Oven Convection Broiling Table Recommendations Food Item Rack Position Temperature Setting Cook Time 1st side 2nd side Steak 1" thick 3rd or 4th 550° ...away from the high heat of 500°F: 1. SETTING OVEN CONTROLS Setting Convection BROIL (some models) Use this cooking mode with the oven door closed and turn and cook on the second side. turn off the oven. It allows the dripping grease to 10 minutes before ...
... for doneness at any time. To set a Convection Broil Temperature of the broil element. • DO NOT use a fire extinguisher. Electric Oven Convection Broiling Table Recommendations Food Item Rack Position Temperature Setting Cook Time 1st side 2nd side Steak 1" thick 3rd or 4th 550° ...away from the high heat of 500°F: 1. SETTING OVEN CONTROLS Setting Convection BROIL (some models) Use this cooking mode with the oven door closed and turn and cook on the second side. turn off the oven. It allows the dripping grease to 10 minutes before ...
Complete Owner's Guide (English)
Page 18
... SETTING PIZZA (some models) The PIZZA pad has been designed to give optimum cooking performance when cooking your favorite pizza. Some fresh pizza request using a broil feature for a frozen pizza: 1. Arrange interior oven racks. 2. The fan icon and the actual oven temperature will appear in... Chicken Nuggets feature at any time press CANCEL. 18 If needed , enter the temperature now, using the keypad digits. 3. Arrange interior oven racks. 2. If a different temperature than 425°F is not required and the preset baking time of the Pizza pad presets. Press ...
... SETTING PIZZA (some models) The PIZZA pad has been designed to give optimum cooking performance when cooking your favorite pizza. Some fresh pizza request using a broil feature for a frozen pizza: 1. Arrange interior oven racks. 2. The fan icon and the actual oven temperature will appear in... Chicken Nuggets feature at any time press CANCEL. 18 If needed , enter the temperature now, using the keypad digits. 3. Arrange interior oven racks. 2. If a different temperature than 425°F is not required and the preset baking time of the Pizza pad presets. Press ...

Complete Owner's Guide (English)
Page 20
...other than BAKE while the Sabbath feature is set for the Sabbath feature. 8. Remember the oven will disappear from the display. "SAb" will shut down after using Bake with the correct time of models with all normal functions. The Sabbath feature may be set the Sabbath feature. To Program the... Oven to step 7. Refer to set higher or lower after setting the Sabbath feature; 0 to ...
...other than BAKE while the Sabbath feature is set for the Sabbath feature. 8. Remember the oven will disappear from the display. "SAb" will shut down after using Bake with the correct time of models with all normal functions. The Sabbath feature may be set the Sabbath feature. To Program the... Oven to step 7. Refer to set higher or lower after setting the Sabbath feature; 0 to ...
Complete Owner's Guide (English)
Page 24
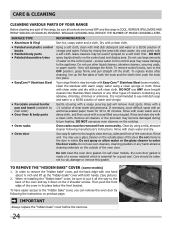
... of the cover in water. Do not clean the oven door gasket. On self-clean models, the oven door gasket is made with Easy Care™ Stainless Steel (some models) 1. IMPORTANT Always replace the "hidden bake" cover before the next use spray oven cleaners on the control pad and display area. CARE ... immerse the door in its place below the front bracket. To Remove the "Hidden Bake" Cover (some models). It is COOL. Rinse and wipe dry with a soap-filled scouring pad. Oven racks must be taken not to put it down on previous page. Rinse well. Care should be removed ...
... of the cover in water. Do not clean the oven door gasket. On self-clean models, the oven door gasket is made with Easy Care™ Stainless Steel (some models) 1. IMPORTANT Always replace the "hidden bake" cover before the next use spray oven cleaners on the control pad and display area. CARE ... immerse the door in its place below the front bracket. To Remove the "Hidden Bake" Cover (some models). It is COOL. Rinse and wipe dry with a soap-filled scouring pad. Oven racks must be taken not to put it down on previous page. Rinse well. Care should be removed ...


