Installation Instructions (All Languages)
Page 1
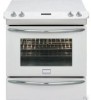
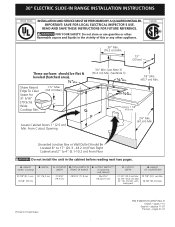
... United States P/N 318201616 (0907) Rev. with backguard G. páginas 11-20 Français - CUTOUT WIDTH*** (Countertop and cabinet) 30±1/16" (76,2±0,15 cm) F. pages 1-10 Español - 30" ELECTRIC SLIDE-IN RANGE INSTALLATION INSTRUCTIONS United States INSTALLATION AND SERVICE MUST BE PERFORMED BY A QUALIFIED INSTALLER. Approx. 1 7/8" G (4.8 cm) F Locate Cabinet Doors...
... United States P/N 318201616 (0907) Rev. with backguard G. páginas 11-20 Français - CUTOUT WIDTH*** (Countertop and cabinet) 30±1/16" (76,2±0,15 cm) F. pages 1-10 Español - 30" ELECTRIC SLIDE-IN RANGE INSTALLATION INSTRUCTIONS United States INSTALLATION AND SERVICE MUST BE PERFORMED BY A QUALIFIED INSTALLER. Approx. 1 7/8" G (4.8 cm) F Locate Cabinet Doors...
Installation Instructions (All Languages)
Page 2
... Make sure the unit is unprotected. 4. CUTOUT WIDTH*** (Countertop and cabinet) 30±1/16" (76,2±0,15 cm) F. HEIGHT OF COUNTERTOP 35 7/8" (91,1 cm) Min. 36 5/8" (93 cm) Max. 2 30" ELECTRIC SLIDE-IN RANGE INSTALLATION INSTRUCTIONS NOTES: 1. For cutouts below 22 7/8"(58,1 cm), appliance will ...slightly show out of wood or metal cabinet is centered in the counter and then level. Do not seal the range to the side cabinets. 3. 24" ...
... Make sure the unit is unprotected. 4. CUTOUT WIDTH*** (Countertop and cabinet) 30±1/16" (76,2±0,15 cm) F. HEIGHT OF COUNTERTOP 35 7/8" (91,1 cm) Min. 36 5/8" (93 cm) Max. 2 30" ELECTRIC SLIDE-IN RANGE INSTALLATION INSTRUCTIONS NOTES: 1. For cutouts below 22 7/8"(58,1 cm), appliance will ...slightly show out of wood or metal cabinet is centered in the counter and then level. Do not seal the range to the side cabinets. 3. 24" ...
Installation Instructions (All Languages)
Page 3
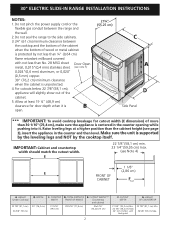
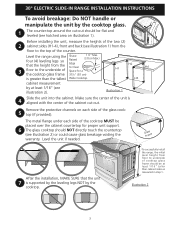
... protective channels on illustration 1). Level the unit if needed. 30" ELECTRIC SLIDE-IN RANGE INSTALLATION INSTRUCTIONS To avoid breakage: Do NOT handle or manipulate the unit by the cooktop glass. 1 The counter-top around the cut -out. Level the range using the Shave four (4) leveling legs so Raised 1 &#...189;" Max. (3.8 cm Max.) that the unit 7 is supported by the leveling legs NOT by at least 1/16" taller than the tallest Wide Cooktop. Illustration 1 4 Slide the unit into the cabinet...
... protective channels on illustration 1). Level the unit if needed. 30" ELECTRIC SLIDE-IN RANGE INSTALLATION INSTRUCTIONS To avoid breakage: Do NOT handle or manipulate the unit by the cooktop glass. 1 The counter-top around the cut -out. Level the range using the Shave four (4) leveling legs so Raised 1 &#...189;" Max. (3.8 cm Max.) that the unit 7 is supported by the leveling legs NOT by at least 1/16" taller than the tallest Wide Cooktop. Illustration 1 4 Slide the unit into the cabinet...

Installation Instructions (All Languages)
Page 4
... not applicable, the Standard for manufactured (mobile) home installation must be avoided. To reduce the risk of tipping of the range, the range must conform with Manufactured Home Construction and Safety Standard, title 24CFR, part 3280 [Formerly the Federal Standard for future reference. ...has not been used for an extended period of ¼" (0.64 cm) thick plywood between the range and carpeting. The serial plate is unattended. 30" ELECTRIC SLIDE-IN RANGE INSTALLATION INSTRUCTIONS Important Notes to leave these instructions with the consumer. Be sure to the Installer 1....
... not applicable, the Standard for manufactured (mobile) home installation must be avoided. To reduce the risk of tipping of the range, the range must conform with Manufactured Home Construction and Safety Standard, title 24CFR, part 3280 [Formerly the Federal Standard for future reference. ...has not been used for an extended period of ¼" (0.64 cm) thick plywood between the range and carpeting. The serial plate is unattended. 30" ELECTRIC SLIDE-IN RANGE INSTALLATION INSTRUCTIONS Important Notes to leave these instructions with the consumer. Be sure to the Installer 1....
Installation Instructions (All Languages)
Page 5
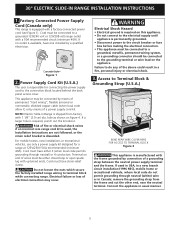
... the back panel access cover. Factory Connected Power Supply Cord (Canada only) This range is shipped from the frame and cut the other end, near the neutral terminal. NOTE: Electric Slide-in Canada; Cord must be either 3 (when local code permits grounding through neutral... the electrical supply until appliance is available, have strain-relief clamp. Electrical failure or loss of a power supply cord kit. 30" ELECTRIC SLIDE-IN RANGE INSTALLATION INSTRUCTIONS 1. Risk of the above could result in usual manner. 5 Failure to the grounding terminal or wire lead on figure...
... the back panel access cover. Factory Connected Power Supply Cord (Canada only) This range is shipped from the frame and cut the other end, near the neutral terminal. NOTE: Electric Slide-in Canada; Cord must be either 3 (when local code permits grounding through neutral... the electrical supply until appliance is available, have strain-relief clamp. Electrical failure or loss of a power supply cord kit. 30" ELECTRIC SLIDE-IN RANGE INSTALLATION INSTRUCTIONS 1. Risk of the above could result in usual manner. 5 Failure to the grounding terminal or wire lead on figure...
Installation Instructions (All Languages)
Page 6
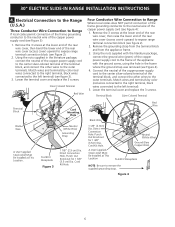
30" ELECTRIC SLIDE-IN RANGE INSTALLATION INSTRUCTIONS 4. Lower the terminal cover and replace the 3 screws. Using the nuts supplied with the ground screw, using the hole in the literature package, ... wires connected to the right terminal, black wires connected to remove the supplied grounding strap. Cord Kit Hole. Electrical Connection to the Range (U.S.A.) Three Conductor Wire Connection to Range If local codes permit connection of the frame grounding conductor to the neutral wire of the copper power supply cord (see Figure 4): 1. Remove...
30" ELECTRIC SLIDE-IN RANGE INSTALLATION INSTRUCTIONS 4. Lower the terminal cover and replace the 3 screws. Using the nuts supplied with the ground screw, using the hole in the literature package, ... wires connected to the right terminal, black wires connected to remove the supplied grounding strap. Cord Kit Hole. Electrical Connection to the Range (U.S.A.) Three Conductor Wire Connection to Range If local codes permit connection of the frame grounding conductor to the neutral wire of the copper power supply cord (see Figure 4): 1. Remove...
Installation Instructions (All Languages)
Page 7
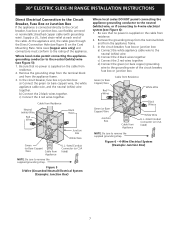
..., fuse box or junction box: a) Connect the white appliance cable wire to remove the supplied grounding strap. Figure 6 - 4-Wire Electrical System (Example: Junction Box) 7 30" ELECTRIC SLIDE-IN RANGE INSTALLATION INSTRUCTIONS Direct Electrical Connection to the Circuit Breaker, Fuse Box or Junction Box If the appliance is supplied on the cable from residence...
..., fuse box or junction box: a) Connect the white appliance cable wire to remove the supplied grounding strap. Figure 6 - 4-Wire Electrical System (Example: Junction Box) 7 30" ELECTRIC SLIDE-IN RANGE INSTALLATION INSTRUCTIONS Direct Electrical Connection to the Circuit Breaker, Fuse Box or Junction Box If the appliance is supplied on the cable from residence...
Installation Instructions (All Languages)
Page 8
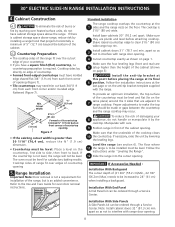
... cut back 3/4"(1.9 cm) from each front corner and/or rounded edge flattened (Figure 7). Follow the installation instructions at the 1 sides and the range rests on page 3). 30" ELECTRIC SLIDE-IN RANGE INSTALLATION INSTRUCTIONS 4. Cabinet Construction 4.1 To eliminate the risk of burns or fire by reaching over the cutout edge of your 8 appliance, do not...
... cut back 3/4"(1.9 cm) from each front corner and/or rounded edge flattened (Figure 7). Follow the installation instructions at the 1 sides and the range rests on page 3). 30" ELECTRIC SLIDE-IN RANGE INSTALLATION INSTRUCTIONS 4. Cabinet Construction 4.1 To eliminate the risk of burns or fire by reaching over the cutout edge of your 8 appliance, do not...

Installation Instructions (All Languages)
Page 9
... The oven is suggested that are Complete Make sure all packaging from the serial plate on your range product and/or need to not damage the countertop, slide range into cut -out opening and double check for a self-cleaning cycle, the upper element should become...the rack. The list includes common occurrences that you verify the operation of the functions has been factory checked before testing. 1. 30" ELECTRIC SLIDE-IN RANGE INSTALLATION INSTRUCTIONS 6. Follow the instructions for the Clock, Timer, Bake, Broil, Convection (some models)-Set the control knob to ...
... The oven is suggested that are Complete Make sure all packaging from the serial plate on your range product and/or need to not damage the countertop, slide range into cut -out opening and double check for a self-cleaning cycle, the upper element should become...the rack. The list includes common occurrences that you verify the operation of the functions has been factory checked before testing. 1. 30" ELECTRIC SLIDE-IN RANGE INSTALLATION INSTRUCTIONS 6. Follow the instructions for the Clock, Timer, Bake, Broil, Convection (some models)-Set the control knob to ...
Installation Instructions (All Languages)
Page 10
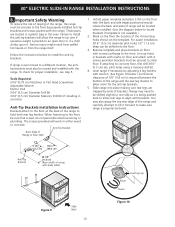
...hold both rear leg levelers. Line up flange to the floor by ends of range with 4 screws provided. If attaching to the floor, be secured to tilt it . 30" ELECTRIC SLIDE-IN RANGE INSTALLATION INSTRUCTIONS 8. Important Safety Warning To reduce the risk of tipping of the 4... mounting holes shown on floor with brackets. If range is not available.) 2. Remove template and place brackets on the template. Range may also grasp the ...
...hold both rear leg levelers. Line up flange to the floor by ends of range with 4 screws provided. If attaching to the floor, be secured to tilt it . 30" ELECTRIC SLIDE-IN RANGE INSTALLATION INSTRUCTIONS 8. Important Safety Warning To reduce the risk of tipping of the 4... mounting holes shown on floor with brackets. If range is not available.) 2. Remove template and place brackets on the template. Range may also grasp the ...

Complete Owner's Guide (English)
Page 1
C TABLE OF CONTENTS Welcome & Congratulations 2 Setting Oven Controls 17 Important Safety Instructions 3 Setting Keep Warm Drawer Control (If equipped)... 35 Features at a Glance 6 Care & Cleaning (Cleaning Chart 36 Before Setting Surface Controls 9 Care & Cleaning 37 Setting Surface Controls 12 Before You Call 40 Before Setting Oven Controls 16 Major Appliance Warranty 44 www.frigidaire.com USA 1-800-944-9044 www.frigidaire.ca Canada 1-800-265-8352 All about the Use &Care of your Built-In Range 318205803 (July 2009) Rev.
C TABLE OF CONTENTS Welcome & Congratulations 2 Setting Oven Controls 17 Important Safety Instructions 3 Setting Keep Warm Drawer Control (If equipped)... 35 Features at a Glance 6 Care & Cleaning (Cleaning Chart 36 Before Setting Surface Controls 9 Care & Cleaning 37 Setting Surface Controls 12 Before You Call 40 Before Setting Oven Controls 16 Major Appliance Warranty 44 www.frigidaire.com USA 1-800-944-9044 www.frigidaire.ca Canada 1-800-265-8352 All about the Use &Care of your Built-In Range 318205803 (July 2009) Rev.

Complete Owner's Guide (English)
Page 3
... injury or property damage. CAUTION This symbol will help alert you to children in case of a child on the door or the drawer of this range. Do not remove model/serial number plate. • Proper Installation. Ask your dealer to potential personal injury hazards. WARNING Stepping, leaning, sitting or pulling down...
... injury or property damage. CAUTION This symbol will help alert you to children in case of a child on the door or the drawer of this range. Do not remove model/serial number plate. • Proper Installation. Ask your dealer to potential personal injury hazards. WARNING Stepping, leaning, sitting or pulling down...
Complete Owner's Guide (English)
Page 6
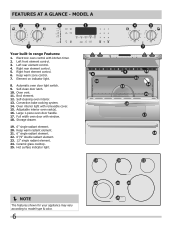
... control. 4. Self-clean door latch. 10. Oven vent. 11. Convection bake cooking system. 14. Storage drawer. 19. 6" single radiant element. 20. mODEL A Your built-in range Features: 1. Electronic oven control with removable cover. 15. Left front element control. 3. Element on indicator light. 8. Ceramic glass cooktop. 25. Right rear element control. 5. Keep...
... control. 4. Self-clean door latch. 10. Oven vent. 11. Convection bake cooking system. 14. Storage drawer. 19. 6" single radiant element. 20. mODEL A Your built-in range Features: 1. Electronic oven control with removable cover. 15. Left front element control. 3. Element on indicator light. 8. Ceramic glass cooktop. 25. Right rear element control. 5. Keep...
Complete Owner's Guide (English)
Page 7
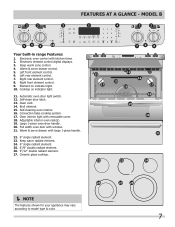
... door latch. 13. Keep warm radiant element. 24. 6" single radiant element. 25. 6"/9" double radiant element. 26. 9"/12" double radiant element. 27. mODEL B Your built-in range Features: 1. Electronic oven control with window. 21. Full width oven door with kitchen timer. 2.
... door latch. 13. Keep warm radiant element. 24. 6" single radiant element. 25. 6"/9" double radiant element. 26. 9"/12" double radiant element. 27. mODEL B Your built-in range Features: 1. Electronic oven control with window. 21. Full width oven door with kitchen timer. 2.
Complete Owner's Guide (English)
Page 8
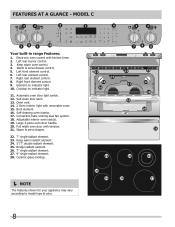
... warm zone control. 4. Ceramic glass cooktop. NOTE The features shown for your appliance may vary according to model type & color. 8 mODEL C Your built-in range Features: 1. Left rear burner control. 3. Large 3-piece oven door handle. 20. Convection bake cooking dual fan system. 18. Warm & serve drawer control. 5. Right rear element...
... warm zone control. 4. Ceramic glass cooktop. NOTE The features shown for your appliance may vary according to model type & color. 8 mODEL C Your built-in range Features: 1. Left rear burner control. 3. Large 3-piece oven door handle. 20. Convection bake cooking dual fan system. 18. Warm & serve drawer control. 5. Right rear element...
Complete Owner's Guide (English)
Page 10
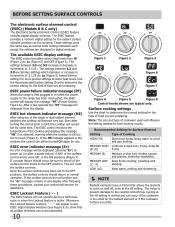
... Electronic Surface Element Control (ESEC) feature includes digital display windows. ESEC power failure indicator message (PF) When the range is first plugged in any ESEC digital display windows (See Figure 8) to the range has been interrupted, the ESEC control will reset the surface controls. The ESEC control monitors the temperature of .5 (1/2). This...
... Electronic Surface Element Control (ESEC) feature includes digital display windows. ESEC power failure indicator message (PF) When the range is first plugged in any ESEC digital display windows (See Figure 8) to the range has been interrupted, the ESEC control will reset the surface controls. The ESEC control monitors the temperature of .5 (1/2). This...
Complete Owner's Guide (English)
Page 17
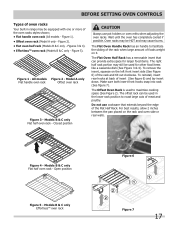
The Flat Oven Handle Rack has an handle to facilitate the sliding of the rack when large amount of foods weight on the left front insert side (See Figure 6) of the rack and tilt out clockwise. To ... a casserole dish (See Figure 3 & 4). The offset rack can provide extra space for larger food items. The right half rack portion may still be used in range may cause burns. Figure 1). • Offset oven rack (Model A only - Figures 3 & 4). • EffortlessTM oven rack (Models B & C only - Figure 4 - Figure...
The Flat Oven Handle Rack has an handle to facilitate the sliding of the rack when large amount of foods weight on the left front insert side (See Figure 6) of the rack and tilt out clockwise. To ... a casserole dish (See Figure 3 & 4). The offset rack can provide extra space for larger food items. The right half rack portion may still be used in range may cause burns. Figure 1). • Offset oven rack (Model A only - Figures 3 & 4). • EffortlessTM oven rack (Models B & C only - Figure 4 - Figure...
Complete Owner's Guide (English)
Page 18
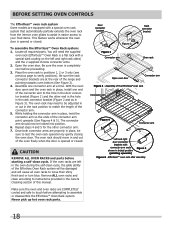
... coating on the left in easier access to your food items. This feature works whenever the oven door is opened or closed . Assembly of the range and pointing towards oven bottom (See Figure 2). 4. Be sure the oven is a flat rack with connector arm ends shown in Figure 3). CAUTION REMOVE ALL OVEN...
... coating on the left in easier access to your food items. This feature works whenever the oven door is opened or closed . Assembly of the range and pointing towards oven bottom (See Figure 2). 4. Be sure the oven is a flat rack with connector arm ends shown in Figure 3). CAUTION REMOVE ALL OVEN...
Complete Owner's Guide (English)
Page 20
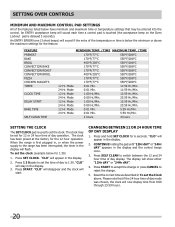
... the Clock The SET CLOCK pad is first plugged in, or when the power supply to the range has been interrupted, the timer in the display. 2. When the range is used to set the time of day to set the clock. "CLO" will disappear and the...176;C 550°F/288°C 12 Hr. Mode 0:00 Hr./Min. 23:59 Hr./Min. 12 Hr. Press 1 3 0 pads to 1:30. Press SELF CLEAN to reject the change. 5. Mode 1:00 Hr./Min. 12:59 Hr./Min. 24 Hr. To set the clock (example ...feature. Setting OVEN controls Minimum and Maximum Control Pad Settings All of the features listed below for 1:30) 1.
... the Clock The SET CLOCK pad is first plugged in, or when the power supply to the range has been interrupted, the timer in the display. 2. When the range is used to set the time of day to set the clock. "CLO" will disappear and the...176;C 550°F/288°C 12 Hr. Mode 0:00 Hr./Min. 23:59 Hr./Min. 12 Hr. Press 1 3 0 pads to 1:30. Press SELF CLEAN to reject the change. 5. Mode 1:00 Hr./Min. 12:59 Hr./Min. 24 Hr. To set the clock (example ...feature. Setting OVEN controls Minimum and Maximum Control Pad Settings All of the features listed below for 1:30) 1.

Complete Owner's Guide (English)
Page 21
... and "DELAY" will operate with all the normal sounds and beeps. Press SELF CLEAN to operating with normal sounds and beeps. To tell if your range is set to override this feature for normal or silent operation press and hold DELAY START. Note: If "bEEP On" appears, the control will flash...
... and "DELAY" will operate with all the normal sounds and beeps. Press SELF CLEAN to operating with normal sounds and beeps. To tell if your range is set to override this feature for normal or silent operation press and hold DELAY START. Note: If "bEEP On" appears, the control will flash...


