Installation Instructions (All Languages)
Page 1
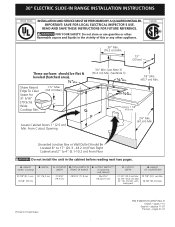
... Cooktop Rim. 1 ½" Max. (3.8 cm Max.) E ½"Min. Printed in the cabinet before reading next two pages. páginas 11-20 Français - 30" ELECTRIC SLIDE-IN RANGE INSTALLATION INSTRUCTIONS United States INSTALLATION AND SERVICE MUST BE PERFORMED BY A QUALIFIED INSTALLER. Approx. 1 7/8" G (4.8 cm) F Locate Cabinet Doors 1" (2.5 cm) Min.... FOR YOUR SAFETY: Do not store or use gasoline or other flammable vapors and liquids in the vicinity of this or any other appliance. HEIGHT OF COUNTERTOP 35 7/8" (91,1 cm) Min. 36 5/8" (93 cm) Max. pages 1-10 Español -
... Cooktop Rim. 1 ½" Max. (3.8 cm Max.) E ½"Min. Printed in the cabinet before reading next two pages. páginas 11-20 Français - 30" ELECTRIC SLIDE-IN RANGE INSTALLATION INSTRUCTIONS United States INSTALLATION AND SERVICE MUST BE PERFORMED BY A QUALIFIED INSTALLER. Approx. 1 7/8" G (4.8 cm) F Locate Cabinet Doors 1" (2.5 cm) Min.... FOR YOUR SAFETY: Do not store or use gasoline or other flammable vapors and liquids in the vicinity of this or any other appliance. HEIGHT OF COUNTERTOP 35 7/8" (91,1 cm) Min. 36 5/8" (93 cm) Max. pages 1-10 Español -
Installation Instructions (All Languages)
Page 2
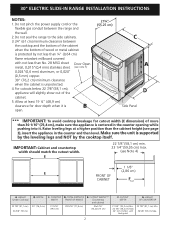
...) stainless steel, (see Note 4) 1 1/8" (2,86 cm) E FRONT OF CABINET F Ref. with not less than 30 1/16" (76,4 cm), make sure the appliance is centered in the counter and then level. WIDTH 30" (76,2 cm) C. COOKTOP WIDTH 31 5/16" (79.5 cm) D. TOTAL DEPTH TO FRONT OF RANGE 28 5/...16" (71,9 cm) E. A. 30" ELECTRIC SLIDE-IN RANGE INSTALLATION INSTRUCTIONS NOTES: 1. Make sure the unit is...
...) stainless steel, (see Note 4) 1 1/8" (2,86 cm) E FRONT OF CABINET F Ref. with not less than 30 1/16" (76,4 cm), make sure the appliance is centered in the counter and then level. WIDTH 30" (76,2 cm) C. COOKTOP WIDTH 31 5/16" (79.5 cm) D. TOTAL DEPTH TO FRONT OF RANGE 28 5/...16" (71,9 cm) E. A. 30" ELECTRIC SLIDE-IN RANGE INSTALLATION INSTRUCTIONS NOTES: 1. Make sure the unit is...

Installation Instructions (All Languages)
Page 4
... adequate ventilation can damage the electronic control. Explosions or fires could result. • Reset all governing codes and ordinances. 4. Read all appliances. Children could result. • Install antitip device packed with CAN/CSA-Z240 MH in United States and with range. Wipe up excess ... the floor covering can tip. • Injury to persons could be seriously burned climbing on the power to the range. 3. 30" ELECTRIC SLIDE-IN RANGE INSTALLATION INSTRUCTIONS Important Notes to record the serial number for the local electrical inspector's use the oven as shown. Be...
... adequate ventilation can damage the electronic control. Explosions or fires could result. • Reset all governing codes and ordinances. 4. Read all appliances. Children could result. • Install antitip device packed with CAN/CSA-Z240 MH in United States and with range. Wipe up excess ... the floor covering can tip. • Injury to persons could be seriously burned climbing on the power to the range. 3. 30" ELECTRIC SLIDE-IN RANGE INSTALLATION INSTRUCTIONS Important Notes to record the serial number for the local electrical inspector's use the oven as shown. Be...
Installation Instructions (All Languages)
Page 5
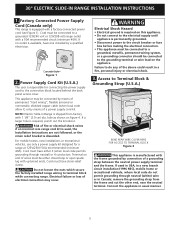
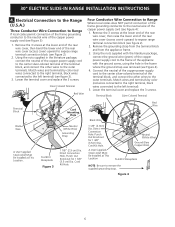
... range wiring to Terminal Block & Grounding Strap (U.S.A.) BEND REAR WIRE COVER HERE FOR ACCESS TO TERMINAL BLOCK Figure 2 This appliance is equipped with the frame grounded by means of permanent "hard wiring"; Cord must be connected to do not permit grounding through...a 50A recommended circuit (minimum 40A). Power Supply Cord Kit (U.S.A.) The user is discarded. Access to terminal block while connecting range. 30" ELECTRIC SLIDE-IN RANGE INSTALLATION INSTRUCTIONS 1. Factory Connected Power Supply Cord (Canada only) This range is manufactured with a factory-connected power cord (...
... range wiring to Terminal Block & Grounding Strap (U.S.A.) BEND REAR WIRE COVER HERE FOR ACCESS TO TERMINAL BLOCK Figure 2 This appliance is equipped with the frame grounded by means of permanent "hard wiring"; Cord must be connected to do not permit grounding through...a 50A recommended circuit (minimum 40A). Power Supply Cord Kit (U.S.A.) The user is discarded. Access to terminal block while connecting range. 30" ELECTRIC SLIDE-IN RANGE INSTALLATION INSTRUCTIONS 1. Factory Connected Power Supply Cord (Canada only) This range is manufactured with a factory-connected power cord (...
Installation Instructions (All Languages)
Page 6
... to the left terminal) (see Figure 3): 1. Remove the grounding strap from the terminal block and from the appliance frame. 3. Match wires and terminals by color (red wires connected to the right terminal, black wires connected to...4). 4. Connect the neutral of the copper power supply cord to the center silver-colored terminal of the appliance with the ground screw, using the hole in the literature package, connect the neutral of the copper power ... power supply cord to expose range terminal connection block (see Figure 4): 1. 30" ELECTRIC SLIDE-IN RANGE INSTALLATION INSTRUCTIONS 4.
... to the left terminal) (see Figure 3): 1. Remove the grounding strap from the terminal block and from the appliance frame. 3. Match wires and terminals by color (red wires connected to the right terminal, black wires connected to...4). 4. Connect the neutral of the copper power supply cord to the center silver-colored terminal of the appliance with the ground screw, using the hole in the literature package, connect the neutral of the copper power ... power supply cord to expose range terminal connection block (see Figure 4): 1. 30" ELECTRIC SLIDE-IN RANGE INSTALLATION INSTRUCTIONS 4.
Installation Instructions (All Languages)
Page 7
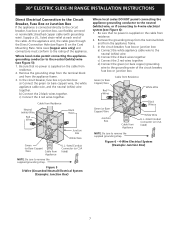
... grounding wire to 4-wire electrical system (see Figure 6): 1. 30" ELECTRIC SLIDE-IN RANGE INSTALLATION INSTRUCTIONS Direct Electrical Connection to the Circuit Breaker, Fuse Box or Junction Box If the appliance is connected directly to the rating of the appliance. Wire sizes (copper wire only) and connections must conform to ... Wire Junction Box Black Wires Cable from residence. 2. Supply a U.L. Remove the grounding strap from the terminal block and from the appliance frame. 3. listed strain-relief at each end of the cable. Be sure that no power is supplied on the cable from...
... grounding wire to 4-wire electrical system (see Figure 6): 1. 30" ELECTRIC SLIDE-IN RANGE INSTALLATION INSTRUCTIONS Direct Electrical Connection to the Circuit Breaker, Fuse Box or Junction Box If the appliance is connected directly to the rating of the appliance. Wire sizes (copper wire only) and connections must conform to ... Wire Junction Box Black Wires Cable from residence. 2. Supply a U.L. Remove the grounding strap from the terminal block and from the appliance frame. 3. listed strain-relief at each end of the cable. Be sure that no power is supplied on the cable from...
Installation Instructions (All Languages)
Page 8
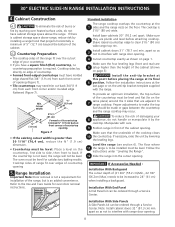
... back 3/4"(1.9 cm) from each front corner of countertop opening . 8 The floor where 11 the range is to make the top flat should be level. 30" ELECTRIC SLIDE-IN RANGE INSTALLATION INSTRUCTIONS 4. Cutout Width ¾" (1.9 cm) ¾" (1.9 cm) 31½" (81 cm) Formed or tile countertop trimmed ¾... 5. The oven must be level. To provide an optimum installation, the top surface of the cabinet (shown on edge of your 8 appliance, do not have cabinet storage space above range, reduce risk by lowering the leveling legs. Figure 7 • If the existing cutout ...
... back 3/4"(1.9 cm) from each front corner of countertop opening . 8 The floor where 11 the range is to make the top flat should be level. 30" ELECTRIC SLIDE-IN RANGE INSTALLATION INSTRUCTIONS 4. Cutout Width ¾" (1.9 cm) ¾" (1.9 cm) 31½" (81 cm) Formed or tile countertop trimmed ¾... 5. The oven must be level. To provide an optimum installation, the top surface of the cabinet (shown on edge of your 8 appliance, do not have cabinet storage space above range, reduce risk by lowering the leveling legs. Figure 7 • If the existing cutout ...

Installation Instructions (All Languages)
Page 9
... equipped. Bake-After setting the oven to include the model and serial numbers and a lot number or letter from the oven before installation in this appliance. The convection fan will stop turning when the oven door is located on your range product and/or need to see Figure10). 3. Remove all controls... to the Use and Care Manual for our phone number and address. Please call list and operating instructions in one direction and then the other. 30" ELECTRIC SLIDE-IN RANGE INSTALLATION INSTRUCTIONS 6. Clean-When the oven is set cooktop height before testing. 1.
... equipped. Bake-After setting the oven to include the model and serial numbers and a lot number or letter from the oven before installation in this appliance. The convection fan will stop turning when the oven door is located on your range product and/or need to see Figure10). 3. Remove all controls... to the Use and Care Manual for our phone number and address. Please call list and operating instructions in one direction and then the other. 30" ELECTRIC SLIDE-IN RANGE INSTALLATION INSTRUCTIONS 6. Clean-When the oven is set cooktop height before testing. 1.

Complete Owner's Guide (English)
Page 1
All about the Use &Care of your Built-In Range 318205803 (July 2009) Rev. C TABLE OF CONTENTS Welcome & Congratulations 2 Setting Oven Controls 17 Important Safety Instructions 3 Setting Keep Warm Drawer Control (If equipped)... 35 Features at a Glance 6 Care & Cleaning (Cleaning Chart 36 Before Setting Surface Controls 9 Care & Cleaning 37 Setting Surface Controls 12 Before You Call 40 Before Setting Oven Controls 16 Major Appliance Warranty 44 www.frigidaire.com USA 1-800-944-9044 www.frigidaire.ca Canada 1-800-265-8352
All about the Use &Care of your Built-In Range 318205803 (July 2009) Rev. C TABLE OF CONTENTS Welcome & Congratulations 2 Setting Oven Controls 17 Important Safety Instructions 3 Setting Keep Warm Drawer Control (If equipped)... 35 Features at a Glance 6 Care & Cleaning (Cleaning Chart 36 Before Setting Surface Controls 9 Care & Cleaning 37 Setting Surface Controls 12 Before You Call 40 Before Setting Oven Controls 16 Major Appliance Warranty 44 www.frigidaire.com USA 1-800-944-9044 www.frigidaire.ca Canada 1-800-265-8352
Complete Owner's Guide (English)
Page 2
.... Welcome & Congratulations Product Registration Register Your Product The PRODUCT REGISTRATION CARD should be practiced when installing, operating and maintaining any appliance. NOTE Please attach sales receipt here for choosing our product. The graphics on your model and serial numbers below for... future purchases. Serial Plate Location Congratulations on your appliance and feature information for several models. Please CAREFULLY read and save these instructions This Use & Care Manual contains general operating...
.... Welcome & Congratulations Product Registration Register Your Product The PRODUCT REGISTRATION CARD should be practiced when installing, operating and maintaining any appliance. NOTE Please attach sales receipt here for choosing our product. The graphics on your model and serial numbers below for... future purchases. Serial Plate Location Congratulations on your appliance and feature information for several models. Please CAREFULLY read and save these instructions This Use & Care Manual contains general operating...

Complete Owner's Guide (English)
Page 3
...to alert you to potential personal injury hazards. Never allow children to sit or stand on the door or the drawer of the appliance unless specifically recommended in fire or property damage. Do not remove the wiring label and other injury. This includes paper, plastic and ... on an open drawer when hot may explode and result in the manuals. Children should be stored in an oven, near the appliance. Save these instructions for this range. Install only per installation instructions provided in serious burns or other literature attached to children in or...
...to alert you to potential personal injury hazards. Never allow children to sit or stand on the door or the drawer of the appliance unless specifically recommended in fire or property damage. Do not remove the wiring label and other injury. This includes paper, plastic and ... on an open drawer when hot may explode and result in the manuals. Children should be stored in an oven, near the appliance. Save these instructions for this range. Install only per installation instructions provided in serious burns or other literature attached to children in or...
Complete Owner's Guide (English)
Page 4
..., or a pan that it has been exposed to a temperature above 0°C/32°F for cooktop service without breaking due to operate the appliance during a power failure. IMPORTANT Do not attempt to the sudden change in color. Any other glazed utensils are dark in temperature. Damage may ...are suitable for at least 3 hours before turning it on Grease Fires. Loose-fitting or hanging garments should be worn while using the appliance. IMPORTANT INSTRUCTIONS FOR USING YOUR cooktop • Know which knob controls each surface heating unit. Doing so may result in burns from...
..., or a pan that it has been exposed to a temperature above 0°C/32°F for cooktop service without breaking due to operate the appliance during a power failure. IMPORTANT Do not attempt to the sudden change in color. Any other glazed utensils are dark in temperature. Damage may ...are suitable for at least 3 hours before turning it on Grease Fires. Loose-fitting or hanging garments should be worn while using the appliance. IMPORTANT INSTRUCTIONS FOR USING YOUR cooktop • Know which knob controls each surface heating unit. Doing so may result in burns from...
Complete Owner's Guide (English)
Page 5
... should be moved while oven is essential for use oven cleaners. Some cleaners can produce harmful fumes if applied to the appliance before you remove or replace food in this Owner's Guide. Let hot air or steam escape before removing and replacing the...any kind should break, cleaning solutions and spillovers may cause severe burns. IMPORTANT SAFETY INSTRUCTIONS FOR CLEANING YOUR OVEN • Clean the appliance regularly to the hood manufacturer's instructions for cleaning. • Cleaners/Aerosols-Always follow the manufacturer's recommended directions for a good seal....
... should be moved while oven is essential for use oven cleaners. Some cleaners can produce harmful fumes if applied to the appliance before you remove or replace food in this Owner's Guide. Let hot air or steam escape before removing and replacing the...any kind should break, cleaning solutions and spillovers may cause severe burns. IMPORTANT SAFETY INSTRUCTIONS FOR CLEANING YOUR OVEN • Clean the appliance regularly to the hood manufacturer's instructions for cleaning. • Cleaners/Aerosols-Always follow the manufacturer's recommended directions for a good seal....
Complete Owner's Guide (English)
Page 6
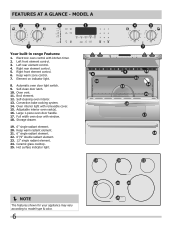
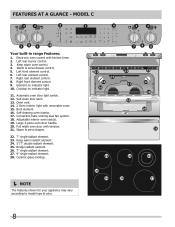
... interior oven rack(s). 16. mODEL A Your built-in range Features: 1. Right rear element control. 5. Hot surface indicator light. NOTE The features shown for your appliance may vary according to model type & color. 6 Oven vent. 11. Self-clean door latch. 10. Keep warm radiant element. 21. 6" single radiant element. 22. 6"/9" double...
... interior oven rack(s). 16. mODEL A Your built-in range Features: 1. Right rear element control. 5. Hot surface indicator light. NOTE The features shown for your appliance may vary according to model type & color. 6 Oven vent. 11. Self-clean door latch. 10. Keep warm radiant element. 21. 6" single radiant element. 22. 6"/9" double...
Complete Owner's Guide (English)
Page 7
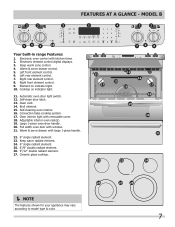
.... 26. 9"/12" double radiant element. 27. Warm & serve drawer control. 5. Self-clean door latch. 13. Ceramic glass cooktop. NOTE The features shown for your appliance may vary according to model type & color. 7 Element on indicator light. 11.
.... 26. 9"/12" double radiant element. 27. Warm & serve drawer control. 5. Self-clean door latch. 13. Ceramic glass cooktop. NOTE The features shown for your appliance may vary according to model type & color. 7 Element on indicator light. 11.
Complete Owner's Guide (English)
Page 8
... fan system. 18. Bridge radiant element. 26. 7" single radiant element. 27. 9" single radiant element. 28. Ceramic glass cooktop. NOTE The features shown for your appliance may vary according to model type & color. 8 Left front element control. 6. Right rear element control. 8. Broil element. 16. Warm & serve drawer control. 5. Element on indicator...
... fan system. 18. Bridge radiant element. 26. 7" single radiant element. 27. 9" single radiant element. 28. Ceramic glass cooktop. NOTE The features shown for your appliance may vary according to model type & color. 8 Left front element control. 6. Right rear element control. 8. Broil element. 16. Warm & serve drawer control. 5. Element on indicator...
Complete Owner's Guide (English)
Page 9
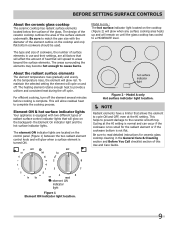
... a uniform and consistent heat during the off . the Element On indicator light and the hot surface indicator lights. Element ON & hot surface indicator lights Your appliance is not flat. Be sure to a MODERATE level. Model A only : The hot surface indicator light located on the cooktop (Figure 2) will glow when any surface...
... a uniform and consistent heat during the off . the Element On indicator light and the hot surface indicator lights. Element ON & hot surface indicator lights Your appliance is not flat. Be sure to a MODERATE level. Model A only : The hot surface indicator light located on the cooktop (Figure 2) will glow when any surface...
Complete Owner's Guide (English)
Page 19
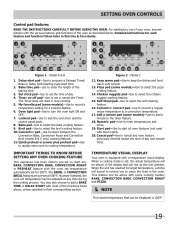
... a cooking mode is 100°F. 19 Quick preheat or power plus preheat pad-Use to quickly raise oven to cancel any Oven Cooking Feature This appliance has been factory pre-set 4 clock 5 my favorite 67 18 123 45 8 9 10 11 12 powerplus keep the dishes and food warm until served. 13...
... a cooking mode is 100°F. 19 Quick preheat or power plus preheat pad-Use to quickly raise oven to cancel any Oven Cooking Feature This appliance has been factory pre-set 4 clock 5 my favorite 67 18 123 45 8 9 10 11 12 powerplus keep the dishes and food warm until served. 13...

Complete Owner's Guide (English)
Page 31
... 425°C press 4 2 5) and then pressing START twice (for at least 3 seconds. To Program the Oven to finish the cooking process. The appliance may only be turned OFF at this step and continue to the Bake Time / Delay Start section for complete instructions. The surface elements can be.... Once the oven is ON. (model B & C only) When your food was turned on automatically. The Sabbath feature may only start heating 15-30 seconds after setting the Sabbath feature; 0 to activate any further changes and the oven is returned, "SF" (Sabbath Failure) will be used even if...
... 425°C press 4 2 5) and then pressing START twice (for at least 3 seconds. To Program the Oven to finish the cooking process. The appliance may only be turned OFF at this step and continue to the Bake Time / Delay Start section for complete instructions. The surface elements can be.... Once the oven is ON. (model B & C only) When your food was turned on automatically. The Sabbath feature may only start heating 15-30 seconds after setting the Sabbath feature; 0 to activate any further changes and the oven is returned, "SF" (Sabbath Failure) will be used even if...
Complete Owner's Guide (English)
Page 33
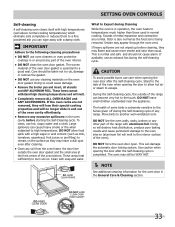
...Care & Cleaning section. To clean, use care when opening the door after the Self-Cleaning cycle. DO NOT leave small children unattended near the appliance. The oven may still be taken not to rub, damage or remove the gasket. • DO NOT use an exhaust fan during the Self...GASKET 33 Care should not cause alarm. If the oven racks are not removed, they will lose their special coating properties and will no longer slide in and out of the oven cavity effortlessly. • Remove any excessive spillovers in normal cooking. During the Self-Cleaning cycle, the outside...
...Care & Cleaning section. To clean, use care when opening the door after the Self-Cleaning cycle. DO NOT leave small children unattended near the appliance. The oven may still be taken not to rub, damage or remove the gasket. • DO NOT use an exhaust fan during the Self...GASKET 33 Care should not cause alarm. If the oven racks are not removed, they will lose their special coating properties and will no longer slide in and out of the oven cavity effortlessly. • Remove any excessive spillovers in normal cooking. During the Self-Cleaning cycle, the outside...