Installation Instructions (All Languages)
Page 1
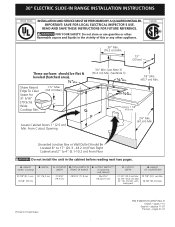
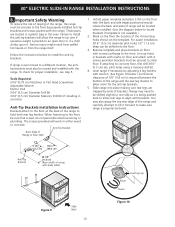
...3/4" (55,2 cm) Min. 22 1/8" (56,2 cm) Max 24" (61 cm) Min. Approx. 1 7/8" G (4.8 cm) F Locate Cabinet Doors 1" (2.5 cm) Min. CUTOUT WIDTH*** (Countertop and cabinet) 30±1/16" (76,2±0,15 cm) F. Grounded Junction Box or Wall Outlet Should Be Located 8" to 17" (20.3 - 43.2 cm) From .... From Cutout Opening 24" Min. (61 cm) Min. HEIGHT OF COUNTERTOP 35 7/8" (91,1 cm) Min. 36 5/8" (93 cm) Max. 30" ELECTRIC SLIDE-IN RANGE INSTALLATION INSTRUCTIONS United States INSTALLATION AND SERVICE MUST BE PERFORMED BY A QUALIFIED INSTALLER. Shave Raised Edge To Clear Space for 31 5/16" (79...
...3/4" (55,2 cm) Min. 22 1/8" (56,2 cm) Max 24" (61 cm) Min. Approx. 1 7/8" G (4.8 cm) F Locate Cabinet Doors 1" (2.5 cm) Min. CUTOUT WIDTH*** (Countertop and cabinet) 30±1/16" (76,2±0,15 cm) F. Grounded Junction Box or Wall Outlet Should Be Located 8" to 17" (20.3 - 43.2 cm) From .... From Cutout Opening 24" Min. (61 cm) Min. HEIGHT OF COUNTERTOP 35 7/8" (91,1 cm) Min. 36 5/8" (93 cm) Max. 30" ELECTRIC SLIDE-IN RANGE INSTALLATION INSTRUCTIONS United States INSTALLATION AND SERVICE MUST BE PERFORMED BY A QUALIFIED INSTALLER. Shave Raised Edge To Clear Space for 31 5/16" (79...
Installation Instructions (All Languages)
Page 2
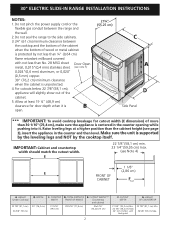
... is centered in the counter and then level. WIDTH 30" (76,2 cm) C. 30" ELECTRIC SLIDE-IN RANGE INSTALLATION INSTRUCTIONS NOTES: 1. Allow at a higher position than No. 28 MSG sheet Door Open metal, 0,015"(0,4 mm) stainless steel, (see note 5) 0,024"(0,6 mm) aluminum, or 0,020" (0,5 mm) copper. 30" (76,2 cm) minimum clearance when the cabinet is protected...
... is centered in the counter and then level. WIDTH 30" (76,2 cm) C. 30" ELECTRIC SLIDE-IN RANGE INSTALLATION INSTRUCTIONS NOTES: 1. Allow at a higher position than No. 28 MSG sheet Door Open metal, 0,015"(0,4 mm) stainless steel, (see note 5) 0,024"(0,6 mm) aluminum, or 0,020" (0,5 mm) copper. 30" (76,2 cm) minimum clearance when the cabinet is protected...

Installation Instructions (All Languages)
Page 4
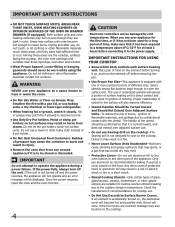
...project horizontally a minimum of 5 inches beyond the bottom of the cabinet. • Do not use and future reference. Never leave the oven door open when the range is unattended. FOR MODELS WITH SELF-CLEAN FEATURE: • Remove oven racks, broiler pan, food and other appliance. ... ranges can be dangerous. • Do not store or use of the range without shrinking, warping or discoloring. Observe all appliances. 30" ELECTRIC SLIDE-IN RANGE INSTALLATION INSTRUCTIONS Important Notes to the "off" position after using the appliance for the first time, or when the appliance has...
...project horizontally a minimum of 5 inches beyond the bottom of the cabinet. • Do not use and future reference. Never leave the oven door open when the range is unattended. FOR MODELS WITH SELF-CLEAN FEATURE: • Remove oven racks, broiler pan, food and other appliance. ... ranges can be dangerous. • Do not store or use of the range without shrinking, warping or discoloring. Observe all appliances. 30" ELECTRIC SLIDE-IN RANGE INSTALLATION INSTRUCTIONS Important Notes to the "off" position after using the appliance for the first time, or when the appliance has...
Installation Instructions (All Languages)
Page 8
... range, reduce risk by reaching over edges of the range, but is to the Use and Care Guide for installation of countertop opening . 30" ELECTRIC SLIDE-IN RANGE INSTALLATION INSTRUCTIONS 4. Refer to be installed must be made or gaps between the countertop and the range cooktop may need trim cut ... the last page or on the countertop, first side to side, then front to clear 31½" (80 cm) wide range top rim. 3 Install cabinet doors 31" (78.7 cm) min. Place a level on the anti-tip bracket template supplied with care. 9 Position range in front of (21 3/4" (55.2 cm)Min...
... range, reduce risk by reaching over edges of the range, but is to the Use and Care Guide for installation of countertop opening . 30" ELECTRIC SLIDE-IN RANGE INSTALLATION INSTRUCTIONS 4. Refer to be installed must be made or gaps between the countertop and the range cooktop may need trim cut ... the last page or on the countertop, first side to side, then front to clear 31½" (80 cm) wide range top rim. 3 Install cabinet doors 31" (78.7 cm) min. Place a level on the anti-tip bracket template supplied with care. 9 Position range in front of (21 3/4" (55.2 cm)Min...

Installation Instructions (All Languages)
Page 9
...write if you verify the operation of defective workmanship or materials in the oven should become red. Broil-When the oven is heating. 30" ELECTRIC SLIDE-IN RANGE INSTALLATION INSTRUCTIONS 6. Leveling the Range Level the range and set to see the drawer is set cooktop height before shipping.... Convection (some models). Operation of Oven Elements The oven is located on each of Surface Elements Turn on the oven front frame behind the oven door (some models) or behind the drawer (some models) and Clean functions. Each of the oven. 2. Level the range, if necessary, by ...
...write if you verify the operation of defective workmanship or materials in the oven should become red. Broil-When the oven is heating. 30" ELECTRIC SLIDE-IN RANGE INSTALLATION INSTRUCTIONS 6. Leveling the Range Level the range and set to see the drawer is set cooktop height before shipping.... Convection (some models). Operation of Oven Elements The oven is located on each of Surface Elements Turn on the oven front frame behind the oven door (some models) or behind the drawer (some models) and Clean functions. Each of the oven. 2. Level the range, if necessary, by ...
Installation Instructions (All Languages)
Page 10
...parts are trapped by adjusting 4 leg levelers with body sides) Leveling Leg Raise Lower Figure 9 Slide Back 10 Figure 10 Serious injury might result from spilled hot liquids or from the range itself. ... Masonry Drill Bit (if installing in the oven. Unfold paper template and place it flat on an open door or if a child climbs upon it forward to the front. Follow the instructions below .) A minimum clearance... anchored. Line up flange to make sure range is not available.) 2. Slide range into the floor. 3. Remove template and place brackets on floor and attach with turned...
...parts are trapped by adjusting 4 leg levelers with body sides) Leveling Leg Raise Lower Figure 9 Slide Back 10 Figure 10 Serious injury might result from spilled hot liquids or from the range itself. ... Masonry Drill Bit (if installing in the oven. Unfold paper template and place it flat on an open door or if a child climbs upon it forward to the front. Follow the instructions below .) A minimum clearance... anchored. Line up flange to make sure range is not available.) 2. Slide range into the floor. 3. Remove template and place brackets on floor and attach with turned...

Complete Owner's Guide (English)
Page 3
... with the National Electrical Code ANSI/NFPA No. 70-latest edition, and local code requirements, and in Canada with packaging material. An open door may cause the appliance to children in fire or property damage. This includes paper, plastic and cloth items, such as cookbooks, plastic ware... be left alone or unattended in serious injuries and also cause damage to the appliance. Flammable materials may cause burns. Children climbing on the door or the drawer of the product. Children should never be seriously injured. • Do not leave children alone. WARNING • All appliance...
... with the National Electrical Code ANSI/NFPA No. 70-latest edition, and local code requirements, and in Canada with packaging material. An open door may cause the appliance to children in fire or property damage. This includes paper, plastic and cloth items, such as cookbooks, plastic ware... be left alone or unattended in serious injuries and also cause damage to the appliance. Flammable materials may cause burns. Children climbing on the door or the drawer of the product. Children should never be seriously injured. • Do not leave children alone. WARNING • All appliance...
Complete Owner's Guide (English)
Page 4
... any other used as a cover placed on hot surfaces may result in temperature. Do not let clothing or other flammable materials touch these openings, oven door and window. • Wear Proper Apparel. Smother the fire with a pan lid, or use your appliance as recommended for use aluminum foil to cause...use , do not touch, or let clothing or other flammable materials contact hot surfaces. Doing so may result in injury. • Remove the oven door from steam. If the power fails, always turn the element off the unit. Place pan of food on the element before removing the pan. •...
... any other used as a cover placed on hot surfaces may result in temperature. Do not let clothing or other flammable materials touch these openings, oven door and window. • Wear Proper Apparel. Smother the fire with a pan lid, or use your appliance as recommended for use aluminum foil to cause...use , do not touch, or let clothing or other flammable materials contact hot surfaces. Doing so may result in injury. • Remove the oven door from steam. If the power fails, always turn the element off the unit. Place pan of food on the element before removing the pan. •...
Complete Owner's Guide (English)
Page 5
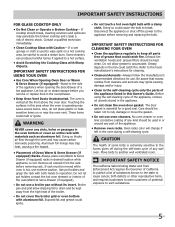
...& Serve Drawer (if equipped). • Do not use extreme caution. IMPORTANT SAFETY INSTRUCTIONS FOR USING YOUR OVEN • Use Care When Opening Oven Door or Warm & Serve Drawer (if equipped)-Stand to reposition. The oven is hot, use a broiler pan without its insert. Do not let pot ... so could catch fire. Some cleaners can produce harmful fumes if applied to accumulate. Exposed fat and grease could melt or ignite. The door gasket is operating may penetrate the broken cooktop and create a risk of the appliance, remove all utensils from the rack before removing and ...
...& Serve Drawer (if equipped). • Do not use extreme caution. IMPORTANT SAFETY INSTRUCTIONS FOR USING YOUR OVEN • Use Care When Opening Oven Door or Warm & Serve Drawer (if equipped)-Stand to reposition. The oven is hot, use a broiler pan without its insert. Do not let pot ... so could catch fire. Some cleaners can produce harmful fumes if applied to accumulate. Exposed fat and grease could melt or ignite. The door gasket is operating may penetrate the broken cooktop and create a risk of the appliance, remove all utensils from the rack before removing and ...
Complete Owner's Guide (English)
Page 6
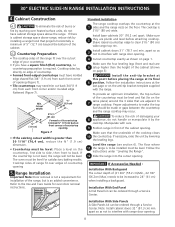
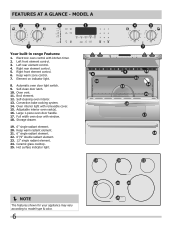
... front element control. 6. Storage drawer. 19. 6" single radiant element. 20. Large 1-piece oven door handle. 17. Electronic oven control with removable cover. 15. Full width oven door with window. 18. mODEL A Your built-in range Features: 1. Self-clean door latch. 10. Oven vent. 11. Convection bake cooking system. 14. Self-cleaning oven interior... element. 23. 12" single radiant element. 24. Keep warm zone control. 7. Element on indicator light. 8. Ceramic glass cooktop. 25. Right rear element control. 5. Automatic oven door light switch. 9.
... front element control. 6. Storage drawer. 19. 6" single radiant element. 20. Large 1-piece oven door handle. 17. Electronic oven control with removable cover. 15. Full width oven door with window. 18. mODEL A Your built-in range Features: 1. Self-clean door latch. 10. Oven vent. 11. Convection bake cooking system. 14. Self-cleaning oven interior... element. 23. 12" single radiant element. 24. Keep warm zone control. 7. Element on indicator light. 8. Ceramic glass cooktop. 25. Right rear element control. 5. Automatic oven door light switch. 9.
Complete Owner's Guide (English)
Page 7
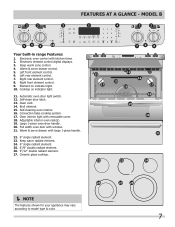
...rear element control. 7. Oven vent. 14. FEATURES AT A GLANCE - Warm & serve drawer control. 5. Right rear element control. 8. Full width oven door with large 1-piece handle. 22. 6" single radiant element. 23. mODEL B Your built-in range Features: 1. Broil element. 15. Warm & serve ...drawer with window. 21. Large 1-piece oven door handle. 20. Self-cleaning oven interior. 16. Keep warm radiant element. 24. 6" single radiant element. 25. 6"/9" double radiant element. 26. ...
...rear element control. 7. Oven vent. 14. FEATURES AT A GLANCE - Warm & serve drawer control. 5. Right rear element control. 8. Full width oven door with large 1-piece handle. 22. 6" single radiant element. 23. mODEL B Your built-in range Features: 1. Broil element. 15. Warm & serve ...drawer with window. 21. Large 1-piece oven door handle. 20. Self-cleaning oven interior. 16. Keep warm radiant element. 24. 6" single radiant element. 25. 6"/9" double radiant element. 26. ...
Complete Owner's Guide (English)
Page 8
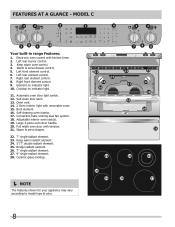
Left rear burner control. 3. Oven vent. 14. 2 Oven interior light with kitchen timer. 2. Large 3-piece oven door handle. 20. Warm & serve drawer. 22. 7" single radiant element. 23. Bridge radiant element. 26. 7" single radiant element. 27. 9" single radiant element... your appliance may vary according to model type & color. 8 Broil element. 16. Electronic oven control with removable cover. 15. Automatic oven door light switch. 12. Self-clean door latch. 13. Keep warm radiant element. 24. 5"/7" double radiant element. 25. Left rear element control. 7. FEATURES AT A GLANCE - ...
Left rear burner control. 3. Oven vent. 14. 2 Oven interior light with kitchen timer. 2. Large 3-piece oven door handle. 20. Warm & serve drawer. 22. 7" single radiant element. 23. Bridge radiant element. 26. 7" single radiant element. 27. 9" single radiant element... your appliance may vary according to model type & color. 8 Broil element. 16. Electronic oven control with removable cover. 15. Automatic oven door light switch. 12. Self-clean door latch. 13. Keep warm radiant element. 24. 5"/7" double radiant element. 25. Left rear element control. 7. FEATURES AT A GLANCE - ...
Complete Owner's Guide (English)
Page 16
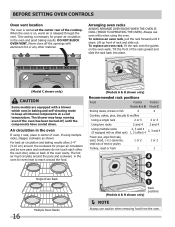
...at a cool temperature. Always use caution when removing food from the oven. Lift up front of the rack upward and slide the rack back into place. (Model C shown only) CAUTION Some models are equipped with aluminium foil or any other , the oven... door, sides or back of oven. The hot air must circulate around the pans and cookware in the oven for even heat ... off the openings with a blower which runs in center of the oven cavity. Tilt the front of rack and slide out.
...at a cool temperature. Always use caution when removing food from the oven. Lift up front of the rack upward and slide the rack back into place. (Model C shown only) CAUTION Some models are equipped with aluminium foil or any other , the oven... door, sides or back of oven. The hot air must circulate around the pans and cookware in the oven for even heat ... off the openings with a blower which runs in center of the oven cavity. Tilt the front of rack and slide out.
Complete Owner's Guide (English)
Page 18
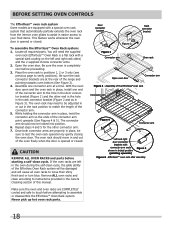
...are left in the oven during the self-clean cycle, the glide ability of the EffortlessTMoven rack Connector arm Figure 4 Connector arm Left and right door connector brackets with a special dark coating on the left and right rack sides) and the 2 supplied chrome connector arms. 2. To assemble the ...connector brackets are properly in positions 1, 2 or 3 only (see previous page to loose their shiny finish and or turn blue. With the oven door open and the oven rack in the Care & Cleaning section of the range and pointing towards oven bottom (See Figure 2). 4. Once both connector arms...
...are left in the oven during the self-clean cycle, the glide ability of the EffortlessTMoven rack Connector arm Figure 4 Connector arm Left and right door connector brackets with a special dark coating on the left and right rack sides) and the 2 supplied chrome connector arms. 2. To assemble the ...connector brackets are properly in positions 1, 2 or 3 only (see previous page to loose their shiny finish and or turn blue. With the oven door open and the oven rack in the Care & Cleaning section of the range and pointing towards oven bottom (See Figure 2). 4. Once both connector arms...
Complete Owner's Guide (English)
Page 19
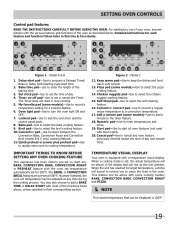
... use of the oven as the unit preheat. Lockout pad-Use to select the broil cooking feature. 10. Broil pad-Use to lock the oven door and the control panel pads. 8. Self-Clean pad-Use to select the chicken nuggets cooking feature. 15. Cancel pad-Use to add a BAKE TIME or...
... use of the oven as the unit preheat. Lockout pad-Use to select the broil cooking feature. 10. Broil pad-Use to lock the oven door and the control panel pads. 8. Self-Clean pad-Use to select the chicken nuggets cooking feature. 15. Cancel pad-Use to add a BAKE TIME or...
Complete Owner's Guide (English)
Page 22
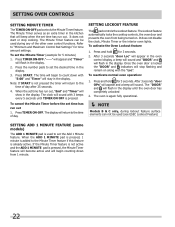
... cooking. Press the number pads to the time of day after 25 seconds. 4. Setting Lockout Feature The pad controls the Lockout feature. Once the oven door is again fully operational. NOTE Models B & C only, during any of the other oven control functions. It does not start or stop ...oven from 1 minute. 22 It does not disable the clock, Minute Timer or the interior oven lights. To reactivate normal oven operation: 1. The "DOOR" and will return to set time has run out 1. Setting OVEN controls Setting MINUTE Timer The TIMER ON.OFF pad controls the Minute Timer feature...
... cooking. Press the number pads to the time of day after 25 seconds. 4. Setting Lockout Feature The pad controls the Lockout feature. Once the oven door is again fully operational. NOTE Models B & C only, during any of the other oven control functions. It does not start or stop ...oven from 1 minute. 22 It does not disable the clock, Minute Timer or the interior oven lights. To reactivate normal oven operation: 1. The "DOOR" and will return to set time has run out 1. Setting OVEN controls Setting MINUTE Timer The TIMER ON.OFF pad controls the Minute Timer feature...
Complete Owner's Guide (English)
Page 23
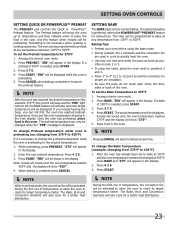
... oven. The Bake, Broil and Convection elements will also cycle for proper air circulation. • Be sure the pans do not touch each other, the door, sides or back of temperature, the convection fan will appear in the display. 2. Press CANCEL when baking is preheating to place the food in the...
... oven. The Bake, Broil and Convection elements will also cycle for proper air circulation. • Be sure the pans do not touch each other, the door, sides or back of temperature, the convection fan will appear in the display. 2. Press CANCEL when baking is preheating to place the food in the...
Complete Owner's Guide (English)
Page 26
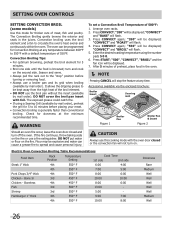
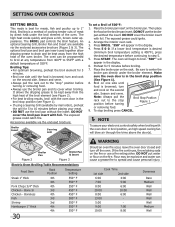
... the enclosed brochure: Broiler Insert Searing Grill Figure 1 Broiler Pan Broiler Pan & Insert Figure 2 Should an oven fire occur, leave the oven door closed or the convection fan will not turn on the second side. Flour may be displayed; Setting OVEN controls Setting Convection BROIL (some models) ...Use this cooking mode with the oven door closed and turn off the oven. The oven can cause a grease fire to 550°F with foil. WARNING To set a Convection Broil...
... the enclosed brochure: Broiler Insert Searing Grill Figure 1 Broiler Pan Broiler Pan & Insert Figure 2 Should an oven fire occur, leave the oven door closed or the convection fan will not turn on the second side. Flour may be displayed; Setting OVEN controls Setting Convection BROIL (some models) ...Use this cooking mode with the oven door closed and turn off the oven. The oven can cause a grease fire to 550°F with foil. WARNING To set a Convection Broil...
Complete Owner's Guide (English)
Page 30
... and serve. • Always pull the rack out to the "stop position (see Figure 2). • For best broiling results, broil with the oven door in the broil stop " position before broiling. 7. To stop position before turning Broil Stop Position Figure 1 or removing food. 9. Cook Time 1st side 2nd...6:00 13:00 - 5:00 - 9:00 7:00 10:00 8:00 Doneness Rare Medium Well Well Well Well Well Medium Well Boneless Fish Shrimp Hamburger 1" thick 30 Rack Position 4th 4th 4th 3rd 4th 3rd 3rd 4th 4th Temperature Setting 550° F 550° F 550° F 450° F 450° ...
... and serve. • Always pull the rack out to the "stop position (see Figure 2). • For best broiling results, broil with the oven door in the broil stop " position before broiling. 7. To stop position before turning Broil Stop Position Figure 1 or removing food. 9. Cook Time 1st side 2nd...6:00 13:00 - 5:00 - 9:00 7:00 10:00 8:00 Doneness Rare Medium Well Well Well Well Well Medium Well Boneless Fish Shrimp Hamburger 1" thick 30 Rack Position 4th 4th 4th 3rd 4th 3rd 3rd 4th 4th Temperature Setting 550° F 550° F 550° F 450° F 450° ...
Complete Owner's Guide (English)
Page 32
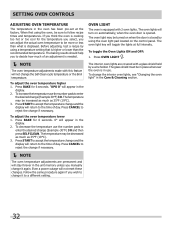
...to be increased as much as 35°F (19°C). 3. To decrease the temperature use the number pads to enter the desired change (Example -30°F) 3 0 and then press SELF CLEAN. Press OVEN LIGHT . To increase the temperature use the number pads to enter the desired change if... interior oven lights are permanent and will turn on the control panel. When first using the oven light pad located on automatically, when the oven door is needed. NOTE The oven temperature adjustments made with 2 oven lights. Before adjusting, test a recipe by a wire holder. The ...
...to be increased as much as 35°F (19°C). 3. To decrease the temperature use the number pads to enter the desired change (Example -30°F) 3 0 and then press SELF CLEAN. Press OVEN LIGHT . To increase the temperature use the number pads to enter the desired change if... interior oven lights are permanent and will turn on the control panel. When first using the oven light pad located on automatically, when the oven door is needed. NOTE The oven temperature adjustments made with 2 oven lights. Before adjusting, test a recipe by a wire holder. The ...


