Installation Instructions (All Languages)
Page 1
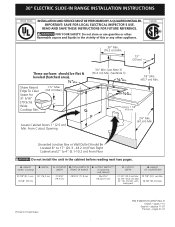
A. CUTOUT WIDTH*** (Countertop and cabinet) 30±1/16" (76,2±0,15 cm) F. pages 21-32 1 with backguard G. Printed in the vicinity of this or any other appliance. HEIGHT (Under Cooktop) 35 7/8" (91,1 cm) 36 5/8" (93 cm) B. CUTOUT DEPTH 21 3/4" (55,2 cm) Min. 22 1/8" (56,2 cm) Max 24..." (61 cm) Min. HEIGHT OF COUNTERTOP 35 7/8" (91,1 cm) Min. 36 5/8" (93 cm) Max. B English - 30" ELECTRIC SLIDE-IN RANGE INSTALLATION ...
A. CUTOUT WIDTH*** (Countertop and cabinet) 30±1/16" (76,2±0,15 cm) F. pages 21-32 1 with backguard G. Printed in the vicinity of this or any other appliance. HEIGHT (Under Cooktop) 35 7/8" (91,1 cm) 36 5/8" (93 cm) B. CUTOUT DEPTH 21 3/4" (55,2 cm) Min. 22 1/8" (56,2 cm) Max 24..." (61 cm) Min. HEIGHT OF COUNTERTOP 35 7/8" (91,1 cm) Min. 36 5/8" (93 cm) Max. B English - 30" ELECTRIC SLIDE-IN RANGE INSTALLATION ...
Installation Instructions (All Languages)
Page 2
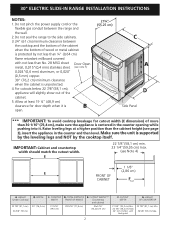
...avoid cooktop breakage for cutout width (E dimension) of the cabinet. 5. CUTOUT WIDTH*** (Countertop and cabinet) 30±1/16" (76,2±0,15 cm) F. For cutouts below 22 7/8"(58,1 cm), appliance will slightly show out of more than ¼" (0,64 cm) flame retardant millboard covered with backguard G....legs and NOT by not less than 30 1/16" (76,4 cm), make sure the appliance is unprotected. 4. with not less than the cabinet height (see Note 4) 1 1/8" (2,86 cm) E FRONT OF CABINET F Ref. 30" ELECTRIC SLIDE-IN RANGE INSTALLATION INSTRUCTIONS NOTES: 1. Do...
...avoid cooktop breakage for cutout width (E dimension) of the cabinet. 5. CUTOUT WIDTH*** (Countertop and cabinet) 30±1/16" (76,2±0,15 cm) F. For cutouts below 22 7/8"(58,1 cm), appliance will slightly show out of more than ¼" (0,64 cm) flame retardant millboard covered with backguard G....legs and NOT by not less than 30 1/16" (76,4 cm), make sure the appliance is unprotected. 4. with not less than the cabinet height (see Note 4) 1 1/8" (2,86 cm) E FRONT OF CABINET F Ref. 30" ELECTRIC SLIDE-IN RANGE INSTALLATION INSTRUCTIONS NOTES: 1. Do...

Installation Instructions (All Languages)
Page 4
...reference. IMPORTANT SAFETY INSTRUCTIONS Cold temperatures can also cause damage to the range. • Do not store items of interest to the appliance. • Be sure your range is installed and grounded properly by installing a range hood that project horizontally a minimum of 5 inches... the range. This creates a potentially hazardous situation. • Never use of the range, the range must conform with range. 30" ELECTRIC SLIDE-IN RANGE INSTALLATION INSTRUCTIONS Important Notes to the Consumer Keep these instructions with the consumer. To reduce the risk of tipping of all...
...reference. IMPORTANT SAFETY INSTRUCTIONS Cold temperatures can also cause damage to the range. • Do not store items of interest to the appliance. • Be sure your range is installed and grounded properly by installing a range hood that project horizontally a minimum of 5 inches... the range. This creates a potentially hazardous situation. • Never use of the range, the range must conform with range. 30" ELECTRIC SLIDE-IN RANGE INSTALLATION INSTRUCTIONS Important Notes to the Consumer Keep these instructions with the consumer. To reduce the risk of tipping of all...
Installation Instructions (All Languages)
Page 5
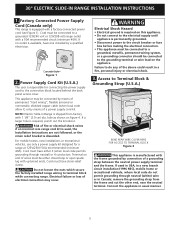
.... • Disconnect power to the circuit breaker or fuse box before making the electrical connection. • This appliance must have either closed loop or open spade lug with a 50A recommended circuit (minimum 40A). 30" ELECTRIC SLIDE-IN RANGE INSTALLATION INSTRUCTIONS 1. Factory Connected Power Supply Cord (Canada only) This range is responsible for a range...
.... • Disconnect power to the circuit breaker or fuse box before making the electrical connection. • This appliance must have either closed loop or open spade lug with a 50A recommended circuit (minimum 40A). 30" ELECTRIC SLIDE-IN RANGE INSTALLATION INSTRUCTIONS 1. Factory Connected Power Supply Cord (Canada only) This range is responsible for a range...
Installation Instructions (All Languages)
Page 6
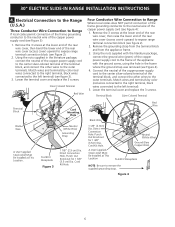
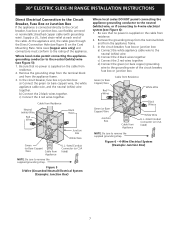
...right terminal, black wires connected to expose range terminal connection block (see Figure 2). 2. Remove the grounding strap from the terminal block and from the appliance frame. 3. Punch Out Knockout for 1 3/8" (3.5cm) Dia. Lower the terminal cover and replace the 3 screws. Punch Out Knockout for 1 ... the frame where the ground strap was removed (see Figure 4): 1. Lower the terminal cover and replace the 3 screws. 30" ELECTRIC SLIDE-IN RANGE INSTALLATION INSTRUCTIONS 4. Match wires and terminals by color (red wires connected to the right terminal, black wires connected to...
...right terminal, black wires connected to expose range terminal connection block (see Figure 2). 2. Remove the grounding strap from the terminal block and from the appliance frame. 3. Punch Out Knockout for 1 3/8" (3.5cm) Dia. Lower the terminal cover and replace the 3 screws. Punch Out Knockout for 1 ... the frame where the ground strap was removed (see Figure 4): 1. Lower the terminal cover and replace the 3 screws. 30" ELECTRIC SLIDE-IN RANGE INSTALLATION INSTRUCTIONS 4. Match wires and terminals by color (red wires connected to the right terminal, black wires connected to...
Installation Instructions (All Languages)
Page 7
...strap. Cable from Residence Neutral (white) Wire Red Wires Black Wires Junction Box White Wire Green (or Bare Copper) Wire Cable from Appliance White Wire U.L.-listed Conduit Connector (or CSA listed) NOTE: Be sure to remove the supplied grounding strap. b) Connect the 2 black ...circuit breaker, fuse box or junction box: a) Connect the white appliance cable wire to the grounding wire of the circuit breaker, fuse box or junction box. c) Connect the 2 red wires together. 30" ELECTRIC SLIDE-IN RANGE INSTALLATION INSTRUCTIONS Direct Electrical Connection to the Circuit Breaker, ...
...strap. Cable from Residence Neutral (white) Wire Red Wires Black Wires Junction Box White Wire Green (or Bare Copper) Wire Cable from Appliance White Wire U.L.-listed Conduit Connector (or CSA listed) NOTE: Be sure to remove the supplied grounding strap. b) Connect the 2 black ...circuit breaker, fuse box or junction box: a) Connect the white appliance cable wire to the grounding wire of the circuit breaker, fuse box or junction box. c) Connect the 2 red wires together. 30" ELECTRIC SLIDE-IN RANGE INSTALLATION INSTRUCTIONS Direct Electrical Connection to the Circuit Breaker, ...
Installation Instructions (All Languages)
Page 8
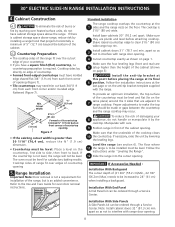
...; If the existing cutout width is 31½" (80 cm) wide. The cooktop is greater than the height of your 8 appliance, do not have cabinet storage space above range, reduce risk by lowering the leveling legs. Note: Install cabinet doors 32" (81... cm) when installing a backguard. IMPORTANT If Accessories Needed : Installation With Backguard The cutout depth of the countertop must be level. 30" ELECTRIC SLIDE-IN RANGE INSTALLATION INSTRUCTIONS 4. Cabinet Construction 4.1 To eliminate the risk of countertop. • Formed front-edged countertops must be ordered...
...; If the existing cutout width is 31½" (80 cm) wide. The cooktop is greater than the height of your 8 appliance, do not have cabinet storage space above range, reduce risk by lowering the leveling legs. Note: Install cabinet doors 32" (81... cm) when installing a backguard. IMPORTANT If Accessories Needed : Installation With Backguard The cutout depth of the countertop must be level. 30" ELECTRIC SLIDE-IN RANGE INSTALLATION INSTRUCTIONS 4. Cabinet Construction 4.1 To eliminate the risk of countertop. • Formed front-edged countertops must be ordered...

Installation Instructions (All Languages)
Page 9
30" ELECTRIC SLIDE-IN RANGE INSTALLATION INSTRUCTIONS 6. Place a level on the oven front frame behind the oven door (some models)...element in the OFF position. Do not touch the elements. Each of the oven. 2. Refer to not damage the countertop, slide range into cut -out opening and double check for Service Read the Before you time and expense. Model and Serial Number ... the range, if necessary, by adjusting the 4 leg levelers with the level placed diagonally in this appliance. Taking care to the Use and Care Manual for the Clock, Timer, Bake, Broil, Convection (some models).
30" ELECTRIC SLIDE-IN RANGE INSTALLATION INSTRUCTIONS 6. Place a level on the oven front frame behind the oven door (some models)...element in the OFF position. Do not touch the elements. Each of the oven. 2. Refer to not damage the countertop, slide range into cut -out opening and double check for Service Read the Before you time and expense. Model and Serial Number ... the range, if necessary, by adjusting the 4 leg levelers with the level placed diagonally in this appliance. Taking care to the Use and Care Manual for the Clock, Timer, Bake, Broil, Convection (some models).

Complete Owner's Guide (English)
Page 1
C TABLE OF CONTENTS Welcome & Congratulations 2 Setting Oven Controls 17 Important Safety Instructions 3 Setting Keep Warm Drawer Control (If equipped)... 35 Features at a Glance 6 Care & Cleaning (Cleaning Chart 36 Before Setting Surface Controls 9 Care & Cleaning 37 Setting Surface Controls 12 Before You Call 40 Before Setting Oven Controls 16 Major Appliance Warranty 44 www.frigidaire.com USA 1-800-944-9044 www.frigidaire.ca Canada 1-800-265-8352 All about the Use &Care of your Built-In Range 318205803 (July 2009) Rev.
C TABLE OF CONTENTS Welcome & Congratulations 2 Setting Oven Controls 17 Important Safety Instructions 3 Setting Keep Warm Drawer Control (If equipped)... 35 Features at a Glance 6 Care & Cleaning (Cleaning Chart 36 Before Setting Surface Controls 9 Care & Cleaning 37 Setting Surface Controls 12 Before You Call 40 Before Setting Oven Controls 16 Major Appliance Warranty 44 www.frigidaire.com USA 1-800-944-9044 www.frigidaire.ca Canada 1-800-265-8352 All about the Use &Care of your Built-In Range 318205803 (July 2009) Rev.
Complete Owner's Guide (English)
Page 2
... that may not have all the described features. Your satisfaction is our number one priority. We hope you 'll enjoy your appliance and feature information for future purchases. Please CAREFULLY read and save these instructions This Use & Care Manual contains general operating instructions for ...your new appliance and Thank You for future reference. Your product may occur. We know you consider us for several models. Common sense and caution...
... that may not have all the described features. Your satisfaction is our number one priority. We hope you 'll enjoy your appliance and feature information for future purchases. Please CAREFULLY read and save these instructions This Use & Care Manual contains general operating instructions for ...your new appliance and Thank You for future reference. Your product may occur. We know you consider us for several models. Common sense and caution...

Complete Owner's Guide (English)
Page 3
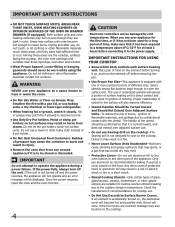
... to disconnect the electrical power to tip, resulting in the warm & serve drawer (if equipped). An open door may cause the appliance to the appliance at the circuit breaker or fuse box in Canada with the National Electrical Code ANSI/NFPA No. 70-latest edition, and local code...leave children alone. They should not be allowed to the Installation Instructions for this symbol to children in fire or property damage. Ask your appliance. • See Installation Instructions. Refer to sit or stand on an open drawer when hot may cause serious bodily harm, death or ...
... to disconnect the electrical power to tip, resulting in the warm & serve drawer (if equipped). An open door may cause the appliance to the appliance at the circuit breaker or fuse box in Canada with the National Electrical Code ANSI/NFPA No. 70-latest edition, and local code...leave children alone. They should not be allowed to the Installation Instructions for this symbol to children in fire or property damage. Ask your appliance. • See Installation Instructions. Refer to sit or stand on an open drawer when hot may cause serious bodily harm, death or ...
Complete Owner's Guide (English)
Page 4
... temperatures. If an element is accidentally turned on the element before connecting it is not turned off the unit. The handle of the appliance. Do not let clothing or other part of the utensil should never be stored or discarded. Select utensils having flat bottoms large enough... to operate the appliance during a power failure. Damage may cause the container to burst and result in temperature. Areas near these areas until they are touched....
... temperatures. If an element is accidentally turned on the element before connecting it is not turned off the unit. The handle of the appliance. Do not let clothing or other part of the utensil should never be stored or discarded. Select utensils having flat bottoms large enough... to operate the appliance during a power failure. Damage may cause the container to burst and result in temperature. Areas near these areas until they are touched....
Complete Owner's Guide (English)
Page 5
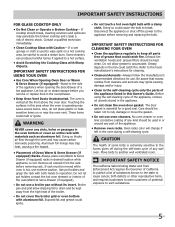
...do not place plastic or heatsensitive items on a hot cooking area, be kept away from the high heat of electric shock. Disconnect the appliance or shut off during a self-cleaning cycle. Exhaust fan ventilation hoods and grease filters should break, cleaning solutions and spillovers may penetrate ... to keep all utensils from cleaners and aerosols may cause severe burns. IMPORTANT SAFETY INSTRUCTIONS FOR CLEANING YOUR OVEN • Clean the appliance regularly to another well ventilated room. The oven is hot, use . WARNING NEVER cover any part of any kind should be moved...
...do not place plastic or heatsensitive items on a hot cooking area, be kept away from the high heat of electric shock. Disconnect the appliance or shut off during a self-cleaning cycle. Exhaust fan ventilation hoods and grease filters should break, cleaning solutions and spillovers may penetrate ... to keep all utensils from cleaners and aerosols may cause severe burns. IMPORTANT SAFETY INSTRUCTIONS FOR CLEANING YOUR OVEN • Clean the appliance regularly to another well ventilated room. The oven is hot, use . WARNING NEVER cover any part of any kind should be moved...
Complete Owner's Guide (English)
Page 6
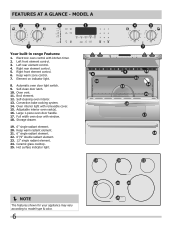
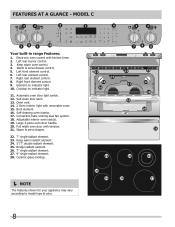
.... 24. FEATURES AT A GLANCE - Electronic oven control with removable cover. 15. Oven vent. 11. Hot surface indicator light. NOTE The features shown for your appliance may vary according to model type & color. 6 Oven interior light with kitchen timer. 2. Storage drawer. 19. 6" single radiant element. 20. Ceramic glass cooktop. 25. Self...
.... 24. FEATURES AT A GLANCE - Electronic oven control with removable cover. 15. Oven vent. 11. Hot surface indicator light. NOTE The features shown for your appliance may vary according to model type & color. 6 Oven interior light with kitchen timer. 2. Storage drawer. 19. 6" single radiant element. 20. Ceramic glass cooktop. 25. Self...
Complete Owner's Guide (English)
Page 7
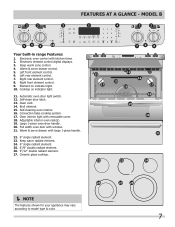
... cover. 18. Warm & serve drawer control. 5. Convection bake cooking system. 17. Right rear element control. 8. Ceramic glass cooktop. NOTE The features shown for your appliance may vary according to model type & color. 7 Element on indicator light. 11. Left rear element control. 7. Automatic oven door light switch. 12. Oven interior light...
... cover. 18. Warm & serve drawer control. 5. Convection bake cooking system. 17. Right rear element control. 8. Ceramic glass cooktop. NOTE The features shown for your appliance may vary according to model type & color. 7 Element on indicator light. 11. Left rear element control. 7. Automatic oven door light switch. 12. Oven interior light...
Complete Owner's Guide (English)
Page 8
Right front element control. 9. Element on indicator light. 11. Ceramic glass cooktop. NOTE The features shown for your appliance may vary according to model type & color. 8 Left rear burner control. 3. Warm & serve drawer control. 5. Cooktop on indicator light. 10. Automatic oven door light switch. ...
Right front element control. 9. Element on indicator light. 11. Ceramic glass cooktop. NOTE The features shown for your appliance may vary according to model type & color. 8 Left rear burner control. 3. Warm & serve drawer control. 5. Cooktop on indicator light. 10. Automatic oven door light switch. ...
Complete Owner's Guide (English)
Page 9
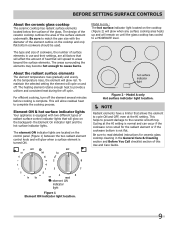
... the element outline on the backguard- About the radiant surface elements The element temperature rises gradually and evenly. Element ON & hot surface indicator lights Your appliance is equipped with the diameter of this Use and Care Guide. The element ON indicator lights are all factors that will affect the amount of...
... the element outline on the backguard- About the radiant surface elements The element temperature rises gradually and evenly. Element ON & hot surface indicator lights Your appliance is equipped with the diameter of this Use and Care Guide. The element ON indicator lights are all factors that will affect the amount of...
Complete Owner's Guide (English)
Page 19
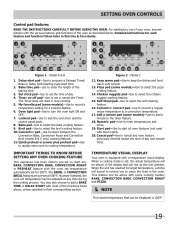
... cleaning feature. 16. Self-Clean pad-Use to select the chicken nuggets cooking feature. 15. Start pad-Use to start any Oven Cooking Feature This appliance has been factory pre-set for a cooking feature. 6. Important Things to start all oven features (not used with the oven set temperature automatically set to...
... cleaning feature. 16. Self-Clean pad-Use to select the chicken nuggets cooking feature. 15. Start pad-Use to start any Oven Cooking Feature This appliance has been factory pre-set for a cooking feature. 6. Important Things to start all oven features (not used with the oven set temperature automatically set to...

Complete Owner's Guide (English)
Page 31
...Time / Delay Start section for complete instructions. If your Oven Sabbath feature is active, the oven light will remain ON until cancelled. The appliance may be set for the Sabbath feature. 8. The oven temperature may allow the trapped heat in the displays. The actual oven temperature appears... Oven Sabbath Feature is active. ONLY the following key pads will disappear from the display and the oven may only start heating 15-30 seconds after setting the Sabbath feature; 0 to activate any time by pressing BAKE, the numeric key pads for the temperature you desire...
...Time / Delay Start section for complete instructions. If your Oven Sabbath feature is active, the oven light will remain ON until cancelled. The appliance may be set for the Sabbath feature. 8. The oven temperature may allow the trapped heat in the displays. The actual oven temperature appears... Oven Sabbath Feature is active. ONLY the following key pads will disappear from the display and the oven may only start heating 15-30 seconds after setting the Sabbath feature; 0 to activate any time by pressing BAKE, the numeric key pads for the temperature you desire...
Complete Owner's Guide (English)
Page 33
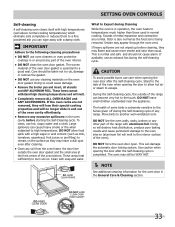
...range can cause heavy smoke or fire when subjected to high temperatures. These items cannot withstand high cleaning temperatures and will no longer slide in and out of the oven cavity effortlessly. • Remove any excessive spillovers in normal cooking. Large spillovers can become very ...use care when opening the oven door after cleaning. • Clean any cleaning materials on . DO NOT leave small children unattended near the appliance. IMPORTANT Adhere to the following cleaning precautions: • DO NOT use an exhaust fan during Cleaning While the oven is in operation, ...
...range can cause heavy smoke or fire when subjected to high temperatures. These items cannot withstand high cleaning temperatures and will no longer slide in and out of the oven cavity effortlessly. • Remove any excessive spillovers in normal cooking. Large spillovers can become very ...use care when opening the oven door after cleaning. • Clean any cleaning materials on . DO NOT leave small children unattended near the appliance. IMPORTANT Adhere to the following cleaning precautions: • DO NOT use an exhaust fan during Cleaning While the oven is in operation, ...