
Complete Owner's Guide (English)
Page 2
... CARD should be practiced when installing, operating and maintaining any appliance. NOTE Please attach sales receipt here for several models. please CAREFULLY read and save these instructions This Use & Care Manual contains general operating instructions for your appliance and feature information...not have all the described features. Box 212378 Augusta, GA 30917 © 2009 Electrolux Canada Corp. Serial Plate Location Cooktop Serial Plate Location Please record your new appliance and Thank You for future reference. Your satisfaction is our number one priority....
... CARD should be practiced when installing, operating and maintaining any appliance. NOTE Please attach sales receipt here for several models. please CAREFULLY read and save these instructions This Use & Care Manual contains general operating instructions for your appliance and feature information...not have all the described features. Box 212378 Augusta, GA 30917 © 2009 Electrolux Canada Corp. Serial Plate Location Cooktop Serial Plate Location Please record your new appliance and Thank You for future reference. Your satisfaction is our number one priority....
Complete Owner's Guide (English)
Page 3
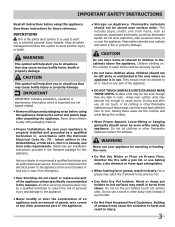
..., or CSA C22.1, Part 1 in the literature package for this symbol to cause burns. Know how to disconnect the electrical power to children in case of a pot holder. • Do Not Heat Unopened Food Containers. Do not store explosives...flammable liquids. Buildup of the appliance. • Storage on the cooktop to recommend a qualified technician and an authorized repair service. Important Safety Instructions Read all instructions before using the appliance. Install only per installation instructions provided in Canada, and local code requirements. Areas near surface units....
..., or CSA C22.1, Part 1 in the literature package for this symbol to cause burns. Know how to disconnect the electrical power to children in case of a pot holder. • Do Not Heat Unopened Food Containers. Do not store explosives...flammable liquids. Buildup of the appliance. • Storage on the cooktop to recommend a qualified technician and an authorized repair service. Important Safety Instructions Read all instructions before using the appliance. Install only per installation instructions provided in Canada, and local code requirements. Areas near surface units....

Complete Owner's Guide (English)
Page 12
...for service calls to remote areas, including the state of Alaska. 12 Damages to the finish of appliance or home incurred during installation, including but not less than authorized service companies; USA 1.800.944.9044 Electrolux Major Appliances North America P.O. Some states and.... 5855 Terry Fox Way Mississauga, Ontario, Canada L5V 3E4 12 This warranty only applies in accordance with the provided instructions. 8 Service calls to correct the installation of God. Claims based on the interior or exterior of the unit. 4 Products purchased "as provided herein. Electrolux...
...for service calls to remote areas, including the state of Alaska. 12 Damages to the finish of appliance or home incurred during installation, including but not less than authorized service companies; USA 1.800.944.9044 Electrolux Major Appliances North America P.O. Some states and.... 5855 Terry Fox Way Mississauga, Ontario, Canada L5V 3E4 12 This warranty only applies in accordance with the provided instructions. 8 Service calls to correct the installation of God. Claims based on the interior or exterior of the unit. 4 Products purchased "as provided herein. Electrolux...

Installation Instructions (All Languages)
Page 1
...36 (91.4) 21½ (54.6) C. WIDTH MIN. DEPTH BELOW COOKTOP* 5½ (14) 5 (12.7) 5 (12.7) 5¾ (14.6) 5¾ (14.6) 5 (12.7) 34¼ (87) 343/8 (87.3) 165/8 (42.2) 16¾ (42.5) 57/8 (14.9) 3 (7.6) 32¾ (83.2) 34¼ (87) 19 (48.3) 20 (50.8) 5 (12.7) All dimensions are available in the vicinity of the cooktop. B English - ELECTRIC COOKTOP INSTALLATION INSTRUCTIONS... Canada INSTALLATION AND SERVICE MUST BE PERFORMED BY A QUALIFIED INSTALLER. READ AND SAVE THESE INSTRUCTIONS FOR FUTURE ...
...36 (91.4) 21½ (54.6) C. WIDTH MIN. DEPTH BELOW COOKTOP* 5½ (14) 5 (12.7) 5 (12.7) 5¾ (14.6) 5¾ (14.6) 5 (12.7) 34¼ (87) 343/8 (87.3) 165/8 (42.2) 16¾ (42.5) 57/8 (14.9) 3 (7.6) 32¾ (83.2) 34¼ (87) 19 (48.3) 20 (50.8) 5 (12.7) All dimensions are available in the vicinity of the cooktop. B English - ELECTRIC COOKTOP INSTALLATION INSTRUCTIONS... Canada INSTALLATION AND SERVICE MUST BE PERFORMED BY A QUALIFIED INSTALLER. READ AND SAVE THESE INSTRUCTIONS FOR FUTURE ...

Installation Instructions (All Languages)
Page 2
...Glass 30" Coil Elements 32" Ceramic-Glass 32" Coil Elements 36" Ceramic-Glass 36" Coil Elements (36" X 18") G 3½" (8.9 cm) 4" (10.2 cm) 6" (15.2 cm) 4" (10.2 cm) 6" (15.2 cm) 4" (10.2 cm) 6" (15.2 cm) 36" Coil Elements 6" (15.2 cm) (36" X 21½") H 3" (7.6 cm) 7½" ... all packing material before installing the cooktop. 2. Observe all instructions contained in these instructions with the electrical installation of Cutout to the Consumer Keep these installation instructions before connecting the electrical supply to leave these instructions with the consumer. when...
...Glass 30" Coil Elements 32" Ceramic-Glass 32" Coil Elements 36" Ceramic-Glass 36" Coil Elements (36" X 18") G 3½" (8.9 cm) 4" (10.2 cm) 6" (15.2 cm) 4" (10.2 cm) 6" (15.2 cm) 4" (10.2 cm) 6" (15.2 cm) 36" Coil Elements 6" (15.2 cm) (36" X 21½") H 3" (7.6 cm) 7½" ... all packing material before installing the cooktop. 2. Observe all instructions contained in these instructions with the electrical installation of Cutout to the Consumer Keep these installation instructions before connecting the electrical supply to leave these instructions with the consumer. when...

Installation Instructions (All Languages)
Page 3
... required on the steel and/or aluminum flexible conduit, do so could result in serious injury or death. 2. ELECTRIC COOKTOP INSTALLATION INSTRUCTIONS IMPORTANT SAFETY INSTRUCTIONS • Be sure your cooktop is installed and grounded properly by a qualified installer or service technician. • These cooktops must be electrically grounded in accordance with local codes or, in their absence, with the National...
... required on the steel and/or aluminum flexible conduit, do so could result in serious injury or death. 2. ELECTRIC COOKTOP INSTALLATION INSTRUCTIONS IMPORTANT SAFETY INSTRUCTIONS • Be sure your cooktop is installed and grounded properly by a qualified installer or service technician. • These cooktops must be electrically grounded in accordance with local codes or, in their absence, with the National...
Installation Instructions (All Languages)
Page 4
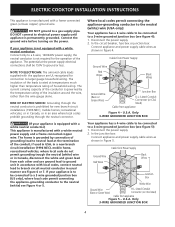
...wire, 120/240V power supply; the neutral conductor is not required for new branch-circuit installations (1996 NEC); The insulation of the leads is rated at the power supply electrical connections shall be connected to a 3 wire grounded junction box (US only), where local ... appliance Figure 5 - DO NOT ground to larger gauge household wiring. Connect the ground wire before turning on the power. U.S.A. ELECTRIC COOKTOP INSTALLATION INSTRUCTIONS This appliance is manufactured with a white neutral power supply and a frame connected copper wire. NOTE TO ELECTRICIAN: The armored cable ...
...wire, 120/240V power supply; the neutral conductor is not required for new branch-circuit installations (1996 NEC); The insulation of the leads is rated at the power supply electrical connections shall be connected to a 3 wire grounded junction box (US only), where local ... appliance Figure 5 - DO NOT ground to larger gauge household wiring. Connect the ground wire before turning on the power. U.S.A. ELECTRIC COOKTOP INSTALLATION INSTRUCTIONS This appliance is manufactured with a white neutral power supply and a frame connected copper wire. NOTE TO ELECTRICIAN: The armored cable ...
Installation Instructions (All Languages)
Page 5
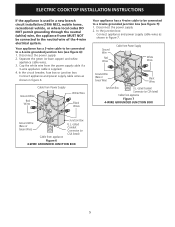
...7): 1. Disconnect the power supply. 2. In the junction box: Connect appliance and power supply cable wires as shown in a new branch circuit installation (1996 NEC), mobile home, recreational vehicle, or where local codes do not permit grounding through the neutral (white) wire, the appliance frame...Green Wire) Cable from appliance Junction Box U.L.-Listed Conduit Connector (or CSA listed) Figure 6 4-WIRE GROUNDED JUNCTION BOX 5 ELECTRIC COOKTOP INSTALLATION INSTRUCTIONS If the appliance is supplied. 4. Your appliance has a 3-wire cable to be connected to the neutral wire of the 4-wire...
...7): 1. Disconnect the power supply. 2. In the junction box: Connect appliance and power supply cable wires as shown in a new branch circuit installation (1996 NEC), mobile home, recreational vehicle, or where local codes do not permit grounding through the neutral (white) wire, the appliance frame...Green Wire) Cable from appliance Junction Box U.L.-Listed Conduit Connector (or CSA listed) Figure 6 4-WIRE GROUNDED JUNCTION BOX 5 ELECTRIC COOKTOP INSTALLATION INSTRUCTIONS If the appliance is supplied. 4. Your appliance has a 3-wire cable to be connected to the neutral wire of the 4-wire...

Installation Instructions (All Languages)
Page 6
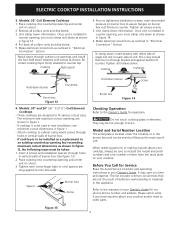
... Figure 10). Lower the cooktop. ELECTRIC COOKTOP INSTALLATION INSTRUCTIONS Cooktop Installation 1. The retainer brackets MUST be centered to meet local codes or, in heat damage or fire (see Figure 8). Screws Figure 8 Set the cooktop into the countertop cutout. Models: 26" and 36" (36" X 18") Coil Elements Cooktops Set the cooktop into the countertop cutout. Cooktop Countertop Retainer Brackets Must Be Installed At Least 1/16...
... Figure 10). Lower the cooktop. ELECTRIC COOKTOP INSTALLATION INSTRUCTIONS Cooktop Installation 1. The retainer brackets MUST be centered to meet local codes or, in heat damage or fire (see Figure 8). Screws Figure 8 Set the cooktop into the countertop cutout. Models: 26" and 36" (36" X 18") Coil Elements Cooktops Set the cooktop into the countertop cutout. Cooktop Countertop Retainer Brackets Must Be Installed At Least 1/16...
Installation Instructions (All Languages)
Page 7
...electrical connections as outlined in "Electrical Connection" Section. Models: 30" and 36" (36" X 21½") Coil Elements Cooktops - Insert 4 screws and installation spacers through bracket and against burner box walls. Tighten each side of unit. When ordering parts for operation. Figure 13 7 Place cooktop... you time and expense. It may be used in new installation, use minimum cutout dimensions in vertical walls of unit. ELECTRIC COOKTOP INSTALLATION INSTRUCTIONS 3. Models: 32" Coil Elements Cooktops 1. Remove all surface units and drip bowls. 5. Reach ...
...electrical connections as outlined in "Electrical Connection" Section. Models: 30" and 36" (36" X 21½") Coil Elements Cooktops - Insert 4 screws and installation spacers through bracket and against burner box walls. Tighten each side of unit. When ordering parts for operation. Figure 13 7 Place cooktop... you time and expense. It may be used in new installation, use minimum cutout dimensions in vertical walls of unit. ELECTRIC COOKTOP INSTALLATION INSTRUCTIONS 3. Models: 32" Coil Elements Cooktops 1. Remove all surface units and drip bowls. 5. Reach ...

Installation Instructions (All Languages)
Page 8
...panel, to route armoured cable to isolate the unit from cooktop to the cabinet(s) by 1" (2.5cm) 4½" (11.5cm) Max.* Use 3/4" (1.9cm) plywood, installed on two runners, flush with toe plate. See Note 1 36" Min. (91.4cm) Min. 208/240 Volt junction ...) edges by mounting brackets. H. ELECTRIC COOKTOP INSTALLATION INSTRUCTIONS For typical under counter installation of an electric built-in oven see the insert sheet included in the literature package and cooktop installation instructions for installation of ap- Only certain cooktop models may be installed over the oven unit, 5" (12...
...panel, to route armoured cable to isolate the unit from cooktop to the cabinet(s) by 1" (2.5cm) 4½" (11.5cm) Max.* Use 3/4" (1.9cm) plywood, installed on two runners, flush with toe plate. See Note 1 36" Min. (91.4cm) Min. 208/240 Volt junction ...) edges by mounting brackets. H. ELECTRIC COOKTOP INSTALLATION INSTRUCTIONS For typical under counter installation of an electric built-in oven see the insert sheet included in the literature package and cooktop installation instructions for installation of ap- Only certain cooktop models may be installed over the oven unit, 5" (12...
Product Specifications Sheet (English)
Page 2
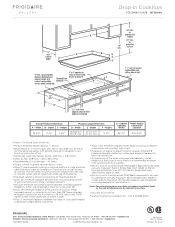
... a recommended minimum of 5" beyond bottom of cooktop to change. Specifications subject to nearest combustible wall on wall at frigidaire.com for detailed instructions. Rear Right Drop-In Cooktop Specifications • Product Shipping Weight (approx.) - 65 Lbs. • Single phase 3- Width B - Height 35-5/8" min. 20-1/4" min. 36-1/8" max. 20-1/2" max. 5" min. Drop-In Cooktops FGEC3665K S / W/B 36" Electric Overall Product Dimensions A -
... a recommended minimum of 5" beyond bottom of cooktop to change. Specifications subject to nearest combustible wall on wall at frigidaire.com for detailed instructions. Rear Right Drop-In Cooktop Specifications • Product Shipping Weight (approx.) - 65 Lbs. • Single phase 3- Width B - Height 35-5/8" min. 20-1/4" min. 36-1/8" max. 20-1/2" max. 5" min. Drop-In Cooktops FGEC3665K S / W/B 36" Electric Overall Product Dimensions A -
Product Specifications Sheet (English)
Page 3
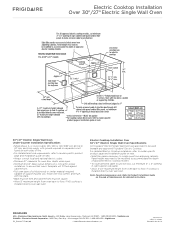
... sides of line. • For detailed electrical requirements, refer to model-specific product page and installation guide on the web at frigidaire.com for detailed instructions. FRIGIDAIRE USA • Electrolux Major Appliances, North...Electric Cooktop Installation Over 30"/27" Electric Single Wall Oven 30"/ 27" Electric Single Wall Oven Under-Counter Installation Specifications • Single phase 3- Refer to floor, if NO cooktop is installed directly over wall oven. Electric Cooktop Installation Over 30"/ 27" Electric Single Wall Oven Specifications All Frigidaire® Electric...
... sides of line. • For detailed electrical requirements, refer to model-specific product page and installation guide on the web at frigidaire.com for detailed instructions. FRIGIDAIRE USA • Electrolux Major Appliances, North...Electric Cooktop Installation Over 30"/27" Electric Single Wall Oven 30"/ 27" Electric Single Wall Oven Under-Counter Installation Specifications • Single phase 3- Refer to floor, if NO cooktop is installed directly over wall oven. Electric Cooktop Installation Over 30"/ 27" Electric Single Wall Oven Specifications All Frigidaire® Electric...


