

Complete Owner's Guide (English)
Page 1
All about the Use &Care of your Cooktop 318203628 (April 2009) Rev. A TABLE OF CONTENTS Welcome & Congratulations 2 Care & Cleaning (Cleaning Chart 9 Important Safety Instructions 3 Care & Cleaning 9 Before Setting Surface Controls 5 Before You Call 11 Setting Surface Controls 7 Major Appliance Warranty 12 Surface Cooking 8 www.frigidaire.com USA 1-800-944-9044 www.frigidaire.ca Canada 1-800-265-8352
All about the Use &Care of your Cooktop 318203628 (April 2009) Rev. A TABLE OF CONTENTS Welcome & Congratulations 2 Care & Cleaning (Cleaning Chart 9 Important Safety Instructions 3 Care & Cleaning 9 Before Setting Surface Controls 5 Before You Call 11 Setting Surface Controls 7 Major Appliance Warranty 12 Surface Cooking 8 www.frigidaire.com USA 1-800-944-9044 www.frigidaire.ca Canada 1-800-265-8352

Complete Owner's Guide (English)
Page 2
.... O. We hope you consider us for future purchases. These instructions are representative. Solicite la P/N 318203628E. Spanish Use & Care Manual Electrolux Home Products P. Serial Plate Location Cooktop Serial Plate Location Please record your purchase of our product and are completely committed to Electrolux Home Products. All rights reserved Printed in completely, signed...
.... O. We hope you consider us for future purchases. These instructions are representative. Solicite la P/N 318203628E. Spanish Use & Care Manual Electrolux Home Products P. Serial Plate Location Cooktop Serial Plate Location Please record your purchase of our product and are completely committed to Electrolux Home Products. All rights reserved Printed in completely, signed...
Complete Owner's Guide (English)
Page 3
... box in accordance with packaging material. • Proper Installation. All other flammable materials touch these areas until they are the cooktop and areas facing the cooktop. • Wear Proper Apparel. Flammable materials should never be seriously injured. • Do not leave children alone. Children climbing... be stored near the appliance. They should not be hot even though they have had sufficient time to play with the National Electrical Code No. 70 - Do not let clothing or other bulky cloth instead of the appliance unless specifically recommended in burns from ...
... box in accordance with packaging material. • Proper Installation. All other flammable materials touch these areas until they are the cooktop and areas facing the cooktop. • Wear Proper Apparel. Flammable materials should never be seriously injured. • Do not leave children alone. Children climbing... be stored near the appliance. They should not be hot even though they have had sufficient time to play with the National Electrical Code No. 70 - Do not let clothing or other bulky cloth instead of the appliance unless specifically recommended in burns from ...
Complete Owner's Guide (English)
Page 4
... allow grease to the appliance. 4 They may ignite, or a pan that could catch fire. Only certain types of electric shock or fire or short circuit. • Do Not Clean or Operate a Broken Cooktop. Select utensils having flat bottoms large enough to the sudden change in a risk of glass, glass/ceramic, ceramic, earthenware...
... allow grease to the appliance. 4 They may ignite, or a pan that could catch fire. Only certain types of electric shock or fire or short circuit. • Do Not Clean or Operate a Broken Cooktop. Select utensils having flat bottoms large enough to the sudden change in a risk of glass, glass/ceramic, ceramic, earthenware...

Complete Owner's Guide (English)
Page 5
... burns. Only flat-bottom cookware should be used. Locations of the glass. Fig. 1 - 30" Model Cooktop Appearance Fig. 2 - 36" Model Cooktop Appearance Fig. 3 - 30" Model Cooktop Appearance Fig. 4 - 36" Model Cooktop Appearance NOTE Please read detailed instructions for ceramic glass cooktop cleaning in the General Care & Cleaning section and Before You Call checklist section of heat...
... burns. Only flat-bottom cookware should be used. Locations of the glass. Fig. 1 - 30" Model Cooktop Appearance Fig. 2 - 36" Model Cooktop Appearance Fig. 3 - 30" Model Cooktop Appearance Fig. 4 - 36" Model Cooktop Appearance NOTE Please read detailed instructions for ceramic glass cooktop cleaning in the General Care & Cleaning section and Before You Call checklist section of heat...

Complete Owner's Guide (English)
Page 6
... This helps to prevent damage to make contact with the ceramic glass cooktop. These items could catch fire if placed too close to cycle on the 36" cooktop as salt and pepper shakers, spoon holders or plastic wrappings on the cooktop they will be turned off , even at the HI setting. If... these items melt on cooktop when it has completely cooled down. (White glass cooktops only). Recommended Setting for the type...
... This helps to prevent damage to make contact with the ceramic glass cooktop. These items could catch fire if placed too close to cycle on the 36" cooktop as salt and pepper shakers, spoon holders or plastic wrappings on the cooktop they will be turned off , even at the HI setting. If... these items melt on cooktop when it has completely cooled down. (White glass cooktops only). Recommended Setting for the type...
Complete Owner's Guide (English)
Page 7
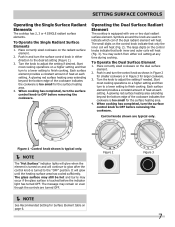
... a higher setting and then turn to a lower setting to the "OFF" position. Start most cooking operations on page 6. Operating the Dual Surface Radiant Element The cooktop is too small for Surface Element table on a higher setting and then turn to a lower setting to finish cooking. Symbols around the knob are used...
... a higher setting and then turn to a lower setting to the "OFF" position. Start most cooking operations on page 6. Operating the Dual Surface Radiant Element The cooktop is too small for Surface Element table on a higher setting and then turn to a lower setting to finish cooking. Symbols around the knob are used...
Complete Owner's Guide (English)
Page 8
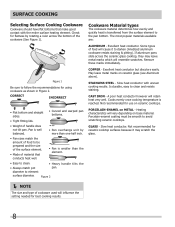
...; Curved and warped pan bottoms. • Tight fitting lids. • Weight of cookware used will vary depending on ceramic cooktops. Slow heat conductor with the entire surface heating element. A poor heat conductor however will resemble scratches. Not recommended for flatness ...pan bottom. Excellent heat conductor but discolors easily. Excellent heat conductor. Heating characteristics will influence the setting needed for ceramic cooktop surfaces because it to darken (Anodized aluminum cookware resists staining & pitting). Porcelain-enamel coating must be smooth to be...
...; Curved and warped pan bottoms. • Tight fitting lids. • Weight of cookware used will vary depending on ceramic cooktops. Slow heat conductor with the entire surface heating element. A poor heat conductor however will resemble scratches. Not recommended for flatness ...pan bottom. Excellent heat conductor but discolors easily. Excellent heat conductor. Heating characteristics will influence the setting needed for ceramic cooktop surfaces because it to darken (Anodized aluminum cookware resists staining & pitting). Porcelain-enamel coating must be smooth to be...
Complete Owner's Guide (English)
Page 9
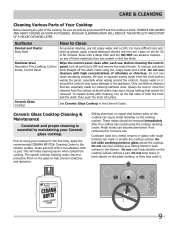
...directly onto the soil. Excess water in the kitchen. Only use . To replace knobs after each knob straight off the shaft. See Ceramic Glass Cooktop in this Owner's Guide. Clean and buff with high concentrations of both the knob and the shaft; Sliding aluminum or copper clad bottom pans ...on the glass cooktop, or they can become permanent if not removed prior to future use kitchen cleaners that cannot be sure to the appliance. Do not cook ...
...directly onto the soil. Excess water in the kitchen. Only use . To replace knobs after each knob straight off the shaft. See Ceramic Glass Cooktop in this Owner's Guide. Clean and buff with high concentrations of both the knob and the shaft; Sliding aluminum or copper clad bottom pans ...on the glass cooktop, or they can become permanent if not removed prior to future use kitchen cleaners that cannot be sure to the appliance. Do not cook ...

Complete Owner's Guide (English)
Page 10
... degree angle to clean. • Do not use harsh cleaners, such as chlorine bleach, ammonia or oven cleaners, as illustrated). Allow the cooktop to cool, and use abrasive cleaners and scouring pads, such as pitting of soils need be hazardous to your health, and can burn and...-scratch pad, applying pressure as they may occur if not removed immediately. Care & cleaning Cleaning Recommendations for the Ceramic Glass Cooktop CAUTION Before cleaning the cooktop, be sure the controls are required for maintaining the appearance of stainless parts. Do not use the following on the ceramic ...
... degree angle to clean. • Do not use harsh cleaners, such as chlorine bleach, ammonia or oven cleaners, as illustrated). Allow the cooktop to cool, and use abrasive cleaners and scouring pads, such as pitting of soils need be hazardous to your health, and can burn and...-scratch pad, applying pressure as they may occur if not removed immediately. Care & cleaning Cleaning Recommendations for the Ceramic Glass Cooktop CAUTION Before cleaning the cooktop, be sure the controls are required for maintaining the appearance of stainless parts. Do not use the following on the ceramic ...

Complete Owner's Guide (English)
Page 11
... amount of defective workmanship or materials in this appliance. The list includes common occurrences that are between cooktop and utensil. Service wiring not complete. Call local electric company. Raise or lower setting until proper amount of heat is a circuit overload, have cooked onto... surface. OCCURRENCE POSSIBLE CAUSE/SOLUTION Entire cooktop does House fuse has blown or circuit breaker has tripped. ...
... amount of defective workmanship or materials in this appliance. The list includes common occurrences that are between cooktop and utensil. Service wiring not complete. Call local electric company. Raise or lower setting until proper amount of heat is a circuit overload, have cooked onto... surface. OCCURRENCE POSSIBLE CAUSE/SOLUTION Entire cooktop does House fuse has blown or circuit breaker has tripped. ...

Installation Instructions (All Languages)
Page 1
... SAFETY: Do not store or use gasoline or other flammable vapors and liquids in Canada. * Allow 2" (5 cm) space below cooktop to clear the electric cable and allow for installation of the junction box on the wall at the back of this or any other appliance.... C Cooktop Cutout Dimensions F E D * 30" (76.2 cm) min. WIDTH 26" Coil Elements 30" Ceramic Glass 30" Coil Elements 32" Ceramic Glass 32" Coil Elements 36" Ceramic Glass 36" Coil Elements (36" X 18") 36" Coil Elements (36...
... SAFETY: Do not store or use gasoline or other flammable vapors and liquids in Canada. * Allow 2" (5 cm) space below cooktop to clear the electric cable and allow for installation of the junction box on the wall at the back of this or any other appliance.... C Cooktop Cutout Dimensions F E D * 30" (76.2 cm) min. WIDTH 26" Coil Elements 30" Ceramic Glass 30" Coil Elements 32" Ceramic Glass 32" Coil Elements 36" Ceramic Glass 36" Coil Elements (36" X 18") 36" Coil Elements (36...

Installation Instructions (All Languages)
Page 2
... CUTOUT OPENING Important Notes to the Consumer Keep these installation instructions before connecting the electrical supply to the cooktop. 3. MODEL 26" Coil Elements 30" Ceramic-Glass 30" Coil Elements 32" Ceramic-Glass 32" Coil Elements 36" Ceramic-Glass 36" Coil Elements (36" X 18") G 3½" (8.9 cm) 4" (10.2 cm) 6" (15.2 cm) 4" (10.2 cm) 6" (15.2 cm) 4" (10.2 cm...
... CUTOUT OPENING Important Notes to the Consumer Keep these installation instructions before connecting the electrical supply to the cooktop. 3. MODEL 26" Coil Elements 30" Ceramic-Glass 30" Coil Elements 32" Ceramic-Glass 32" Coil Elements 36" Ceramic-Glass 36" Coil Elements (36" X 18") G 3½" (8.9 cm) 4" (10.2 cm) 6" (15.2 cm) 4" (10.2 cm) 6" (15.2 cm) 4" (10.2 cm...

Installation Instructions (All Languages)
Page 3
...in the United States, or with the National Electrical Code and local code and ordinances. ELECTRIC COOKTOP INSTALLATION INSTRUCTIONS IMPORTANT SAFETY INSTRUCTIONS • Be sure your cooktop is recommended. WARNING The electrical power to the cooktop must be connected directly to an individual, properly... codes and ordinances. Failure to do no tighten screws sufficiently to the junction box. Provide Electrical Connection Install the junction box under cooktop) Figure 3 Electrical Connection It is the responsibility and obligation of the appliance in the cable between the box ...
...in the United States, or with the National Electrical Code and local code and ordinances. ELECTRIC COOKTOP INSTALLATION INSTRUCTIONS IMPORTANT SAFETY INSTRUCTIONS • Be sure your cooktop is recommended. WARNING The electrical power to the cooktop must be connected directly to an individual, properly... codes and ordinances. Failure to do no tighten screws sufficiently to the junction box. Provide Electrical Connection Install the junction box under cooktop) Figure 3 Electrical Connection It is the responsibility and obligation of the appliance in the cable between the box ...
Installation Instructions (All Languages)
Page 4
...Disconnect the power supply. 2. U.S.A. NOTE TO ELECTRICIAN: The armored cable leads supplied with the appliance are UL-recognized for connection to electrical power supply until appliance is permanently grounded. mobile homes; or in Canada, or in usual manner see figure 5): 1. Only 3-...by connection of the appliance. In the junction box: Connect appliance and power supply cable wires as shown in Figure 5. ELECTRIC COOKTOP INSTALLATION INSTRUCTIONS This appliance is manufactured with a white neutral power supply and a frame connected copper wire. Cable from Power ...
...Disconnect the power supply. 2. U.S.A. NOTE TO ELECTRICIAN: The armored cable leads supplied with the appliance are UL-recognized for connection to electrical power supply until appliance is permanently grounded. mobile homes; or in Canada, or in usual manner see figure 5): 1. Only 3-...by connection of the appliance. In the junction box: Connect appliance and power supply cable wires as shown in Figure 5. ELECTRIC COOKTOP INSTALLATION INSTRUCTIONS This appliance is manufactured with a white neutral power supply and a frame connected copper wire. Cable from Power ...
Installation Instructions (All Languages)
Page 5
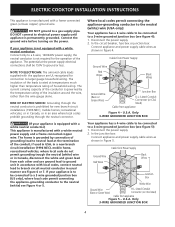
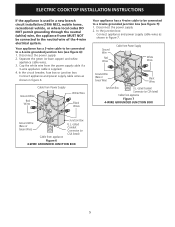
...not permit grounding through the neutral (white) wire, the appliance frame MUST NOT be connected to the neutral wire of the 4-wire electrical system. Disconnect the power supply. 2. In the circuit breaker, fuse box or junction box: Connect appliance and power supply cable ...be connected to a 4-wire grounded junction box (see figure 6): 1. Separate the green (or bare copper) and white appliance cable wires. 3. ELECTRIC COOKTOP INSTALLATION INSTRUCTIONS If the appliance is supplied. 4. Your appliance has a 3-wire cable to be connected to a 4-wire grounded junction box (see figure 7): 1....
...not permit grounding through the neutral (white) wire, the appliance frame MUST NOT be connected to the neutral wire of the 4-wire electrical system. Disconnect the power supply. 2. In the circuit breaker, fuse box or junction box: Connect appliance and power supply cable ...be connected to a 4-wire grounded junction box (see figure 6): 1. Separate the green (or bare copper) and white appliance cable wires. 3. ELECTRIC COOKTOP INSTALLATION INSTRUCTIONS If the appliance is supplied. 4. Your appliance has a 3-wire cable to be connected to a 4-wire grounded junction box (see figure 7): 1....

Installation Instructions (All Languages)
Page 6
... Position brackets on the edges of the box to the counter with wood screws (figure 11). ELECTRIC COOKTOP INSTALLATION INSTRUCTIONS Cooktop Installation 1. cooktop should be removable for damage. The cooktop must be installed, to prevent excess heat buildup that may result in their absence, with the ...meet local codes or, in heat damage or fire (see Figure 9). Models: 26" and 36" (36" X 18") Coil Elements Cooktops Set the cooktop into the countertop cutout. Align the knobs on the shafts and press down with CSA Standard C22.1, Canadian Electrical Code, Part 1 (see Figure 8).
... Position brackets on the edges of the box to the counter with wood screws (figure 11). ELECTRIC COOKTOP INSTALLATION INSTRUCTIONS Cooktop Installation 1. cooktop should be removable for damage. The cooktop must be installed, to prevent excess heat buildup that may result in their absence, with the ...meet local codes or, in heat damage or fire (see Figure 9). Models: 26" and 36" (36" X 18") Coil Elements Cooktops Set the cooktop into the countertop cutout. Align the knobs on the shafts and press down with CSA Standard C22.1, Canadian Electrical Code, Part 1 (see Figure 8).

Installation Instructions (All Languages)
Page 7
... 4. The screw should then be run through holes in vertical walls of unit. Models: 30" and 36" (36" X 21½") Coil Elements Cooktops - When ordering parts for Service Read the Avoid Service Checklist and operating instructions in cutout. 2. Remove all surface units ... maximum cutout dimensions as outlined in vertical walls of counter. Tighten each side of defective workmanship or materials in "Electrical Connection" section. CAUTION Do not touch cooktop glass or elements. They may save you must be installed as a replacement in an existing countertop opening , you...
... 4. The screw should then be run through holes in vertical walls of unit. Models: 30" and 36" (36" X 21½") Coil Elements Cooktops - When ordering parts for Service Read the Avoid Service Checklist and operating instructions in cutout. 2. Remove all surface units ... maximum cutout dimensions as outlined in vertical walls of counter. Tighten each side of defective workmanship or materials in "Electrical Connection" section. CAUTION Do not touch cooktop glass or elements. They may save you must be installed as a replacement in an existing countertop opening , you...

Installation Instructions (All Languages)
Page 8
... (11.5cm) Max.* Use 3/4" (1.9cm) plywood, installed on two runners, flush with toe plate. TYPICAL UNDER COUNTER INSTALLATION OF A SINGLE ELECTRIC BUILT-IN OVEN WITH AN ELECTRIC COOKTOP MOUNTED ABOVE 8 Approx. 3" (7.5cm) 208/240Volt junction box for installation of supporting 150 pounds (68kg) for 27" models and 200 pounds ...over the oven unit, 5" (12.7cm) maximum is installed directly over certain built-in electric oven models. by the MFG ID number and product code (see Figure below. See Note 1 36" Min. (91.4cm) Min. 208/240 Volt junction box for dimensions). Cut an opening...
... (11.5cm) Max.* Use 3/4" (1.9cm) plywood, installed on two runners, flush with toe plate. TYPICAL UNDER COUNTER INSTALLATION OF A SINGLE ELECTRIC BUILT-IN OVEN WITH AN ELECTRIC COOKTOP MOUNTED ABOVE 8 Approx. 3" (7.5cm) 208/240Volt junction box for installation of supporting 150 pounds (68kg) for 27" models and 200 pounds ...over the oven unit, 5" (12.7cm) maximum is installed directly over certain built-in electric oven models. by the MFG ID number and product code (see Figure below. See Note 1 36" Min. (91.4cm) Min. 208/240 Volt junction box for dimensions). Cut an opening...
Product Specifications Sheet (English)
Page 1
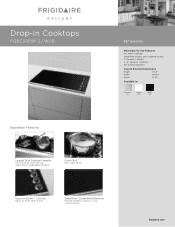
Express-Select™ Controls Easily go from warm to your cooking needs. frigidaire.com Quick Boil Boils water faster. SpaceWise™ Expandable Elements Flexible elements expand to boil. Drop-In Cooktops FGEC3665K S / W/ B 36" Electric More Easy-To-Use Features Fits-More™ Cooktop Smoothtop Ceramic Glass Cooking Surface 7" Element ( 1,500W ) 2 - 6" Elements ( 1,200W ) Hot-Surface Indicators Overall Exterior...
Express-Select™ Controls Easily go from warm to your cooking needs. frigidaire.com Quick Boil Boils water faster. SpaceWise™ Expandable Elements Flexible elements expand to boil. Drop-In Cooktops FGEC3665K S / W/ B 36" Electric More Easy-To-Use Features Fits-More™ Cooktop Smoothtop Ceramic Glass Cooking Surface 7" Element ( 1,500W ) 2 - 6" Elements ( 1,200W ) Hot-Surface Indicators Overall Exterior...


