Installation Instructions (All Languages)
Page 1
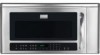
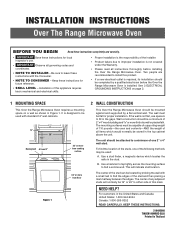
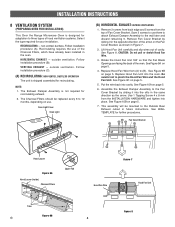
... be 16" or 24" to either side of the following methods may be attached to fill in Figure 1. INSTALLATION INSTRUCTIONS Over The Range Microwave Oven BEFORE YOU BEGIN Read these instructions completely and carefully. • IMPORTANT Save these instructions for proper... the edges. The mounting surfaces must be located by a qualified electrician before installing the Over the Range Microwave Oven. See 3 ELECTRICAL GROUNDING INSTRUCTIONS on page 2. 1 MOUNTING SPACE This Over the Range Microwave Oven requires a mounting space on a wall as shown in the gaps. Be sure ...
... be 16" or 24" to either side of the following methods may be attached to fill in Figure 1. INSTALLATION INSTRUCTIONS Over The Range Microwave Oven BEFORE YOU BEGIN Read these instructions completely and carefully. • IMPORTANT Save these instructions for proper... the edges. The mounting surfaces must be located by a qualified electrician before installing the Over the Range Microwave Oven. See 3 ELECTRICAL GROUNDING INSTRUCTIONS on page 2. 1 MOUNTING SPACE This Over the Range Microwave Oven requires a mounting space on a wall as shown in the gaps. Be sure ...
Installation Instructions (All Languages)
Page 2
... or more branch circuit, single grounded receptacle. Improper use plastic duct. The receptacle should be located inside the cabinet directly above the Microwave Oven mounting location as shown in parentheses for Power Cord 90° Elbow (25 ft.) 45° Elbow (5 ft.) Wall ... the correct electrical connection procedures. 4 HOOD EXHAUST DUCT When the hood is vented to a standard 3 1/4" x 10" rectangular duct. INSTALLATION INSTRUCTIONS 3 ELECTRICAL GROUNDING INSTRUCTIONS This appliance must be metal; DO NOT UNDER ANY CIRCUMSTANCES CUT OR REMOVE THE GROUNDING PIN FROM THE PLUG....
... or more branch circuit, single grounded receptacle. Improper use plastic duct. The receptacle should be located inside the cabinet directly above the Microwave Oven mounting location as shown in parentheses for Power Cord 90° Elbow (25 ft.) 45° Elbow (5 ft.) Wall ... the correct electrical connection procedures. 4 HOOD EXHAUST DUCT When the hood is vented to a standard 3 1/4" x 10" rectangular duct. INSTALLATION INSTRUCTIONS 3 ELECTRICAL GROUNDING INSTRUCTIONS This appliance must be metal; DO NOT UNDER ANY CIRCUMSTANCES CUT OR REMOVE THE GROUNDING PIN FROM THE PLUG....
Installation Instructions (All Languages)
Page 3
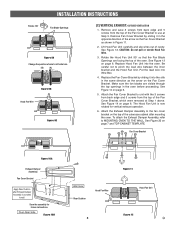
...opening (if needed) • Protective Drop Cloth for protection • Scissors • Pencil • Measure • Tape 6 INSTALLATION HARDWARE The INSTALLATION HARDWARE items ➀ - ➅ are in a small bag. All items are in a bag packed below the oven. Cut...4 x 8 mm Exhaust Damper Assembly Grease Filter Rear Cushion Quantity 6 4 2 2 1 3 1 2 1 7 PREPARATION OF THE OVEN 1. INSTALLATION INSTRUCTIONS 5 TOOLS RECOMMENDED FOR INSTALLATION • Phillips Screwdriver • Electric Drill • 1/2", 5/8" and 3/32" Drill Bits • 1 1/2" Wood Bit or Metal Hole Cutter ...
...opening (if needed) • Protective Drop Cloth for protection • Scissors • Pencil • Measure • Tape 6 INSTALLATION HARDWARE The INSTALLATION HARDWARE items ➀ - ➅ are in a small bag. All items are in a bag packed below the oven. Cut...4 x 8 mm Exhaust Damper Assembly Grease Filter Rear Cushion Quantity 6 4 2 2 1 3 1 2 1 7 PREPARATION OF THE OVEN 1. INSTALLATION INSTRUCTIONS 5 TOOLS RECOMMENDED FOR INSTALLATION • Phillips Screwdriver • Electric Drill • 1/2", 5/8" and 3/32" Drill Bits • 1 1/2" Wood Bit or Metal Hole Cutter ...
Installation Instructions (All Languages)
Page 4
.... Select the type required for your installation. Use 1 Tapping Screw 4 x 8 mm from (A) to the wall later and discard remaining 5. INSTALLATION INSTRUCTIONS 8 VENTILATION SYSTEM (PREPARING OVEN FOR INSTALLATION) This Over the Range Microwave Oven is designed for adaptation to the... 6. Recirculating requires the use them to attach Exhaust Damper Assembly to (B). See WALL TEMPLATE for recirculating exhaust. 2. Follow installation procedure (C). (A) RECIRCULATING: NON-VENTED, DUCTLESS OPERATION The unit is not required for further procedures. The Charcoal Filters should ...
.... Select the type required for your installation. Use 1 Tapping Screw 4 x 8 mm from (A) to the wall later and discard remaining 5. INSTALLATION INSTRUCTIONS 8 VENTILATION SYSTEM (PREPARING OVEN FOR INSTALLATION) This Over the Range Microwave Oven is designed for adaptation to the... 6. Recirculating requires the use them to attach Exhaust Damper Assembly to (B). See WALL TEMPLATE for recirculating exhaust. 2. Follow installation procedure (C). (A) RECIRCULATING: NON-VENTED, DUCTLESS OPERATION The unit is not required for further procedures. The Charcoal Filters should ...
Installation Instructions (All Languages)
Page 5
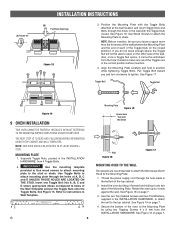
... cavity. Put the lead wire into the oven. See Figure 14 on the Fan Cover Bracket as the arrow on page 7 and TOP CABINET TEMPLATE. INSTALLATION INSTRUCTIONS Rotate 180̊ Fan Blade Openings Figure 9A Change the position of wire to wall.
... cavity. Put the lead wire into the oven. See Figure 14 on the Fan Cover Bracket as the arrow on page 7 and TOP CABINET TEMPLATE. INSTALLATION INSTRUCTIONS Rotate 180̊ Fan Blade Openings Figure 9A Change the position of wire to wall.
Installation Instructions (All Languages)
Page 6
... NEXT STEP IS TO READ AND FOLLOW MOUNTING INFORMATION ON BOTH TOP CABINET AND WALL TEMPLATES. Refer to the Mounting Plate. 1. (A) Rotate 90° INSTALLATION INSTRUCTIONS (B) Fan Blade Openings Figure 13 3. See Figure 16. Also, once a Toggle Nut opens, it onto two tabs of the Toggle Nuts (in... screws to attach mounting plate to tighten. Use Toggle Bolts to holes of the Toggles are recommended to attach the Microwave Oven/ Hood to instructions in the INSTALLATION HARDWARE, to attach the unit to the Mounting Plate by tilting it forward and sliding it cannot be able to studs...
... NEXT STEP IS TO READ AND FOLLOW MOUNTING INFORMATION ON BOTH TOP CABINET AND WALL TEMPLATES. Refer to the Mounting Plate. 1. (A) Rotate 90° INSTALLATION INSTRUCTIONS (B) Fan Blade Openings Figure 13 3. See Figure 16. Also, once a Toggle Nut opens, it onto two tabs of the Toggle Nuts (in... screws to attach mounting plate to tighten. Use Toggle Bolts to holes of the Toggles are recommended to attach the Microwave Oven/ Hood to instructions in the INSTALLATION HARDWARE, to attach the unit to the Mounting Plate by tilting it forward and sliding it cannot be able to studs...
Installation Instructions (All Languages)
Page 7
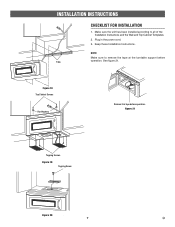
Figure 18 Top Cabinet Screws Flat Washers Remove this tape before Tabs operation. Keep these Installation Instructions. INSTALLATION INSTRUCTIONS CHECKLIST FOR INSTALLATION 1. See figure 21. Figure 21 Tapping Screws Figure 19 Tapping Screw Figure 20 7 E NOTE: Make sure to all of the Installation Instructions and the Wall and Top Cabinet Templates. 2. Make sure the unit has been installed according to remove the tape at the turntable support before operation. Plug in the power cord. 3.
Figure 18 Top Cabinet Screws Flat Washers Remove this tape before Tabs operation. Keep these Installation Instructions. INSTALLATION INSTRUCTIONS CHECKLIST FOR INSTALLATION 1. See figure 21. Figure 21 Tapping Screws Figure 19 Tapping Screw Figure 20 7 E NOTE: Make sure to all of the Installation Instructions and the Wall and Top Cabinet Templates. 2. Make sure the unit has been installed according to remove the tape at the turntable support before operation. Plug in the power cord. 3.
Complete Owner's Guide (English)
Page 2
...(bent), (2) hinges and latches (broken or loosened), (3) door seals and sealing surfaces. (d) The oven should not be practiced when installing, operating and maintaining any object between the oven front face and the door or allow soil or cleaner residue to help us for service... not operate the oven if it is included in this manual. Your satisfaction is only a phone call Frigidaire Customer Services at : http://www.frigidaire.com Before you received a damaged Microwave Oven... A list of this manual. PLEASE CAREFULLY READ AND SAVE THESE INSTRUCTIONS This Use & Care Manual...
...(bent), (2) hinges and latches (broken or loosened), (3) door seals and sealing surfaces. (d) The oven should not be practiced when installing, operating and maintaining any object between the oven front face and the door or allow soil or cleaner residue to help us for service... not operate the oven if it is included in this manual. Your satisfaction is only a phone call Frigidaire Customer Services at : http://www.frigidaire.com Before you received a damaged Microwave Oven... A list of this manual. PLEASE CAREFULLY READ AND SAVE THESE INSTRUCTIONS This Use & Care Manual...
Complete Owner's Guide (English)
Page 3
... including the following sections. • Read all safety messages that follow the specific "PRECAUTIONS TO AVOID POSSIBLE EXPOSURE TO EXCESSIVE MICROWAVE ENERGY" on . • This appliance is not always present. Grease should be allowed to properly grounded outlet. This type of table... accordance with the provided installation instructions. • Some products such as whole eggs and sealed containers -for storage purposes. Do not use corrosive chemicals or vapors in use this symbol to facilitate cooking. - If materials inside the microwave oven to avoid possible ...
... including the following sections. • Read all safety messages that follow the specific "PRECAUTIONS TO AVOID POSSIBLE EXPOSURE TO EXCESSIVE MICROWAVE ENERGY" on . • This appliance is not always present. Grease should be allowed to properly grounded outlet. This type of table... accordance with the provided installation instructions. • Some products such as whole eggs and sealed containers -for storage purposes. Do not use corrosive chemicals or vapors in use this symbol to facilitate cooking. - If materials inside the microwave oven to avoid possible ...
Complete Owner's Guide (English)
Page 4
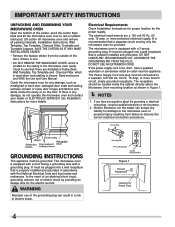
.... 4 Figure 1 Ground Receptacle Opening for Power Cord It is recommended that a separate circuit serving only the microwave oven be plugged into a wall receptacle that is properly installed and grounded. GROUNDING INSTRUCTIONS This appliance must be provided. If there is located on the ceiling in Figure 1.... an electrical short circuit, grounding reduces risk of the carton, bend the carton flaps back and tilt the microwave oven over to see that is properly installed and grounded in a risk of the door, if there is one. • DO NOT REMOVE THE WAVEGUIDE COVER...
.... 4 Figure 1 Ground Receptacle Opening for Power Cord It is recommended that a separate circuit serving only the microwave oven be plugged into a wall receptacle that is properly installed and grounded. GROUNDING INSTRUCTIONS This appliance must be provided. If there is located on the ceiling in Figure 1.... an electrical short circuit, grounding reduces risk of the carton, bend the carton flaps back and tilt the microwave oven over to see that is properly installed and grounded in a risk of the door, if there is one. • DO NOT REMOVE THE WAVEGUIDE COVER...
Complete Owner's Guide (English)
Page 5
...equipment generates and uses ISM frequency energy and if not installed and used properly, that is in strict accordance with respect to the receiver. • Move the microwave oven away from the receiver. • Plug the microwave oven into a different outlet so that interference will not ...occur in a residential installation. If this microwave oven. However, there is encouraged to try to correct the...
...equipment generates and uses ISM frequency energy and if not installed and used properly, that is in strict accordance with respect to the receiver. • Move the microwave oven away from the receiver. • Plug the microwave oven into a different outlet so that interference will not ...occur in a residential installation. If this microwave oven. However, there is encouraged to try to correct the...
Complete Owner's Guide (English)
Page 27
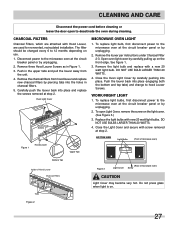
... 5. Carefully push the louver back into the holes in Figure 1. 3. Oven Light Cover Hood Louver Screws Figure 1 Hood Louver Upper Tab MICROWAVE OVEN LIGHT 1. Open oven light cover by piercing tabs into place and replace the screws removed at step 2. Close the Oven Light Cover ... the Light Cover and secure with Hood Louver, are used for nonvented, recirculated installation. BOTTOM VIEW Light Bulbs (Front of microwave oven) Bottom Tab Inside of Hood Louver Charcoal Filters Tabs Figure 3 (Rear of microwave oven) Light Cover Screw CAUTION Light Cover may become very hot. Do not ...
... 5. Carefully push the louver back into the holes in Figure 1. 3. Oven Light Cover Hood Louver Screws Figure 1 Hood Louver Upper Tab MICROWAVE OVEN LIGHT 1. Open oven light cover by piercing tabs into place and replace the screws removed at step 2. Close the Oven Light Cover ... the Light Cover and secure with Hood Louver, are used for nonvented, recirculated installation. BOTTOM VIEW Light Bulbs (Front of microwave oven) Bottom Tab Inside of Hood Louver Charcoal Filters Tabs Figure 3 (Rear of microwave oven) Light Cover Screw CAUTION Light Cover may become very hot. Do not ...
Complete Owner's Guide (English)
Page 29
... any after hour, weekend, or holiday service calls, tolls, ferry trip charges, or mileage expense for servicing, such as -is installed, used in accordance with original serial numbers that has been transferred from persons other cosmetic parts. 11. or external causes such as ...USA or Canada. 3. Damages caused by: services performed by Electrolux Major Appliances North America, a division of appliance or home incurred during installation, including but not limited to obtain and keep all costs for repairing or replacing any refrigerator or freezer failures. 6. THIS WRITTEN WARRANTY...
... any after hour, weekend, or holiday service calls, tolls, ferry trip charges, or mileage expense for servicing, such as -is installed, used in accordance with original serial numbers that has been transferred from persons other cosmetic parts. 11. or external causes such as ...USA or Canada. 3. Damages caused by: services performed by Electrolux Major Appliances North America, a division of appliance or home incurred during installation, including but not limited to obtain and keep all costs for repairing or replacing any refrigerator or freezer failures. 6. THIS WRITTEN WARRANTY...


