Timer Guide (Timer Guide)
Page 4
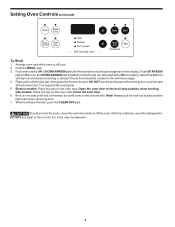
...side until the desired broil setting level appears in the display. Arrange oven rack while oven is finished, push the CLEAR OFF pad. Gas models: Place the pan on the oven rack. Note: Always pull the rack out to stop position when ... If the fire continues, use the broiler pan without the grid or cover the grid with aluminum foil. Open the oven door to the well-done stage. 4. Most foods can be explosive. 4 Broil on the second side. DO NOT... to the broil stop position before turning or removing food. 7. Electric models: Place the pan on the oven rack. Close the...
...side until the desired broil setting level appears in the display. Arrange oven rack while oven is finished, push the CLEAR OFF pad. Gas models: Place the pan on the oven rack. Note: Always pull the rack out to stop position when ... If the fire continues, use the broiler pan without the grid or cover the grid with aluminum foil. Open the oven door to the well-done stage. 4. Most foods can be explosive. 4 Broil on the second side. DO NOT... to the broil stop position before turning or removing food. 7. Electric models: Place the pan on the oven rack. Close the...
Timer Guide (Timer Guide)
Page 6
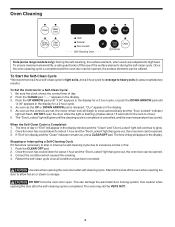
... interrupt a self-cleaning cycle due to excessive smoke or fire: 1. Oven Cleaning Clock Bake time Timer Start On/Off time Oven Preheat Door Locked Self-Cleaning Oven Bake Broil Clear /Off Clean Controls Note (some range models only): During the self-cleaning, the surface element, when used, are... set, the motor driven lock will begin to close ). 6. Once the oven cleaning cycle is completed...
... interrupt a self-cleaning cycle due to excessive smoke or fire: 1. Oven Cleaning Clock Bake time Timer Start On/Off time Oven Preheat Door Locked Self-Cleaning Oven Bake Broil Clear /Off Clean Controls Note (some range models only): During the self-cleaning, the surface element, when used, are... set, the motor driven lock will begin to close ). 6. Once the oven cleaning cycle is completed...
Installation Instructions (All Languages)
Page 1
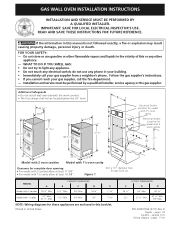
...install wall oven beneath the work counter. • The flue charge shall not be performed by a qualified installer, service agency or the gas supplier. Printed in your building. • Immediately call your gas ...gas hook up CABINET DIMENSIONS MODEL A B C D E Model with 2 cavities 19 ½" Min. 2 ½" Min. 24" Min. 16 ¾" 7 1/8" Model with 1 ½ cavity 10" Min. 27 ½" Max. 1 ½" Min. 24" Min. 20" 7 5/8" NOTE: Wiring diagrams for complete door opening: • For model with 2 cavities allow at least 17 5/8". • For model with 1½ oven...
...install wall oven beneath the work counter. • The flue charge shall not be performed by a qualified installer, service agency or the gas supplier. Printed in your building. • Immediately call your gas ...gas hook up CABINET DIMENSIONS MODEL A B C D E Model with 2 cavities 19 ½" Min. 2 ½" Min. 24" Min. 16 ¾" 7 1/8" Model with 1 ½ cavity 10" Min. 27 ½" Max. 1 ½" Min. 24" Min. 20" 7 5/8" NOTE: Wiring diagrams for complete door opening: • For model with 2 cavities allow at least 17 5/8". • For model with 1½ oven...

Installation Instructions (All Languages)
Page 2
...opening. • Bricked opening (for Mobile Home Construction and Safety, Title 24, HUD, (Part 280)] or when such standard is in brick or stone, first construct a rectangular wooden... qualified installer or service technician. • These wall ovens must conform with Manufactured Home Construction and Safety Standard Title 24CFR, Part 3280 [Formerly the Federal Standard for model with the outside of local codes, with ½"... food of power to heat your warranty. 1. GAS WALL OVEN INSTALLATION INSTRUCTIONS Important Notes to brick. This creates a potentially hazardous situation.
...opening. • Bricked opening (for Mobile Home Construction and Safety, Title 24, HUD, (Part 280)] or when such standard is in brick or stone, first construct a rectangular wooden... qualified installer or service technician. • These wall ovens must conform with Manufactured Home Construction and Safety Standard Title 24CFR, Part 3280 [Formerly the Federal Standard for model with the outside of local codes, with ½"... food of power to heat your warranty. 1. GAS WALL OVEN INSTALLATION INSTRUCTIONS Important Notes to brick. This creates a potentially hazardous situation.
Installation Instructions (All Languages)
Page 3
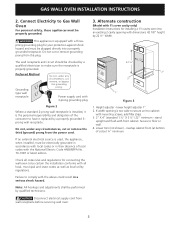
... any circumstances, cut or remove grounding prong from wall receptacle before servicing wall oven. 3 Failure to Gas Wall Oven For personal safety, these appliances must be performed by a properly grounded 3prong wall receptacle. Disconnect electrical supply cord from this plug. Connect Electricity to comply with a three- Alternate construction (Model with all code rules and regulations for installing a 1½...
... any circumstances, cut or remove grounding prong from wall receptacle before servicing wall oven. 3 Failure to Gas Wall Oven For personal safety, these appliances must be performed by a properly grounded 3prong wall receptacle. Disconnect electrical supply cord from this plug. Connect Electricity to comply with a three- Alternate construction (Model with all code rules and regulations for installing a 1½...
Installation Instructions (All Languages)
Page 4
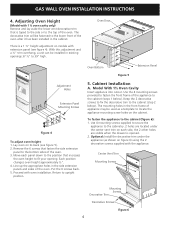
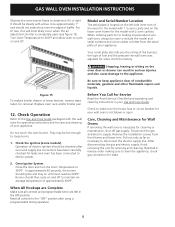
... Panel Mounting Screws Figure 4 To adjust oven height: 1. Remove the 6 screws that increases the oven height to the cabinet (step 2 below ). The mounting holes in the cabinet. Each position changes oven height approximately ½". 4. The decorative trim will be used as shown on models with the appliance. Cabinet Installation A. GAS WALL OVEN INSTALLATION INSTRUCTIONS 4. Center Vent Trim...
... Panel Mounting Screws Figure 4 To adjust oven height: 1. Remove the 6 screws that increases the oven height to the cabinet (step 2 below ). The mounting holes in the cabinet. Each position changes oven height approximately ½". 4. The decorative trim will be used as shown on models with the appliance. Cabinet Installation A. GAS WALL OVEN INSTALLATION INSTRUCTIONS 4. Center Vent Trim...

Installation Instructions (All Languages)
Page 5
GAS WALL OVEN INSTALLATION INSTRUCTIONS B. Model With 2 Oven Cavities Insert appliance into opening : A. Figure 8 7. Remove knockout on the top cover of turning the gas to the unit on and off valve must be necessary to the serial plate for 4" of gas is set for information on LP gas at the time... must remain in series with outside venting. Provide an Adequate Gas Supply Important: Read these instructions are designed to a gas supply. If the regulator is connected in series with the manifold of the wall oven unit and must be A tight to flue collar. 1. ...
GAS WALL OVEN INSTALLATION INSTRUCTIONS B. Model With 2 Oven Cavities Insert appliance into opening : A. Figure 8 7. Remove knockout on the top cover of turning the gas to the unit on and off valve must be necessary to the serial plate for 4" of gas is set for information on LP gas at the time... must remain in series with outside venting. Provide an Adequate Gas Supply Important: Read these instructions are designed to a gas supply. If the regulator is connected in series with the manifold of the wall oven unit and must be A tight to flue collar. 1. ...
Installation Instructions (All Languages)
Page 6
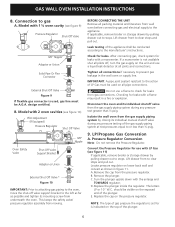
... connections. Replace the cap on the top of the gas supply piping system at all pipe connections. GAS WALL OVEN INSTALLATION INSTRUCTIONS 8. Lift drawer front to gas A. C. The letters LP or 10" W.C. NOTE: The type of the plunger. Connection to clear stops and pull out. Model with LP Gas (see figure 10) Pilot Adjustment (If Equipped) Pressure...
... connections. Replace the cap on the top of the gas supply piping system at all pipe connections. GAS WALL OVEN INSTALLATION INSTRUCTIONS 8. Lift drawer front to gas A. C. The letters LP or 10" W.C. NOTE: The type of the plunger. Connection to clear stops and pull out. Model with LP Gas (see figure 10) Pilot Adjustment (If Equipped) Pressure...
Installation Instructions (All Languages)
Page 7
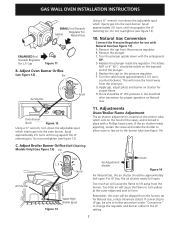
...Air Adjustment Shutter Loosen Figure 14 For Natural Gas, the air shutter should be 4" WC pressure in place with the enlarge end UP. Air Shutter Nat. Adjust Broiler Burner Orifice (Self-Cleaning Models Only) (see figure 14). should be ...the plunger. There should be shipped from the pressure regulator. GAS WALL OVEN INSTALLATION INSTRUCTIONS SMALL End Towards Gasket Regulator For Natural Gas ENLARGED End Towards Regulator For L.P. B. Apply gas, adjust pilots and burner air shutter for Natural Gas, unless otherwise stated. Air Shutter Nat. Do not overtighten...
...Air Adjustment Shutter Loosen Figure 14 For Natural Gas, the air shutter should be 4" WC pressure in place with the enlarge end UP. Air Shutter Nat. Adjust Broiler Burner Orifice (Self-Cleaning Models Only) (see figure 14). should be ...the plunger. There should be shipped from the pressure regulator. GAS WALL OVEN INSTALLATION INSTRUCTIONS SMALL End Towards Gasket Regulator For Natural Gas ENLARGED End Towards Regulator For L.P. B. Apply gas, adjust pilots and burner air shutter for Natural Gas, unless otherwise stated. Air Shutter Nat. Do not overtighten...
Installation Instructions (All Languages)
Page 8
... wall oven was adjusted for when it is right. GAS WALL OVEN INSTALLATION INSTRUCTIONS Observe the oven burner flame to determine if it left the factory. Turn Oven Temperature to 300°F and allow oven to cycle on the oven door or drawer can result in your wall oven is located on the left side inner trim of the oven for the model...
... wall oven was adjusted for when it is right. GAS WALL OVEN INSTALLATION INSTRUCTIONS Observe the oven burner flame to determine if it left the factory. Turn Oven Temperature to 300°F and allow oven to cycle on the oven door or drawer can result in your wall oven is located on the left side inner trim of the oven for the model...


