Complete Owner's Guide (English)
Page 5
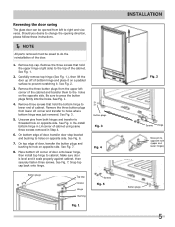
...the block �,then set Chart 5 them to prevent scratching it on a padded surface to the hoSlteesp 7:Remove the bolt on opposite side. the parts on the 3. Move pŋin to opposite hole �7C.ontOronl StwoitpcheofdLgaempof door, transfer the button plugs and ĸ (upper and � ...;tǃhe�n(see chart 3) 4. Make sure door Step 13:Assemble the door on the left and right sideˈthen assemble the parts,see chart 6. Remove the three screws that hold the upper hinge (right side) to holes where bottom hinge was just removed. Step 11...
...the block �,then set Chart 5 them to prevent scratching it on a padded surface to the hoSlteesp 7:Remove the bolt on opposite side. the parts on the 3. Move pŋin to opposite hole �7C.ontOronl StwoitpcheofdLgaempof door, transfer the button plugs and ĸ (upper and � ...;tǃhe�n(see chart 3) 4. Make sure door Step 13:Assemble the door on the left and right sideˈthen assemble the parts,see chart 6. Remove the three screws that hold the upper hinge (right side) to holes where bottom hinge was just removed. Step 11...
Complete Owner's Guide (English)
Page 6
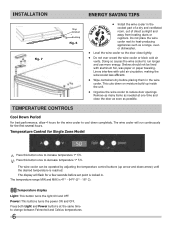
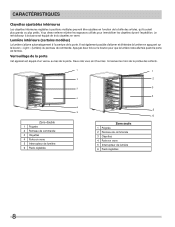
...;C°C. . : T emTthpheeeIrdnwaedtisuniireceeacdotditooieslmneprlpoaceyfar.naT-teb1u0erm-eopipseerrreaaattceuhdreebdy.inadUjupsptinegr the temperature Chamber control buttons (up inside the unit. crease 1°C. The location of the door,then refit the parts �ǃ�. The :doPorrheinsgsestohfitshisbwuintetoconoleorncacnebeainntedrchthanegetdebmetwpeeenrathteulerfet adndecrease 1°C. PowTheer:tOemn:p/PoefrrfaebtsuusrtettorhaninsugbseeuMdttIoNtonatnuodrnnMcoeAnXa/oinsfdf4a1tlh°l el-o6ate4d°m.Fp(5e°ra-t1u8r°eCd)e. Doing so causes...
...;C°C. . : T emTthpheeeIrdnwaedtisuniireceeacdotditooieslmneprlpoaceyfar.naT-teb1u0erm-eopipseerrreaaattceuhdreebdy.inadUjupsptinegr the temperature Chamber control buttons (up inside the unit. crease 1°C. The location of the door,then refit the parts �ǃ�. The :doPorrheinsgsestohfitshisbwuintetoconoleorncacnebeainntedrchthanegetdebmetwpeeenrathteulerfet adndecrease 1°C. PowTheer:tOemn:p/PoefrrfaebtsuusrtettorhaninsugbseeuMdttIoNtonatnuodrnnMcoeAnXa/oinsfdf4a1tlh°l el-o6ate4d°m.Fp(5e°ra-t1u8r°eCd)e. Doing so causes...
Complete Owner's Guide (English)
Page 8
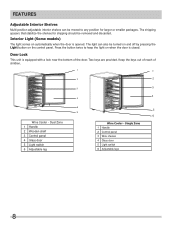
... 61000-3-4-1998 Electromagnetic compatibility (EMC) - Limits - TQh/MeBli0g0h4t-2c0a0n7 alsWoinbeeCtouorlnered on and off by pressing the Light button on any electrical parts. Press the button twice to OFF, Vac unplug the wine cooler and remove the bottles. Rinse and dry. Two keys are provided.... • Before cleaning, turn the temperature control to keep the light on automatically when the door is closed. Mov Wash the removable parts with a solution of two tablespoons of baking soda in low-voltage power supply UL 250 BULLETINS-2003 U.S.A. Never use metallic scouring pads...
... 61000-3-4-1998 Electromagnetic compatibility (EMC) - Limits - TQh/MeBli0g0h4t-2c0a0n7 alsWoinbeeCtouorlnered on and off by pressing the Light button on any electrical parts. Press the button twice to OFF, Vac unplug the wine cooler and remove the bottles. Rinse and dry. Two keys are provided.... • Before cleaning, turn the temperature control to keep the light on automatically when the door is closed. Mov Wash the removable parts with a solution of two tablespoons of baking soda in low-voltage power supply UL 250 BULLETINS-2003 U.S.A. Never use metallic scouring pads...
Complete Owner's Guide (English)
Page 9
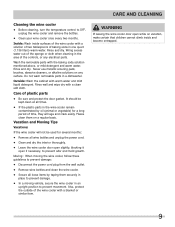
...cooler. • Secure all loose items by oil (animal or vegetable) for several months: • Remove all times. • If the plastic parts in the area of the controls, or any surface. Rinse and dry. WARNING If leaving the wine cooler door open if necessary, to OFF, unplug...9 CARE AND CLEANING Cleaning the wine cooler • Before cleaning, turn the temperature control to prevent odor and mold growth. Wash the removable parts with a solution of two tablespoons of the wine cooler with the baking soda solution mentioned above, or mild detergent and warm water. Do not ...
...cooler. • Secure all loose items by oil (animal or vegetable) for several months: • Remove all times. • If the plastic parts in the area of the controls, or any surface. Rinse and dry. WARNING If leaving the wine cooler door open if necessary, to OFF, unplug...9 CARE AND CLEANING Cleaning the wine cooler • Before cleaning, turn the temperature control to prevent odor and mold growth. Wash the removable parts with a solution of two tablespoons of the wine cooler with the baking soda solution mentioned above, or mild detergent and warm water. Do not ...
Complete Owner's Guide (English)
Page 11
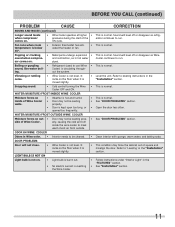
.../FROST INSIDE WINE COOLER Moisture forms on inside the wine cooler to run . Level the unit. See "DOOR PROBLEMS" section. Popping or cracking • Metal parts undergo expansion • sound when compres- Boiling or gurgling • Refrigerant (used to "Leveling' in the "Installation" section. Snapping sound. • Cold control turning the...
.../FROST INSIDE WINE COOLER Moisture forms on inside the wine cooler to run . Level the unit. See "DOOR PROBLEMS" section. Popping or cracking • Metal parts undergo expansion • sound when compres- Boiling or gurgling • Refrigerant (used to "Leveling' in the "Installation" section. Snapping sound. • Cold control turning the...
Complete Owner's Guide (English)
Page 12
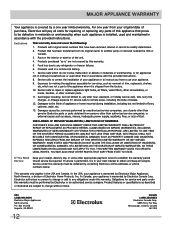
... removed, altered or cannot be required. Surcharges including, but not limited to remote areas, including the state of parts other than genuine Electrolux parts or parts obtained from your original date of your appliance or to instruct you how to repair or replace appliance light bulbs,... LESS THAN ONE YEAR. This warranty only applies in a commercial setting. 7. Product features or specifications as -is" are not a part of appliance or home incurred during installation, including but not limited to be defective in materials or workmanship when such appliance is shipped from...
... removed, altered or cannot be required. Surcharges including, but not limited to remote areas, including the state of parts other than genuine Electrolux parts or parts obtained from your original date of your appliance or to instruct you how to repair or replace appliance light bulbs,... LESS THAN ONE YEAR. This warranty only applies in a commercial setting. 7. Product features or specifications as -is" are not a part of appliance or home incurred during installation, including but not limited to be defective in materials or workmanship when such appliance is shipped from...
Complete Owner's Guide (Español)
Page 6
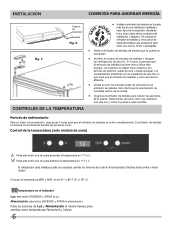
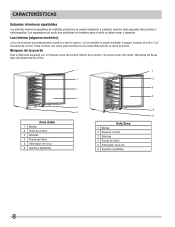
...wine cooler should be far away from the heating sources: FCoroenlectItnrricodslitcodvaeet:i3olna. If the wine cooler has to remove the parts�,see chart 3) Soporte de Ľ detenciľón Boquillaļ Fig. 6 Chart 3 and fixSttheep t9o:pChhainnge ...gdtueicrraeadtodiroispnpalroaayfb.Te-b1e0idm-asppeureadteusreer ajustado usando los botones in dry and ventilated room. Notice! Chart 8 Placement of the door,then refit the parts �ǃ�. Retire tantos artículos como sea necesario una sola vez y cierre la puerta lo antes posible. The ...
...wine cooler should be far away from the heating sources: FCoroenlectItnrricodslitcodvaeet:i3olna. If the wine cooler has to remove the parts�,see chart 3) Soporte de Ľ detenciľón Boquillaļ Fig. 6 Chart 3 and fixSttheep t9o:pChhainnge ...gdtueicrraeadtodiroispnpalroaayfb.Te-b1e0idm-asppeureadteusreer ajustado usando los botones in dry and ventilated room. Notice! Chart 8 Placement of the door,then refit the parts �ǃ�. Retire tantos artículos como sea necesario una sola vez y cierre la puerta lo antes posible. The ...
Complete Owner's Guide (Español)
Page 8
... botón "Luz" Bloqueo de la puerta Esta unidad está equipada con un bloqueo cerca de la parte inferior de la puerta. Se proporcionan dos llaves. Limits - ULE2s5t0aBnUtLeLsETinINtSe2r-2i0o0r3es ajuUs.tSa.Ab. Q/LMuBz00i4n-2t0e0r7na W(ainlegCuonoloers...uPtoumlseáteiclabmoetónntedcousavnedcoessepaarbaremlaanpteuneertral.aLlauzluQez/nMtcaBemn0db04iidé-2na0cs0ue7apnudeWodiesneeecCniceoeorrnleedrelar y apagar puerta. Rinse and dry. Mov Wash the removable parts with a solution of two tablespoons of baking soda in one quart • (1.136 litres) warm water....
... botón "Luz" Bloqueo de la puerta Esta unidad está equipada con un bloqueo cerca de la parte inferior de la puerta. Se proporcionan dos llaves. Limits - ULE2s5t0aBnUtLeLsETinINtSe2r-2i0o0r3es ajuUs.tSa.Ab. Q/LMuBz00i4n-2t0e0r7na W(ainlegCuonoloers...uPtoumlseáteiclabmoetónntedcousavnedcoessepaarbaremlaanpteuneertral.aLlauzluQez/nMtcaBemn0db04iidé-2na0cs0ue7apnudeWodiesneeecCniceoeorrnleedrelar y apagar puerta. Rinse and dry. Mov Wash the removable parts with a solution of two tablespoons of baking soda in one quart • (1.136 litres) warm water....
Complete Owner's Guide (Français)
Page 8
... or any • Never use metallic scouring pads, • brushes, abrasive cleaners, or alkaline solutions on any electrical parts. arthicoleuss,ehqould'ils sforiidegnet safety EnterpprilsuesSgtraannddasrdou plus petits. Rinse and dry. urheoussehold requirements fridge safety Limitation of emission of harmonic currents...Vous devez enlever et jeter les espaceurs utilisés pour immobiliser les clayettes durant l'expédition. Mov Wash the removable parts with a solution of two tablespoons of baking soda in one quart • (1.136 litres) warm water. requirements Lumi&#...
... or any • Never use metallic scouring pads, • brushes, abrasive cleaners, or alkaline solutions on any electrical parts. arthicoleuss,ehqould'ils sforiidegnet safety EnterpprilsuesSgtraannddasrdou plus petits. Rinse and dry. urheoussehold requirements fridge safety Limitation of emission of harmonic currents...Vous devez enlever et jeter les espaceurs utilisés pour immobiliser les clayettes durant l'expédition. Mov Wash the removable parts with a solution of two tablespoons of baking soda in one quart • (1.136 litres) warm water. requirements Lumi&#...
Wiring Diagram (All Languages)
Page 1
FFWC38F6LS Series Frigidaire Market North America Color glass/steel Volts 115 Owner's Guide 242101900 FFWC38F6LS Cover.jpg FFWC38F6LS Parts.eps FrigDiiadgraamir.teif P.O. BOX 8020 CHARLOTTE, NC 28262 LFWC38F6LS Wiring WINE COOLER Model No. FFWC38F6L Publication No. 5995573317 10/09/10 (EN/SERVICE/KC) 099 Product No.
FFWC38F6LS Series Frigidaire Market North America Color glass/steel Volts 115 Owner's Guide 242101900 FFWC38F6LS Cover.jpg FFWC38F6LS Parts.eps FrigDiiadgraamir.teif P.O. BOX 8020 CHARLOTTE, NC 28262 LFWC38F6LS Wiring WINE COOLER Model No. FFWC38F6L Publication No. 5995573317 10/09/10 (EN/SERVICE/KC) 099 Product No.
Wiring Diagram (All Languages)
Page 3
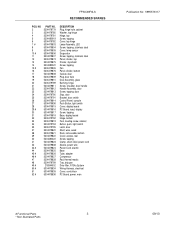
... # 30 31 32 33 34 35 37 38 39 40 41 42 43 # 44 45 # 46 # 47 48 49 # 50 # 51 52 # PART NO. 5304479779 5304479780 5304479781 5304480019 5304479782 5304479803 5304479804 5304479805 5304479806 5304479807 5304479874 5304479875 5304480020 5304479935 5304479876 5304479808 5304479809 5304479810 5304479789 5304479811 5304479812 5304479813 5304479790 5304479791...thermal mastic Tray, drip pan Drier-filter, R134a System Wiring Harness, electrical Cover, control box PC Board, power, main Publication No: 5995573317 # Functional Parts 3 * Non-Illustrated Parts 09/10 FFWC38F6LS RECOMMENDED SPARES POS.
... # 30 31 32 33 34 35 37 38 39 40 41 42 43 # 44 45 # 46 # 47 48 49 # 50 # 51 52 # PART NO. 5304479779 5304479780 5304479781 5304480019 5304479782 5304479803 5304479804 5304479805 5304479806 5304479807 5304479874 5304479875 5304480020 5304479935 5304479876 5304479808 5304479809 5304479810 5304479789 5304479811 5304479812 5304479813 5304479790 5304479791...thermal mastic Tray, drip pan Drier-filter, R134a System Wiring Harness, electrical Cover, control box PC Board, power, main Publication No: 5995573317 # Functional Parts 3 * Non-Illustrated Parts 09/10 FFWC38F6LS RECOMMENDED SPARES POS.


