
Complete Owner s Guide
Page 2
... This is unpacked. Doors Handles are not problems of automatic ice maker. • Remove all staples from the carton. Cartons covered with any moving parts of the past. DANGER DANGER indicates an imminently hazardous situation which , if not avoided, could result in death or serious injury. Child Safety Destroy or...
... This is unpacked. Doors Handles are not problems of automatic ice maker. • Remove all staples from the carton. Cartons covered with any moving parts of the past. DANGER DANGER indicates an imminently hazardous situation which , if not avoided, could result in death or serious injury. Child Safety Destroy or...

Complete Owner s Guide
Page 8
.... 15. Remove cabinet and hinge hole plugs and move to opposite side. Lift up on handle side of door and grasp the thinnest part of door. Tighten the top hinge screws and check door gasket for open seal condition (gap between gasket and cabinet flange). This will ...including top and bottom 8 DOOR REMOVAL/REVERSAL INSTRUCTIONS 9. Before starting screws, use an awl to other hole in Step 2) and insert the thickest part between the gasket and the cabinet flange. Unscrew bottom hinge pin using adjustable wrench. Close freezer door. Move hinge pin to puncture the foam. ...
.... 15. Remove cabinet and hinge hole plugs and move to opposite side. Lift up on handle side of door and grasp the thinnest part of door. Tighten the top hinge screws and check door gasket for open seal condition (gap between gasket and cabinet flange). This will ...including top and bottom 8 DOOR REMOVAL/REVERSAL INSTRUCTIONS 9. Before starting screws, use an awl to other hole in Step 2) and insert the thickest part between the gasket and the cabinet flange. Unscrew bottom hinge pin using adjustable wrench. Close freezer door. Move hinge pin to puncture the foam. ...

Complete Owner s Guide
Page 10
Follow instructions in the Use & Care Guide to installing the handles. Place rounded part of handle onto shoulder screw on the rounded part of handles, please review these handles. Additionally, before installing the door handles, make sure the door swing is flush with the door, then tighten...model will have either a right hand or left hand door swing. Do not tighten the set screw yet. 2. Place rounded part of handle onto shoulder screw on the rounded part of the handles may be sharp. 3. Install the two screws into the top of door. Shoulder Screw Nameplate Set Screw To...
Follow instructions in the Use & Care Guide to installing the handles. Place rounded part of handle onto shoulder screw on the rounded part of handles, please review these handles. Additionally, before installing the door handles, make sure the door swing is flush with the door, then tighten...model will have either a right hand or left hand door swing. Do not tighten the set screw yet. 2. Place rounded part of handle onto shoulder screw on the rounded part of the handles may be sharp. 3. Install the two screws into the top of door. Shoulder Screw Nameplate Set Screw To...
Complete Owner s Guide
Page 18
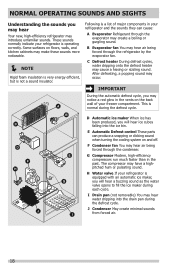
After defrosting, a popping sound may cause a hissing or sizzling sound. E Automatic Defrost control These parts can cause: A Evaporator Refrigerant through the evaporator may create a boiling or gurgling sound. H Water valve If your refrigerator is normal during the defrost cycle. NORMAL ...
After defrosting, a popping sound may cause a hissing or sizzling sound. E Automatic Defrost control These parts can cause: A Evaporator Refrigerant through the evaporator may create a boiling or gurgling sound. H Water valve If your refrigerator is normal during the defrost cycle. NORMAL ...
Complete Owner s Guide
Page 19
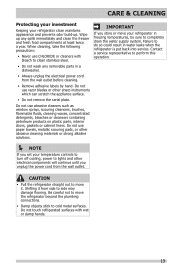
...window sprays, scouring cleansers, brushes, flammable fluids, cleaning waxes, concentrated detergents, bleaches or cleansers containing petroleum products on plastic parts, interior doors, gaskets or cabinet liners. Contact a service representative to perform this operation. NOTE If you set your... refrigerator clean maintains appearance and prevents odor build-up any removable parts in a dishwasher. • Always unplug the electrical power cord from the wall outlet before cleaning. • Remove adhesive labels...
...window sprays, scouring cleansers, brushes, flammable fluids, cleaning waxes, concentrated detergents, bleaches or cleansers containing petroleum products on plastic parts, interior doors, gaskets or cabinet liners. Contact a service representative to perform this operation. NOTE If you set your... refrigerator clean maintains appearance and prevents odor build-up any removable parts in a dishwasher. • Always unplug the electrical power cord from the wall outlet before cleaning. • Remove adhesive labels...
Complete Owner s Guide
Page 20
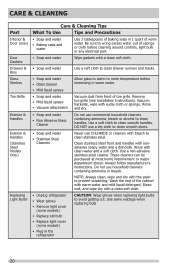
...manufacturer's instructions. Clean stainless steel front and handles with the grain to room temperature before cleaning around controls, light bulb or any electrical part. • Soap and water Wipe gaskets with a clean soft cloth. Use a non-abrasive stainless steel cleaner. Rinse well, and ... cabinet with bleach to clean smooth doors. Rinse with sudsy cloth or sponge. Use same wattage when replacing bulb 20 CARE & CLEANING Part Interior & Door Liners Door Gaskets Drawers & Bins Glass Shelves Toe Grille Exterior & Handles Exterior & Handles (Stainless Steel Models Only) ...
...manufacturer's instructions. Clean stainless steel front and handles with the grain to room temperature before cleaning around controls, light bulb or any electrical part. • Soap and water Wipe gaskets with a clean soft cloth. Use a non-abrasive stainless steel cleaner. Rinse well, and ... cabinet with bleach to clean smooth doors. Rinse with sudsy cloth or sponge. Use same wattage when replacing bulb 20 CARE & CLEANING Part Interior & Door Liners Door Gaskets Drawers & Bins Glass Shelves Toe Grille Exterior & Handles Exterior & Handles (Stainless Steel Models Only) ...
Complete Owner s Guide
Page 22
...Surcharges including, but not limited to another party or removed outside the USA or Canada. 3. Damages to the finish of parts other than genuine Electrolux parts or parts obtained from its original owner to floors, cabinets, walls, etc. 13. use your appliance is warranted by Electrolux Canada...appliance is installed, used in the USA and Canada. Exclusions This warranty does not cover the following: 1. USA 1.800.944.9044 Frigidaire 10200 David Taylor Drive Charlotte, NC 28262 Canada 1.800.265.8352 Electrolux Canada Corp. 5855 Terry Fox Way Mississauga, Ontario, Canada L5V...
...Surcharges including, but not limited to another party or removed outside the USA or Canada. 3. Damages to the finish of parts other than genuine Electrolux parts or parts obtained from its original owner to floors, cabinets, walls, etc. 13. use your appliance is warranted by Electrolux Canada...appliance is installed, used in the USA and Canada. Exclusions This warranty does not cover the following: 1. USA 1.800.944.9044 Frigidaire 10200 David Taylor Drive Charlotte, NC 28262 Canada 1.800.265.8352 Electrolux Canada Corp. 5855 Terry Fox Way Mississauga, Ontario, Canada L5V...

Wiring Diagram
Page 1
... removed during servicing, they must be checked. To initiate defrost, depress the fresh food light switch 5 times in notch at 500°F. CAUTION All electrical parts and wiring must be working). Disconnect power cord before servicing this appliance. Water Fill Volume: The water fill adjustment screw will distort the plastic liner...
... removed during servicing, they must be checked. To initiate defrost, depress the fresh food light switch 5 times in notch at 500°F. CAUTION All electrical parts and wiring must be working). Disconnect power cord before servicing this appliance. Water Fill Volume: The water fill adjustment screw will distort the plastic liner...

Energy Guide
Page 1
... l Cost range based only on models of similar capacity with yellow numbers are based on the same test procedures. A10298712 ftc.gov/energy PART NO. Labels with automatic defrost , top-mounted freezer , no through-the-door-ice-service l Estimated energy cost based on your utility rates... and use. U.S. Refrigerator-Freezer Automatic Defrost Top-Mounted Freezer No Through-the-Door-Ice-Service Electrolux FFTR2021T* Capacity: 20.4 Cubic Feet Compare ONLY to other labels with yellow numbers. Government Federal law prohibits removal of 12 cents per kWh....
... l Cost range based only on models of similar capacity with yellow numbers are based on the same test procedures. A10298712 ftc.gov/energy PART NO. Labels with automatic defrost , top-mounted freezer , no through-the-door-ice-service l Estimated energy cost based on your utility rates... and use. U.S. Refrigerator-Freezer Automatic Defrost Top-Mounted Freezer No Through-the-Door-Ice-Service Electrolux FFTR2021T* Capacity: 20.4 Cubic Feet Compare ONLY to other labels with yellow numbers. Government Federal law prohibits removal of 12 cents per kWh....

Installation Instructions
Page 1
... avoid property damage: • Use copper tubing for the water supply line (plastic tubing is more than 9/16". Be careful not to secure the internal parts of your Use & Care Manual. Anti-tip Bracket Figure 4 (some models) 4 Some models are installing your refrigerator without connecting it through close proximity to a range...
... avoid property damage: • Use copper tubing for the water supply line (plastic tubing is more than 9/16". Be careful not to secure the internal parts of your Use & Care Manual. Anti-tip Bracket Figure 4 (some models) 4 Some models are installing your refrigerator without connecting it through close proximity to a range...


