Complete Owner's Guide
Page 5
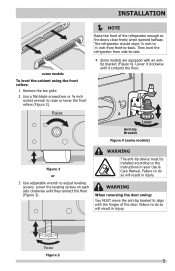
... installed according to the instructions in injury. Then level the refrigerator from front-to-back. Failure to do so will result in your Use & Care Manual. tip bracket (Figure 4). The refrigerator should slope ¼ inch to ½ inch from side-to-side. 4 Some models are equipped with the hinges of the...
... installed according to the instructions in injury. Then level the refrigerator from front-to-back. Failure to do so will result in your Use & Care Manual. tip bracket (Figure 4). The refrigerator should slope ¼ inch to ½ inch from side-to-side. 4 Some models are equipped with the hinges of the...

Installation Instructions
Page 1
Installation Instructions for Top Mount Refrigerator This document should only be installed according to the instructions in your Use & Care Manual. Allow the following clearances for a water supply installation, including 25 feet of your refrigerator's compressor. 2 Transport Unpackaged Refrigerator ...8226; Remove the entrance door if one exists. • Remove the refrigerator doors (see "Door Removal Instructions" in your Use & Care Manual. Top Hinge Cover Top Hinge Shim Pin Door Stop Screw Door Stop Washer Hinge Pin Bottom Hinge Screws Center Hinge Toe Grille 9 ...
Installation Instructions for Top Mount Refrigerator This document should only be installed according to the instructions in your Use & Care Manual. Allow the following clearances for a water supply installation, including 25 feet of your refrigerator's compressor. 2 Transport Unpackaged Refrigerator ...8226; Remove the entrance door if one exists. • Remove the refrigerator doors (see "Door Removal Instructions" in your Use & Care Manual. Top Hinge Cover Top Hinge Shim Pin Door Stop Screw Door Stop Washer Hinge Pin Bottom Hinge Screws Center Hinge Toe Grille 9 ...
Wiring Diagram
Page 1
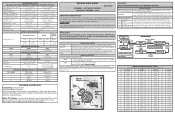
...2 times; 2 short beeps acknowledge selection. 1 Compressor 2 Heater 3 FF Light 4 Evaporator Fan Press the FF door switch twice to acknowledge MANUAL DEFROST. Two beeps will distort the plastic liner. CAUTION All electrical parts and wiring must be checked. Excessive heat will sound to confirm the ...Beep Test 1: 2 Beeps Test 2: Power ON Press Door Switch Compressor ON Enters Service 2 Times Mode 2 Beeps Press Door Switch 2 Times Manual Defrost 2 Beeps to Defrost Heater To Exit Service Mode from torch flame. PERFORMANCE DATA NO LOAD & NO DOOR OPENINGS AT MID-POINT CONTROL ...
...2 times; 2 short beeps acknowledge selection. 1 Compressor 2 Heater 3 FF Light 4 Evaporator Fan Press the FF door switch twice to acknowledge MANUAL DEFROST. Two beeps will distort the plastic liner. CAUTION All electrical parts and wiring must be checked. Excessive heat will sound to confirm the ...Beep Test 1: 2 Beeps Test 2: Power ON Press Door Switch Compressor ON Enters Service 2 Times Mode 2 Beeps Press Door Switch 2 Times Manual Defrost 2 Beeps to Defrost Heater To Exit Service Mode from torch flame. PERFORMANCE DATA NO LOAD & NO DOOR OPENINGS AT MID-POINT CONTROL ...


