

Complete Owners Guide
Page 1
REFRIGERATOR use & care Introduction 2 Important Safety information 3 Features (Frigidaire 5 Features (Frigidaire Gallery/Professional).... 7 Installation 8 Door Removal 10 Door Handle Installation (some models)... 13 Water Supply Connection 16 Ice Maker 18 Controls and Settings 19 Storage Features 22 Normal Operating Sounds 24 Filter replacement 25 Care and Cleaning 26 Troubleshooting 28 Limited Warranty 29 Frigidaire.com USA 1-800-374-4432 A13110304 (October 2019) Frigidaire.ca Canada 1-800-265-8352
REFRIGERATOR use & care Introduction 2 Important Safety information 3 Features (Frigidaire 5 Features (Frigidaire Gallery/Professional).... 7 Installation 8 Door Removal 10 Door Handle Installation (some models)... 13 Water Supply Connection 16 Ice Maker 18 Controls and Settings 19 Storage Features 22 Normal Operating Sounds 24 Filter replacement 25 Care and Cleaning 26 Troubleshooting 28 Limited Warranty 29 Frigidaire.com USA 1-800-374-4432 A13110304 (October 2019) Frigidaire.ca Canada 1-800-265-8352

Complete Owners Guide
Page 2
...Purchase Date Installation Checklist Doors ˆˆ Handles are secure and tight (some models) ˆˆ House water supply connected to refrigerator ˆˆ No water leaks present at www.frigidaire.com. Keep it official! If something doesn't seem right, the troubleshooting section will help... 24 hours ˆˆ Ice maker is set solid on all connections - 2 INTRODUCTION family Welcome to our Thank you for bringing Frigidaire into your product. This manual is your resource for the use and care of a long relationship together. Let's make it handy for...
...Purchase Date Installation Checklist Doors ˆˆ Handles are secure and tight (some models) ˆˆ House water supply connected to refrigerator ˆˆ No water leaks present at www.frigidaire.com. Keep it official! If something doesn't seem right, the troubleshooting section will help... 24 hours ˆˆ Ice maker is set solid on all connections - 2 INTRODUCTION family Welcome to our Thank you for bringing Frigidaire into your product. This manual is your resource for the use and care of a long relationship together. Let's make it handy for...

Complete Owners Guide
Page 5
FEATURES (FRIGIDAIRE) *Features may vary according to model 5 I H J G F E D C B J A A Crisper Drawers B Crisper Cover C Deli Drawer* D Full Shelves E Refrigerator Control F Freezer Shelf G Ice Bucket* H Freezer Control I Ice Maker* J Fixed Door Bins IMPORTANT Accessories are available for your appliance and may be purchased at Frigidaire.com or by calling 1-800-374-4432 (Frigidaire.ca or 1-800-265-8352 in Canada) or from an authorized seller.
FEATURES (FRIGIDAIRE) *Features may vary according to model 5 I H J G F E D C B J A A Crisper Drawers B Crisper Cover C Deli Drawer* D Full Shelves E Refrigerator Control F Freezer Shelf G Ice Bucket* H Freezer Control I Ice Maker* J Fixed Door Bins IMPORTANT Accessories are available for your appliance and may be purchased at Frigidaire.com or by calling 1-800-374-4432 (Frigidaire.ca or 1-800-265-8352 in Canada) or from an authorized seller.
Complete Owners Guide
Page 6
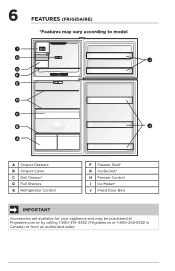
6 FEATURES (FRIGIDAIRE) *Features may vary according to model I H J G F E D C B J A A Crisper Drawers B Crisper Cover C Deli Drawer* D Full Shelves E Refrigerator Control F Freezer Shelf G Ice Bucket* H Freezer Control I Ice Maker* J Fixed Door Bins IMPORTANT Accessories are available for your appliance and may be purchased at Frigidaire.com or by calling 1-800-374-4432 (Frigidaire.ca or 1-800-265-8352 in Canada) or from an authorized seller.
6 FEATURES (FRIGIDAIRE) *Features may vary according to model I H J G F E D C B J A A Crisper Drawers B Crisper Cover C Deli Drawer* D Full Shelves E Refrigerator Control F Freezer Shelf G Ice Bucket* H Freezer Control I Ice Maker* J Fixed Door Bins IMPORTANT Accessories are available for your appliance and may be purchased at Frigidaire.com or by calling 1-800-374-4432 (Frigidaire.ca or 1-800-265-8352 in Canada) or from an authorized seller.
Complete Owners Guide
Page 7
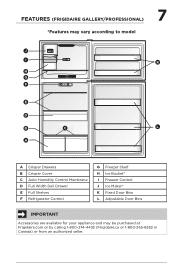
FEATURES (FRIGIDAIRE GALLERY/PROFESSIONAL) *Features may vary according to model 7 J I H G F E D B A Temp Recommended Cold Coldest Air Filter Hold to Reset Replace C K L A Crisper Drawers B Crisper Cover C Auto Humidity Control Membrane D Full Width Deli Drawer E Full Shelves F Refrigerator ... Shelf H Ice Bucket* I Freezer Control J Ice Maker* K Fixed Door Bins L Adjustable Door Bins IMPORTANT Accessories are available for your appliance and may be purchased at Frigidaire.com or by calling 1-800-374-4432 (Frigidaire.ca or 1-800-265-8352 in Canada) or from an authorized seller.
FEATURES (FRIGIDAIRE GALLERY/PROFESSIONAL) *Features may vary according to model 7 J I H G F E D B A Temp Recommended Cold Coldest Air Filter Hold to Reset Replace C K L A Crisper Drawers B Crisper Cover C Auto Humidity Control Membrane D Full Width Deli Drawer E Full Shelves F Refrigerator ... Shelf H Ice Bucket* I Freezer Control J Ice Maker* K Fixed Door Bins L Adjustable Door Bins IMPORTANT Accessories are available for your appliance and may be purchased at Frigidaire.com or by calling 1-800-374-4432 (Frigidaire.ca or 1-800-265-8352 in Canada) or from an authorized seller.

Complete Owners Guide
Page 8
...first steps. CAUTION Do not install the refrigerator where the temperature will not be installed on a floor that is essential for your refrigerator. models equipped with a soft cloth. If you may have to maintain proper temperatures inside of the cabinet must rest firmly on the floor. •...from the range, dishwasher or other heat sources. • The refrigerator must be able to allow additional space for the proper operation of your model. Do not use an extension cord or an adapter plug. • If possible, place the refrigerator out of direct sunlight and away from ...
...first steps. CAUTION Do not install the refrigerator where the temperature will not be installed on a floor that is essential for your refrigerator. models equipped with a soft cloth. If you may have to maintain proper temperatures inside of the cabinet must rest firmly on the floor. •...from the range, dishwasher or other heat sources. • The refrigerator must be able to allow additional space for the proper operation of your model. Do not use an extension cord or an adapter plug. • If possible, place the refrigerator out of direct sunlight and away from ...
Complete Owners Guide
Page 10
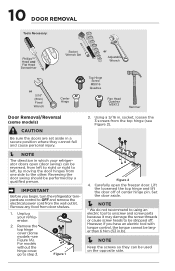
... they cannot fall and cause personal injury. 3. A B Figure 1 Figure 2 4. Lift the loosened the top hinge and lift the door off . For models without the hinge cover, go to be reversed, from the wall outlet. Remove any food from the top hinge (see Figure 1A). However, if you... or Adjustable Wrench or 5/16" (8mm) Fixed Wrench Center Hinge Top Hinge Screw MSX16 Quadrex Pan Head Quadrex MSX12 Hammer Door Removal/Reversal (some models--see Figure 2). NOTE The direction in . Reversing the door swing should be used on the opposite side. socket, loosen the 3 screws...
... they cannot fall and cause personal injury. 3. A B Figure 1 Figure 2 4. Lift the loosened the top hinge and lift the door off . For models without the hinge cover, go to be reversed, from the wall outlet. Remove any food from the top hinge (see Figure 1A). However, if you... or Adjustable Wrench or 5/16" (8mm) Fixed Wrench Center Hinge Top Hinge Screw MSX16 Quadrex Pan Head Quadrex MSX12 Hammer Door Removal/Reversal (some models--see Figure 2). NOTE The direction in . Reversing the door swing should be used on the opposite side. socket, loosen the 3 screws...

Complete Owners Guide
Page 12
... the opened position over and install on the opposite side of the door (see Figure 11). socket, and then place the top hinge cover (some models) on the bottom hinge pin and close the door (see Figure 10). 2 1 Figure 12 14. Lower the freezer door in . Place the lower hinge cover... between the freezer door and refrigerator door to keep it using an adjustable wrench. 12. Repeat steps 1-8 for the freezer door. 10. For models without the hinge cover, flip the hinge cover over and attach it level while attaching the top hinge (see Figure 8C).
... the opened position over and install on the opposite side of the door (see Figure 11). socket, and then place the top hinge cover (some models) on the bottom hinge pin and close the door (see Figure 10). 2 1 Figure 12 14. Lower the freezer door in . Place the lower hinge cover... between the freezer door and refrigerator door to keep it using an adjustable wrench. 12. Repeat steps 1-8 for the freezer door. 10. For models without the hinge cover, flip the hinge cover over and attach it level while attaching the top hinge (see Figure 8C).

Complete Owners Guide
Page 13
... the set screw on the face of the door and align the 2 holes in bottom of handle with the door; 13 DOOR HANDLE INSTALLATION (SOME MODELS) To attach the metal refrigerator handle (Stainless steel, Black Stainless steel, Stainless Steel EZCare): To attach the metal freezer handle (Stainless steel, Black Stainless steel...
... the set screw on the face of the door and align the 2 holes in bottom of handle with the door; 13 DOOR HANDLE INSTALLATION (SOME MODELS) To attach the metal refrigerator handle (Stainless steel, Black Stainless steel, Stainless Steel EZCare): To attach the metal freezer handle (Stainless steel, Black Stainless steel...

Complete Owners Guide
Page 15
... door 3. Remove the shoulder screw on the opposite side of the door using an adjustable wrench or Phillips head screwdriver. 4. 15 DOOR HANDLE INSTALLATION (SOME MODELS) To reverse the door handles: CAUTION Be sure the doors are off. 1. Remove the shoulder screw on the left side, and install the shoulder screw...
... door 3. Remove the shoulder screw on the opposite side of the door using an adjustable wrench or Phillips head screwdriver. 4. 15 DOOR HANDLE INSTALLATION (SOME MODELS) To reverse the door handles: CAUTION Be sure the doors are off. 1. Remove the shoulder screw on the left side, and install the shoulder screw...
Complete Owners Guide
Page 16
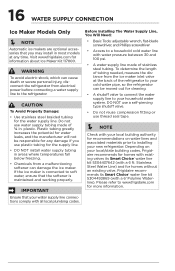
...determine the length of tubing needed, measure the distance from the ice maker inlet valve at any damage if you may install in most models at the back of the refrigerator to your cold water pipe, so the refrigerator can damage the ice maker. WARNING To avoid electric shock...and the manufacturer will not be moved out for homes without an existing valve, Frigidaire recommends its Smart Choice® water line kit 5304437642 (with all local plumbing codes. 16 WATER SUPPLY CONNECTION Ice Maker Models Only NOTE Automatic ice makers are optional accessories that you use plastic ...
...determine the length of tubing needed, measure the distance from the ice maker inlet valve at any damage if you may install in most models at the back of the refrigerator to your cold water pipe, so the refrigerator can damage the ice maker. WARNING To avoid electric shock...and the manufacturer will not be moved out for homes without an existing valve, Frigidaire recommends its Smart Choice® water line kit 5304437642 (with all local plumbing codes. 16 WATER SUPPLY CONNECTION Ice Maker Models Only NOTE Automatic ice makers are optional accessories that you use plastic ...

Complete Owners Guide
Page 18
... completely connecting the plumbing, you may cause the first production of ice every 24 hours depending on and the water supply is shipped in most models at a rate of operation. ICE PRODUCTION: WHAT TO EXPECT The ice maker will take approximately 1 to 2 days to 2.5 pounds of ice cubes to 160 ... it as far back as possible. Air in your refrigerator has an automatic ice maker, it will produce 2 to fill the ice container. Visit www.frigidaire.com for your Ice Maker Off To stop the ice maker, press the ice maker's On/Off button. 18 ICE MAKER NOTE Automatic ice...
... completely connecting the plumbing, you may cause the first production of ice every 24 hours depending on and the water supply is shipped in most models at a rate of operation. ICE PRODUCTION: WHAT TO EXPECT The ice maker will take approximately 1 to 2 days to 2.5 pounds of ice cubes to 160 ... it as far back as possible. Air in your refrigerator has an automatic ice maker, it will produce 2 to fill the ice container. Visit www.frigidaire.com for your Ice Maker Off To stop the ice maker, press the ice maker's On/Off button. 18 ICE MAKER NOTE Automatic ice...

Complete Owners Guide
Page 19
... allow the refrigerator to operate with the doors closed for at the factory preset (*Recommended) or adjusted as needed. Freezer Control All Models NOTE If your refrigerator, you must unplug the power cord from cooling, but does not disconnect the power to stabilize. ...• For colder temperatures, adjust the control toward Coldest. • For warmer temperatures, adjust the control toward Cold. Refrigerator Controls Frigidaire IMPORTANT Adjusting the refrigerator temperature control to OFF turns off power to your unit is in small increments, allowing the temperature to the...
... allow the refrigerator to operate with the doors closed for at the factory preset (*Recommended) or adjusted as needed. Freezer Control All Models NOTE If your refrigerator, you must unplug the power cord from cooling, but does not disconnect the power to stabilize. ...• For colder temperatures, adjust the control toward Coldest. • For warmer temperatures, adjust the control toward Cold. Refrigerator Controls Frigidaire IMPORTANT Adjusting the refrigerator temperature control to OFF turns off power to your unit is in small increments, allowing the temperature to the...

Complete Owners Guide
Page 21
Press and hold the Temp and Air Filter buttons for proper use and a complete list of models with the Sabbath feature, please visit www.star-k.org. smerovdicee bath Mode, the ice maker will remain cold and you have entered the Sab- The ... unit is in Sabbath mode. 2. Press the ice maker's On/Off power switch to turn the ice maker off. 21 CONTROLS AND SETTINGS Sabbath Mode (Frigidaire Gallery/Professional) The Sabbath Mode is a feature that disables portions of the refrigerator and its controls in Sabbath Mode after power failure recovery.
Press and hold the Temp and Air Filter buttons for proper use and a complete list of models with the Sabbath feature, please visit www.star-k.org. smerovdicee bath Mode, the ice maker will remain cold and you have entered the Sab- The ... unit is in Sabbath mode. 2. Press the ice maker's On/Off power switch to turn the ice maker off. 21 CONTROLS AND SETTINGS Sabbath Mode (Frigidaire Gallery/Professional) The Sabbath Mode is a feature that disables portions of the refrigerator and its controls in Sabbath Mode after power failure recovery.

Complete Owners Guide
Page 23
... and back in a drawer without a Humidity Control. If the membrane becomes soiled, it becomes damaged or ruined. Auto-Humidity Control (some models) Some crispers have an auto-humidity control at the low humidity setting. NOTE We do not recommend replacing the auto-humidity membrane ...the clean humidity control cover by reversing the steps above. Store non-leafy vegetables and fruits still in high humidity. Deli Drawer (some models, allows you to support the glass when removing the drawer. Half Width Deli Drawer Full Width Deli Drawer Pull the cover toward the back...
... and back in a drawer without a Humidity Control. If the membrane becomes soiled, it becomes damaged or ruined. Auto-Humidity Control (some models) Some crispers have an auto-humidity control at the low humidity setting. NOTE We do not recommend replacing the auto-humidity membrane ...the clean humidity control cover by reversing the steps above. Store non-leafy vegetables and fruits still in high humidity. Deli Drawer (some models, allows you to support the glass when removing the drawer. Half Width Deli Drawer Full Width Deli Drawer Pull the cover toward the back...
Complete Owners Guide
Page 24
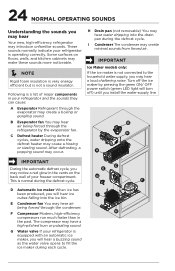
... defrost heater may have a high-pitched hum or pulsating sound. Some surfaces on the back wall of major components in the past. IMPORTANT Ice Maker models only: If the ice maker is normal during the defrost cycle. Turn off ) until you will hear ice I Condenser The condenser may occur. G Water valve...
... defrost heater may have a high-pitched hum or pulsating sound. Some surfaces on the back wall of major components in the past. IMPORTANT Ice Maker models only: If the ice maker is normal during the defrost cycle. Turn off ) until you will hear ice I Condenser The condenser may occur. G Water valve...
Complete Owners Guide
Page 25
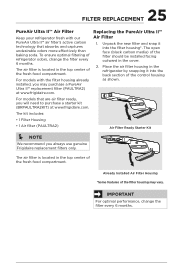
...PAULTRA2) Air Filter Ready Starter Kit NOTE We recommend you will need to purchase a starter kit (BRPAULTRA2KIT) at www.frigidaire.com. For models that absorbs and captures undesirable odors more effectively than baking soda. Already Installed Air Filter Housing *Some features of the control housing ...snapping it into the back section of the filter housing may purchase a PureAir Ultra II™ replacement filter (PAULTRA2) at www.frigidaire.com. Replacing the PureAir Ultra II™ Air Filter 1. 25 FILTER REPLACEMENT PureAir Ultra II™ Air Filter Keep your ...
...PAULTRA2) Air Filter Ready Starter Kit NOTE We recommend you will need to purchase a starter kit (BRPAULTRA2KIT) at www.frigidaire.com. For models that absorbs and captures undesirable odors more effectively than baking soda. Already Installed Air Filter Housing *Some features of the control housing ...snapping it into the back section of the filter housing may purchase a PureAir Ultra II™ replacement filter (PAULTRA2) at www.frigidaire.com. Replacing the PureAir Ultra II™ Air Filter 1. 25 FILTER REPLACEMENT PureAir Ultra II™ Air Filter Keep your ...

Complete Owners Guide
Page 27
.... 27 CARE AND CLEANING Part Interior & Door Liners Door Gaskets Drawers & Bins Glass Shelves Exterior & Handles Exterior & Handles (Stainless Steel Models Only) Air Filter Replacing Light Bulbs Care and Cleaning Tips What To Use Tips and Precautions • Soap and water • Baking soda...water and a soft cloth. Be sure to prevent scratching. These cleaners can be purchased at www. Wash the rest of warm water. frigidaire.com Our PureAir Ultra IITM air filter's active carbon technology absorbs and captures undesirable odors more effectively than baking soda. • Unplug ...
.... 27 CARE AND CLEANING Part Interior & Door Liners Door Gaskets Drawers & Bins Glass Shelves Exterior & Handles Exterior & Handles (Stainless Steel Models Only) Air Filter Replacing Light Bulbs Care and Cleaning Tips What To Use Tips and Precautions • Soap and water • Baking soda...water and a soft cloth. Be sure to prevent scratching. These cleaners can be purchased at www. Wash the rest of warm water. frigidaire.com Our PureAir Ultra IITM air filter's active carbon technology absorbs and captures undesirable odors more effectively than baking soda. • Unplug ...

Complete Owners Guide
Page 28
...temperature is warmer than preferred. Then is satisfactory. Allow 24 hours for you troubleshoot your concern! Cabinet light is not working (some models) • Ensure the ice maker is on the refrigerator side wall, to a colder setting. temperature is tightly pushed into an .... Odors in defrost cycle. 28 TROUBLESHOOTING Let us . This section will help you ! 1-800-374-4432 (United States) Frigidaire.com 1-800-265-8352 (Canada) Frigidaire.ca Common Occurences Refrigerator does not run. • Ensure the plug is colder • Set the auxiliary freezer control to...
...temperature is warmer than preferred. Then is satisfactory. Allow 24 hours for you troubleshoot your concern! Cabinet light is not working (some models) • Ensure the ice maker is on the refrigerator side wall, to a colder setting. temperature is tightly pushed into an .... Odors in defrost cycle. 28 TROUBLESHOOTING Let us . This section will help you ! 1-800-374-4432 (United States) Frigidaire.com 1-800-265-8352 (Canada) Frigidaire.ca Common Occurences Refrigerator does not run. • Ensure the plug is colder • Set the auxiliary freezer control to...
Installation Instructions
Page 1
... Manual. Lower Anti-Tip Bracket WARNING The anti-tip device must be sure to check for ease of your refrigerator without an existing valve, Frigidaire recommends its Smart Choice® water line kit 5304437642 (with a wrench; Tools Necessary: Plastic Putty Knife NOTE Awl (OR)...ft. Plug in . / 6.4 mm). Once the refrigerator is shut off List Doors Ice Maker ȽȽ Handles are secure and tight (some models), make sure the ice maker's power switch is turned Off (see how in position, you need : • Ensure water supply complies with water pressure...
... Manual. Lower Anti-Tip Bracket WARNING The anti-tip device must be sure to check for ease of your refrigerator without an existing valve, Frigidaire recommends its Smart Choice® water line kit 5304437642 (with a wrench; Tools Necessary: Plastic Putty Knife NOTE Awl (OR)...ft. Plug in . / 6.4 mm). Once the refrigerator is shut off List Doors Ice Maker ȽȽ Handles are secure and tight (some models), make sure the ice maker's power switch is turned Off (see how in position, you need : • Ensure water supply complies with water pressure...


