
Installation Instructions
Page 1
... you purchased your refrigerator's shipping carton. Plug in 24 hours. 4 Place In Permanent Position If possible, use packing foam and tape to secure the internal parts of your site preparation: • Choose a place near a grounded electrical outlet. • Do not use refrigerator handles to use a self-piercing shut-off valve and...
... you purchased your refrigerator's shipping carton. Plug in 24 hours. 4 Place In Permanent Position If possible, use packing foam and tape to secure the internal parts of your site preparation: • Choose a place near a grounded electrical outlet. • Do not use refrigerator handles to use a self-piercing shut-off valve and...

Complete Owner s Guide
Page 2
... all instructions before using this refrigerator. It is turned ON Ice & water dispenser operates correctly Front filter must be flush with any moving parts of your old refrigerator or freezer, please follow this or any exterior wrapping material immediately after the refrigerator is the safety alert symbol. recheck in...
... all instructions before using this refrigerator. It is turned ON Ice & water dispenser operates correctly Front filter must be flush with any moving parts of your old refrigerator or freezer, please follow this or any exterior wrapping material immediately after the refrigerator is the safety alert symbol. recheck in...

Complete Owner s Guide
Page 8
... removed in hinge and tighten with adjustable wrench. 14. Reverse door handles (see instruction on handle side of door and grasp the thinnest part of door. DOOR REMOVAL/REVERSAL INSTRUCTIONS 9. Unscrew bottom hinge pin using adjustable wrench. Move hinge pin to opposite side. Move freezer and ...refrigerator door stops to other hole in Step 2) and insert the thickest part between gasket and cabinet flange). Remove cabinet and hinge hole plugs and move to opposite side. 15. Look for open areas between the...
... removed in hinge and tighten with adjustable wrench. 14. Reverse door handles (see instruction on handle side of door and grasp the thinnest part of door. DOOR REMOVAL/REVERSAL INSTRUCTIONS 9. Unscrew bottom hinge pin using adjustable wrench. Move hinge pin to opposite side. Move freezer and ...refrigerator door stops to other hole in Step 2) and insert the thickest part between gasket and cabinet flange). Remove cabinet and hinge hole plugs and move to opposite side. 15. Look for open areas between the...

Complete Owner s Guide
Page 10
... handle until the handle is flush with the door, then tighten another ½ turn . Do not tighten the set screw on the rounded part of the handle. 10 Set Screw Shoulder Screw Set Screw Handle Screw Tighten the set screw yet. 2. Install the two screws into the top... Screw Screw Handle Stainless Steel Models Screw Handle Shoulder Screw Handle Shoulder Screw Button Plug Set Screw To attach metal freezer handle: 1. Place rounded part of handle onto shoulder screw on face of door and align the two holes in bottom of the handles may be sharp. 3. HANDLE INSTALLATION ...
... handle until the handle is flush with the door, then tighten another ½ turn . Do not tighten the set screw on the rounded part of the handle. 10 Set Screw Shoulder Screw Set Screw Handle Screw Tighten the set screw yet. 2. Install the two screws into the top... Screw Screw Handle Stainless Steel Models Screw Handle Shoulder Screw Handle Shoulder Screw Button Plug Set Screw To attach metal freezer handle: 1. Place rounded part of handle onto shoulder screw on face of door and align the two holes in bottom of the handles may be sharp. 3. HANDLE INSTALLATION ...
Complete Owner s Guide
Page 18
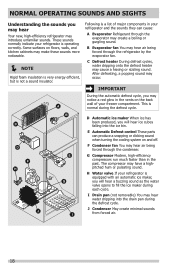
... ice cubes falling into the drain pan during the defrost cycle. The compressor may hear water dripping into the ice bin. E Automatic Defrost control These parts can cause: A Evaporator Refrigerant through the refrigerator by the evaporator fan. F Condenser fan You may hear air being forced through the evaporator may introduce unfamiliar...
... ice cubes falling into the drain pan during the defrost cycle. The compressor may hear water dripping into the ice bin. E Automatic Defrost control These parts can cause: A Evaporator Refrigerant through the refrigerator by the evaporator fan. F Condenser fan You may hear air being forced through the evaporator may introduce unfamiliar...
Complete Owner s Guide
Page 19
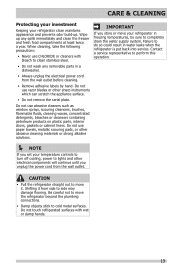
...temperature controls to turn off cooling, power to move your refrigerator clean maintains appearance and prevents odor build-up any removable parts in water leaks when the refrigerator is put back into service. Be careful not to lights and other sharp instruments which... such as window sprays, scouring cleansers, brushes, flammable fluids, cleaning waxes, concentrated detergents, bleaches or cleansers containing petroleum products on plastic parts, interior doors, gaskets or cabinet liners. Do not touch refrigerated surfaces with bleach to do so could result in a dishwasher. •...
...temperature controls to turn off cooling, power to move your refrigerator clean maintains appearance and prevents odor build-up any removable parts in water leaks when the refrigerator is put back into service. Be careful not to lights and other sharp instruments which... such as window sprays, scouring cleansers, brushes, flammable fluids, cleaning waxes, concentrated detergents, bleaches or cleansers containing petroleum products on plastic parts, interior doors, gaskets or cabinet liners. Do not touch refrigerated surfaces with bleach to do so could result in a dishwasher. •...
Complete Owner s Guide
Page 20
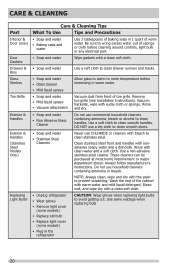
CARE & CLEANING Part Interior & Door Liners Door Gaskets Drawers & Bins Glass Shelves Toe Grille Exterior & Handles Exterior & Handles (Stainless Steel Models Only) Replacing Light Bulbs Care & Cleaning Tips ... • Replace light cover (some models) • Plug in warm water. Be sure to room temperature before cleaning around controls, light bulb or any electrical part. • Soap and water Wipe gaskets with warm water and mild liquid detergent. Vacuum backside, wipe with nonabrasive soapy water and a dishcloth. Use a soft cloth...
CARE & CLEANING Part Interior & Door Liners Door Gaskets Drawers & Bins Glass Shelves Toe Grille Exterior & Handles Exterior & Handles (Stainless Steel Models Only) Replacing Light Bulbs Care & Cleaning Tips ... • Replace light cover (some models) • Plug in warm water. Be sure to room temperature before cleaning around controls, light bulb or any electrical part. • Soap and water Wipe gaskets with warm water and mild liquid detergent. Vacuum backside, wipe with nonabrasive soapy water and a dishcloth. Use a soft cloth...
Complete Owner s Guide
Page 22
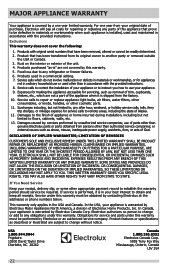
... by Electrolux Major Appliances North America, a division of the unit. 4. or external causes such as described or illustrated are not a part of parts other cosmetic parts. 11. YOU MAY ALSO HAVE OTHER RIGHTS THAT VARY FROM STATE TO STATE. This warranty only applies in a commercial setting. 7. In... PRODUCT REPAIR OR REPLACEMENT AS PROVIDED HEREIN. Electrolux authorizes no person to floors, cabinets, walls, etc. 13. USA 1.800.944.9044 Frigidaire 10200 David Taylor Drive Charlotte, NC 28262 Canada 1.800.265.8352 Electrolux Canada Corp. 5855 Terry Fox Way Mississauga, Ontario, Canada L5V ...
... by Electrolux Major Appliances North America, a division of the unit. 4. or external causes such as described or illustrated are not a part of parts other cosmetic parts. 11. YOU MAY ALSO HAVE OTHER RIGHTS THAT VARY FROM STATE TO STATE. This warranty only applies in a commercial setting. 7. In... PRODUCT REPAIR OR REPLACEMENT AS PROVIDED HEREIN. Electrolux authorizes no person to floors, cabinets, walls, etc. 13. USA 1.800.944.9044 Frigidaire 10200 David Taylor Drive Charlotte, NC 28262 Canada 1.800.265.8352 Electrolux Canada Corp. 5855 Terry Fox Way Mississauga, Ontario, Canada L5V ...

Wiring Diagram
Page 1
... (running) 1.1 to 1.6 Base Voltage 115 vac (127 vac max) DEFROST SPECIFICATIONS Cabinet Size Thermostat Cut-in 6 seconds. AUTOMATIC DEFROST TOP MOUNT FREEZER - CAUTION All electrical parts and wiring must be returned to their original position and properly secured. Electronic Timer (ADC) - CONDENSER FAN MOTOR Watts RPM 2.3 1100 CW Opposite Shaft ICE...
... (running) 1.1 to 1.6 Base Voltage 115 vac (127 vac max) DEFROST SPECIFICATIONS Cabinet Size Thermostat Cut-in 6 seconds. AUTOMATIC DEFROST TOP MOUNT FREEZER - CAUTION All electrical parts and wiring must be returned to their original position and properly secured. Electronic Timer (ADC) - CONDENSER FAN MOTOR Watts RPM 2.3 1100 CW Opposite Shaft ICE...
Energy Guide
Page 1
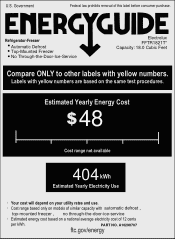
PART NO. Labels with yellow numbers. A10298707 ftc.gov/energy U.S. Estimated Yearly Energy Cost $ 48 Cost range not available X4X0X4 kWh Estimated Yearly Electricity Use l Your ...
PART NO. Labels with yellow numbers. A10298707 ftc.gov/energy U.S. Estimated Yearly Energy Cost $ 48 Cost range not available X4X0X4 kWh Estimated Yearly Electricity Use l Your ...


