Complete Owner's Guide
Page 5
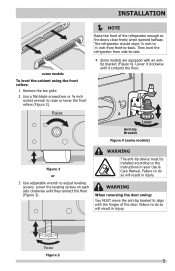
... until it contacts the floor. The refrigerator should slope ¼ inch to ½ inch from side-to do so will result in your Use & Care Manual. Lower Anti-tip Bracket Figure 4 (some models To level the cabinet using the front rollers: 1 Remove the toe grille. 2 Use a flat-blade screwdriver or ⅜...
... until it contacts the floor. The refrigerator should slope ¼ inch to ½ inch from side-to do so will result in your Use & Care Manual. Lower Anti-tip Bracket Figure 4 (some models To level the cabinet using the front rollers: 1 Remove the toe grille. 2 Use a flat-blade screwdriver or ⅜...
Wiring Diagram
Page 1
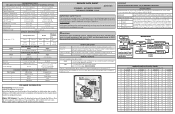
...light will sound for heat or air flow, as appropriate, to determine the result of each test, the component listed will interrupt power to Enter Manual Defrost. initiate first/next test --> Press the door switch 2 times; 2 short beeps acknowledge selection. 1 Compressor 2 Heater 3 FF Light 4... Beep Test 1: 2 Beeps Test 2: Power ON Press Door Switch Compressor ON Enters Service 2 Times Mode 2 Beeps Press Door Switch 2 Times Manual Defrost 2 Beeps to Defrost Heater To Exit Service Mode from housing. PERFORMANCE DATA NO LOAD & NO DOOR OPENINGS AT MID-POINT CONTROL SETTING Type...
...light will sound for heat or air flow, as appropriate, to determine the result of each test, the component listed will interrupt power to Enter Manual Defrost. initiate first/next test --> Press the door switch 2 times; 2 short beeps acknowledge selection. 1 Compressor 2 Heater 3 FF Light 4... Beep Test 1: 2 Beeps Test 2: Power ON Press Door Switch Compressor ON Enters Service 2 Times Mode 2 Beeps Press Door Switch 2 Times Manual Defrost 2 Beeps to Defrost Heater To Exit Service Mode from housing. PERFORMANCE DATA NO LOAD & NO DOOR OPENINGS AT MID-POINT CONTROL SETTING Type...

Installation Instructions
Page 1
...in 24 hours. 4 Place In Permanent Position If possible, use packing foam and tape to secure the internal parts of your Use & Care Manual. Anti-tip Bracket Figure 4 (some models) 4 Some models are secure and tight Door seals completely to cabinet on all sides &#... when opened halfway. P/N: A01278401 Raise Figure 1 or Figure 2 Raise Figure 3 NOTE WARNING Raise the front of your Use & Care Manual. The refrigerator should align with the installation of the refrigerator enough so the doors close proximity to a range, dishwasher or other heat source. •...
...in 24 hours. 4 Place In Permanent Position If possible, use packing foam and tape to secure the internal parts of your Use & Care Manual. Anti-tip Bracket Figure 4 (some models) 4 Some models are secure and tight Door seals completely to cabinet on all sides &#... when opened halfway. P/N: A01278401 Raise Figure 1 or Figure 2 Raise Figure 3 NOTE WARNING Raise the front of your Use & Care Manual. The refrigerator should align with the installation of the refrigerator enough so the doors close proximity to a range, dishwasher or other heat source. •...


