
Installation Instructions (All Languages)
Page 1
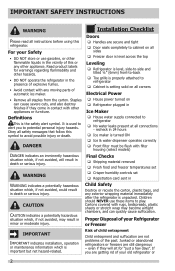
...See illustration 2.) 7/16" Wrench and 3/32" Hex Key (some models) Final Checks Shipping material removed Fresh Food and Freezer temperatures set Crisper Humidity controls set screw) 1 If the refrigerator door is lower than an entrance, consider two options: •... line until you can register online at www.electroluxusa.com. If the refrigerator is a list of toe grille from . Fasten top clips to remove the refrigerator and freezer doors, did you for choosing Frigidaire. 8 Installation Checkoff List Doors Door seals completely ...
...See illustration 2.) 7/16" Wrench and 3/32" Hex Key (some models) Final Checks Shipping material removed Fresh Food and Freezer temperatures set Crisper Humidity controls set screw) 1 If the refrigerator door is lower than an entrance, consider two options: •... line until you can register online at www.electroluxusa.com. If the refrigerator is a list of toe grille from . Fasten top clips to remove the refrigerator and freezer doors, did you for choosing Frigidaire. 8 Installation Checkoff List Doors Door seals completely ...
Complete Owner's Guide
Page 2
...entrapment and suffocation are getting rid of explosive fumes. • Avoid contact with any exterior wrapping material immediately after the refrigerator is important but not hazard-related. CAUTION CAUTION indicates a potentially hazardous situation which is unpacked. It is the safety ...front-to-back Toe grille is properly attached to refrigerator Cabinet is turned ON Ice & water dispenser operates correctly Front filter must be flush with filter housing (select models) DANGER indicates an imminently hazardous situation which , if not ...
...entrapment and suffocation are getting rid of explosive fumes. • Avoid contact with any exterior wrapping material immediately after the refrigerator is important but not hazard-related. CAUTION CAUTION indicates a potentially hazardous situation which is unpacked. It is the safety ...front-to-back Toe grille is properly attached to refrigerator Cabinet is turned ON Ice & water dispenser operates correctly Front filter must be flush with filter housing (select models) DANGER indicates an imminently hazardous situation which , if not ...
Complete Owner's Guide
Page 4
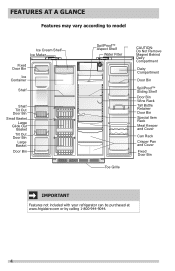
FEATURES AT A GLANCE Features may vary according to model Ice Cream Shelf Ice Maker Fixed Door Bin Ice Container Shelf Shelf Tilt Out Door Bin Small Basket Large Glide Out Basket Tilt Out Door ... Retainer Door Bin Special Item Rack Meat Keeper and Cover Can Rack Crisper Pan and Cover Fixed Door Bin IMPORTANT Features not included with your refrigerator can be purchased at www.frigidaire.com or by calling 1-800-944-9044. 4
FEATURES AT A GLANCE Features may vary according to model Ice Cream Shelf Ice Maker Fixed Door Bin Ice Container Shelf Shelf Tilt Out Door Bin Small Basket Large Glide Out Basket Tilt Out Door ... Retainer Door Bin Special Item Rack Meat Keeper and Cover Can Rack Crisper Pan and Cover Fixed Door Bin IMPORTANT Features not included with your refrigerator can be purchased at www.frigidaire.com or by calling 1-800-944-9044. 4
Complete Owner's Guide
Page 5
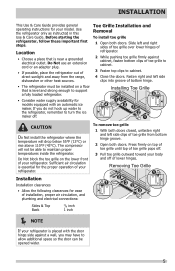
... firmly on a floor that is placed with an automatic ice maker. Location • Choose a place that is essential for your model. If you may have to support a fully loaded refrigerator. • Consider water supply availability for ease of installation, proper air circulation, and plumbing and electrical connections: To remove toe grille 1 With...
... firmly on a floor that is placed with an automatic ice maker. Location • Choose a place that is essential for your model. If you may have to support a fully loaded refrigerator. • Consider water supply availability for ease of installation, proper air circulation, and plumbing and electrical connections: To remove toe grille 1 With...
Complete Owner's Guide
Page 6
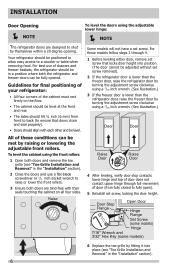
... using a 7/16 inch wrench. (See illustration.) 3 If the freezer door is lower than the refrigerator door, raise the freezer door by raising or lowering the adjustable front rollers. Some models will not have a set screw that doors close and seal properly). • Doors should align with... a counter or table when removing food. Guidelines for final positioning of your refrigerator: • All four corners of drawers and freezer baskets, the refrigerator should be level at the front and rear. For those models follow steps 2 through full movement of these conditions can be fully opened....
... using a 7/16 inch wrench. (See illustration.) 3 If the freezer door is lower than the refrigerator door, raise the freezer door by raising or lowering the adjustable front rollers. Some models will not have a set screw that doors close and seal properly). • Doors should align with... a counter or table when removing food. Guidelines for final positioning of your refrigerator: • All four corners of drawers and freezer baskets, the refrigerator should be level at the front and rear. For those models follow steps 2 through full movement of these conditions can be fully opened....

Complete Owner's Guide
Page 8
...its outer sleeve inward. 4 Remove the screws from the connector located below the freezer door. Water Line Tubing Hinge Assembly Screws Non-Adjusting Hinge (some models) Door Top Hinge To remove the freezer door: 1 Detach the multi-wire cable connector located above steps. 2 Trace lightly around the hinge with ...a pencil. Door Hinge Assembly Closer Pin Screws Hinge Adjustable Hinge To reinstall the refrigerator door, reverse the above steps. DOOR REMOVAL INSTRUCTIONS 3 Remove the two bottom hinge screws and hinge if necessary.
...its outer sleeve inward. 4 Remove the screws from the connector located below the freezer door. Water Line Tubing Hinge Assembly Screws Non-Adjusting Hinge (some models) Door Top Hinge To remove the freezer door: 1 Detach the multi-wire cable connector located above steps. 2 Trace lightly around the hinge with ...a pencil. Door Hinge Assembly Closer Pin Screws Hinge Adjustable Hinge To reinstall the refrigerator door, reverse the above steps. DOOR REMOVAL INSTRUCTIONS 3 Remove the two bottom hinge screws and hinge if necessary.

Complete Owner's Guide
Page 9
... no gaps. HANDLE INSTALLATION Frigidaire Professional® Freezer Upper End Cap Refrigerator Upper End Cap Freezer Lower End Cap Refrigerator Lower End Cap Frigidaire Gallery® Freezer Upper End Cap Refrigerator Upper End Cap Freezer Lower End Cap Refrigerator Lower End Cap Ensure Handle... NOTE All set screws should be sharp (some models). CAUTION Wear gloves and safety goggles and use extreme CAUTION when installing these instructions and illustrations thoroughly prior to install refrigerator handle. IMPORTANT To ensure proper installation of the handles may...
... no gaps. HANDLE INSTALLATION Frigidaire Professional® Freezer Upper End Cap Refrigerator Upper End Cap Freezer Lower End Cap Refrigerator Lower End Cap Frigidaire Gallery® Freezer Upper End Cap Refrigerator Upper End Cap Freezer Lower End Cap Refrigerator Lower End Cap Ensure Handle... NOTE All set screws should be sharp (some models). CAUTION Wear gloves and safety goggles and use extreme CAUTION when installing these instructions and illustrations thoroughly prior to install refrigerator handle. IMPORTANT To ensure proper installation of the handles may...

Complete Owner's Guide
Page 12
Your refrigerator comes with a state-of your freezer and fresh food compartments. The models with a two-digit temperature display are preset at the factory. The first time you press the button, the display shows current setting you desire... system. The system's control panel is , place a separate thermometer inside . CONTROLS Allowing Cooling Time Before Use To ensure safe food storage, allow your refrigerator to operate with the doors closed for at least 8 to 12 hours before making additional changes. Setting Cooling Temperatures NOTE When changing control settings...
Your refrigerator comes with a state-of your freezer and fresh food compartments. The models with a two-digit temperature display are preset at the factory. The first time you press the button, the display shows current setting you desire... system. The system's control panel is , place a separate thermometer inside . CONTROLS Allowing Cooling Time Before Use To ensure safe food storage, allow your refrigerator to operate with the doors closed for at least 8 to 12 hours before making additional changes. Setting Cooling Temperatures NOTE When changing control settings...
Complete Owner's Guide
Page 13
... same time pressing the 'fresh food temperature down . The unit will continue to mute alarms. 13 The control panel will stay muted even if the refrigerator is an audible alarm only and does not display in the paragraph above ). After which the control panel will sound again and can be muted... on , use the same key combination that was used to monitor the product temperatures for an extended period of time an alarm will sound. (Some models will have been muted, they will still show the display temperature. Alarm Mute Alarms can be reset again. High Temperature When a warm...
... same time pressing the 'fresh food temperature down . The unit will continue to mute alarms. 13 The control panel will stay muted even if the refrigerator is an audible alarm only and does not display in the paragraph above ). After which the control panel will sound again and can be muted... on , use the same key combination that was used to monitor the product temperatures for an extended period of time an alarm will sound. (Some models will have been muted, they will still show the display temperature. Alarm Mute Alarms can be reset again. High Temperature When a warm...

Complete Owner's Guide
Page 16
... used items can extend the life of the shelf into position. The fresh drawers, located under the bottom refrigerator shelf, are adjustable for short term storage of jars, bottles, and cans. In some models) catch and hold accidental spills. Crispers do not feature humidity 2 controls. 2 Cantilever Glass Shelf Door storage Cantilever Sliding...
... used items can extend the life of the shelf into position. The fresh drawers, located under the bottom refrigerator shelf, are adjustable for short term storage of jars, bottles, and cans. In some models) catch and hold accidental spills. Crispers do not feature humidity 2 controls. 2 Cantilever Glass Shelf Door storage Cantilever Sliding...
Complete Owner's Guide
Page 26
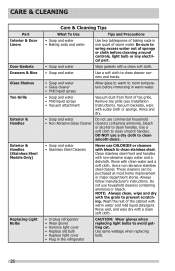
... cloth to prevent scratching. Use a non-abrasive stainless steel cleaner. NOTE: Always clean, wipe and dry with a clean soft cloth. • Unplug refrigerator • Wear gloves • Remove light cover • Replace old bulb • Replace light cover • Plug in the... water. CARE & CLEANING Part Interior & Door Liners Door Gaskets Drawers & Bins Glass Shelves Toe Grille Exterior & Handles Exterior & Handles (Stainless Steel Models Only) Replacing Light Bulbs Care & Cleaning Tips What To Use Tips and Precautions • Soap and water • Baking soda and water Use two...
... cloth to prevent scratching. Use a non-abrasive stainless steel cleaner. NOTE: Always clean, wipe and dry with a clean soft cloth. • Unplug refrigerator • Wear gloves • Remove light cover • Replace old bulb • Replace light cover • Plug in the... water. CARE & CLEANING Part Interior & Door Liners Door Gaskets Drawers & Bins Glass Shelves Toe Grille Exterior & Handles Exterior & Handles (Stainless Steel Models Only) Replacing Light Bulbs Care & Cleaning Tips What To Use Tips and Precautions • Soap and water • Baking soda and water Use two...
Complete Owner's Guide
Page 29
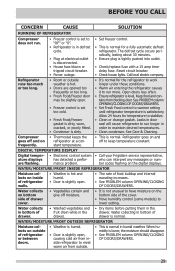
... 29 DIGITAL TEMPERATURE DISPLAY Digital temper- • Electronic control system • Call your Frigidaire service representative, ature displays has detected a perfor- WATER/MOISTURE/FROST INSIDE REFRIGERATOR Moisture collects on the bottom side of drawer. • Washed vegetables and fruit drain ... putting them in bottom of the cover. • Move humidity control (some models) to maintain desired temperatures. • Clean condenser. Allow 24 hours for a fully automatic defrost refrigerator. are opened too frequently or too long. • Fresh Food/freezer door ...
... 29 DIGITAL TEMPERATURE DISPLAY Digital temper- • Electronic control system • Call your Frigidaire service representative, ature displays has detected a perfor- WATER/MOISTURE/FROST INSIDE REFRIGERATOR Moisture collects on the bottom side of drawer. • Washed vegetables and fruit drain ... putting them in bottom of the cover. • Move humidity control (some models) to maintain desired temperatures. • Clean condenser. Allow 24 hours for a fully automatic defrost refrigerator. are opened too frequently or too long. • Fresh Food/freezer door ...
Wiring Diagram
Page 1
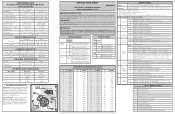
... • Press FF UP or DOWN to aide in evaluation of the damper. --- Display is released. Turns off evaporator fan, displays "_". --- Some models) 8.0 1100 CW Opposite Shaft 2550 CW Opposite Shaft .03 Running .07 Running ICE MAKER SPECIFICATIONS Electrical 115 vac (127 vac max) 60 Hertz Thermostat ... 32 to 40% 0º to 4ºF (-18º to -16ºC) 55 to 65% -1º to 3ºF (-18º to -16ºC) Refrigerator Temperature 34º to 39ºF (1º to 4ºC) 34º to 39ºF (1º to 4ºC) Low Side Pressure (cut-in) Low Side ...
... • Press FF UP or DOWN to aide in evaluation of the damper. --- Display is released. Turns off evaporator fan, displays "_". --- Some models) 8.0 1100 CW Opposite Shaft 2550 CW Opposite Shaft .03 Running .07 Running ICE MAKER SPECIFICATIONS Electrical 115 vac (127 vac max) 60 Hertz Thermostat ... 32 to 40% 0º to 4ºF (-18º to -16ºC) 55 to 65% -1º to 3ºF (-18º to -16ºC) Refrigerator Temperature 34º to 39ºF (1º to 4ºC) 34º to 39ºF (1º to 4ºC) Low Side Pressure (cut-in) Low Side ...


