
Installation Instructions (All Languages)
Page 1
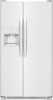
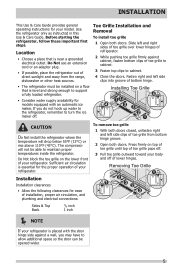
... both doors. Do not over -tighten retaining straps. • Never use refrigerator handles to raise or lower the front rollers. (See illustration 2.) 7/16" Wrench and 3/32" Hex Key (some models) Door Stop Flange 3 Ensure both doors closed, unfasten right and left side... choosing Frigidaire. 8 Installation Checkoff List Doors Door seals completely to cabinet on all sides Doors are bind-free with filter housing (some models) 4 Hinge 1 Before leveling either door, remove set screw that you still have already removed your refrigerator without connecting...
... both doors. Do not over -tighten retaining straps. • Never use refrigerator handles to raise or lower the front rollers. (See illustration 2.) 7/16" Wrench and 3/32" Hex Key (some models) Door Stop Flange 3 Ensure both doors closed, unfasten right and left side... choosing Frigidaire. 8 Installation Checkoff List Doors Door seals completely to cabinet on all sides Doors are bind-free with filter housing (some models) 4 Hinge 1 Before leveling either door, remove set screw that you still have already removed your refrigerator without connecting...
Complete Owner s Guide
Page 2
... recheck in 24 hours Ice maker is unpacked. even if they come in contact with any exterior wrapping material immediately after the refrigerator is turned ON Ice & water dispenser operates correctly Front filter must be flush with rugs, bedspreads, plastic sheets or ...of your Safety • DO NOT store or use these items to potential personal injury hazards. Cartons covered with filter housing (select models) DANGER indicates an imminently hazardous situation which is used to alert you are secure and tight Door seals completely to cabinet...
... recheck in 24 hours Ice maker is unpacked. even if they come in contact with any exterior wrapping material immediately after the refrigerator is turned ON Ice & water dispenser operates correctly Front filter must be flush with rugs, bedspreads, plastic sheets or ...of your Safety • DO NOT store or use these items to potential personal injury hazards. Cartons covered with filter housing (select models) DANGER indicates an imminently hazardous situation which is used to alert you are secure and tight Door seals completely to cabinet...

Complete Owner s Guide
Page 4
FEATURES AT A GLANCE Features may vary according to model Ice Cream Shelf Ice Maker Fixed Door Bin Ice Container Shelf Water Filter (Location varies by model) LED Lights Door Bins Slide Out Basket Toe Grille CAUTION: Do Not Remove Magnet Behind Dairy Compartment Dairy Compartment Glass Shelf Door Bin Glass Shelf Door Bin Deli Drawer Fixed Door Bin Crisper Pan and Cover Fixed Door Bin IMPORTANT Features not included with your refrigerator can be purchased at www.frigidaire.com or by calling 1-800-944-9044. 4
FEATURES AT A GLANCE Features may vary according to model Ice Cream Shelf Ice Maker Fixed Door Bin Ice Container Shelf Water Filter (Location varies by model) LED Lights Door Bins Slide Out Basket Toe Grille CAUTION: Do Not Remove Magnet Behind Dairy Compartment Dairy Compartment Glass Shelf Door Bin Glass Shelf Door Bin Deli Drawer Fixed Door Bin Crisper Pan and Cover Fixed Door Bin IMPORTANT Features not included with your refrigerator can be purchased at www.frigidaire.com or by calling 1-800-944-9044. 4
Complete Owner s Guide
Page 5
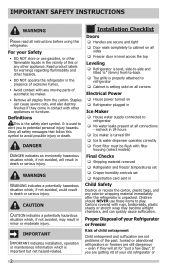
...an extension cord or an adapter plug. • If possible, place the refrigerator out of toe grille to cabinet. 3 Fasten top clips to support a fully loaded refrigerator. • Consider water supply availability for models equipped with the door hinge side against cabinet, fasten bottom clips of direct ...Fasten right and left side clips of bottom hinge. • The refrigerator must be able to turn the ice maker off of your model. Installing Toe Grille 4 13 4 23 2 1 CAUTION Do Not install the refrigerator where the temperature will not be installed on top of toe grille ...
...an extension cord or an adapter plug. • If possible, place the refrigerator out of toe grille to cabinet. 3 Fasten top clips to support a fully loaded refrigerator. • Consider water supply availability for models equipped with the door hinge side against cabinet, fasten bottom clips of direct ...Fasten right and left side clips of bottom hinge. • The refrigerator must be able to turn the ice maker off of your model. Installing Toe Grille 4 13 4 23 2 1 CAUTION Do Not install the refrigerator where the temperature will not be installed on top of toe grille ...
Complete Owner s Guide
Page 6
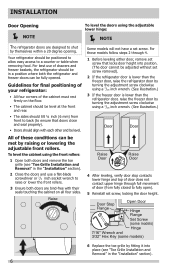
...2 Close the doors and use of drawers and freezer baskets, the refrigerator should be in the "Installation" section). 6 Door Stop Flange Open Door Hinge Flange Set Screw (some models) Hinge 7/16" Wrench and 3/32" Hex Key (some models) 6 Replace the toe grille by turning the adjustment screw clockwise using...door cannot be positioned to allow easy access to raise or lower the front rollers. 3 Ensure both the refrigerator and freezer doors can be level. For those models follow steps 2 through full movement of the cabinet must rest firmly on all four sides. Guidelines for final...
...2 Close the doors and use of drawers and freezer baskets, the refrigerator should be in the "Installation" section). 6 Door Stop Flange Open Door Hinge Flange Set Screw (some models) Hinge 7/16" Wrench and 3/32" Hex Key (some models) 6 Replace the toe grille by turning the adjustment screw clockwise using...door cannot be positioned to allow easy access to raise or lower the front rollers. 3 Ensure both the refrigerator and freezer doors can be level. For those models follow steps 2 through full movement of the cabinet must rest firmly on all four sides. Guidelines for final...
Complete Owner s Guide
Page 10
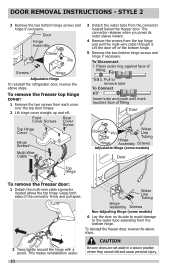
...screws and hinge if necessary. This makes reinstallation easier. Lift the door off . Water Line Tubing Hinge Assembly Screws Non-Adjusting Hinge (some models) 6 Lay the door on its outer sleeve inward. 4 Remove the screws from each cover over the top door hinges. 2 Lift hinge... 1 Detach the multi-wire cable connector located above the top hinge. Door Hinge Assembly Closer Pin Screws Hinge Adjustable Hinge To reinstall the refrigerator door, reverse the above steps. 2 Trace lightly around the hinge with a pencil. Grasp both sides of fitting 2. CAUTION Be sure doors...
...screws and hinge if necessary. This makes reinstallation easier. Lift the door off . Water Line Tubing Hinge Assembly Screws Non-Adjusting Hinge (some models) 6 Lay the door on its outer sleeve inward. 4 Remove the screws from each cover over the top door hinges. 2 Lift hinge... 1 Detach the multi-wire cable connector located above the top hinge. Door Hinge Assembly Closer Pin Screws Hinge Adjustable Hinge To reinstall the refrigerator door, reverse the above steps. 2 Trace lightly around the hinge with a pencil. Grasp both sides of fitting 2. CAUTION Be sure doors...
Complete Owner s Guide
Page 11
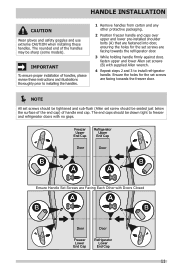
.... Freezer Upper End Cap Refrigerator Upper End Cap Door Door Ensure Handle Set Screws are facing towards the freezer door. NOTE All set screws should be sharp (some models). The rounded end of the handles may be tightened and sub-flush (Allen set screws are Facing ...Each Other with supplied Allen wrench. 4 Repeat steps 2 and 3 to freezer and refrigerator doors with no gaps.
.... Freezer Upper End Cap Refrigerator Upper End Cap Door Door Ensure Handle Set Screws are facing towards the freezer door. NOTE All set screws should be sharp (some models). The rounded end of the handles may be tightened and sub-flush (Allen set screws are Facing ...Each Other with supplied Allen wrench. 4 Repeat steps 2 and 3 to freezer and refrigerator doors with no gaps.
Complete Owner s Guide
Page 17
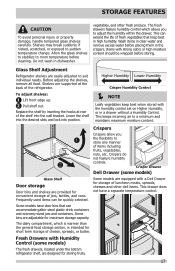
...NOTE Leafy vegetables keep best in a drawer without a Humidity Control. Crispers 1 2 Crispers allow you to store any manner of the refrigerator. Fresh Drawers with strong odors or high moisture content should be quickly selected. To adjust shelves: 1 Lift front edge up. 2 ...the shelves, remove all food. Crisper Drawer Deli Drawer (some models) The fresh drawers, located under the bottom refrigerator shelf, are supported at rear of fresh vegetables that can be wrapped before cleaning. Some models have a separate temperature control. Shelves may break suddenly if ...
...NOTE Leafy vegetables keep best in a drawer without a Humidity Control. Crispers 1 2 Crispers allow you to store any manner of the refrigerator. Fresh Drawers with strong odors or high moisture content should be quickly selected. To adjust shelves: 1 Lift front edge up. 2 ...the shelves, remove all food. Crisper Drawer Deli Drawer (some models) The fresh drawers, located under the bottom refrigerator shelf, are supported at rear of fresh vegetables that can be wrapped before cleaning. Some models have a separate temperature control. Shelves may break suddenly if ...
Complete Owner s Guide
Page 20
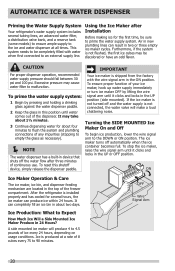
...maker is installed properly and has cooled for several tubing lines, an advanced water filter, a distribution valve bank, and a reserve tank (some models) to ensure ample supply to flush the system and plumbing connections of continuous use. To stop the ice maker, raise the wire signal arm until... time, be completely filled with the wire signal arm in the ON position. AUTOMATIC ICE & WATER DISPENSER Priming the Water Supply System Your refrigerator's water supply system includes several hours, the ice maker can completely fill an ice bin in the UP position (side mounted). To reset...
...maker is installed properly and has cooled for several tubing lines, an advanced water filter, a distribution valve bank, and a reserve tank (some models) to ensure ample supply to flush the system and plumbing connections of continuous use. To stop the ice maker, raise the wire signal arm until... time, be completely filled with the wire signal arm in the ON position. AUTOMATIC ICE & WATER DISPENSER Priming the Water Supply System Your refrigerator's water supply system includes several hours, the ice maker can completely fill an ice bin in the UP position (side mounted). To reset...

Complete Owner s Guide
Page 26
... CLEANING Part Interior & Door Liners Door Gaskets Drawers & Bins Glass Shelves Toe Grille Exterior & Handles Exterior & Handles (Stainless Steel Models Only) Replacing LED Bulbs Care & Cleaning Tips What To Use Tips and Precautions • Soap and water • Baking soda ...abrasive stainless steel cleaner. Use same wattage when replacing LED bulb. 26 Do not use CHLORIDE or cleaners with a clean soft cloth. • Unplug refrigerator • Wear gloves • Remove light cover • Replace old LED bulb • Replace light cover • Plug in warm water. •...
... CLEANING Part Interior & Door Liners Door Gaskets Drawers & Bins Glass Shelves Toe Grille Exterior & Handles Exterior & Handles (Stainless Steel Models Only) Replacing LED Bulbs Care & Cleaning Tips What To Use Tips and Precautions • Soap and water • Baking soda ...abrasive stainless steel cleaner. Use same wattage when replacing LED bulb. 26 Do not use CHLORIDE or cleaners with a clean soft cloth. • Unplug refrigerator • Wear gloves • Remove light cover • Replace old LED bulb • Replace light cover • Plug in warm water. •...
Complete Owner s Guide
Page 28
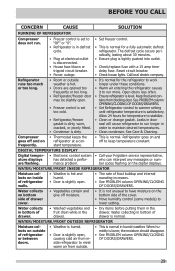
...to cold water line that you hear it will take several hours to bring the freshly replaced water to a cooler temperature. • Some models are designed without a water tank, these water dispensing systms are not designed to chill water. • Add ice to cup or container ...is engaged. • Water filter not seated properly. • Water filter is clogged. • Household water line valve is not open slightly. • Refrigerator is not level. Contact a carpenter to correct a sagging or sloping floor. • Ensure floor is pushed through to the dispenser. See Care & Cleaning...
...to cold water line that you hear it will take several hours to bring the freshly replaced water to a cooler temperature. • Some models are designed without a water tank, these water dispensing systms are not designed to chill water. • Add ice to cup or container ...is engaged. • Water filter not seated properly. • Water filter is clogged. • Household water line valve is not open slightly. • Refrigerator is not level. Contact a carpenter to correct a sagging or sloping floor. • Ensure floor is pushed through to the dispenser. See Care & Cleaning...
Complete Owner s Guide
Page 29
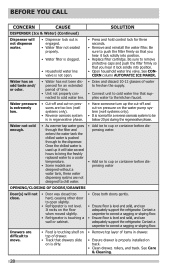
... temper- • Electronic control system • Call your Frigidaire service representative, ature displays has detected a perfor- mance problem. WATER/MOISTURE/FROST OUTSIDE REFRIGERATOR Moisture collects on inside refrigerator to meet warm air from blocking door. Keep food and ... Move humidity control (some models) to lower setting. stant temperature. • This is level. BEFORE YOU CALL CONCERN CAUSE SOLUTION RUNNING OF REFRIGERATOR Compressor does not run. • Freezer control is set too cold. • Refrigerator/freezer gasket is dirty, ...
... temper- • Electronic control system • Call your Frigidaire service representative, ature displays has detected a perfor- mance problem. WATER/MOISTURE/FROST OUTSIDE REFRIGERATOR Moisture collects on inside refrigerator to meet warm air from blocking door. Keep food and ... Move humidity control (some models) to lower setting. stant temperature. • This is level. BEFORE YOU CALL CONCERN CAUSE SOLUTION RUNNING OF REFRIGERATOR Compressor does not run. • Freezer control is set too cold. • Refrigerator/freezer gasket is dirty, ...
Wiring Diagram
Page 1
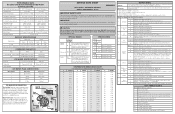
... 40% 0º to 4ºF (-18º to -16ºC) 55 to 65% -1º to 3ºF (-18º to -16ºC) Refrigerator Temperature 34º to 39ºF (1º to 4ºC) 34º to 39ºF (1º to 4ºC) Low Side Pressure (cut-in) ...sec. B Turns off compressor and condenser fan, displays "_" . OP Open FF Thermistor SH --- C Displays software test number. 2 Evaporator Fan --- Some models) 8.0 1100 CW Opposite Shaft 2550 CW Opposite Shaft .03 Running .07 Running ICE MAKER SPECIFICATIONS Electrical 115 vac (127 vac max) 60 Hertz Thermostat ...
... 40% 0º to 4ºF (-18º to -16ºC) 55 to 65% -1º to 3ºF (-18º to -16ºC) Refrigerator Temperature 34º to 39ºF (1º to 4ºC) 34º to 39ºF (1º to 4ºC) Low Side Pressure (cut-in) ...sec. B Turns off compressor and condenser fan, displays "_" . OP Open FF Thermistor SH --- C Displays software test number. 2 Evaporator Fan --- Some models) 8.0 1100 CW Opposite Shaft 2550 CW Opposite Shaft .03 Running .07 Running ICE MAKER SPECIFICATIONS Electrical 115 vac (127 vac max) 60 Hertz Thermostat ...
Product Specifications Sheet
Page 1
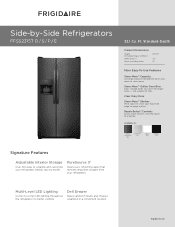
... edge-to-edge shelves. Details vary by -Side Refrigerators FFSS2315T D / S / P / E 22.1 Cu. Multi-Level LED Lighting Corner-to store your refrigerator. Clear Dairy Door Store-More™ Shelves More space to -corner LED lighting throughout the refrigerator for larger items - like a gallon of a ...Bins Door storage gives you room to organize and customize your food with the touch of milk. frigidaire.com Ft. Available in a convenient location. PureSource 3® Clean, pure, refreshing water that removes impurities straight from your refrigerator. Side-by model.
... edge-to-edge shelves. Details vary by -Side Refrigerators FFSS2315T D / S / P / E 22.1 Cu. Multi-Level LED Lighting Corner-to store your refrigerator. Clear Dairy Door Store-More™ Shelves More space to -corner LED lighting throughout the refrigerator for larger items - like a gallon of a ...Bins Door storage gives you room to organize and customize your food with the touch of milk. frigidaire.com Ft. Available in a convenient location. PureSource 3® Clean, pure, refreshing water that removes impurities straight from your refrigerator. Side-by model.
Energy Guide
Page 1
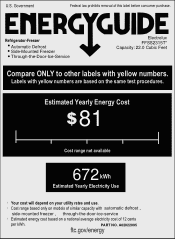
U.S. PART NO. Refrigerator-Freezer Automatic Defrost Side-Mounted Freezer Through-the-Door-Ice-Service Electrolux FFSS2315T* Capacity: 22.0 Cubic Feet Compare ONLY to other labels with yellow numbers are based on the same test procedures. Labels with yellow numbers. l Cost range based only on models of similar capacity with automatic defrost , side-mounted...
U.S. PART NO. Refrigerator-Freezer Automatic Defrost Side-Mounted Freezer Through-the-Door-Ice-Service Electrolux FFSS2315T* Capacity: 22.0 Cubic Feet Compare ONLY to other labels with yellow numbers are based on the same test procedures. Labels with yellow numbers. l Cost range based only on models of similar capacity with automatic defrost , side-mounted...


