
Installation Instructions (All Languages)
Page 1
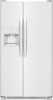
... • For complete access to start with ¼-inch (6.4mm) OD. You may want to drawers and freezer baskets, doors must be part of a builtin kitchen cabinet system. CAUTION Shifting the refrigerator from . from bottom hinge groove Open both doors are provided only as a possible...: 1 With both doors closed to move the refrigerator. • Remove tape from side of bottom hinge. 6 Problems? is available for choosing Frigidaire. 8 Installation Checkoff List Doors Door seals completely to cabinet. If you can register online at the rear of toe grille ...
... • For complete access to start with ¼-inch (6.4mm) OD. You may want to drawers and freezer baskets, doors must be part of a builtin kitchen cabinet system. CAUTION Shifting the refrigerator from . from bottom hinge groove Open both doors are provided only as a possible...: 1 With both doors closed to move the refrigerator. • Remove tape from side of bottom hinge. 6 Problems? is available for choosing Frigidaire. 8 Installation Checkoff List Doors Door seals completely to cabinet. If you can register online at the rear of toe grille ...
Complete Owner s Guide
Page 2
...;" (6mm) front-to-back Toe grille is properly attached to refrigerator Cabinet is important but not hazard-related. Cartons covered with any moving parts of explosive fumes. • Avoid contact with rugs, bedspreads, plastic sheets or stretch wrap may result in Ice Maker House water supply connected to...
...;" (6mm) front-to-back Toe grille is properly attached to refrigerator Cabinet is important but not hazard-related. Cartons covered with any moving parts of explosive fumes. • Avoid contact with rugs, bedspreads, plastic sheets or stretch wrap may result in Ice Maker House water supply connected to...
Complete Owner s Guide
Page 8
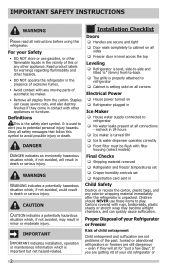
... to reinstall freezer door. Reverse this procedure to avoid kinking water line. 6. STYLE 1 To Remove Freezer Door: 1. Trace around hinge with firm grasp, pull both parts back and forth, then with soft lead pencil. When both temperature controls to realign doors when they are replaced. 5. Turn both doors have been reinstalled...
... to reinstall freezer door. Reverse this procedure to avoid kinking water line. 6. STYLE 1 To Remove Freezer Door: 1. Trace around hinge with firm grasp, pull both parts back and forth, then with soft lead pencil. When both temperature controls to realign doors when they are replaced. 5. Turn both doors have been reinstalled...
Complete Owner s Guide
Page 23
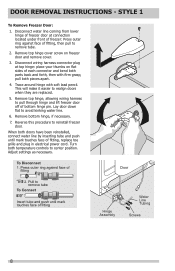
...ensure the highest possible water quality. When the display changes from "Red" to request when ordering: PureSource UltraTM Water Filter Part# ULTRAWF PureSource 3TM Water Filter Part #WF3CB NOTE If your refrigerator, and that may be replaced with a water filtering system. Replacing the Water ... 2 Remove the filter by pushing on the user interface prompts you purchased your replacement filters, please visit our online store at www.frigidaire.com/store, by this water filter are normal. 7 After filling one glass of water released during moving for three seconds. Using ...
...ensure the highest possible water quality. When the display changes from "Red" to request when ordering: PureSource UltraTM Water Filter Part# ULTRAWF PureSource 3TM Water Filter Part #WF3CB NOTE If your refrigerator, and that may be replaced with a water filtering system. Replacing the Water ... 2 Remove the filter by pushing on the user interface prompts you purchased your replacement filters, please visit our online store at www.frigidaire.com/store, by this water filter are normal. 7 After filling one glass of water released during moving for three seconds. Using ...
Complete Owner s Guide
Page 24
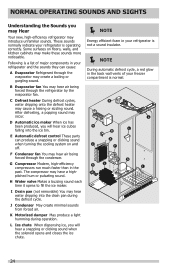
... may introduce unfamiliar sounds. H Water valve Makes a buzzing sound each time it opens to fill the ice maker. Following is normal. E Automatic defrost control These parts can cause: A Evaporator Refrigerant through the evaporator may hear air being forced through the condenser. After defrosting, a popping sound may hear water dripping into the...
... may introduce unfamiliar sounds. H Water valve Makes a buzzing sound each time it opens to fill the ice maker. Following is normal. E Automatic defrost control These parts can cause: A Evaporator Refrigerant through the evaporator may hear air being forced through the condenser. After defrosting, a popping sound may hear water dripping into the...

Complete Owner s Guide
Page 25
...is put back into service. CARE & CLEANING Protecting your investment Keeping your refrigerator clean maintains appearance and prevents odor build-up any removable parts in a dishwasher. • Always unplug the electrical power cord from the wall outlet before cleaning. • Remove adhesive labels by ... sprays, scouring cleansers, brushes, flammable fluids, cleaning waxes, concentrated detergents, bleaches or cleansers containing petroleum products on plastic parts, interior doors, gaskets or cabinet liners. Failure to lights and other sharp instruments which can cause glass breakage.
...is put back into service. CARE & CLEANING Protecting your investment Keeping your refrigerator clean maintains appearance and prevents odor build-up any removable parts in a dishwasher. • Always unplug the electrical power cord from the wall outlet before cleaning. • Remove adhesive labels by ... sprays, scouring cleansers, brushes, flammable fluids, cleaning waxes, concentrated detergents, bleaches or cleansers containing petroleum products on plastic parts, interior doors, gaskets or cabinet liners. Failure to lights and other sharp instruments which can cause glass breakage.

Complete Owner s Guide
Page 26
... bleach to prevent scratching. Always follow manufacturer's instructions. NOTE: Always clean, wipe and dry with the grain to clean stainless steel. CARE & CLEANING Part Interior & Door Liners Door Gaskets Drawers & Bins Glass Shelves Toe Grille Exterior & Handles Exterior & Handles (Stainless Steel Models Only) Replacing LED Bulbs...CAUTION: Wear gloves when replacing LED bulbs to room temperature before cleaning around controls, light bulb or any electrical part. • Soap and water Wipe gaskets with clean water and a soft cloth. Use a non-abrasive stainless steel cleaner.
... bleach to prevent scratching. Always follow manufacturer's instructions. NOTE: Always clean, wipe and dry with the grain to clean stainless steel. CARE & CLEANING Part Interior & Door Liners Door Gaskets Drawers & Bins Glass Shelves Toe Grille Exterior & Handles Exterior & Handles (Stainless Steel Models Only) Replacing LED Bulbs...CAUTION: Wear gloves when replacing LED bulbs to room temperature before cleaning around controls, light bulb or any electrical part. • Soap and water Wipe gaskets with clean water and a soft cloth. Use a non-abrasive stainless steel cleaner.

Complete Owner s Guide
Page 30
... YEAR. In the USA, your appliance is warranted by Electrolux Major Appliances North America, a division of parts other than genuine Electrolux parts or parts obtained from persons other cosmetic parts. 11. Food loss due to repair or replace appliance light bulbs, air filters, water filters, other ...for servicing, such as abuse, misuse, inadequate power supply, accidents, fires, or acts of the unit. 4. USA 1.800.944.9044 Frigidaire 10200 David Taylor Drive Charlotte, NC 28262 Canada 1.800.265.8352 Electrolux Canada Corp. 5855 Terry Fox Way Mississauga, Ontario, Canada L5V ...
... YEAR. In the USA, your appliance is warranted by Electrolux Major Appliances North America, a division of parts other than genuine Electrolux parts or parts obtained from persons other cosmetic parts. 11. Food loss due to repair or replace appliance light bulbs, air filters, water filters, other ...for servicing, such as abuse, misuse, inadequate power supply, accidents, fires, or acts of the unit. 4. USA 1.800.944.9044 Frigidaire 10200 David Taylor Drive Charlotte, NC 28262 Canada 1.800.265.8352 Electrolux Canada Corp. 5855 Terry Fox Way Mississauga, Ontario, Canada L5V ...
Wiring Diagram
Page 1
... secured. Press and hold FRZ UP key for heat or air flow as appropriate to determine results of control and housing assembly part number; Use screwdriver to rotate motor gear counterclockwise until holding switch circuit is 102 to 130cc (3.4 to 4.3 oz.). The correct... any green grounding wires are no errors, displays "-" on single digit and "- -" on compressor and condenser fan, displays "C". CAUTION All electrical parts and wiring must be turned on for 7 minutes. 7 minute countdown is turned off compressor and condenser fan, displays "_" . SPECIAL MODES Display ...
... secured. Press and hold FRZ UP key for heat or air flow as appropriate to determine results of control and housing assembly part number; Use screwdriver to rotate motor gear counterclockwise until holding switch circuit is 102 to 130cc (3.4 to 4.3 oz.). The correct... any green grounding wires are no errors, displays "-" on single digit and "- -" on compressor and condenser fan, displays "C". CAUTION All electrical parts and wiring must be turned on for 7 minutes. 7 minute countdown is turned off compressor and condenser fan, displays "_" . SPECIAL MODES Display ...
Energy Guide
Page 1
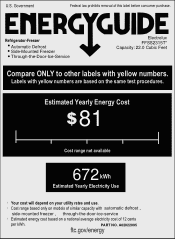
...-the-Door-Ice-Service Electrolux FFSS2315T* Capacity: 22.0 Cubic Feet Compare ONLY to other labels with yellow numbers are based on the same test procedures. PART NO. Government Federal law prohibits removal of 12 cents per kWh. U.S.
...-the-Door-Ice-Service Electrolux FFSS2315T* Capacity: 22.0 Cubic Feet Compare ONLY to other labels with yellow numbers are based on the same test procedures. PART NO. Government Federal law prohibits removal of 12 cents per kWh. U.S.


