
Complete Owners Guide
Page 2
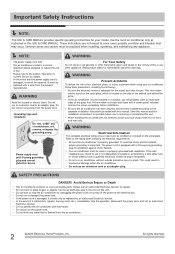
... a current detection device designed to reduce the risk of Current Device' for your new room air conditioner is adequate for possible future use in this or any appliance. In the event of this USE & CARE MANUAL. If the window is important. If the wall receptacle you have a qualified electrician install the proper receptacle...
... a current detection device designed to reduce the risk of Current Device' for your new room air conditioner is adequate for possible future use in this or any appliance. In the event of this USE & CARE MANUAL. If the window is important. If the wall receptacle you have a qualified electrician install the proper receptacle...
Complete Owners Guide
Page 11
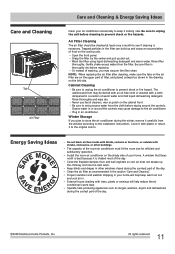
...the unit before replacing Or instead of the day. Plug in or around the controls. All rights reserved. 11 Install the room air conditioner on the left side. Operate heat producing appliances such as recommended in the drawing on the shady side of filter, and placed...Gently shake excess water from the window according to the installation instructions. Cover it with shrubs, enclosures, or other windows closed during the winter, remove it looking new. A window that faces north is shaded most of washing, you plan to store the air conditioner during the sunniest part of the...
...the unit before replacing Or instead of the day. Plug in or around the controls. All rights reserved. 11 Install the room air conditioner on the left side. Operate heat producing appliances such as recommended in the drawing on the shady side of filter, and placed...Gently shake excess water from the window according to the installation instructions. Cover it with shrubs, enclosures, or other windows closed during the winter, remove it looking new. A window that faces north is shaded most of washing, you plan to store the air conditioner during the sunniest part of the...
Complete Owners Guide
Page 12
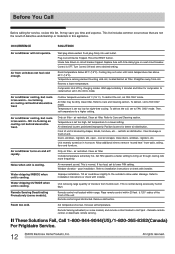
... section. Unit recently turned on some models). Tilt air conditioner slightly to the outside to a lower temperature. Remove obstruction. If These Solutions Fail, Call 1-800-944-9044(US)/1-800-265-8352(Canada) For Frigidaire Service. 12 2009 Electrolux Home Products, Inc. It...cold enough. open - Close doors, windows, registers, etc. air restricted. Window vibration - Air from humid room. Water dripping OUTSIDE when unit is cooling. To defrost the coil, set temperature. Air filter may be dirty. cool air escapes. Clean air filter. Unit removing large quantity of ...
... section. Unit recently turned on some models). Tilt air conditioner slightly to the outside to a lower temperature. Remove obstruction. If These Solutions Fail, Call 1-800-944-9044(US)/1-800-265-8352(Canada) For Frigidaire Service. 12 2009 Electrolux Home Products, Inc. It...cold enough. open - Close doors, windows, registers, etc. air restricted. Window vibration - Air from humid room. Water dripping OUTSIDE when unit is cooling. To defrost the coil, set temperature. Air filter may be dirty. cool air escapes. Clean air filter. Unit removing large quantity of ...
Installation Instructions
Page 1
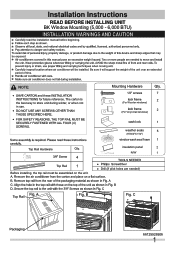
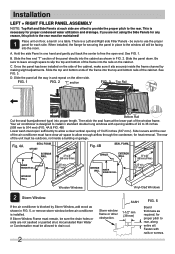
be exposed: Carefully inspect location where air conditioner will support the weight of the unit over an extended period of time. Be sure it will be assembled on the unit. B Fig. NOTE: ... when not in use. Top Rail Hardware Qty. 4 Top Rail 1 Before installing, the top rail must be installed. Mounting Hardware (For Wooden windows) (For Vinyl-Clad windows) Qty. 7 2 2 1 weather seals 5 window sash seal foam 1 insulation panel 2 1 2 3 4 5 1 2 3 4 5 6 7 8 9 10 11 12 ruler 1 Drill (If pilot holes are needed) Top Rail Fig. C 1 66129926906 Installation ...
be exposed: Carefully inspect location where air conditioner will support the weight of the unit over an extended period of time. Be sure it will be assembled on the unit. B Fig. NOTE: ... when not in use. Top Rail Hardware Qty. 4 Top Rail 1 Before installing, the top rail must be installed. Mounting Hardware (For Wooden windows) (For Vinyl-Clad windows) Qty. 7 2 2 1 weather seals 5 window sash seal foam 1 insulation panel 2 1 2 3 4 5 1 2 3 4 5 6 7 8 9 10 11 12 ruler 1 Drill (If pilot holes are needed) Top Rail Fig. C 1 66129926906 Installation ...
Installation Instructions
Page 2
... or a table. Be sure to leave enough space to use the proper panel for securing the panel in FIG. 5, or remove storm window before air conditioner is installed. Then stick the seal foam at each side. Accumulated Rain Water or Condensation must be sure the drain holes or slots are ..." to 36" (558 mm to 914mm) 13.25" min (337 mm) Wooden Windows INNER WINDOW SILL 22" to 36" (558 mm to 914mm) 13.25" min (337 mm) Vinyl-Clad Windows Storm Window: If the air conditioner is designed to allow enough airflow through the condenser, for proper condensed water utilization and...
... or a table. Be sure to leave enough space to use the proper panel for securing the panel in FIG. 5, or remove storm window before air conditioner is installed. Then stick the seal foam at each side. Accumulated Rain Water or Condensation must be sure the drain holes or slots are ..." to 36" (558 mm to 914mm) 13.25" min (337 mm) Wooden Windows INNER WINDOW SILL 22" to 36" (558 mm to 914mm) 13.25" min (337 mm) Vinyl-Clad Windows Storm Window: If the air conditioner is designed to allow enough airflow through the condenser, for proper condensed water utilization and...

Installation Instructions
Page 3
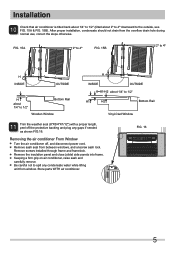
... the top rail of the air conditioner frame is against the window frame (FIG. 7A for wooden windows), (FIG. 7B for Vinyl-Clad windows). FIG. 7A FIG. 7B window frame Place the frame lock between the frame extensions and the window sill as shown (FIG. 8A for wooden windows), (FIG. 8B for Vinyl-Clad windows). FIG. 6A FIG. 6B...
... the top rail of the air conditioner frame is against the window frame (FIG. 7A for wooden windows), (FIG. 7B for Vinyl-Clad windows). FIG. 7A FIG. 7B window frame Place the frame lock between the frame extensions and the window sill as shown (FIG. 8A for wooden windows), (FIG. 8B for Vinyl-Clad windows). FIG. 6A FIG. 6B...
Installation Instructions
Page 5
.... 15B). Remove screws installed through frame and framelock. After proper installation, condensate should not drain from between windows, and unscrew sash lock. Keeping a firm grip on air conditioner, raise sash and carefully remove. Store parts WITH air conditioner. FIG. 16 5 Remove the insulation panel and close (slide) side panels into frame. Be careful not to...
.... 15B). Remove screws installed through frame and framelock. After proper installation, condensate should not drain from between windows, and unscrew sash lock. Keeping a firm grip on air conditioner, raise sash and carefully remove. Store parts WITH air conditioner. FIG. 16 5 Remove the insulation panel and close (slide) side panels into frame. Be careful not to...


