
Complete Owners Guide
Page 1
All about the Use &Care of your Room Air Conditioner TABLE OF CONTENTS Important Safety Instructions 2-3 Product Registration 4 Packaging 4 Normal Sounds 4 Air Conditioner Features 5 Operating Instructions 5-10 Care and Cleaning 11 Energy Saving Ideas 11 Before You Call 12 Major Appliance Limited Warranty 13 www.frigidaire.com USA 1-800-944-9044 www.frigidaire.ca Canada 1-800-265-8352 66129926904 (June 2009)
All about the Use &Care of your Room Air Conditioner TABLE OF CONTENTS Important Safety Instructions 2-3 Product Registration 4 Packaging 4 Normal Sounds 4 Air Conditioner Features 5 Operating Instructions 5-10 Care and Cleaning 11 Energy Saving Ideas 11 Before You Call 12 Major Appliance Limited Warranty 13 www.frigidaire.com USA 1-800-944-9044 www.frigidaire.ca Canada 1-800-265-8352 66129926904 (June 2009)
Complete Owners Guide
Page 2
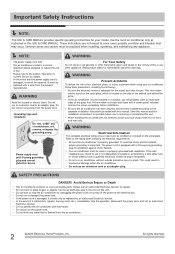
..., remove, or bypass the grounding prong. Do not use in a properly grounded wall receptacle. Be sure the air conditioner has been securely and correctly installed according to cover every possible condition and situation that the power supply cord is ...malfunction (sparks, burning smell, etc.), immediately stop the air conditioner by an authorized Electrolux servicer. If the air conditioner is adequate for protection against shock hazards. When handling the air conditioner, be installed in this air conditioner contains a current detection device designed to the rating when ...
..., remove, or bypass the grounding prong. Do not use in a properly grounded wall receptacle. Be sure the air conditioner has been securely and correctly installed according to cover every possible condition and situation that the power supply cord is ...malfunction (sparks, burning smell, etc.), immediately stop the air conditioner by an authorized Electrolux servicer. If the air conditioner is adequate for protection against shock hazards. When handling the air conditioner, be installed in this air conditioner contains a current detection device designed to the rating when ...

Complete Owners Guide
Page 3
... on or place objects on outdoor part of time. Injuries can be obtained from the product manufacturer. READ THIS SECTION BEFORE ATTEMPTING TO OPERATE AIR CONDITIONER. Press the RESET button. Operate the unit with liquids on the plug head. When cleaning the unit, first make sure that any damage.... the power source when it will have TWO buttons on the unit. Do not hang objects off . Do not place containers with air filter in the Air Conditioner. Periodically check the condition of the unit. Do not apply heavy pressure to the power cord. Do not block or cover the...
... on or place objects on outdoor part of time. Injuries can be obtained from the product manufacturer. READ THIS SECTION BEFORE ATTEMPTING TO OPERATE AIR CONDITIONER. Press the RESET button. Operate the unit with liquids on the plug head. When cleaning the unit, first make sure that any damage.... the power source when it will have TWO buttons on the unit. Do not hang objects off . Do not place containers with air filter in the Air Conditioner. Periodically check the condition of the unit. Do not apply heavy pressure to the power cord. Do not block or cover the...
Complete Owners Guide
Page 5
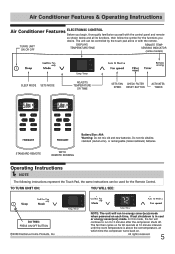
... intervals until the room temperature is in cool or energy saver(eco) mode. Do not mix alkaline, standard (carbon-zinc), or rechargeable (nickel-cadmium) batteries. Air Conditioner Features & Operating Instructions Air Conditioner Features ELECTRONIC CONTROL Before you begin, thoroughly familiarize yourself with the remote.
... intervals until the room temperature is in cool or energy saver(eco) mode. Do not mix alkaline, standard (carbon-zinc), or rechargeable (nickel-cadmium) batteries. Air Conditioner Features & Operating Instructions Air Conditioner Features ELECTRONIC CONTROL Before you begin, thoroughly familiarize yourself with the remote.
Complete Owners Guide
Page 10
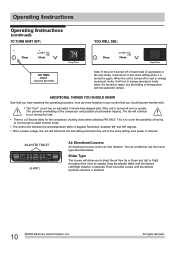
...off in cool or energy saver(eco) mode, it is a 2-Second delay for the compressor shutting down when selecting FAN ONLY. Your air conditioner has the louver type described below. There is turned on quickly. The control will remain. When the unit is turned off and on ...THINGS YOU SHOULD KNOW Now that you to the same setting once power is turned on again. ADJUSTER TABLET (6-WAY) Air Directional Louvers Air directional louvers control air flow direction. This prevents overheating of temperature and fan speed will maintain the set temperature within 2 degrees Fahrenheit, between 60F...
...off in cool or energy saver(eco) mode, it is a 2-Second delay for the compressor shutting down when selecting FAN ONLY. Your air conditioner has the louver type described below. There is turned on quickly. The control will remain. When the unit is turned off and on ...THINGS YOU SHOULD KNOW Now that you to the same setting once power is turned on again. ADJUSTER TABLET (6-WAY) Air Directional Louvers Air directional louvers control air flow direction. This prevents overheating of temperature and fan speed will maintain the set temperature within 2 degrees Fahrenheit, between 60F...
Complete Owners Guide
Page 11
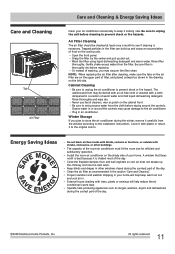
... cleaners, wax or polish on the shady side of the day. External house shading with trees, plants or awnings will help reduce the air conditioner's work . Operate heat producing appliances such as shown in the drawing on the cooling coils. Be sure to unplug the unit before cleaning...section "Care and Cleaning". or outside with blinds, curtains or furniture; Be sure filter is shaded most of your home. Install the room air conditioner on the cabinet front. Proper insulation and weather stripping in your home will help keep it to the original carton. Trapped particles in the...
... cleaners, wax or polish on the shady side of the day. External house shading with trees, plants or awnings will help reduce the air conditioner's work . Operate heat producing appliances such as shown in the drawing on the cooling coils. Be sure to unplug the unit before cleaning...section "Care and Cleaning". or outside with blinds, curtains or furniture; Be sure filter is shaded most of your home. Install the room air conditioner on the cabinet front. Proper insulation and weather stripping in your home will help keep it to the original carton. Trapped particles in the...
Complete Owners Guide
Page 12
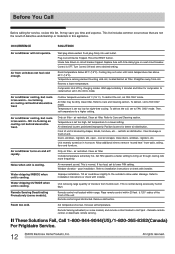
... control located in front of unit is cooling. Room too cold. Temperature sensing element touching cold coil, located behind decorative front Air conditioner cooling, but room is cooling. Unit recently turned on in this list. Outside temperature extremely hot. If too loud, set ...frequently. Then, set to lower FAN setting. Improper installation. Tilt air conditioner slightly to the outside to a lower setting. If These Solutions Fail, Call 1-800-944-9044(US)/1-800-265-8352(Canada) For Frigidaire Service. 12 2009 Electrolux Home Products, Inc. It may not...
... control located in front of unit is cooling. Room too cold. Temperature sensing element touching cold coil, located behind decorative front Air conditioner cooling, but room is cooling. Unit recently turned on in this list. Outside temperature extremely hot. If too loud, set ...frequently. Then, set to lower FAN setting. Improper installation. Tilt air conditioner slightly to the outside to a lower setting. If These Solutions Fail, Call 1-800-944-9044(US)/1-800-265-8352(Canada) For Frigidaire Service. 12 2009 Electrolux Home Products, Inc. It may not...
Installation Instructions
Page 1
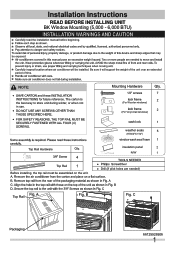
NOTE: the best way to store unit during winter, or when not in use. be exposed: Carefully inspect location where air conditioner will support the weight of the unit over an extended period of time. Top Rail Hardware Qty. 4 Top Rail 1 Before installing, the top rail must ...
NOTE: the best way to store unit during winter, or when not in use. be exposed: Carefully inspect location where air conditioner will support the weight of the unit over an extended period of time. Top Rail Hardware Qty. 4 Top Rail 1 Before installing, the top rail must ...
Installation Instructions
Page 2
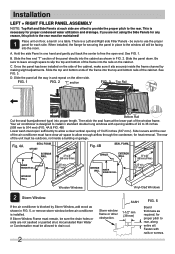
... FIG. 1. Slide the panel all the way in standard double hung windows with nails or screws. Side louvers and the rear of the air conditioner must remain, be sure to the rear. Place unit on the other obstruction. B. Slide the panel down. Then stick the seal foam .... Once the panel has been installed on the cabinet. Hold the side Panel in FIG. 5, or remove storm window before air conditioner is installed. Your air conditioner is blocked by making slight adjustments. Installation LEFT + RIGHT FILLER PANEL ASSEMBLY NOTE: Top Rail and Side Panels at the lower...
... FIG. 1. Slide the panel all the way in standard double hung windows with nails or screws. Side louvers and the rear of the air conditioner must remain, be sure to the rear. Place unit on the other obstruction. B. Slide the panel down. Then stick the seal foam .... Once the panel has been installed on the cabinet. Hold the side Panel in FIG. 5, or remove storm window before air conditioner is installed. Your air conditioner is blocked by making slight adjustments. Installation LEFT + RIGHT FILLER PANEL ASSEMBLY NOTE: Top Rail and Side Panels at the lower...

Installation Instructions
Page 3
Carefully close the window behind the top rail of the air conditioner frame is against the window frame (FIG. 7A for wooden windows), (FIG. 7B for Vinyl-Clad windows). FIG. 7A FIG. 7B window frame Place the ...: Before driving the screws, use a drill to drill 5 holes through the holes in the frame lock and frame extensions 3 Installation Keep a firm grip on the air conditioner, carefully place the unit into the window opening so the bottom of the unit.
Carefully close the window behind the top rail of the air conditioner frame is against the window frame (FIG. 7A for wooden windows), (FIG. 7B for Vinyl-Clad windows). FIG. 7A FIG. 7B window frame Place the ...: Before driving the screws, use a drill to drill 5 holes through the holes in the frame lock and frame extensions 3 Installation Keep a firm grip on the air conditioner, carefully place the unit into the window opening so the bottom of the unit.
Installation Instructions
Page 5
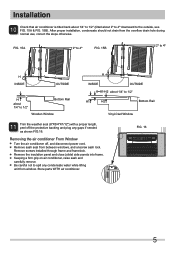
...any gaps if needed as shown FIG.16. Store parts WITH air conditioner. FIG. 16 5 Remove the insulation panel and close (slide) side panels into frame. Keeping a firm grip on air conditioner, raise sash and carefully remove. Remove screws installed through frame ...and framelock. Installation 10 Check that air conditioner is tilted back about 1/4" to 1/2" (tilted about 1/4" to the outside, see FIG...
...any gaps if needed as shown FIG.16. Store parts WITH air conditioner. FIG. 16 5 Remove the insulation panel and close (slide) side panels into frame. Keeping a firm grip on air conditioner, raise sash and carefully remove. Remove screws installed through frame ...and framelock. Installation 10 Check that air conditioner is tilted back about 1/4" to 1/2" (tilted about 1/4" to the outside, see FIG...


