
Installation Instructions (All Languages)
Page 1
To level cabinet or change door height: 1. Top Hinge Cover OR Top Hinge Top Hinge Cover Top Hinge Bottom Water Tube Wood Shim Pin Center Hinge 9 √ See "Normal Operating Sights & Sounds" in the Use & Care Manual so you understand the sounds you may vary per model.) WATER SUPPLY Connect water supply - IF YOU ARE DISSATISFIED WITH THE INSTALLATION, PLEASE CALL THE STORE YOU PURCHASED IT FROM. Toe Grille NOTE Adjustable Front Roller (some models) Raise the front of your refrigerator must rest firmly on a solid floor. q L K e äáåÉ t...
To level cabinet or change door height: 1. Top Hinge Cover OR Top Hinge Top Hinge Cover Top Hinge Bottom Water Tube Wood Shim Pin Center Hinge 9 √ See "Normal Operating Sights & Sounds" in the Use & Care Manual so you understand the sounds you may vary per model.) WATER SUPPLY Connect water supply - IF YOU ARE DISSATISFIED WITH THE INSTALLATION, PLEASE CALL THE STORE YOU PURCHASED IT FROM. Toe Grille NOTE Adjustable Front Roller (some models) Raise the front of your refrigerator must rest firmly on a solid floor. q L K e äáåÉ t...
Complete Owner's Guide (English)
Page 1
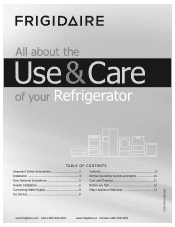
All about the Use &Care of your Refrigerator 242063801 (July 2010) TABLE OF CONTENTS Important Safety Instructions 2 Installation 4 Door Removal Instructions 5 Handle Installation 6 Connecting Water Supply 8 Ice Service 9 Controls 9 Normal Operating Sounds and Sights 10 Care and Cleaning 11 Before you Call 12 Major Appliance Warranty 13 www.frigidaire.com USA 1-800-944-9044 www.frigidaire.ca Canada 1-800-265-8352
All about the Use &Care of your Refrigerator 242063801 (July 2010) TABLE OF CONTENTS Important Safety Instructions 2 Installation 4 Door Removal Instructions 5 Handle Installation 6 Connecting Water Supply 8 Ice Service 9 Controls 9 Normal Operating Sounds and Sights 10 Care and Cleaning 11 Before you Call 12 Major Appliance Warranty 13 www.frigidaire.com USA 1-800-944-9044 www.frigidaire.ca Canada 1-800-265-8352
Complete Owner's Guide (English)
Page 2
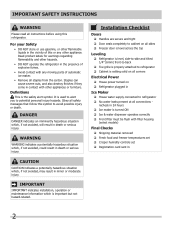
WARNING WARNING indicates a potentially hazardous situation which , if not avoided, will result in death or serious injury. For your Safety • DO NOT store or use gasoline, or other flammable liquids in death or serious injury. Definitions This is used to alert you to avoid possible injury or death. It is the safety alert symbol. Important Safety Instructions WARNING Please read all instructions before using this or any moving parts of explosive fumes. • Avoid contact with other appliances or furniture. DANGER DANGER indicates an imminently hazardous situation ...
WARNING WARNING indicates a potentially hazardous situation which , if not avoided, will result in death or serious injury. For your Safety • DO NOT store or use gasoline, or other flammable liquids in death or serious injury. Definitions This is used to alert you to avoid possible injury or death. It is the safety alert symbol. Important Safety Instructions WARNING Please read all instructions before using this or any moving parts of explosive fumes. • Avoid contact with other appliances or furniture. DANGER DANGER indicates an imminently hazardous situation ...
Complete Owner's Guide (English)
Page 3
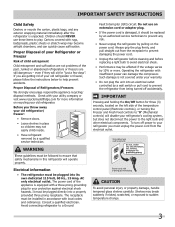
Junked or abandoned refrigerators or freezers are getting rid of Refrigerators/Freezers We strongly encourage responsible appliance recycling/ disposal methods. Before you throw away your old refrigerator/ freezer: • Remove doors. • Leave shelves in place so children may break suddenly if nicked, scratched, or exposed to sudden temperature change. 3 Consult a qualified electrician. Always grip the plug firmly, and pull straight out from the receptacle to prevent damaging the power cord. • Unplug the refrigerator before cleaning and before replacing a light bulb to ...
Junked or abandoned refrigerators or freezers are getting rid of Refrigerators/Freezers We strongly encourage responsible appliance recycling/ disposal methods. Before you throw away your old refrigerator/ freezer: • Remove doors. • Leave shelves in place so children may break suddenly if nicked, scratched, or exposed to sudden temperature change. 3 Consult a qualified electrician. Always grip the plug firmly, and pull straight out from the receptacle to prevent damaging the power cord. • Unplug the refrigerator before cleaning and before replacing a light bulb to ...
Complete Owner's Guide (English)
Page 4
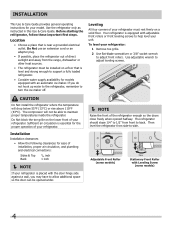
Use the refrigerator only as instructed in this Use & Care Guide. Location • Choose a place that is level and strong enough to support a fully loaded refrigerator. • Consider water supply availability for models equipped with the door hinge side against a wall, you do not hook up water to the refrigerator, remember to help level your refrigerator. Your refrigerator is near a grounded electrical outlet. Use adjustable wrench to -side. CAUTION Do Not install the refrigerator where the temperature will not be able to back. Do Not block the toe grille on the lower front of ...
Use the refrigerator only as instructed in this Use & Care Guide. Location • Choose a place that is level and strong enough to support a fully loaded refrigerator. • Consider water supply availability for models equipped with the door hinge side against a wall, you do not hook up water to the refrigerator, remember to help level your refrigerator. Your refrigerator is near a grounded electrical outlet. Use adjustable wrench to -side. CAUTION Do Not install the refrigerator where the temperature will not be able to back. Do Not block the toe grille on the lower front of ...

Complete Owner's Guide (English)
Page 5
Trace around the hinge with adjustable wrench. 14 Remove cabinet and hinge hole plugs and move to the other hole in hinge and tighten with the two screws removed from step 7. 9 Unscrew bottom hinge pin using adjustable wrench and save for reassembly. Remove top hinge and lift door off of refrigerator, remove inside screw and loosening two outside screws enough to allow hinge and shim to opposite side. Tighten screws. 6 Loosen two outside screws on opposite side of bottom hinge and set aside. 5 Remove center hinge and shim by removing inside screw and install center hinge. 7 ...
Trace around the hinge with adjustable wrench. 14 Remove cabinet and hinge hole plugs and move to the other hole in hinge and tighten with the two screws removed from step 7. 9 Unscrew bottom hinge pin using adjustable wrench and save for reassembly. Remove top hinge and lift door off of refrigerator, remove inside screw and loosening two outside screws enough to allow hinge and shim to opposite side. Tighten screws. 6 Loosen two outside screws on opposite side of bottom hinge and set aside. 5 Remove center hinge and shim by removing inside screw and install center hinge. 7 ...

Complete Owner's Guide (English)
Page 6
The rounded end of door. Follow instructions in the Use & Care Guide to installing the handles. Do not tighten the set screw yet. 2 Install the two (2) screws into the top of the handle. 3 Tighten the set screw on the rounded part of door. IMPORTANT To ensure proper installation of the handle until the handle is correct. Your model will have either a right hand or left hand door swing. Do not tighten the set screw yet. 2 Install the two (2) screws into the bottom of the handle. 3 Tighten the set screw on the rounded part of handles, please review these handles. Handle ...
The rounded end of door. Follow instructions in the Use & Care Guide to installing the handles. Do not tighten the set screw yet. 2 Install the two (2) screws into the top of the handle. 3 Tighten the set screw on the rounded part of door. IMPORTANT To ensure proper installation of the handle until the handle is correct. Your model will have either a right hand or left hand door swing. Do not tighten the set screw yet. 2 Install the two (2) screws into the bottom of the handle. 3 Tighten the set screw on the rounded part of handles, please review these handles. Handle ...
Complete Owner's Guide (English)
Page 7
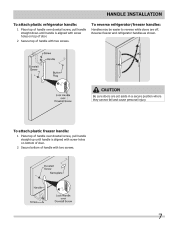
Handle installation To attach plastic refrigerator handle: 1 Place top of handle over dovetail screw, pull handle straight up until handle is aligned with screw holes on top of door. 2 Secure top of handle with two screws. To attach plastic freezer handle: 1 Place top of handle over dovetail screw, pull handle straight down until handle is aligned with screw holes on bottom of door. 2 Secure bottom of handle with two screws. 7 Reverse freezer and refrigerator handles as shown. CAUTION Be sure doors are off. To reverse refrigerator/freezer handles: Handles may be easier to...
Handle installation To attach plastic refrigerator handle: 1 Place top of handle over dovetail screw, pull handle straight up until handle is aligned with screw holes on top of door. 2 Secure top of handle with two screws. To attach plastic freezer handle: 1 Place top of handle over dovetail screw, pull handle straight down until handle is aligned with screw holes on bottom of door. 2 Secure bottom of handle with two screws. 7 Reverse freezer and refrigerator handles as shown. CAUTION Be sure doors are off. To reverse refrigerator/freezer handles: Handles may be easier to...
Complete Owner's Guide (English)
Page 8
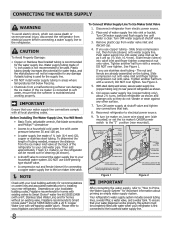
..." for important information about 2½ turns, behind refrigerator as shown). • A shutoff valve to connect the water supply line to www.frigidaire.com/store for any other surface. 7. Push water supply line into water valve inlet as far as shown. 6. Tighten another half turn with...water® line kit 5305510264 (with self-tapping saddle valve). Place end of the refrigerator to installing your local/state building codes, Frigidaire recommends for connecting a copper water supply line to the ice maker inlet valve. NOTE Check with water when your cold water...
..." for important information about 2½ turns, behind refrigerator as shown). • A shutoff valve to connect the water supply line to www.frigidaire.com/store for any other surface. 7. Push water supply line into water valve inlet as far as shown. 6. Tighten another half turn with...water® line kit 5305510264 (with self-tapping saddle valve). Place end of the refrigerator to installing your local/state building codes, Frigidaire recommends for connecting a copper water supply line to the ice maker inlet valve. NOTE Check with water when your cold water...

Complete Owner's Guide (English)
Page 9
Place the ice container under the ice maker, pushing it as far back as needed. NOTE Automatic ice makers are also optional accessories that may cause the first production of ice cubes to Normal. If the ice maker is not turned off and the water supply is not connected, the water valve will change only the freezer temperature. Cool Down Period To ensure safe food storage, allow the refrigerator to operate with the doors closed for at any time. For example, if the refrigerator control is shipped from the factory with the wire signal arm in both compartments. To turn ...
Place the ice container under the ice maker, pushing it as far back as needed. NOTE Automatic ice makers are also optional accessories that may cause the first production of ice cubes to Normal. If the ice maker is not turned off and the water supply is not connected, the water valve will change only the freezer temperature. Cool Down Period To ensure safe food storage, allow the refrigerator to operate with the doors closed for at any time. For example, if the refrigerator control is shipped from the factory with the wire signal arm in both compartments. To turn ...
Complete Owner's Guide (English)
Page 10
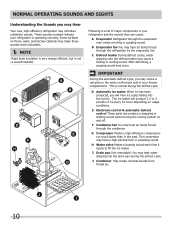
Following is not a sound insulator. After defrosting, a popping sound may cause a hissing or sizzling sound. D Automatic ice maker When ice has been produced, you will produce 2.5 to fill the ice maker. G Compressor Modern, high-efficiency compressors run much faster than in the vents on the back wall of ice every 24 hours depending on floors, walls, and kitchen cabinets may hear air being forced through the refrigerator by the evaporator fan. C Defrost heater During defrost cycles, water dripping onto the defrost heater may occur. This is operating correctly. The ice maker ...
Following is not a sound insulator. After defrosting, a popping sound may cause a hissing or sizzling sound. D Automatic ice maker When ice has been produced, you will produce 2.5 to fill the ice maker. G Compressor Modern, high-efficiency compressors run much faster than in the vents on the back wall of ice every 24 hours depending on floors, walls, and kitchen cabinets may hear air being forced through the refrigerator by the evaporator fan. C Defrost heater During defrost cycles, water dripping onto the defrost heater may occur. This is operating correctly. The ice maker ...

Complete Owner's Guide (English)
Page 11
Do not use household cleaners containing ammonia or bleach. Do not use CHLORIDE or cleaners with bleach to move it from the wall outlet before cleaning. • Remove adhesive labels by hand. Soap and water Use a soft cloth to avoid getting cut. Do not use razor blades or other sharp instruments which can be sure to completely drain the water supply system. Unplug refrigerator Wear gloves Remove light cover Replace old bulb Replace light cover Plug in the refrigerator CAUTION: Wear gloves when replacing light bulbs to clean drawer runners and tracks. Shifting...
Do not use household cleaners containing ammonia or bleach. Do not use CHLORIDE or cleaners with bleach to move it from the wall outlet before cleaning. • Remove adhesive labels by hand. Soap and water Use a soft cloth to avoid getting cut. Do not use razor blades or other sharp instruments which can be sure to completely drain the water supply system. Unplug refrigerator Wear gloves Remove light cover Replace old bulb Replace light cover Plug in the refrigerator CAUTION: Wear gloves when replacing light bulbs to clean drawer runners and tracks. Shifting...
Complete Owner's Guide (English)
Page 12
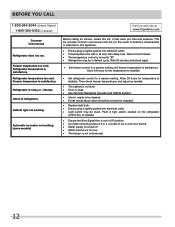
... Wire Signal Arm is not in refrigerator. Before You Call 1-800-944-9044 (United States) 1-800-265-8352 (Canada) Visit our web site at www.frigidaire.com. Reset circuit breaker. • The temperature control is not cold enough. 12 Odors in UP position. • Ice maker should be covered or wrapped...
... Wire Signal Arm is not in refrigerator. Before You Call 1-800-944-9044 (United States) 1-800-265-8352 (Canada) Visit our web site at www.frigidaire.com. Reset circuit breaker. • The temperature control is not cold enough. 12 Odors in UP position. • Ice maker should be covered or wrapped...

Complete Owner's Guide (English)
Page 13
Product that prove to establish the warranty period should service be readily determined. 2. Service calls to correct the installation of your appliance or to instruct you Need Service Keep your receipt, delivery slip, or some other than in materials or workmanship, or for servicing, such as abuse, misuse, inadequate power supply, accidents, fires, or acts of Alaska. 12. use of parts other than genuine Electrolux parts or parts obtained from persons other appropriate payment record to be defective in materials or workmanship when such appliance is installed, used and ...
Product that prove to establish the warranty period should service be readily determined. 2. Service calls to correct the installation of your appliance or to instruct you Need Service Keep your receipt, delivery slip, or some other than in materials or workmanship, or for servicing, such as abuse, misuse, inadequate power supply, accidents, fires, or acts of Alaska. 12. use of parts other than genuine Electrolux parts or parts obtained from persons other appropriate payment record to be defective in materials or workmanship when such appliance is installed, used and ...
