
Complete Owner's Guide (English)
Page 1
All about the Use &Care of your Refrigerator 242063800 (November 2009) TABLE OF CONTENTS Important Safety Instructions 2 Installation 4 Door Removal Instructions 5 Handle Installation 6 Connecting Water Supply 8 Ice Service 9 Controls 9 Normal Operating Sounds and Sights 10 Care and Cleaning 11 Before you Call 12 Major Appliance Warranty 13 www.frigidaire.com USA 1-800-944-9044 www.frigidaire.ca Canada 1-800-265-8352
All about the Use &Care of your Refrigerator 242063800 (November 2009) TABLE OF CONTENTS Important Safety Instructions 2 Installation 4 Door Removal Instructions 5 Handle Installation 6 Connecting Water Supply 8 Ice Service 9 Controls 9 Normal Operating Sounds and Sights 10 Care and Cleaning 11 Before you Call 12 Major Appliance Warranty 13 www.frigidaire.com USA 1-800-944-9044 www.frigidaire.ca Canada 1-800-265-8352

Complete Owner's Guide (English)
Page 2
Installation Checklist Doors Handles are secure and tight Door seals completely to cabinet on all sides Freezer door is level across the top Leveling Refrigerator is level, side-to-side and tilted 1/4" (6mm) front-to-back Toe grille is properly attached ...
Installation Checklist Doors Handles are secure and tight Door seals completely to cabinet on all sides Freezer door is level across the top Leveling Refrigerator is level, side-to-side and tilted 1/4" (6mm) front-to-back Toe grille is properly attached ...

Complete Owner's Guide (English)
Page 3
... 115 Volt, 60 Hz., 15 Amp, AC only electrical outlet. CAUTION To avoid personal injury or property damage, handle tempered glass shelves carefully. Junked or abandoned refrigerators or freezers are not problems of the temperature control panel (Electronic controls... controls) will operate properly. Avoid connecting refrigerator to your refrigerator you throw away your old refrigerator/ freezer: • Remove doors. • Leave shelves in accordance with local codes and ordinances. Operating the refrigerator with insufficient power can quickly cause suffocation....
... 115 Volt, 60 Hz., 15 Amp, AC only electrical outlet. CAUTION To avoid personal injury or property damage, handle tempered glass shelves carefully. Junked or abandoned refrigerators or freezers are not problems of the temperature control panel (Electronic controls... controls) will operate properly. Avoid connecting refrigerator to your refrigerator you throw away your old refrigerator/ freezer: • Remove doors. • Leave shelves in accordance with local codes and ordinances. Operating the refrigerator with insufficient power can quickly cause suffocation....
Complete Owner's Guide (English)
Page 5
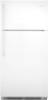
... enough to allow hinge and shim to the other. Ensure plastic washer stays on hinge pin. 4 Lift refrigerator door off center hinge pin. Door Removal Instructions Top Hinge Cover Front Screw Top Hinge Cover Rear Screw Tools Necessary: Top Hinge Screw Bottom Hinge Screw...direction in hinge and tighten with adjustable wrench. 10 Reverse door handles (see instruction on next page). 11 Move freezer and refrigerator door stops to opposite side. Move hinge pin to other hole in which your refrigerator doors open (door swing) can be performed by removing inside screw and install...
... enough to allow hinge and shim to the other. Ensure plastic washer stays on hinge pin. 4 Lift refrigerator door off center hinge pin. Door Removal Instructions Top Hinge Cover Front Screw Top Hinge Cover Rear Screw Tools Necessary: Top Hinge Screw Bottom Hinge Screw...direction in hinge and tighten with adjustable wrench. 10 Reverse door handles (see instruction on next page). 11 Move freezer and refrigerator door stops to opposite side. Move hinge pin to other hole in which your refrigerator doors open (door swing) can be performed by removing inside screw and install...

Complete Owner's Guide (English)
Page 6
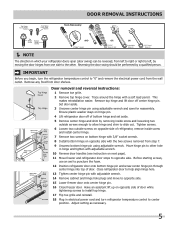
Additionally, before installing the door handles, make sure the door swing is flush with the door, then tighten another 1/2 turn . Follow instructions in the Use & Care Guide to installing the handles. Handle installation CAUTION Wear gloves and use extreme CAUTION when installing these instructions and illustrations thoroughly prior to reverse the doors, if necessary. Your model will have...
Additionally, before installing the door handles, make sure the door swing is flush with the door, then tighten another 1/2 turn . Follow instructions in the Use & Care Guide to installing the handles. Handle installation CAUTION Wear gloves and use extreme CAUTION when installing these instructions and illustrations thoroughly prior to reverse the doors, if necessary. Your model will have...
Complete Owner's Guide (English)
Page 7
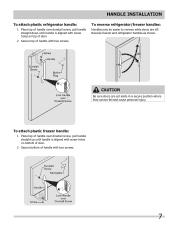
CAUTION Be sure doors are off. To attach plastic freezer handle: 1 Place top of handle over dovetail screw, pull handle straight down until handle is aligned with screw holes on bottom of door. 2 Secure bottom of handle with two screws. 7 Handle installation To attach plastic refrigerator handle: 1 Place top of handle over dovetail screw, pull handle straight up until handle is aligned with...
CAUTION Be sure doors are off. To attach plastic freezer handle: 1 Place top of handle over dovetail screw, pull handle straight down until handle is aligned with screw holes on bottom of door. 2 Secure bottom of handle with two screws. 7 Handle installation To attach plastic refrigerator handle: 1 Place top of handle over dovetail screw, pull handle straight up until handle is aligned with...

Complete Owner's Guide (English)
Page 11
...with clean water and a soft cloth. Part Interior & Door • Liners • Door Gaskets • Drawers & Bins • Glass Shelves • • • Toe Grille • • • Exterior & • Handles • Exterior & • Handles (Stainless Steel • Models Only) Replacing Light •... sponge. Do not use commercial household cleaners containing ammonia, bleach or Non Abrasive Glass Cleaner alcohol to clean handles. Do not use abrasive cleaners such as window sprays, scouring cleansers, brushes, flammable fluids, cleaning waxes, ...
...with clean water and a soft cloth. Part Interior & Door • Liners • Door Gaskets • Drawers & Bins • Glass Shelves • • • Toe Grille • • • Exterior & • Handles • Exterior & • Handles (Stainless Steel • Models Only) Replacing Light •... sponge. Do not use commercial household cleaners containing ammonia, bleach or Non Abrasive Glass Cleaner alcohol to clean handles. Do not use abrasive cleaners such as window sprays, scouring cleansers, brushes, flammable fluids, cleaning waxes, ...

Installation Instructions (All Languages)
Page 1
... - Use adjustable wrench to adjust front rollers. The refrigerator should slope ¼" to ½" from doors only after installation is complete INSTALLATION CHECKOFF LIST Doors Handles are secure and tight Door seals completely to cabinet on all sides Freezer door is level across the top Leveling Refrigerator is level, side to side and tilted 1/4" (6mm...
... - Use adjustable wrench to adjust front rollers. The refrigerator should slope ¼" to ½" from doors only after installation is complete INSTALLATION CHECKOFF LIST Doors Handles are secure and tight Door seals completely to cabinet on all sides Freezer door is level across the top Leveling Refrigerator is level, side to side and tilted 1/4" (6mm...

