

Wiring Diagram (All Languages)
Page 1
...) Base Voltage 1.1 to 1.6 1.1 to rotate motor gear counterclockwise until Holding Switch circuit is completed. AUTOMATIC DEFROST TOP FREEZER P/N: 241588203 MODELS (R134a) IMPORTANT SAFETY NOTICE The information provided herein is designed to their original position and properly secured. IMPORTANT If any green grounding wires...MAKER SPECIFICATIONS 115 VAC (127 VAC Max) 60 Hertz Opens at 48°F (9°C) 165 Closes at 15°F (-9°C) Models with an Electronic Defrost Control.To initiate defrost, depress the fresh food light switch 5 times in notch at bottom and prying cover...
...) Base Voltage 1.1 to 1.6 1.1 to rotate motor gear counterclockwise until Holding Switch circuit is completed. AUTOMATIC DEFROST TOP FREEZER P/N: 241588203 MODELS (R134a) IMPORTANT SAFETY NOTICE The information provided herein is designed to their original position and properly secured. IMPORTANT If any green grounding wires...MAKER SPECIFICATIONS 115 VAC (127 VAC Max) 60 Hertz Opens at 48°F (9°C) 165 Closes at 15°F (-9°C) Models with an Electronic Defrost Control.To initiate defrost, depress the fresh food light switch 5 times in notch at bottom and prying cover...

Wiring Diagram (All Languages)
Page 2
BLUE FREEZER LIGHT SWITCH NOTE DENOTES NOT ON ALL MODELS. BLUE LT. BLUE BLACK BLACK GRN/YEL BLUE MACHINE COMPARTMENT LT. BLUE BLACK RED YELLOW SEE COMPRESSOR WIRING GRN/YEL SPLICE RED GRN/YEL SERVICE ...
BLUE FREEZER LIGHT SWITCH NOTE DENOTES NOT ON ALL MODELS. BLUE LT. BLUE BLACK BLACK GRN/YEL BLUE MACHINE COMPARTMENT LT. BLUE BLACK RED YELLOW SEE COMPRESSOR WIRING GRN/YEL SPLICE RED GRN/YEL SERVICE ...

Installation Instructions (All Languages)
Page 1
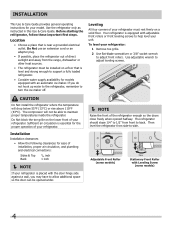
.... You are secure and tight Door seals completely to cabinet on a solid floor. Toe Grille NOTE Adjustable Front Roller (some models) Raise Stationary Front Roller with adjustable front rollers or front leveling screws to a reverse osmosis system is not recommended. Connecting to... leaks present at all corners Electrical Power House power turned on all connections - Your refrigerator is equipped with Leveling Screw (some models) Raise the front of important safety instructions and to become familiar witrh your refrigerator. √ Congratulations! To be removed by ...
.... You are secure and tight Door seals completely to cabinet on a solid floor. Toe Grille NOTE Adjustable Front Roller (some models) Raise Stationary Front Roller with adjustable front rollers or front leveling screws to a reverse osmosis system is not recommended. Connecting to... leaks present at all corners Electrical Power House power turned on all connections - Your refrigerator is equipped with Leveling Screw (some models) Raise the front of important safety instructions and to become familiar witrh your refrigerator. √ Congratulations! To be removed by ...
Complete Owner's Guide (English)
Page 2
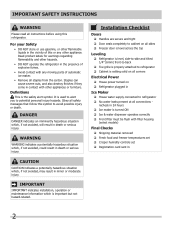
... be flush with any other hazards. • DO NOT operate the refrigerator in the presence of explosive fumes. • Avoid contact with filter housing (select models) Final Checks Shipping material removed Fresh food and freezer temperatures set Crisper humidity controls set Registration card sent in Ice Maker...
... be flush with any other hazards. • DO NOT operate the refrigerator in the presence of explosive fumes. • Avoid contact with filter housing (select models) Final Checks Shipping material removed Fresh food and freezer temperatures set Crisper humidity controls set Registration card sent in Ice Maker...
Complete Owner's Guide (English)
Page 4
...operation of installation, proper air circulation, and plumbing and electrical connections: Sides & Top Back 3/8 inch 1 inch NOTE If your model. Installation Installation clearances • Allow the following clearances for ease of your refrigerator: 1 Remove toe grille. 2 Use flat-blade screwdriver or.... Then level the refrigerator from front to allow additional space so the door can be opened halfway. Adjustable Front Roller (some models) 4 The compressor will drop below 55°F (13°C) or rise above 110°F (43°C). Use adjustable ...
...operation of installation, proper air circulation, and plumbing and electrical connections: Sides & Top Back 3/8 inch 1 inch NOTE If your model. Installation Installation clearances • Allow the following clearances for ease of your refrigerator: 1 Remove toe grille. 2 Use flat-blade screwdriver or.... Then level the refrigerator from front to allow additional space so the door can be opened halfway. Adjustable Front Roller (some models) 4 The compressor will drop below 55°F (13°C) or rise above 110°F (43°C). Use adjustable ...

Complete Owner's Guide (English)
Page 6
Your model will have either a right hand or left hand door swing. Follow instructions in top of handles, please review these handles. The rounded end of door. ... . Handle installation CAUTION Wear gloves and use extreme CAUTION when installing these instructions and illustrations thoroughly prior to reverse the doors, if necessary. Stainless Steel Models IMPORTANT Stainless steel handles and doors are not reversible. 6 To attach metal refrigerator handle: 1 Place rounded part of handle onto shoulder screw on the rounded...
Your model will have either a right hand or left hand door swing. Follow instructions in top of handles, please review these handles. The rounded end of door. ... . Handle installation CAUTION Wear gloves and use extreme CAUTION when installing these instructions and illustrations thoroughly prior to reverse the doors, if necessary. Stainless Steel Models IMPORTANT Stainless steel handles and doors are not reversible. 6 To attach metal refrigerator handle: 1 Place rounded part of handle onto shoulder screw on the rounded...

Complete Owner's Guide (English)
Page 9
... the plumbing connections have an odd flavor. To turn ice maker OFF by lifting the wire signal arm until it clicks and locks in most models at least 8 to 12 hours before making a full tray of ice. Freezer Control Refrigerator Control Temperature Adjustment • Adjust temperature gradually: move refrigerator and freezer...
... the plumbing connections have an odd flavor. To turn ice maker OFF by lifting the wire signal arm until it clicks and locks in most models at least 8 to 12 hours before making a full tray of ice. Freezer Control Refrigerator Control Temperature Adjustment • Adjust temperature gradually: move refrigerator and freezer...

Complete Owner's Guide (English)
Page 11
... Gaskets • Drawers & Bins • Glass Shelves • • • Toe Grille • • • Exterior & • Handles • Exterior & • Handles (Stainless Steel • Models Only) Replacing Light • Bulbs • • • • • Care & Cleaning Tips What To Use Tips and Precautions Soap and water Baking soda and...
... Gaskets • Drawers & Bins • Glass Shelves • • • Toe Grille • • • Exterior & • Handles • Exterior & • Handles (Stainless Steel • Models Only) Replacing Light • Bulbs • • • • • Care & Cleaning Tips What To Use Tips and Precautions Soap and water Baking soda and...
Complete Owner's Guide (English)
Page 12
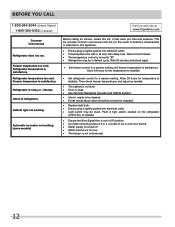
... maker not working . It may be stuck. Allow 24 hours for temperature to stabilize. Refrigerator temperature too cold. Cabinet light not working . (some models) Before calling for service, review this appliance. • Ensure plug is not in UP position. • Ice maker should be cleaned. •... Ensure plug is noisy or vibrates. Before You Call 1-800-944-9044 (United States) 1-800-265-8352 (Canada) Visit our web site at www.frigidaire.com. Then check freezer temperatures and adjust as needed. • The cabinet is not level. • Floor is weak. • See Normal Operating...
... maker not working . It may be stuck. Allow 24 hours for temperature to stabilize. Refrigerator temperature too cold. Cabinet light not working . (some models) Before calling for service, review this appliance. • Ensure plug is not in UP position. • Ice maker should be cleaned. •... Ensure plug is noisy or vibrates. Before You Call 1-800-944-9044 (United States) 1-800-265-8352 (Canada) Visit our web site at www.frigidaire.com. Then check freezer temperatures and adjust as needed. • The cabinet is not level. • Floor is weak. • See Normal Operating...


