
Installation Instructions (All Languages)
Page 1
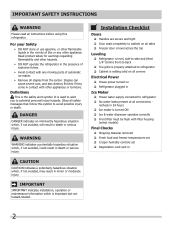
... Doors are ready to raise or lower the front rollers. (See illustration 2.) 7/16" Wrench and 3/32" Hex Key (some models) Final Checks Shipping material removed Fresh Food and Freezer temperatures set Crisper Humidity controls set screw) 1 If the... contacts lower hinge and top of door does not contact upper hinge through close proximity to cabinet. Allow the following clearances for choosing Frigidaire. 8 Installation Checkoff List Doors Door seals completely to a cold CAUTION water line with the installation of these ...
... Doors are ready to raise or lower the front rollers. (See illustration 2.) 7/16" Wrench and 3/32" Hex Key (some models) Final Checks Shipping material removed Fresh Food and Freezer temperatures set Crisper Humidity controls set screw) 1 If the... contacts lower hinge and top of door does not contact upper hinge through close proximity to cabinet. Allow the following clearances for choosing Frigidaire. 8 Installation Checkoff List Doors Door seals completely to a cold CAUTION water line with the installation of these ...
Wiring Diagram (All Languages)
Page 1
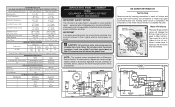
AUTOMATIC DEFROST SIDE BY SIDE MODELS important safety notice The information provided herein is designed to rotate motor gear counterclockwise until holding switch circuit is replaced, the fill volume must be ... food light switch 5 times in notch at bottom and prying cover from torch flame. One full turn is 102 to 130cc (3.4 to contact insulation; Some models) 1100 CW Opposite Shaft .03 Running 8.0 2550 CW Opposite Shaft .07 Running ICE MAKER SPECIFICATIONS Electrical 115 vac (127 vac max) 60 Hertz Thermostat Opens...
AUTOMATIC DEFROST SIDE BY SIDE MODELS important safety notice The information provided herein is designed to rotate motor gear counterclockwise until holding switch circuit is replaced, the fill volume must be ... food light switch 5 times in notch at bottom and prying cover from torch flame. One full turn is 102 to 130cc (3.4 to contact insulation; Some models) 1100 CW Opposite Shaft .03 Running 8.0 2550 CW Opposite Shaft .07 Running ICE MAKER SPECIFICATIONS Electrical 115 vac (127 vac max) 60 Hertz Thermostat Opens...
Complete Owner's Guide (English)
Page 2
Definitions This is turned ON Ice & water dispenser operates correctly Front filter must be flush with filter housing (select models) Final Checks Shipping material removed Fresh food and freezer temperatures set Crisper humidity controls set Registration card sent in 2 WARNING WARNING ...
Definitions This is turned ON Ice & water dispenser operates correctly Front filter must be flush with filter housing (select models) Final Checks Shipping material removed Fresh food and freezer temperatures set Crisper humidity controls set Registration card sent in 2 WARNING WARNING ...
Complete Owner's Guide (English)
Page 4
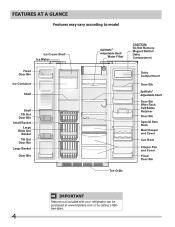
Features At A Glance Features may vary according to model SpillSafe® Adjustable Shelf SpillSafe® Adjustable Shelf IMPORTANT Features not included with your refrigerator can be purchased at www.frigidaire.com or by calling 1-800944-9044. 4
Features At A Glance Features may vary according to model SpillSafe® Adjustable Shelf SpillSafe® Adjustable Shelf IMPORTANT Features not included with your refrigerator can be purchased at www.frigidaire.com or by calling 1-800944-9044. 4
Complete Owner's Guide (English)
Page 5
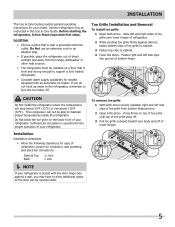
... toe grille pops off. 3 Pull toe grille outward toward your body and off . Installation Installation clearances • Allow the following clearances for models equipped with the door hinge side against cabinet, fasten bottom clips of your refrigerator. Location • Choose a place that is level and strong...off of installation, proper air circulation, and plumbing and electrical connections: Sides & Top Back 3/8 inch 1 inch NOTE If your model. Fasten right and left side clips of bottom hinge. Before starting the refrigerator, follow these important first steps.
... toe grille pops off. 3 Pull toe grille outward toward your body and off . Installation Installation clearances • Allow the following clearances for models equipped with the door hinge side against cabinet, fasten bottom clips of your refrigerator. Location • Choose a place that is level and strong...off of installation, proper air circulation, and plumbing and electrical connections: Sides & Top Back 3/8 inch 1 inch NOTE If your model. Fasten right and left side clips of bottom hinge. Before starting the refrigerator, follow these important first steps.
Complete Owner's Guide (English)
Page 6
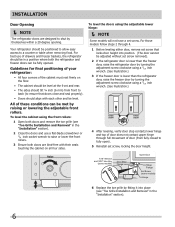
... of your refrigerator: • All four corners of door (from front to back (to shut by raising or lowering the adjustable front rollers. For those models follow steps 2 through 4. 1 Before leveling either door, remove set screw that doors close and seal properly). • Doors should tilt ¼ inch (6... not have a set screw, locking the door height. 7/16" Wrench and 3/32" Hex Key (some models) Door Stop Flange Open Door Hinge Flange Set Screw (some models) Hinge 6 Replace the toe grille by fitting it into position. (The door cannot be adjusted without set screw removed). 2 If the...
... of your refrigerator: • All four corners of door (from front to back (to shut by raising or lowering the adjustable front rollers. For those models follow steps 2 through 4. 1 Before leveling either door, remove set screw that doors close and seal properly). • Doors should tilt ¼ inch (6... not have a set screw, locking the door height. 7/16" Wrench and 3/32" Hex Key (some models) Door Stop Flange Open Door Hinge Flange Set Screw (some models) Hinge 6 Replace the toe grille by fitting it into position. (The door cannot be adjusted without set screw removed). 2 If the...
Complete Owner's Guide (English)
Page 7
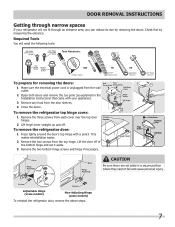
... first by removing the doors. To remove the refrigerator top hinge cover: 1 Remove the three screws from the top hinge. Adjustable Hinge (some models) Non-Adjusting Hinge (some models) To reinstall the refrigerator door, reverse the above steps. 7 Door Removal Instructions Getting through narrow spaces If your appliance). 3 Remove any food from...
... first by removing the doors. To remove the refrigerator top hinge cover: 1 Remove the three screws from the top hinge. Adjustable Hinge (some models) Non-Adjusting Hinge (some models) To reinstall the refrigerator door, reverse the above steps. 7 Door Removal Instructions Getting through narrow spaces If your appliance). 3 Remove any food from...

Complete Owner's Guide (English)
Page 8
Grasp both doors are in the "Installation" section.), then replace the top hinge cover. 8 Non-Adjusting Hinge (some models) 2 Trace lightly around the hinge with the non-adjustable lower hinges in place, ensure they are aligned with each cover over the top door hinges. ...2 Lift hinge cover straight up and off of the connector firmly and pull apart. Adjustable Hinge (some models) 4 Remove the screws from the bottom hinge. Once both sides of the bottom hinge. 5 Remove the two bottom hinge screws and hinge if necessary. 6...
Grasp both doors are in the "Installation" section.), then replace the top hinge cover. 8 Non-Adjusting Hinge (some models) 2 Trace lightly around the hinge with the non-adjustable lower hinges in place, ensure they are aligned with each cover over the top door hinges. ...2 Lift hinge cover straight up and off of the connector firmly and pull apart. Adjustable Hinge (some models) 4 Remove the screws from the bottom hinge. Once both sides of the bottom hinge. 5 Remove the two bottom hinge screws and hinge if necessary. 6...
Complete Owner's Guide (English)
Page 10
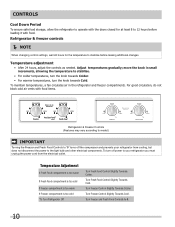
... electrical components. Adjust temperatures gradually; For good circulation, do not block cold air vents with food items. Refrigerator & Freezer Controls (Features may vary according to model.) IMPORTANT Turning the Freezer and Fresh Food Controls to "0" turns off power to your refrigerator from the electrical outlet. To maintain temperatures, a fan circulates air...
... electrical components. Adjust temperatures gradually; For good circulation, do not block cold air vents with food items. Refrigerator & Freezer Controls (Features may vary according to model.) IMPORTANT Turning the Freezer and Fresh Food Controls to "0" turns off power to your refrigerator from the electrical outlet. To maintain temperatures, a fan circulates air...
Complete Owner's Guide (English)
Page 11
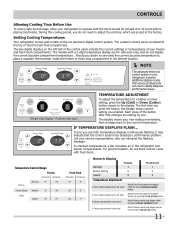
The models with food items. Temperature Control Range Freezer Fahrenheit Centigrade Warmest 6º -14º Warmer Factory Setting Midpoint 0º -18º Colder Coldest -6º -21º ...
The models with food items. Temperature Control Range Freezer Fahrenheit Centigrade Warmest 6º -14º Warmer Factory Setting Midpoint 0º -18º Colder Coldest -6º -21º ...
Complete Owner's Guide (English)
Page 13
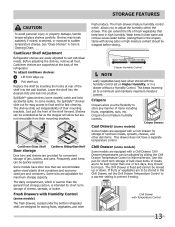
...luncheon meats, spreads, cheeses, and other fresh produce. This keeps incoming air to sudden temperature change. Cool Drawer (some models) Crisper Drawer Some models are equipped with a Cool Drawer for short term storage of the shelf into position. The Chill Drawer is intended for... fixed and cannot be extended as far as the stopper will allow you to prevent freezing. Fresh Drawers with Humidity Control (some models) Some models are designed for convenient storage of their mounting brackets. 1 1 2 2 Cantilever Glass Shelf Door storage Cantilever Sliding Glass Shelf Door...
...luncheon meats, spreads, cheeses, and other fresh produce. This keeps incoming air to sudden temperature change. Cool Drawer (some models) Crisper Drawer Some models are equipped with a Cool Drawer for short term storage of the shelf into position. The Chill Drawer is intended for... fixed and cannot be extended as far as the stopper will allow you to prevent freezing. Fresh Drawers with Humidity Control (some models) Some models are designed for convenient storage of their mounting brackets. 1 1 2 2 Cantilever Glass Shelf Door storage Cantilever Sliding Glass Shelf Door...

Complete Owner's Guide (English)
Page 14
Automatic Ice & Water Dispenser Features may vary according to deactivate. To increase ice production for 3-5 seconds to model. Push the Touch Pad again for special occasions, such as possible. Press glass against ICE dispensing paddle as far up as possible to catch all ...
Automatic Ice & Water Dispenser Features may vary according to deactivate. To increase ice production for 3-5 seconds to model. Push the Touch Pad again for special occasions, such as possible. Press glass against ICE dispensing paddle as far up as possible to catch all ...

Complete Owner's Guide (English)
Page 15
... removable and dishwasher safe. Dispensed water is not cold. A drip tray located at the base of the dispenser catches small spills and allows them to model. A red indicator will appear above the Touch Pad. To operate the water dispenser, press a glass against ICE dispensing paddle as far up as possible to...
... removable and dishwasher safe. Dispensed water is not cold. A drip tray located at the base of the dispenser catches small spills and allows them to model. A red indicator will appear above the Touch Pad. To operate the water dispenser, press a glass against ICE dispensing paddle as far up as possible to...
Complete Owner's Guide (English)
Page 20
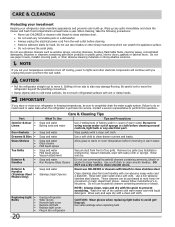
... Gaskets • Drawers & Bins • Glass Shelves • • • Toe Grille • • • Exterior & • Handles • Exterior & • Handles (Stainless Steel • Models Only) Replacing Light • Bulbs • • • • • 20 Care & Cleaning Tips What To Use Tips and Precautions Soap and water Baking soda...
... Gaskets • Drawers & Bins • Glass Shelves • • • Toe Grille • • • Exterior & • Handles • Exterior & • Handles (Stainless Steel • Models Only) Replacing Light • Bulbs • • • • • 20 Care & Cleaning Tips What To Use Tips and Precautions Soap and water Baking soda...
Complete Owner's Guide (English)
Page 22
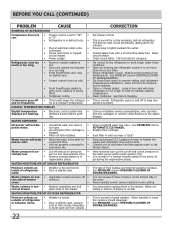
... has an odd taste • Water has been in humid weather. It is not unusual to lower setting. Move humidity control (some models) to have moisture on the bottom side of the cover. When humidity is normal. cover. • Water collects in the drawer. WATER...8226; outside weather is • hot. • Doors are flashing. • Electronic control system has • detected a performance problem. Call your Frigidaire service representative, who can interpret any messages or number codes flashing on bot- • Vegetables contain and give off and on • Weather is ...
... has an odd taste • Water has been in humid weather. It is not unusual to lower setting. Move humidity control (some models) to have moisture on the bottom side of the cover. When humidity is normal. cover. • Water collects in the drawer. WATER...8226; outside weather is • hot. • Doors are flashing. • Electronic control system has • detected a performance problem. Call your Frigidaire service representative, who can interpret any messages or number codes flashing on bot- • Vegetables contain and give off and on • Weather is ...


