
Installation Instructions (All Languages)
Page 1
...of the Guide to learn how to raise or lower the front rollers. (See illustration 2.) 7/16" Wrench and 3/32" Hex Key (some models) Door Stop Flange 3 Ensure both doors. When using the front rollers: 1 With both doors closed to start with each other surfaces. 9 ... power source until water is clear by customer after unit is a list of your refrigerator. construction for contractors. To connect the water supply to the rear of your refrigerator: 1 Ensure that you for choosing Frigidaire. 8 Installation Checkoff List Doors Door seals completely to move it...
...of the Guide to learn how to raise or lower the front rollers. (See illustration 2.) 7/16" Wrench and 3/32" Hex Key (some models) Door Stop Flange 3 Ensure both doors. When using the front rollers: 1 With both doors closed to start with each other surfaces. 9 ... power source until water is clear by customer after unit is a list of your refrigerator. construction for contractors. To connect the water supply to the rear of your refrigerator: 1 Ensure that you for choosing Frigidaire. 8 Installation Checkoff List Doors Door seals completely to move it...
Wiring Diagram (All Languages)
Page 1
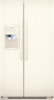
... 55 to 65% Freezer Temperature 0º to 4ºF -18º to -16ºC -1º to 3ºF -18º to -16ºC Refrigerator Temperature 34º to 39ºF 1º to 4ºC 34º to 39ºF 1º to 4ºC Low Side Pressure (cut-in notch ... should function to contact insulation; To initiate defrost, depress the fresh food light switch 5 times in 6 seconds. AUTOMATIC DEFROST SIDE BY SIDE MODELS important safety notice The information provided herein is replaced, the fill volume must be checked. To terminate defrost, depress the fresh food light switch ...
... 55 to 65% Freezer Temperature 0º to 4ºF -18º to -16ºC -1º to 3ºF -18º to -16ºC Refrigerator Temperature 34º to 39ºF 1º to 4ºC 34º to 39ºF 1º to 4ºC Low Side Pressure (cut-in notch ... should function to contact insulation; To initiate defrost, depress the fresh food light switch 5 times in 6 seconds. AUTOMATIC DEFROST SIDE BY SIDE MODELS important safety notice The information provided herein is replaced, the fill volume must be checked. To terminate defrost, depress the fresh food light switch ...
Complete Owner's Guide (English)
Page 2
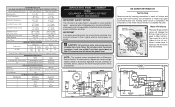
... moderate injury. Installation Checklist Doors Handles are secure and tight Door seals completely to cabinet on Refrigerator plugged in the presence of automatic ice maker. • Remove all instructions before using this symbol to potential personal injury hazards...situation which is turned ON Ice & water dispenser operates correctly Front filter must be flush with filter housing (select models) Final Checks Shipping material removed Fresh food and freezer temperatures set Crisper humidity controls set ...
... moderate injury. Installation Checklist Doors Handles are secure and tight Door seals completely to cabinet on Refrigerator plugged in the presence of automatic ice maker. • Remove all instructions before using this symbol to potential personal injury hazards...situation which is turned ON Ice & water dispenser operates correctly Front filter must be flush with filter housing (select models) Final Checks Shipping material removed Fresh food and freezer temperatures set Crisper humidity controls set ...
Complete Owner's Guide (English)
Page 4
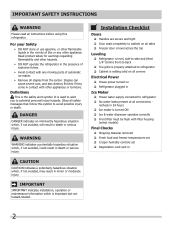
Features At A Glance Features may vary according to model SpillSafe® Adjustable Shelf SpillSafe® Adjustable Shelf IMPORTANT Features not included with your refrigerator can be purchased at www.frigidaire.com or by calling 1-800944-9044. 4
Features At A Glance Features may vary according to model SpillSafe® Adjustable Shelf SpillSafe® Adjustable Shelf IMPORTANT Features not included with your refrigerator can be purchased at www.frigidaire.com or by calling 1-800944-9044. 4
Complete Owner's Guide (English)
Page 5
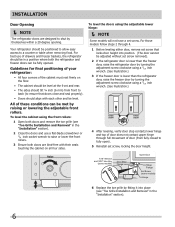
Sufficient air circulation is level and strong enough to support a fully loaded refrigerator. • Consider water supply availability for models equipped with the door hinge side against cabinet, fasten bottom clips of your model. The compressor will drop below 55°F (13°C) or rise above ...110°F (43°C). CAUTION Do Not install the refrigerator where the temperature will not be installed on a floor that...
Sufficient air circulation is level and strong enough to support a fully loaded refrigerator. • Consider water supply availability for models equipped with the door hinge side against cabinet, fasten bottom clips of your model. The compressor will drop below 55°F (13°C) or rise above ...110°F (43°C). CAUTION Do Not install the refrigerator where the temperature will not be installed on a floor that...
Complete Owner's Guide (English)
Page 6
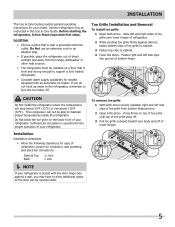
... Flange Open Door Hinge Flange Set Screw (some models) Hinge 6 Replace the toe grille by fitting it into position. (The door cannot be adjusted without set screw removed). 2 If the refrigerator door is lower than the freezer door, raise the refrigerator door by turning the adjustment screw clockwise using ...cabinet on all four sides. To level the doors using the front rollers: 1 Open both the refrigerator and freezer doors can be met by themselves within a 20 degree opening. For those models follow steps 2 through full movement of door (from front to back (to shut by raising ...
... Flange Open Door Hinge Flange Set Screw (some models) Hinge 6 Replace the toe grille by fitting it into position. (The door cannot be adjusted without set screw removed). 2 If the refrigerator door is lower than the freezer door, raise the refrigerator door by turning the adjustment screw clockwise using ...cabinet on all four sides. To level the doors using the front rollers: 1 Open both the refrigerator and freezer doors can be met by themselves within a 20 degree opening. For those models follow steps 2 through full movement of door (from front to back (to shut by raising ...
Complete Owner's Guide (English)
Page 7
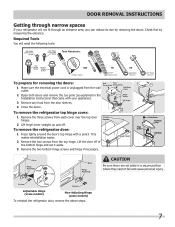
...; Head To prepare for removing the doors: 1 Make sure the electrical power cord is unplugged from the door shelves. 4 Close the doors. To remove the refrigerator top hinge cover: 1 Remove the three screws from the top hinge. Required Tools You will not fit through an entrance area, you can reduce its... outlet. 2 Open both doors and remove the toe grille (as explained in a secure position where they cannot fall and cause personal injury. Adjustable Hinge (some models) Non-Adjusting Hinge (some models) To reinstall the refrigerator door, reverse the above steps. 7
...; Head To prepare for removing the doors: 1 Make sure the electrical power cord is unplugged from the door shelves. 4 Close the doors. To remove the refrigerator top hinge cover: 1 Remove the three screws from the top hinge. Required Tools You will not fit through an entrance area, you can reduce its... outlet. 2 Open both doors and remove the toe grille (as explained in a secure position where they cannot fall and cause personal injury. Adjustable Hinge (some models) Non-Adjusting Hinge (some models) To reinstall the refrigerator door, reverse the above steps. 7
Complete Owner's Guide (English)
Page 10
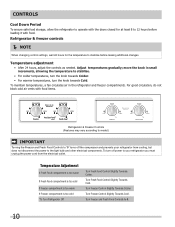
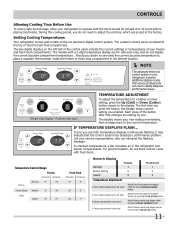
...circulation, do not block cold air vents with food items. Refrigerator & Freezer Controls (Features may vary according to model.) IMPORTANT Turning the Freezer and Fresh Food Controls to "0" turns off power to your refrigerator from the electrical outlet. Turn Fresh Food Control Slightly Towards ... the power to the light bulb and other electrical components. To turn the knob towards Cold. move the knob in the refrigerator and freezer compartments. Temperature adjustment • After 24 hours, adjust the controls as needed. Adjust temperatures gradually; Turn Freezer ...
...circulation, do not block cold air vents with food items. Refrigerator & Freezer Controls (Features may vary according to model.) IMPORTANT Turning the Freezer and Fresh Food Controls to "0" turns off power to your refrigerator from the electrical outlet. Turn Fresh Food Control Slightly Towards ... the power to the light bulb and other electrical components. To turn the knob towards Cold. move the knob in the refrigerator and freezer compartments. Temperature adjustment • After 24 hours, adjust the controls as needed. Adjust temperatures gradually; Turn Freezer ...
Complete Owner's Guide (English)
Page 11
The models with food items. Temperature Control Range Freezer Fahrenheit Centigrade Warmest 6º -14º Warmer Factory Setting Midpoint 0º -18º Colder Coldest -6º -21º ... changes the setting by one degree colder by pressing Down (Colder) button. Controls Allowing Cooling Time Before Use To ensure safe food storage, allow your refrigerator to operate with the doors closed for reference only, and do not need to adjust the controls, which are for at the factory. If ever...
The models with food items. Temperature Control Range Freezer Fahrenheit Centigrade Warmest 6º -14º Warmer Factory Setting Midpoint 0º -18º Colder Coldest -6º -21º ... changes the setting by one degree colder by pressing Down (Colder) button. Controls Allowing Cooling Time Before Use To ensure safe food storage, allow your refrigerator to operate with the doors closed for reference only, and do not need to adjust the controls, which are for at the factory. If ever...
Complete Owner's Guide (English)
Page 13
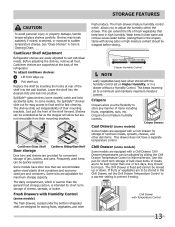
...Lower the shelf into the desired slots and lock into the wall bracket. Some models have a separate temperature control Chill Drawer (some models) The fresh drawers, located under the bottom refrigerator shelf, are provided for fast cleaning. Some bins are adjustable for storage of...their mounting brackets. Crispers do not feature humidity controls. SpillSafeTM glass shelves (some models, the SpillSafeTM shelves slide out for short term storage of the refrigerator. In some models) catch and hold accidental spills. Storage Features CAUTION To avoid personal injury or property...
...Lower the shelf into the desired slots and lock into the wall bracket. Some models have a separate temperature control Chill Drawer (some models) The fresh drawers, located under the bottom refrigerator shelf, are provided for fast cleaning. Some bins are adjustable for storage of...their mounting brackets. Crispers do not feature humidity controls. SpillSafeTM glass shelves (some models, the SpillSafeTM shelves slide out for short term storage of the refrigerator. In some models) catch and hold accidental spills. Storage Features CAUTION To avoid personal injury or property...
Complete Owner's Guide (English)
Page 20
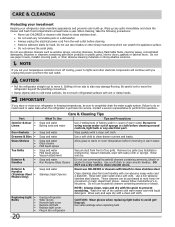
...• • • Toe Grille • • • Exterior & • Handles • Exterior & • Handles (Stainless Steel • Models Only) Replacing Light • Bulbs • • • • • 20 Care & Cleaning Tips What To Use Tips and Precautions Soap and water... clean, wipe and dry with sudsy cloth or sponge. Wipe up . Shifting it . IMPORTANT If you store or move your refrigerator in a dishwasher. • Always unplug the electrical power cord from the wall outlet before cleaning. • Remove adhesive labels by...
...• • • Toe Grille • • • Exterior & • Handles • Exterior & • Handles (Stainless Steel • Models Only) Replacing Light • Bulbs • • • • • 20 Care & Cleaning Tips What To Use Tips and Precautions Soap and water... clean, wipe and dry with sudsy cloth or sponge. Wipe up . Shifting it . IMPORTANT If you store or move your refrigerator in a dishwasher. • Always unplug the electrical power cord from the wall outlet before cleaning. • Remove adhesive labels by...
Complete Owner's Guide (English)
Page 22
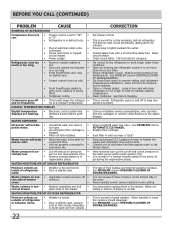
...MAKER. It is not unusual to have moisture on the digital displays. Move humidity control (some models) to • cold water line. Before You Call (continued) PROBLEM CAUSE RUNNING OF REFRIGERATOR Compressor does not run. • Freezer control is set too cold. • • ...will not dis- • Household water line valve is satisfactory. Clean condenser. This is lower, the moisture should disappear. Call your Frigidaire service representative, who can interpret any messages or number codes flashing on the bottom side of water to warmer setting until you hear a...
...MAKER. It is not unusual to have moisture on the digital displays. Move humidity control (some models) to • cold water line. Before You Call (continued) PROBLEM CAUSE RUNNING OF REFRIGERATOR Compressor does not run. • Freezer control is set too cold. • • ...will not dis- • Household water line valve is satisfactory. Clean condenser. This is lower, the moisture should disappear. Call your Frigidaire service representative, who can interpret any messages or number codes flashing on the bottom side of water to warmer setting until you hear a...


