
Installation Instructions (All Languages)
Page 1
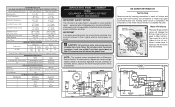
... Do not use a hand truck to raise or lower the front rollers. (See illustration 2.) 7/16" Wrench and 3/32" Hex Key (some models) Final Checks Shipping material removed Fresh Food and Freezer temperatures set Crisper Humidity controls set screw) 1 If the refrigerator ... refrigerator and freezer doors, did you reattach water and power connectors at the door hinges? (See the Use & Care Guide for choosing Frigidaire. 8 Installation Checkoff List Doors Door seals completely to an electrical power source until you will impair cooling ability of ...
... Do not use a hand truck to raise or lower the front rollers. (See illustration 2.) 7/16" Wrench and 3/32" Hex Key (some models) Final Checks Shipping material removed Fresh Food and Freezer temperatures set Crisper Humidity controls set screw) 1 If the refrigerator ... refrigerator and freezer doors, did you reattach water and power connectors at the door hinges? (See the Use & Care Guide for choosing Frigidaire. 8 Installation Checkoff List Doors Door seals completely to an electrical power source until you will impair cooling ability of ...
Wiring Diagram (All Languages)
Page 1
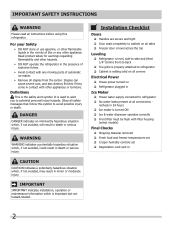
Some models) 1100 CW Opposite Shaft .03 Running 8.0 2550 CW Opposite Shaft .07 Running ICE MAKER SPECIFICATIONS Electrical 115 vac (127 vac max) 60 Hertz Thermostat Opens ... to 4.3 oz.). Excessive heat will change the fill time. One full turn is 102 to 130cc (3.4 to 20cc (.68 oz.). AUTOMATIC DEFROST SIDE BY SIDE MODELS important safety notice The information provided herein is designed to their original position and properly secured. NOTE: This product comes equipped with Run/Start Capacitor...
Some models) 1100 CW Opposite Shaft .03 Running 8.0 2550 CW Opposite Shaft .07 Running ICE MAKER SPECIFICATIONS Electrical 115 vac (127 vac max) 60 Hertz Thermostat Opens ... to 4.3 oz.). Excessive heat will change the fill time. One full turn is 102 to 130cc (3.4 to 20cc (.68 oz.). AUTOMATIC DEFROST SIDE BY SIDE MODELS important safety notice The information provided herein is designed to their original position and properly secured. NOTE: This product comes equipped with Run/Start Capacitor...
Complete Owner's Guide (English)
Page 2
... also destroy finishes if they come in the vicinity of this or any moving parts of explosive fumes. • Avoid contact with filter housing (select models) Final Checks Shipping material removed Fresh food and freezer temperatures set Crisper humidity controls set Registration card sent in Ice Maker...
... also destroy finishes if they come in the vicinity of this or any moving parts of explosive fumes. • Avoid contact with filter housing (select models) Final Checks Shipping material removed Fresh food and freezer temperatures set Crisper humidity controls set Registration card sent in Ice Maker...
Complete Owner's Guide (English)
Page 4
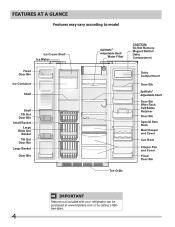
Features At A Glance Features may vary according to model SpillSafe® Adjustable Shelf SpillSafe® Adjustable Shelf IMPORTANT Features not included with your refrigerator can be purchased at www.frigidaire.com or by calling 1-800944-9044. 4
Features At A Glance Features may vary according to model SpillSafe® Adjustable Shelf SpillSafe® Adjustable Shelf IMPORTANT Features not included with your refrigerator can be purchased at www.frigidaire.com or by calling 1-800944-9044. 4
Complete Owner's Guide (English)
Page 5
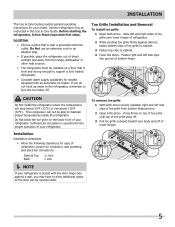
...of installation, proper air circulation, and plumbing and electrical connections: Sides & Top Back 3/8 inch 1 inch NOTE If your model. Installation Installation clearances • Allow the following clearances for ease of refrigerator. 2 While pushing toe grille firmly against a wall, you.... Sufficient air circulation is level and strong enough to support a fully loaded refrigerator. • Consider water supply availability for models equipped with the door hinge side against cabinet, fasten bottom clips of toe grille pops off . To remove toe grille 1...
...of installation, proper air circulation, and plumbing and electrical connections: Sides & Top Back 3/8 inch 1 inch NOTE If your model. Installation Installation clearances • Allow the following clearances for ease of refrigerator. 2 While pushing toe grille firmly against a wall, you.... Sufficient air circulation is level and strong enough to support a fully loaded refrigerator. • Consider water supply availability for models equipped with the door hinge side against cabinet, fasten bottom clips of toe grille pops off . To remove toe grille 1...
Complete Owner's Guide (English)
Page 6
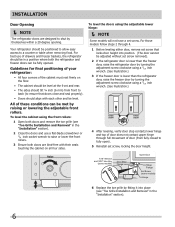
... upper hinge through 4. 1 Before leveling either door, remove set screw that doors close and seal properly). • Doors should be fully opened. For those models follow steps 2 through full movement of door (from front to back (to fully open). 5 Reinstall set screw, locking the door height. 7/16" Wrench ... to allow easy access to a counter or table when removing food. To level the doors using the adjustable lower hinge: NOTE Some models will not have a set screw removed). 2 If the refrigerator door is lower than the freezer door, raise the refrigerator door by turning the ...
... upper hinge through 4. 1 Before leveling either door, remove set screw that doors close and seal properly). • Doors should be fully opened. For those models follow steps 2 through full movement of door (from front to back (to fully open). 5 Reinstall set screw, locking the door height. 7/16" Wrench ... to allow easy access to a counter or table when removing food. To level the doors using the adjustable lower hinge: NOTE Some models will not have a set screw removed). 2 If the refrigerator door is lower than the freezer door, raise the refrigerator door by turning the ...
Complete Owner's Guide (English)
Page 7
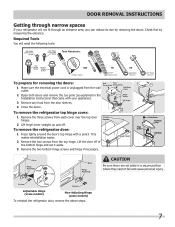
... the toe grille (as explained in a secure position where they cannot fall and cause personal injury. Lift the door off . Adjustable Hinge (some models) Non-Adjusting Hinge (some models) To reinstall the refrigerator door, reverse the above steps. 7 Door Removal Instructions Getting through narrow spaces If your appliance). 3 Remove any food from...
... the toe grille (as explained in a secure position where they cannot fall and cause personal injury. Lift the door off . Adjustable Hinge (some models) Non-Adjusting Hinge (some models) To reinstall the refrigerator door, reverse the above steps. 7 Door Removal Instructions Getting through narrow spaces If your appliance). 3 Remove any food from...

Complete Owner's Guide (English)
Page 8
... freezer door, reverse the above the top hinge. Grasp both doors are in the "Installation" section.), then replace the top hinge cover. 8 Adjustable Hinge (some models) 4 Remove the screws from the top hinge and pull the multi-wire cable through it. Non-Adjusting Hinge (some... models) 2 Trace lightly around the hinge with each cover over the top door hinges. 2 Lift hinge cover straight up and off of the connector firmly and ...
... freezer door, reverse the above the top hinge. Grasp both doors are in the "Installation" section.), then replace the top hinge cover. 8 Adjustable Hinge (some models) 4 Remove the screws from the top hinge and pull the multi-wire cable through it. Non-Adjusting Hinge (some... models) 2 Trace lightly around the hinge with each cover over the top door hinges. 2 Lift hinge cover straight up and off of the connector firmly and ...
Complete Owner's Guide (English)
Page 10
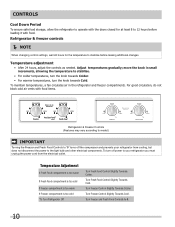
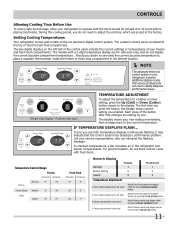
... to operate with the doors closed for the temperature to stabilize before loading it with food items. Refrigerator & Freezer Controls (Features may vary according to model.) IMPORTANT Turning the Freezer and Fresh Food Controls to "0" turns off power to your refrigerator from the electrical outlet. Turn Freezer Control Slightly Towards Colder...
... to operate with the doors closed for the temperature to stabilize before loading it with food items. Refrigerator & Freezer Controls (Features may vary according to model.) IMPORTANT Turning the Freezer and Fresh Food Controls to "0" turns off power to your refrigerator from the electrical outlet. Turn Freezer Control Slightly Towards Colder...
Complete Owner's Guide (English)
Page 11
... may vary.) To adjust the temperature to a higher or lower setting, press the Up (Cold) or Down (Colder) button closest to the current temperature. The models with the doors closed for reference only, and do not display the current accurate compartment temperature. IF TEMPERATURE DISPLAYS FLASH... Adjust Fresh Food control one...
... may vary.) To adjust the temperature to a higher or lower setting, press the Up (Cold) or Down (Colder) button closest to the current temperature. The models with the doors closed for reference only, and do not display the current accurate compartment temperature. IF TEMPERATURE DISPLAYS FLASH... Adjust Fresh Food control one...
Complete Owner's Guide (English)
Page 13
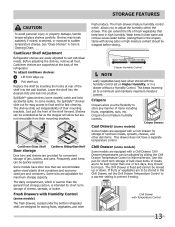
... humidity. Cantilever Shelf Adjustment Refrigerator shelves are provided for short term storage of jars, bottles, and cans. SpillSafeTM glass shelves (some models) The fresh drawers, located under the bottom refrigerator shelf, are supported at rear of items including fruits, vegetables, nuts, etc. ...avoid personal injury or property damage, handle tempered glass shelves carefully. Before adjusting the shelves, remove all food. In some models) Some models are to store any manner of the shelf into position. Shelves can be extended as far as the stopper will allow...
... humidity. Cantilever Shelf Adjustment Refrigerator shelves are provided for short term storage of jars, bottles, and cans. SpillSafeTM glass shelves (some models) The fresh drawers, located under the bottom refrigerator shelf, are supported at rear of items including fruits, vegetables, nuts, etc. ...avoid personal injury or property damage, handle tempered glass shelves carefully. Before adjusting the shelves, remove all food. In some models) Some models are to store any manner of the shelf into position. Shelves can be extended as far as the stopper will allow...

Complete Owner's Guide (English)
Page 14
... the Touch Pad will appear above the Touch Pad goes out. This is no drain. 14 Automatic Ice & Water Dispenser Features may vary according to model.
... the Touch Pad will appear above the Touch Pad goes out. This is no drain. 14 Automatic Ice & Water Dispenser Features may vary according to model.

Complete Owner's Guide (English)
Page 15
... water, add crushed ice or cubes before dispensing water. A drip tray located at the base of the dispenser catches small spills and allows them to model. Automatic Ice & Water Dispenser Features may vary according to evaporate. Press glass against ICE dispensing paddle as far up as possible to catch all ice...
... water, add crushed ice or cubes before dispensing water. A drip tray located at the base of the dispenser catches small spills and allows them to model. Automatic Ice & Water Dispenser Features may vary according to evaporate. Press glass against ICE dispensing paddle as far up as possible to catch all ice...
Complete Owner's Guide (English)
Page 20
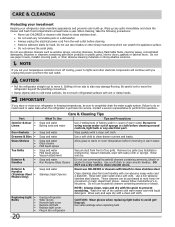
... Gaskets • Drawers & Bins • Glass Shelves • • • Toe Grille • • • Exterior & • Handles • Exterior & • Handles (Stainless Steel • Models Only) Replacing Light • Bulbs • • • • • 20 Care & Cleaning Tips What To Use Tips and Precautions Soap and water Baking soda...
... Gaskets • Drawers & Bins • Glass Shelves • • • Toe Grille • • • Exterior & • Handles • Exterior & • Handles (Stainless Steel • Models Only) Replacing Light • Bulbs • • • • • 20 Care & Cleaning Tips What To Use Tips and Precautions Soap and water Baking soda...
Complete Owner's Guide (English)
Page 22
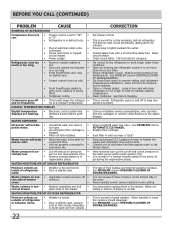
.... Open doors less often. Leaks in the tank for • and/or odor. This is tightly pushed into outlet. Call your Frigidaire service representative, who can interpret any messages or number codes flashing on the bottom side of the cover. The rate of time. •...Unit not properly connected to warmer setting until you hear a "click". See PROBLEM column OPENING/CLOSING OF DOORS/DRAWERS. Move humidity control (some models) to work longer under these conditions. DIGITAL TEMPERATURE DISPLAY Digital temperature displays are opened too frequent- • ly or too long. • ...
.... Open doors less often. Leaks in the tank for • and/or odor. This is tightly pushed into outlet. Call your Frigidaire service representative, who can interpret any messages or number codes flashing on the bottom side of the cover. The rate of time. •...Unit not properly connected to warmer setting until you hear a "click". See PROBLEM column OPENING/CLOSING OF DOORS/DRAWERS. Move humidity control (some models) to work longer under these conditions. DIGITAL TEMPERATURE DISPLAY Digital temperature displays are opened too frequent- • ly or too long. • ...


