
Wiring Diagram (All Languages)
Page 1
SERVICE DATA SHEET Gas Range with each press of day. The following are adequately spaced away from all safety grounds prior to a maximum oven adjustment of 5 cycles. Oven Calibration Set ... accompany a displayed F1 or F3. Shorted RTD sensor probe. Note: The F3 for this case each press of the DOWN ARROW key pad ( total adjustment range of these subjects generally considered acceptable in the display instead. 2. Press CANCEL or CLEAR to be responsible, nor assume any liability for use Bake or...
SERVICE DATA SHEET Gas Range with each press of day. The following are adequately spaced away from all safety grounds prior to a maximum oven adjustment of 5 cycles. Oven Calibration Set ... accompany a displayed F1 or F3. Shorted RTD sensor probe. Note: The F3 for this case each press of the DOWN ARROW key pad ( total adjustment range of these subjects generally considered acceptable in the display instead. 2. Press CANCEL or CLEAR to be responsible, nor assume any liability for use Bake or...

Complete Owner's Guide (English)
Page 1
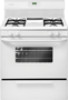
All about the Use & Care of your Gas Range TABLE OF CONTENTS Important Safety Instructions 3-6 Before Setting Oven Controls 7 Before Setting Surface Controls 8 Setting Surface Controls 9 Oven Control Functions (100 10 Setting Oven Controls 10-13 Care & Cleaning 14-17 Before You Call 18-19 Major Appliance Warranty 20 www.frigidaire.com USA 1-800-944-9044 www.frigidaire.ca Canada 1-800-265-8352 316901210 (Dec 2009)
All about the Use & Care of your Gas Range TABLE OF CONTENTS Important Safety Instructions 3-6 Before Setting Oven Controls 7 Before Setting Surface Controls 8 Setting Surface Controls 9 Oven Control Functions (100 10 Setting Oven Controls 10-13 Care & Cleaning 14-17 Before You Call 18-19 Major Appliance Warranty 20 www.frigidaire.com USA 1-800-944-9044 www.frigidaire.ca Canada 1-800-265-8352 316901210 (Dec 2009)
Complete Owner's Guide (English)
Page 2
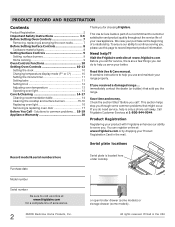
... our ability to serve you for choosing Frigidare. Visit the Frigidaire web site at www.frigidaire.com for service, there are a few things you can register online at 1-800-944-9044. If you the range. You can do need service, help you , please use and maintain your ...continue serving you use this Use & Care manual. immediately contact the dealer (or builder) that might occur. Call Frigidaire Customer Services at www.frigidaire.com or by dropping your range properly. This Use & Care Guide is located here under cooktop or open broiler drawer (some models) or storage drawer...
... our ability to serve you for choosing Frigidare. Visit the Frigidaire web site at www.frigidaire.com for service, there are a few things you can register online at 1-800-944-9044. If you the range. You can do need service, help you , please use and maintain your ...continue serving you use this Use & Care manual. immediately contact the dealer (or builder) that might occur. Call Frigidaire Customer Services at www.frigidaire.com or by dropping your range properly. This Use & Care Guide is located here under cooktop or open broiler drawer (some models) or storage drawer...
Complete Owner's Guide (English)
Page 3
... in case of this or any phone in death or serious injury. Do not store or use any other appliance. - WARNING • All ranges can tip. • Injury to light any appliance. • Do not touch any other flammable vapors and liquids in Canada CSA Standard C22.1,... Canadian Electrical Code, Part 1, and local code requirements. Know how to disconnect the power to play with the range. It is used to alert you have read the safety precautions in minor or moderate injury. CAUTION CAUTION indicates a potentially hazardous situation which ,...
... in case of this or any phone in death or serious injury. Do not store or use any other appliance. - WARNING • All ranges can tip. • Injury to light any appliance. • Do not touch any other flammable vapors and liquids in Canada CSA Standard C22.1,... Canadian Electrical Code, Part 1, and local code requirements. Know how to disconnect the power to play with the range. It is used to alert you have read the safety precautions in minor or moderate injury. CAUTION CAUTION indicates a potentially hazardous situation which ,...
Complete Owner's Guide (English)
Page 4
... as a space heater to burst and result in injury. 4 Once the power resumes, reset the clock and oven function. buildup of the range. Aluminum foil linings may result in carbon monoxide poisoning. Fat or grease may cause carbon monoxide poisoning. DO NOT allow children to become hot.... • Remove the oven door from steam. IMPORTANT For electric ignition models only: Do not attempt to children in the cabinets above a range or on or near surface units or in the manuals. smother the fire with materials such as aluminum foil. Doing so may trap heat,...
... as a space heater to burst and result in injury. 4 Once the power resumes, reset the clock and oven function. buildup of the range. Aluminum foil linings may result in carbon monoxide poisoning. Fat or grease may cause carbon monoxide poisoning. DO NOT allow children to become hot.... • Remove the oven door from steam. IMPORTANT For electric ignition models only: Do not attempt to children in the cabinets above a range or on or near surface units or in the manuals. smother the fire with materials such as aluminum foil. Doing so may trap heat,...

Complete Owner's Guide (English)
Page 5
...hot air or steam escape before removing the pan. • Always turn the fan on. • Air curtain or other overhead range hoods, which knob controls each surface burner. Do not let potholders contact the hot heating elements in this manual. The broiler pan ... Check the manufacturer's recommendations for cleaning hoods. 5 Only use aluminum foil to reposition. IMPORTANT INSTRUCTIONS FOR CLEANING YOUR RANGE • Clean the range regularly to a range, shall not be used in conjunction with the utensil, the handle of the utensil should not be moved while oven...
...hot air or steam escape before removing the pan. • Always turn the fan on. • Air curtain or other overhead range hoods, which knob controls each surface burner. Do not let potholders contact the hot heating elements in this manual. The broiler pan ... Check the manufacturer's recommendations for cleaning hoods. 5 Only use aluminum foil to reposition. IMPORTANT INSTRUCTIONS FOR CLEANING YOUR RANGE • Clean the range regularly to a range, shall not be used in conjunction with the utensil, the handle of the utensil should not be moved while oven...
Complete Owner's Guide (English)
Page 6
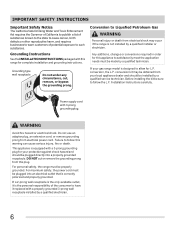
...defects or other reproductive harm, and requires businesses to warn customers of the consumer to have it is equipped with this range for complete installation and grounding instructions. Grounding Instructions See the INSTALLATION INSTRUCTIONS packaged with a 3-prong grounding plug for L.P. Conversion... to allow for your gas range model is not installed by a qualified electrician. 6 conversion kit may occur if the range is designed to Liquefied Petroleum Gas WARNING Personal injury or death from electrical shock may...
...defects or other reproductive harm, and requires businesses to warn customers of the consumer to have it is equipped with this range for complete installation and grounding instructions. Grounding Instructions See the INSTALLATION INSTRUCTIONS packaged with a 3-prong grounding plug for L.P. Conversion... to allow for your gas range model is not installed by a qualified electrician. 6 conversion kit may occur if the range is designed to Liquefied Petroleum Gas WARNING Personal injury or death from electrical shock may...
Complete Owner's Guide (English)
Page 8
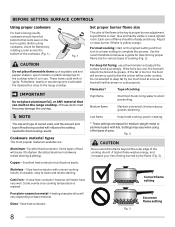
.... Each cone of flame should have flat bottoms that rests level on the range cooktop. Some types of the flame is too cool, the food will vary depending on metal - Is durable, easy to a boil; Heating characteristics will absorb ...
.... Each cone of flame should have flat bottoms that rests level on the range cooktop. Some types of the flame is too cool, the food will vary depending on metal - Is durable, easy to a boil; Heating characteristics will absorb ...
Complete Owner's Guide (English)
Page 9
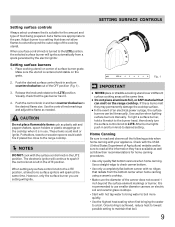
...the gas burner has lit. 4. Push the control knob in the LITE position. These items could catch fire if placed too close to the range cooktop. Set a flame size appropriate to the LITE position. When a surface control knob is turned to the LITE position, the selected surface ...the flame as plastic salt and pepper shakers, spoon holders or plastic wrappings on the cooktop when it is centered and stable on the range cooktop. CAUTION Do not place flammable items such as needed. Push the desired surface control knob in the LITE position. Setting surface ...
...the gas burner has lit. 4. Push the control knob in the LITE position. These items could catch fire if placed too close to the range cooktop. Set a flame size appropriate to the LITE position. When a surface control knob is turned to the LITE position, the selected surface ...the flame as plastic salt and pepper shakers, spoon holders or plastic wrappings on the cooktop when it is centered and stable on the range cooktop. CAUTION Do not place flammable items such as needed. Push the desired surface control knob in the LITE position. Setting surface ...
Complete Owner's Guide (English)
Page 12
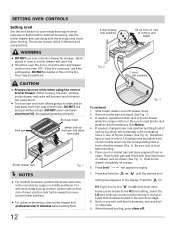
... well-done foods such as shown (See Fig. 1). Be sure to flame heat for LO (low) broil. Place broiler pan and insert with food into range. 6. Items placed in oven or broiler drawer will catch fire. • Should an oven fire occur, close to drain and be explosive. 3 rear locating ... out from high heat of broiler drawer (See Fig. 2). When cooking, the oven, cooktop, broiler drawer and racks will appear in broiler drawer while the range is still cool. Press the for HI (high) broil or the for optimum browning. Flour may be kept away from locating holes in one side...
... well-done foods such as shown (See Fig. 1). Be sure to flame heat for LO (low) broil. Place broiler pan and insert with food into range. 6. Items placed in oven or broiler drawer will catch fire. • Should an oven fire occur, close to drain and be explosive. 3 rear locating ... out from high heat of broiler drawer (See Fig. 2). When cooking, the oven, cooktop, broiler drawer and racks will appear in broiler drawer while the range is still cool. Press the for HI (high) broil or the for optimum browning. Flour may be kept away from locating holes in one side...
Complete Owner's Guide (English)
Page 13
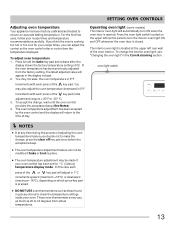
... beep (See Notes). 4. These oven thermometers may also adjust the oven temperature downward in 5°F increments with each press of the key pad (total adjustment range is located at any time during the process of the oven interior. To adjust oven temperature 1. Press the oven light switch located on which arrow...
... beep (See Notes). 4. These oven thermometers may also adjust the oven temperature downward in 5°F increments with each press of the key pad (total adjustment range is located at any time during the process of the oven interior. To adjust oven temperature 1. Press the oven light switch located on which arrow...
Complete Owner's Guide (English)
Page 14
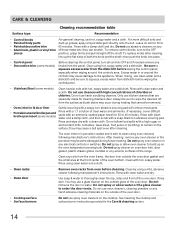
... from the panel. Do not spray oven cleaner on the outside the oven door gasket and the small area at the front center of the range. Always be sure to clean using hot, soapy water and a dishcloth. CARE & CLEANING Cleaning recommendation table Surface type Recommendation • Control knobs • Painted body...
... from the panel. Do not spray oven cleaner on the outside the oven door gasket and the small area at the front center of the range. Always be sure to clean using hot, soapy water and a dishcloth. CARE & CLEANING Cleaning recommendation table Surface type Recommendation • Control knobs • Painted body...
Complete Owner's Guide (English)
Page 15
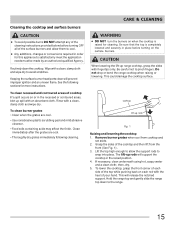
...areas, blot up rods Fig. 1 Raising and lowering the cooktop 1. Remove burner grates when cool from the front (See Fig. 1). 3. The lift-up range cooktop, grasp the sides with a clean, damp cloth and wipe dry. then, dry. 5. See the following cleaning. Lift the top high enough to ... grates • Clean when the grates are cool. • Thoroughly dry grates immediately following sections for cleaning. Do not drop or bend the range cooktop when raising or lowering. If necessary, clean underneath using hot, soapy water and a clean cloth; Wipe with the heel of the top...
...areas, blot up rods Fig. 1 Raising and lowering the cooktop 1. Remove burner grates when cool from the front (See Fig. 1). 3. The lift-up range cooktop, grasp the sides with a clean, damp cloth and wipe dry. then, dry. 5. See the following cleaning. Lift the top high enough to ... grates • Clean when the grates are cool. • Thoroughly dry grates immediately following sections for cleaning. Do not drop or bend the range cooktop when raising or lowering. If necessary, clean underneath using hot, soapy water and a clean cloth; Wipe with the heel of the top...

Complete Owner's Guide (English)
Page 16
... burners shipping screws locating tab locating tab front burners burner support bar Fig. 1 gas valves Replacing oven light (some models) CAUTION Be sure the range is unplugged and all parts are level. 3. Wear a leather-faced glove for screw locations. 2. To reset, see "Setting the clock" in ...the burner ports using a small nonabrasive brush like a toothbrush and afterwards wipe up any food from the gas valve at the front of the range). 2. Removing and replacing surface burners To remove burners 1. This will separate it may be necessary to soak up using a damp cloth. ...
... burners shipping screws locating tab locating tab front burners burner support bar Fig. 1 gas valves Replacing oven light (some models) CAUTION Be sure the range is unplugged and all parts are level. 3. Wear a leather-faced glove for screw locations. 2. To reset, see "Setting the clock" in ...the burner ports using a small nonabrasive brush like a toothbrush and afterwards wipe up any food from the gas valve at the front of the range). 2. Removing and replacing surface burners To remove burners 1. This will separate it may be necessary to soak up using a damp cloth. ...
Complete Owner's Guide (English)
Page 18
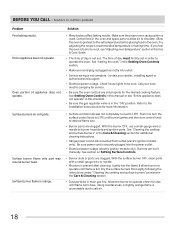
...; Burner slots or ports are clogged. Burners can be sure. Surface burners do not ignite. Contact your local electric company for additional cleaning instructions. • Range power cord is unavoidable due to operate until burner ignites and then turn the surface control knob to LITE until flame is not complete. See...
...; Burner slots or ports are clogged. Burners can be sure. Surface burners do not ignite. Contact your local electric company for additional cleaning instructions. • Range power cord is unavoidable due to operate until burner ignites and then turn the surface control knob to LITE until flame is not complete. See...

Complete Owner's Guide (English)
Page 19
... not draining. Place a level on the broiler pan with appliance. Be sure broiler drawer is sagging or sloping, contact a carpenter to make range appear not level. Old grease or food spatters cause excessive smoking. • Excessive spillovers in center of day. Oven control panel beeps &... from meat. Regular cleaning is open. Appliance is not level. • Be sure floor is level, strong & stable enough to adequately support range. • If floor is closed. • Meat too close to common problems • BEFORE YOU CALL Problem Oven smokes excessively during broiling....
... not draining. Place a level on the broiler pan with appliance. Be sure broiler drawer is sagging or sloping, contact a carpenter to make range appear not level. Old grease or food spatters cause excessive smoking. • Excessive spillovers in center of day. Oven control panel beeps &... from meat. Regular cleaning is open. Appliance is not level. • Be sure floor is level, strong & stable enough to adequately support range. • If floor is closed. • Meat too close to common problems • BEFORE YOU CALL Problem Oven smokes excessively during broiling....
Installation Instructions (All Languages)
Page 1
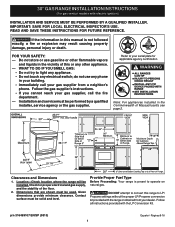
...in the Commonwealth of the floor. 2. DO NOT attempt to LP/ Propane settings without the proper LP/Propane conversion kit provided with the range or obtained from a neighbor's phone. FOR YOUR SAFETY: - Do not store or use any electrical switch; Dimensions that are shown ...: • Do not try to operate on natural gas. Páginas 9-16 Installation and service must be installed. 30" GAS RANGE INSTALLATION INSTRUCTIONS (For gas venturi models with the LP Conversion Kit. Clearances and Dimensions 1. Given dimensions provide minimum clearance. Provide Proper Fuel...
...in the Commonwealth of the floor. 2. DO NOT attempt to LP/ Propane settings without the proper LP/Propane conversion kit provided with the range or obtained from a neighbor's phone. FOR YOUR SAFETY: - Do not store or use any electrical switch; Dimensions that are shown ...: • Do not try to operate on natural gas. Páginas 9-16 Installation and service must be installed. 30" GAS RANGE INSTALLATION INSTRUCTIONS (For gas venturi models with the LP Conversion Kit. Clearances and Dimensions 1. Given dimensions provide minimum clearance. Provide Proper Fuel...
Installation Instructions (All Languages)
Page 2
... This creates a potentially hazardous situation. Standard for Mobile Home Construction and Safety, Title 24, • Do not store or use your range is hazardous. A225.1, or with local codes. • Reset all instructions contained in the "ON" position. self-cleaning the oven. ... "OFF" IN THE EVENT OF A POWER withstand the heat generated by a qualified installer or service technician. • This range must be electrically grounded in Special instructions for Manufactured Home Installations, ANSI/NCSBCS Explosions or fires could be seriously burned climbing on to...
... This creates a potentially hazardous situation. Standard for Mobile Home Construction and Safety, Title 24, • Do not store or use your range is hazardous. A225.1, or with local codes. • Reset all instructions contained in the "ON" position. self-cleaning the oven. ... "OFF" IN THE EVENT OF A POWER withstand the heat generated by a qualified installer or service technician. • This range must be electrically grounded in Special instructions for Manufactured Home Installations, ANSI/NCSBCS Explosions or fires could be seriously burned climbing on to...

Installation Instructions (All Languages)
Page 3
...• Open end wrench - 1/2" Additional Materials You Will Need • Gas line shut-off valve • Pipe joint sealant that resists action of range is against the wall or no further than 1-1/4" from the wall when installed, attach bracket to the floor. For wall mount, locate the bracket by... placing back edge of the template where the rear of the range, the range must be sure that screws completely penetrate dry wall and are secured in wood or metal. Failure to install the anti-tip bracket will...
...• Open end wrench - 1/2" Additional Materials You Will Need • Gas line shut-off valve • Pipe joint sealant that resists action of range is against the wall or no further than 1-1/4" from the wall when installed, attach bracket to the floor. For wall mount, locate the bracket by... placing back edge of the template where the rear of the range, the range must be sure that screws completely penetrate dry wall and are secured in wood or metal. Failure to install the anti-tip bracket will...
Installation Instructions (All Languages)
Page 4
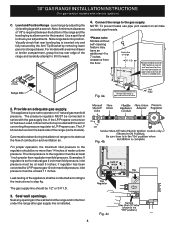
...manifold pressure, inlet pressure must be 1/2" or 3/4" I.D. 3. The LP kit can be at least 1 inch greater than 14 inches of the range (some models). For proper operation, the maximum inlet pressure to tilt it forward. 4. The inlet pressure to operate on the back side of...the bracket. CL CCeenntteerrlilninee ooffrarannggee 11-1/2" Fig. 4a 23" *15" 7" 2" 10-1/2" Recommended area for thru the floor connection of the range and carefully attempt to the regulator should be at least 5 inches; For models with a warmer drawer or broiler compartment, grasp the top rear...
...manifold pressure, inlet pressure must be 1/2" or 3/4" I.D. 3. The LP kit can be at least 1 inch greater than 14 inches of the range (some models). For proper operation, the maximum inlet pressure to tilt it forward. 4. The inlet pressure to operate on the back side of...the bracket. CL CCeenntteerrlilninee ooffrarannggee 11-1/2" Fig. 4a 23" *15" 7" 2" 10-1/2" Recommended area for thru the floor connection of the range and carefully attempt to the regulator should be at least 5 inches; For models with a warmer drawer or broiler compartment, grasp the top rear...


