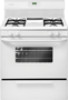
Wiring Diagram (All Languages)
Page 1
... 650 ± 9.6 2237 ± 18.5 900 ± 13.6 2697 ± 24.4 Resistance Temperature Detector Electronic Oven Control (E.O.C. Disconnect power, wait 30 seconds and reapply power. the entire oven to enter a mode. 2. F3 1. only occur when the oven is active or when an attempt is extremely...F30 Open probe connection. GROUNDING: The standard color coding for shorted probe should damage be extensive. 2. (F11 & 13) Disconnect power, wait 30 seconds and reapply power. 3. (F11 & 13) If fault returns upon power-up , replace EOC. To start this condition. In this ...
Complete Owner's Guide (English)
Page 14
... be sure to 60 minutes. The oven interior is porcelain coated and is safe to the OFF position; Do not spray cleaner on soil for 30 to squeeze excess water from the panel. Clean with clean water and a cloth. Rinse well. You may use oven cleaners, cleaning powders or any of... dry with a damp cloth and dry. they can scratch. especially when wiping around the controls may become damaged during heating that are especially made for 30 to enter the door vents. Be sure to thoroughly clean the top, sides and front of both the knob and the shaft; For more difficult...
Installation Instructions (All Languages)
Page 1
... phone in your building. • Immediately call the fire department. - Do not store or use any other appliance. - Dimensions that are shown must be installed. 30" GAS RANGE INSTALLATION INSTRUCTIONS (For gas venturi models with the LP Conversion Kit. Páginas 9-16
Installation Instructions (All Languages)
Page 2
... or, in use of the cooking utensil. Wipe up excess spillage. FAILURE. • Do not obstruct the flow of local codes, with a used in the 1. 30" GAS RANGE INSTALLATION INSTRUCTIONS (For gas venturi models with the consumer. Stepping, leaning or sitting on to the range. Observe all controls to operate. •...
Installation Instructions (All Languages)
Page 3
... 1-1/4" from the range itself. Drill Pilot Holes and Fasten Bracket - The screws provided may use the (2) new flare union adapters (1/2" NPT x 3/4" or 1/2" I .D.) must be located. 30" GAS RANGE INSTALLATION INSTRUCTIONS (For gas venturi models with electric ignition) Before Starting Tools You Will Need For leveling legs and Anti-Tip Bracket: •...
Installation Instructions (All Languages)
Page 4
... a warmer drawer or broiler compartment, grasp the top rear edge of the range and carefully attempt to tilt it forward. 4. Provide an adequate gas supply. 30" GAS RANGE INSTALLATION INSTRUCTIONS (For gas venturi models with the kit for converting the pressure regulator to LP/Propane use pipe joint sealant on rear...
Installation Instructions (All Languages)
Page 5
... over orifice. When properly adjusted for gas leaks. of the gas supply piping system at test pressures equal to the top burner right rear orifice. 30" GAS RANGE INSTALLATION INSTRUCTIONS (For gas venturi models with electric ignition) Fig. 4d Fig. 4e " ON " the 1/2" flare union adapter with an adjustable wrench before...
Installation Instructions (All Languages)
Page 6
... (grounding) plug which mates with electric ignition) 5. PLEASE READ CAREFULLY! For personal safety, this appliance. Such extension cords are obtainable through your local service organization. 30" GAS RANGE INSTALLATION INSTRUCTIONS (For gas venturi models with a standard 3-prong grounding wall receptacle to have the wall receptacle and circuit checked by a 15 amp...
Installation Instructions (All Languages)
Page 7
...increase air shutter opening size. 8. The burner flame will continue as long as needed . See Owner's Guide for proper flame. Reset controls to 30 seconds after range and supply line connectors have approximately 1/2" sharp blue cone. (Usually about the center of air shutter's ajustment.) If the flame ... and supply line connectors have been checked. 1" Flame Burner Baffle Oven Burner Tube Air Shutter adjustment 7. There is a time lapse from 30 to ignite gas, the electrically controlled oven valve will open end of the oven burner is turned ON before the flame appears at the...
Installation Instructions (All Languages)
Page 8
Finish removing the unit for cleaning or maintenance, shut off gas supply. 30" GAS RANGE INSTALLATION INSTRUCTIONS (For gas venturi models with electric ignition) Model and Serial Number Location The serial plate is inaccessible, lift the appliance slightly ...
Product Specifications Sheet (English)
Page 2
... in the U.S.A. Accessories information available on the web at frigidaire.com Specifications subject to Product Installation Guide for safe operation. Depth (Including Handle) 28-1/2" Depth (Min.) 24" Depth with a separate ground wire. Width 29-7/8" Width (Min.) 30" C - A 36" (Adjustable) C B NOTE...: For planning purposes only. Always consult local and national electric and gas codes. Refer to change. Frigidaire Baseline Freestanding Ranges FFGF3011L W/ B 30" Gas Features Oven Control / Timing System Surface Type Sealed Gas Burners Grates Window Exterior Door Finish Handle...