
Installation Instructions (All Languages)
Page 3
... Fig. 11 4A. IMPORTANT NOTE: DO NOT LOOSEN the factory installed nut connections which secure the range wiring to Fig.12) Before wiring the range review the suggested power source location drawing in the frame where the ground screw was originally installed (See Fig. 12). 5. Follow the manufacturer's installation instructions supplied...
... Fig. 11 4A. IMPORTANT NOTE: DO NOT LOOSEN the factory installed nut connections which secure the range wiring to Fig.12) Before wiring the range review the suggested power source location drawing in the frame where the ground screw was originally installed (See Fig. 12). 5. Follow the manufacturer's installation instructions supplied...

Installation Instructions (All Languages)
Page 4
... range by the center, lowest screw (See Fig. 13). The ground strap is connected to the terminal block. follow Steps 1,2 & 5 below . Before wiring the range, review the suggested power source location drawings in Fig. 14). Wire Permanent Connections) Follow the manufacturer's installation instructions supplied with the strain relief and install (Also...
... range by the center, lowest screw (See Fig. 13). The ground strap is connected to the terminal block. follow Steps 1,2 & 5 below . Before wiring the range, review the suggested power source location drawings in Fig. 14). Wire Permanent Connections) Follow the manufacturer's installation instructions supplied with the strain relief and install (Also...
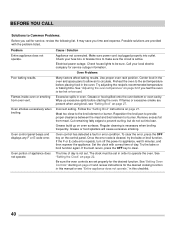
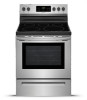
Complete Owner s Guide
Page 40
... . Try adjusting the recipe's recommended temperature or baking time. Excessive spills in this manual or see "Setting Broil" on page 20 and review instructions for the desired function. Wipe up on the control panel. Follow the "Setting Broil" instructions on page 22. Cut remaining fatty edges...error condition. Set the clock with the problem listed. See "Setting the Clock" on page 27. Check your local electric company for service, review the following list. See "Adjusting the oven temperature" on page 32 if you feel the oven is active. Grease or food spilled onto ...
... . Try adjusting the recipe's recommended temperature or baking time. Excessive spills in this manual or see "Setting Broil" on page 20 and review instructions for the desired function. Wipe up on the control panel. Follow the "Setting Broil" instructions on page 22. Cut remaining fatty edges...error condition. Set the clock with the problem listed. See "Setting the Clock" on page 27. Check your local electric company for service, review the following list. See "Adjusting the oven temperature" on page 32 if you feel the oven is active. Grease or food spilled onto ...
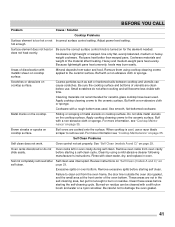
Complete Owner s Guide
Page 41
... and weight of discoloration with time. Mineral deposits from oven cavity before use a razor blade scraper to the ceramic surface. Oven control not set properly. Review instructions on "Self Clean (models A and C)" on cooktop surface. When cooktop is turned on cooktop surface. Be sure the correct surface control knob is cool...
... and weight of discoloration with time. Mineral deposits from oven cavity before use a razor blade scraper to the ceramic surface. Oven control not set properly. Review instructions on "Self Clean (models A and C)" on cooktop surface. When cooktop is turned on cooktop surface. Be sure the correct surface control knob is cool...
